The dashboard allows the driver to monitor the main operating parameters of the car, read the readings of various sensors, indicators and instruments.
Over the past few years, instrument panels have changed from analog to digital, and instrument panel lighting has also changed to make information easier to read and improve overall information content.
For this reason, many drivers are replacing conventional dashboard lighting bulbs with more modern solutions:
- to improve the appearance of the interior;
- in order to improve the quality of information reading.
At the same time, replacing the light bulbs in the dashboard can be done independently on almost any car. Read more in our article.
How to make your own dashboard lighting in a car with LEDs
What car enthusiasts don’t do to make their car more convenient and unusual. Some car owners spend a lot of money on professional dashboard tuning. And some craftsmen prefer to do it themselves. This kind of tuning is quite easy to do. In order to replace conventional light bulbs with light-emitting diodes (LEDs), you do not need to have special knowledge or skills. We’ll tell you how to make LED backlighting for the instrument panel in a car with your own hands.
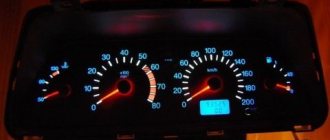
A well-lit dashboard is not only more informative at night, but also has a better view
Simple and fast upgrade
In principle, with your own hands you can either completely replace the instrument panel of a VAZ 2110 or tuning the existing one.
One of the quite popular options is replacing light bulbs with LEDs. Moreover, there is no difficulty in this - you need to remove the light bulbs and insert LEDs in their place.
However, there is one small trick: they work well only if the polarity is observed! If the LED does not light up immediately when connected, you need to remove it, turn it 180 degrees, then reinsert it into the socket.
Even such a simple replacement will increase the brightness of the dashboard, but this is not enough, it is hardly worth completing the tuning with your own hands.
Disassembling the console
Initially, you need to disassemble the dashboard: remove the protective glass, then the arrows, but keep in mind that they are very fragile, and in order not to damage them, it is better to slip thick paper under the screwdriver; it does not require much effort.
And to remove the dashboard backing you will need a knife, with its help you need to cut through the layer of sealant around the entire perimeter.
After removing the “cover”, use a knife to carefully scratch the filter; it is a special paint. Then degrease this area with acetone or alcohol.
Order of Operations
Remove the radio cover using a screwdriver, carefully threading the tool under the socket. First we pull it out from the bottom, then the top part of the lining. The electrical wires leading to the cigarette lighter must be disconnected. Now we find the screws on the dashboard and unscrew them. Remove the handles from the damper sliders and the heater switch by pulling them towards you.
- Now you need to remove the dashboard panel, it is held not only by screws, but also by other fasteners, so first you will have to loosen it a little.
- Now you need to disconnect the wiring from the panel: from the clock, from the alarm, from the headlights and other devices.
On the back surface we find cartridges. It's easier to unscrew them with small pliers. Release the cartridge by turning it counterclockwise. Half a turn is enough. We do the same with the rest of the cartridges - they are all designed the same. We check the lamps with a tester and determine which ones are faulty. Or we change the entire combination, for example, to LEDs. We screw in the light bulbs tightly, remembering that they operate under conditions of vibration and shaking. We install all the cartridges in place. We use pliers again. Turn half clockwise until it stops. Now we connect the panel to the instrument connectors and check the functionality of all the light bulbs: from the ignition to the hazard warning lights. If everything works correctly, we fix the panel and perform the installation in the reverse order, before installing the radio cover.
How to make dashboard arrows backlit
The color of the speedometer and tachometer needles is important. If they are white, then you can leave them as they are. But if not, then you need to remove the old paint with a knife and treat them with alcohol, then paint them with white varnish or regular paint.
The color of the arrow should be white, because only it conveys the entire gamut of LEDs.
You can try and highlight the arrows separately. This requires LEDs with a diameter of 3 mm at 12 V.
Important! In the car network, the voltage is 12 V; if the LEDs are designed for a lower value, then they cannot be connected directly. They should be connected through a stabilizer.
If the diameter of the LEDs is larger, you will have to make additional holes for them.
It is recommended to place LEDs either along the entire scale or opposite those values near which the arrow is most often located.
Do-it-yourself overexposure of buttons on a VAZ 2114
Replacing the standard button backlighting on a VAZ 2114 will require the preparation of certain tools, materials, as well as some time. To work you will need the following list of necessary things:
- soldering iron with a thin tip;
- solder;
- tweezers;
- small knife or flat screwdriver;
- LED elements of the desired color.
Which LEDs and in what quantities should I buy?
The buttons installed on the dashboard of the model in question come in old and new styles. In the first case, small light bulbs or LEDs are used as a backlight element, and in the second, boards with sealed SMD LEDs are used.
Bulbs, LEDs and SMD elements can be used as backlighting elements in buttons.
Each button is equipped with two LED elements: one is responsible for illuminating the button itself, and the second indicates the activation of a particular function. The exception is the low beam headlight button - it does not have a power indicator LED. Therefore, if you plan to replace the LEDs on all five buttons, you will need to purchase 9 backlight elements. The type of the latter can be determined only after disassembling the button. The old model requires 12 V LEDs with a diameter of 3 mm. The new sample uses elements marked 0805. When using standard LEDs, it is recommended to additionally install a resistor with a resistance of 500 Ohms to 1 kOhm along the power circuit (directly in the button), which will prevent the element from burning out.
To prevent the LED from burning out, it is recommended to install a resistor in series
How to remove buttons
To remove the buttons on the front console, do the following:
- Remove the negative terminal from the battery.
- We take out the plug of the on-board computer or the BC itself, if it is installed. To do this, just hook it with your finger and pull it towards you.
- We put our hand into the hole formed and feel the back of the buttons.
- Carefully press the buttons out.
- We remove the blocks with wires.
- Having completed the necessary actions with the buttons, install them in the reverse order.
Replacing the backlight of the front panel buttons
Since replacing LEDs on old and new button versions is somewhat different, each process should be considered separately.
Overexposure of old-style buttons
After removing the buttons from the instrument panel, perform the following sequence of actions:
- Pull the top of the button and remove the lid that is pressed.
- Insert a flathead screwdriver into the button and remove the inner part. You need to remove it carefully so as not to lose the springs.
- Use a multimeter to determine the polarity of the LEDs.
- We bend the leads and dismantle the LED element.
- We bend the leads of the new LEDs and insert them into the button body, observing the polarity, after which we shorten the leads with side cutters to the required length.
- Reassemble the button in reverse order.
Overexposure of new buttons
On modern buttons we change the LEDs this way:
- We disassemble the button, as in the previous paragraph.
- After opening we find a board with installed LEDs. We determine the polarity of the elements and solder them with a soldering iron with a thin tip.
- In their place, we carefully install new SMD LEDs of the desired glow color.
- We reassemble the button.
Video: overexposure of VAZ 2114 buttons
Modernization of the buttons for turning on the headlights and low beam
The buttons for turning on the headlights and low beam headlights are made as a single element. The absence of an LED indicating that the headlights are on low beam causes inconvenience to many motorists. This is due to the fact that it is often unclear whether the headlights work or not. To solve this problem, they resort to modernizing the button. In addition to the tools listed above, you will need a similar button from which the necessary parts will be removed. The finalization process itself consists of the following steps:
- Remove the button from the panel.
- Using a minus screwdriver, we pry up the keys, take them out and see that the LED is initially missing.
- We disassemble the button housing by pressing on the latches with a screwdriver. At this stage the buttons should be in the pressed position.
- We remove a couple of pins and contacts from the spare button, and then install them in the body of the element being modified.
- We take out the board with two LEDs from the spare button and replace it with the board with one LED element.
- Using a soldering iron, we connect the board to the new terminals.
- To supply power to the new contacts, we connect the contacts with copper wire according to the photo.
- Using a sharp knife or screwdriver, make a hole in the button cover.
- We assemble the part in the reverse order and install it in place.
Schemes for smooth switching on of the backlight
To smoothly turn on the backlight of the scale and arrows, you need to spend a little effort, and more specifically, re-solder the circuit.
Below are two diagrams, in the first case - the dashboard, and then - the arrows. The circuits can be implemented on small pieces of a circuit board, which are sold in radio parts stores.
Consider one important factor: if the LEDs differ in power, they will not light up at the same time, some ahead of time, others late, but in general the backlight will turn on smoothly. This also applies to the LEDs on the scale.
Simple option
The most common problem after replacing lamps with LED elements is the divergence of light in “spots”, which is very clearly visible and at the same time such an update does not look very nice.
LED backlighting of the instrument panel, made using SMD elements, is free of this problem. The fact is that a simple LED emits “point light” with a narrow beam pattern. That is, if you shine such an element on the wall, you will get a small circle with obvious boundaries. It is because of this that after installing such LEDs, “empty” spaces appear on the dashboard in which the light from neighboring sources does not intersect.
SMD LEDs are made without a housing that directs the light. Therefore they have a wider radiation pattern. The glow of such an element will cover a much larger area, and the LED backlighting of the instrument panel will acquire a beautiful and attractive appearance.
But this method also has its drawbacks - the impossibility of changing color and poor uniformity of light when installed in “standard places”.
We collect
When everything is ready, we begin to slowly assemble the console. First of all, we install the substrate. Apply sealant to the back side and glue it to the panel.
Then we put the arrows and protective glass in place. After modernization, the instrument panel looks bright and unusual.
LED lighting not only looks unusual and bright, but is also a good addition to the car in terms of economy, which helps save battery power, since LEDs consume 80% less energy than a regular light bulb.
Source
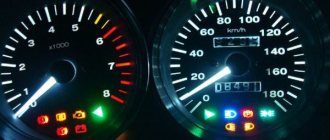
What kind of lamps are needed?
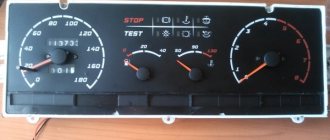
Before disassembling your VAZ, it makes sense to drive it to the nearest auto store and stock up on new light bulbs. But which ones to buy? Judging by the first photo, the backlight and indication lamps have different sizes. The choice is simple: if the backlight bulbs have burned out (position 2 in the same photo), then you will need AMN 12-3-1 (T3W) bulbs. If they are indicator ones, then A 12-1.2 (Wl.2).
LED light bulbs
If you are tired of changing light bulbs in the power supply of your VAZ or are just a fan of modern tuning, then you can install LED light bulbs instead of incandescent ones, since the industry also produces those that have the same standard size, base, socket and operating voltage.
Important! The battery charge indicator lamp cannot be changed to an LED one - the battery will not be charged properly.
How to make dashboard lighting with diodes
Many car enthusiasts are not happy with the lighting of their dashboard in the evening and at night. But poor-quality lighting or its complete absence has a negative impact on road safety. Therefore, many craftsmen do auto tuning with their own hands, making additional lighting for their car. And first of all, the dashboard lighting is done.
Very often, LEDs are used for these purposes, which have many advantages and allow you to create high-quality lighting inside the car with your own hands. This article will tell you how you can install this type of lighting in the dashboard and the nuances that should be observed in this situation.
Why do you need additional lighting?
Today, car tuning is carried out not only outside, but also inside its interior, and there is no better place than the dashboard. Diodes built into the panel will allow you to achieve the following positive aspects:
- give the dashboard a new unusual look;
- High-quality illumination of important elements of the dashboard;
- make additional lighting for the vehicle interior;
- make your car ride more comfortable;
- improve road safety. When the instrument panel is well lit, all the indicators are clearly visible on it, which allows you to correctly assess the position of the car on the road and not violate the rules of the road with your driving.
The easiest way to illuminate such an element of a car as the dashboard is to install diodes in it. The following types of LED products can be used here:
- separate diodes. Using them as backlight, you can create full or decorative lighting for the dashboard. It is worth noting that LEDs can glow in different colors. Therefore, such LED lighting can beautifully complement external tuning, glowing with it in the same color scheme;
Note! Additional lighting of the dashboard created with the help of such diodes allows them to be built into almost any part of the board. As a result, the lighting will fully meet the car owner’s requirements and provide illumination where it is really needed.
- LED Strip Light. This tape is very often used as decorative lighting not only for a car, but also for home premises or street elements. It can be easily replaced with another, which will allow you to change the boring color scheme to a new one. The LED strip has a self-adhesive base, with the help of which its installation by hand is quite easy and quite quick.
Despite the ease of working with LED strip, diodes are most often used to illuminate a car dashboard. This choice is associated with certain advantages of using this type of lighting.
Making an optitron
I'm trying to clean the filter at the edge of the scale. The peculiarity of these scales is that they are designed for the use of ordinary light bulbs, so they have an additional layer of dark filter (dots) applied to them, which ensures uniform illumination (closer to the light bulb, darker). A yellow filter is also visible under the white scattering layer. I would leave the yellow one, but removing black and white without affecting the yellow is unrealistic.
This is what it looks like in the light. Despite the white backlight, the numbers are still yellow thanks to the yellow filter, so you will have to remove it, although I didn’t want to.
Illuminated fuel and temperature gauges. I was afraid that there would not be enough three LEDs for the scale, but it turned out to be in vain - the scale is illuminated evenly, the gradient is not noticeable to the eye. Yes! As a result, only 3 tracks remained.
Rear temperature and fuel gauges. The light filter has been partially removed in the right places.
Ready-made temperature and fuel scales.
I remove the light filter on the tachometer. I use nail polish remover and pieces of cotton pads (we take everything from my wife/mother/sister’s arsenal). The technology is as follows: soak the pieces in liquid and apply to the area for a minute. While we are making the next one, the previous one soaks and the coating can be easily removed with a fingernail. Carefully! The front side is very sensitive to solvents, especially alcohol!
Installing tachometer backlight. Hot glue from a “gun” serves as supports and at the same time fasteners. The downside is that in this version the tachometer is not removable.
Finished tachometer scale.
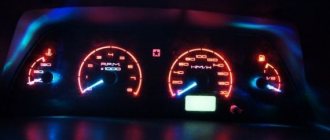
"Combined" lighting. LED tachometer, regular speedometer. The temperature scale and fuel gauge are double backlit. Here the photo does not convey the effect quite correctly.
Speedometer backlight board. The main difficulty, it turned out, was precisely here. Due to the built-in odometer, the speedometer device is very bulky and there is very little space left for illumination. As a result of trimming and pointing, very little remained of the scarf.
Rear speedometer backlight board. I had to restore the path this way
I'm installing the speedometer light. Two lights didn’t fit, so I moved them to the side surface
I turn on the speedometer light and check it. Between the tachometer and speedometer, the common plus and minus are brought out into the T10 socket; a protective diode and a common current-limiting resistor (all from the same lamp) are also installed in it, plugged into the standard socket from under the backlight lamp.
Finished speedometer scale
Complete tidy. Currently in finished condition.
Why LED lighting is preferable
At the moment, there are a variety of products on the lighting market that can be used to illuminate any brand of car.
Note! Not every make of car actually needs this type of lighting. Some manufacturers include high-quality LED lighting in the dashboard already at the production stage. This situation is usually typical for expensive foreign cars.
Industrial dashboard lighting
Features of organizing LED lighting
LED light bulb for car
Using LED lighting for a car, you can use diode bulbs with a standard base. This way you can illuminate the instrument buttons on the panel. In a situation where several devices need to be illuminated at once, for high-quality lighting you should use an LED bulb placed in a special socket. This requires a special re-soldering. But you can simply buy it in a store or market.
In addition, to illuminate the car’s dashboard and its alarm system, you can use light bulbs that produce a narrow luminous flux. It can be obtained from a regular light bulb by using a special diffuser (lenses) for lighting. Thus, in the first situation, the lighting will be point-like, and in the second, the luminous flux will fall at a certain angle. When organizing button illumination, you can use light sources with a directional luminous flux. But to illuminate the speedometer and alarm panels, preference should be given to bulbs that provide a large scattering angle. Although this can already be left to the individual choice of the car owner.
What kind of service is this?
Replacing the LED instrument panel and LED door lighting is carried out in order to organize your driver's seat as convenient and comfortable as possible, especially everything related to lighting. Since the instrument panel is the main data on movement and is always in sight, it should, first of all, be pleasant to perceive. Everyone knows what a control panel is and why it is needed, even if they don’t know how it works. The devices are connected to the vital systems of the car and display readings in numbers or scales that are understandable to the driver. The instrument panel is organized in two ways:
- It is of a mechanical nature and operates using electricity produced by a battery: the visual surface on which scales and numbers are drawn is illuminated by lamps;
- Computer screen.
The first type of control panel organization is the most common. The control console is illuminated by 4 lamps, which affect the quality of the illumination. And this quality can be changed: made more saturated or, on the contrary, muted, changed the color of the lighting or made it combined.
LED lamps for the dashboard differ in the shape of the LED, and, accordingly, light dispersion:
- spot glow;
- diffuse glow.
To modernize the instrument panel, it is necessary to replace conventional lamps with LED ones and change the light filters. In this case, two replacement options are possible: simple or complete.
How the arrows are illuminated
Very often, a car needs backlighting of the dashboard arrows.
Instrument needle illumination
In a situation where it is necessary to install diode lighting of the arrows on the dashboard, the following manipulations must be performed:
- We clean the paint of the arrow on three sides. The paint is stripped from the bottom of the arrow and on its sides;
- After this, the cleaned surfaces should be painted over with a white clerical touch or white nail polish. You can also use regular white paint, but it will be a little more fiddly;
Note! Painting the arrow white will help increase the lighting effect.
Filled speedometer needles
- after that we take three LEDs. They need to be soldered together in series;
- The soldered LEDs should be placed in the dashboard. You first need to drill holes in it for installing diodes and masking wires.
Deep revision
It is also advisable to add lighting - using an LED strip. You can take a white one, or a colored one. Preferably something that is not too harsh on the eyes – perhaps blue or green, depending on the owner’s taste.
Today, blue light is the most popular - it gives good visibility of readings on all instruments, but does not interfere with the driver’s ability to see the road clearly.
Another good idea is to make the arrows glow a different color. To do this, they need to be cleaned of old, red paint, and then painted white.
It could be nitro enamel or, even simpler, white nail polish. A color LED must be installed next to the needle on the instrument scale. The arrow, changing its position, will be colored differently.
Additionally, when using only white light, a colored overlay will help. That is, even without electrical intervention, the colored film overlay will change its appearance.
If possible, the light filter is removed, and the backing is decorated with an overlay, and here you can get creative with different materials and colors (electrical tape, colored tape, colored vinyl film). Such an overlay will significantly transform the panel and make it exclusive.
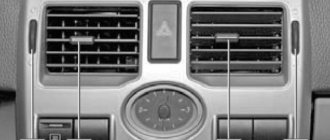
Organization of backlighting of stove control buttons
The second most popular situation in organizing the lighting of the dashboard in a car is the illumination of the stove control buttons.
The organization of the backlight of the console buttons intended for controlling the stove is carried out as follows:
- First, remove the handles, as well as the glass from the control unit;
- We make a reflector out of foil. It will need to be secured under the removed glass;
- then carefully unscrew the lower part of the console. Under it there will be a cartridge with an old light source, which must be replaced;
- replace the old light bulb with an LED;
Note! You can install an LED strip under the bottom of the console. Thanks to its self-adhesive base, it will easily take the required position. In this situation, it will be connected with its wires through the cartridge. The main thing here is to maintain the polarity of the wires, otherwise the LED strip will not light up.
- After installing the LED, return all parts of the console to their original place in the reverse order.
Ready-made console lighting
The simplest way to create backlighting involves the following manipulations:
- take the button out of the console;
- we disassemble it into its component elements;
- inside such a button there should be a light bulb that changes to an LED;
- if necessary, you can remove the light filter from the button or combine it with a new diode glow. As a result, you can get a new beautiful and unique shade.
As you can see, illuminating the console designed to control the stove in a car is quite easy.
Replacement instructions
The procedure for replacing dashboard lamps is not particularly difficult. The only problem may be disassembly, which allows you to remove the backlight panel and get to the light bulbs. The difficulty is that the fastening screws are located at different points, and you need to know their location. Let's consider the process in order:
Required Tools
To replace the light bulbs in the dashboard you will need:
- a screwdriver with a cross blade;
- a flat-head screwdriver, preferably with a thin blade for unsnapping plugs and fasteners;
- pliers for dismantling cartridges;
- set of replacement lamps.
A small number of necessary tools makes the work convenient and fast. If you plan to make a small tuning - changing the color or brightness of the backlight, then additional devices will be required to remove the factory paint, dismantle the plastic filters and a solvent to clean the remaining paint layer on the back of the instrument panel.
Replacing the backlight
To obtain an even backlight, it is recommended, if possible, to change all the dashboard bulbs at once. Replacing one lamp can create a situation where after a week you will have to repeat the entire procedure in order to change another burnt out lamp. Therefore, experts recommend updating all the lighting at once. It is also advisable to replace incandescent lamps with LEDs - they are economical, have a wide range and provide a large selection of shade and brightness.
How to disassemble the dashboard
First of all, you need to remove the decorative trim from the radio. On the VAZ 2114, the dashboard is mechanically connected to this part, so you need to immediately disconnect it. After this, perform the following steps:
- Using a flathead and Phillips screwdriver, the decorative casing is disconnected. The steering column should be lowered as much as possible so that it does not interfere with the work. You will have to carefully snap off the decorative plugs and unscrew the 5 screws securing the casing. You also need to remove the handles from the sliders and the heater switch;
- After disconnecting the screws, the casing must be pulled towards you. You should act carefully; perhaps not all elements have been removed yet and they can be broken. You don’t have to completely remove the casing; there’s enough room to unscrew the mounting screws;
- To disconnect the dashboard you need a long Phillips screwdriver. Unscrew the screws, tilt the shield towards you and pull out the terminal blocks with connecting wires.
Replacing backlight bulbs
To dismantle the cartridges, it is convenient to use small pliers. They grip the flat back. It is carefully turned half a turn counterclockwise, after which the assembly can be removed from the socket. In a similar way, all elements to be replaced are extracted. Then the lamps are removed and new copies are installed in their place. Insert the cartridges into the sockets and turn them half a turn clockwise to secure them. After this, it is recommended to connect the terminal blocks, apply operating voltage and check the functionality of the light bulbs until the casing is assembled. The vehicle systems are checked:
- turn on the ignition and check the operation of the oil pressure, generator and check indicators. Raise the handbrake lever and see if the lamp lights up;
- trigger an alarm to check;
- switch the high and low beam of the headlights and determine whether the indication works;
- include dimensions.
If all elements of the lighting system are operating normally, reassemble the dashboard in the reverse order. This completes the process of replacing the VAZ 2114 dashboard bulbs.
Combined instrument lighting
To implement this type of lighting, you need to stock up on the following materials:
- double sided tape;
- LED in a socket (three pieces);
- foil.
In order to remove the dashboard, it is necessary to clarify the removal steps with the instructions that came with the vehicle. The algorithm of actions here is as follows:
- removing the instrument cluster;
- carefully unscrew the speedometer cable and disconnect all existing plugs;
- illumination sources should be located in the upper part of the instrument panel - three light bulbs. There will also be a green filter here. It can be removed or left;
- The light bulb is being replaced with LEDs and a foil diffuser is being installed. We secure it with double-sided tape.
Ready-made dashboard lighting
After this, all that remains is to assemble all the panel parts and install them in their original places.
Note! In any case, you can safely experiment with the colors of the LEDs in order to get the most beautiful type of glow.
A few nuances
You can experiment with color, because some people like the red glow of devices, while others’ eyes are less tired of green. As you can see, replacing and installing the LEDs back into the dashboard is quite simple. Of course, a lot depends on the car model, but there are no fundamental differences:
- the instrument panel is removed and the old lamps that illuminated the instruments are removed;
- the color filter is erased;
- LEDs are installed (they are glued or soldered);
- the panel returns to its original place.
Some craftsmen advise taking a photo of the panel before removing it, so that later you know exactly what to return where. You can look at the instruction manual to figure out how the panel is secured and thereby speed up the disassembly process.
Knowing the desire of car enthusiasts to change the colors of instrument lighting, many companies began to produce sets of LEDs for the dashboard.
They are made with a base similar to T5 and are immediately designed for on-board network voltage. There are also light bulbs with different sockets that are suitable for foreign or domestic cars.
If you use ordinary LEDs, then for their uniform glow it is advisable to include a resistor (100-270 Ohms) and a stabilizer in the circuit. Otherwise, you may encounter the problem that your backlight noticeably changes its brightness and glows unevenly, and you will also extend the life of the LEDs.