Having become a symbol of a new era in the automotive industry, the VAZ 2101 over the years has turned into a cult car of the domestic automobile industry. Some models can still be found on the roads of the country, and all thanks to the careful care of their owners for their technical condition.
Original wiring diagram for VAZ 2101
It is clear that time does not spare anyone, and many elements of the car require replacement. In particular, the wiring of the VAZ 2101 was initially designed for 15 years of operation. Today on sale you can find many options for ready-made wiring kits for classics, but:
- You need to know the parameters of the products offered;
- Their compliance with the technical regulations of the car manufacturer (and rarely anyone has preserved the instructions);
- Correspondence of connectors and terminal blocks of equipment installed on the vehicle.
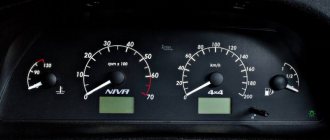
Instrument panel VAZ 2101
The dashboard makes driving a car more comfortable, so it should be convenient and simple to use, displaying important information to the driver.
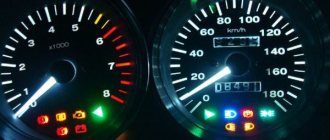
The standard dashboard of the VAZ 2101 has a limited number of instruments and indicators and is characterized by rather dim backlighting
The instrument panel of the VAZ “kopek” consists of the following elements:
- 6 indicator lights;
- 3 pointer instruments;
- 1 digital indicator.
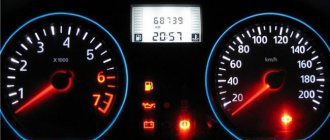
Instruments and indicators of the VAZ 2101 instrument panel: 1 - fuel reserve warning lamp; 2 — fuel level indicator; 3 — speedometer; 4 — liquid temperature indicator in the engine cooling system; 5 - warning lamp for turning on the parking brake and signaling an insufficient level of brake fluid in the reservoir; 6 — control lamp for oil pressure in the engine lubrication system; 7 — battery charge indicator lamp; 8 — trip counter; 9 — control lamp for turning on the direction indicators; 10 — control lamp for turning on the side light; 11 — control lamp for turning on the high beam headlights
The panel equipment also includes:
- speedometer;
- odometer;
- coolant temperature gauge;
- fuel level indicator;
- fuel reserve warning lamp;
- block of warning lamps: activation of the parking brake and signaling of insufficient level of brake fluid in the reservoir;
- oil pressure in the engine lubrication system;
- battery charge;
- turning on the direction indicators;
- turning on the side light;
- turning on the high beam headlights.
Which one can I put?
If you are not satisfied with the design of the VAZ 2101 dashboard, it can be replaced or updated as follows:
- buy and install a more modern version, which is equipped with an on-board computer, which will not be cheap;
- update the dashboard by replacing instrument scales and arrows;
- install a device from another car.
When choosing an instrument panel, you need to take into account that the configuration may differ significantly and is not at all suitable for the “classics”. In this case, you will need to make adjustments according to the seat in the front panel.
From another VAZ model
On a VAZ 2101, it is possible to install a homemade dashboard using instruments from a VAZ 2106. It can use a speedometer, tachometer, temperature and fuel level indicator, which will look more informative compared to the standard instrument panel. Connecting the indicators should not raise any questions, with the exception of the tachometer: it must be connected in accordance with the “six” diagram.
The dashboard of the VAZ 2101 can be modified by installing additional devices from the VAZ 2106
More information about the instrument panel of the VAZ 2106: https://bumper.guru/klassicheskie-modeli-vaz/elektrooborudovanie/panel-priborov/panel-priborov-vaz-2106.html
From "Gazelle"
To install the dashboard from the Gazelle, you will need to make quite serious changes to it, since it is very different in size from the standard product. In addition, the connection diagrams and terminals of the cars are not the same at all.
To install a Gazelle dashboard on a penny, a serious modification will be required
From a foreign car
The best option, but also the most difficult, is to introduce an instrument panel from a foreign car. In most cases, this requires replacing the entire front panel. The most suitable options for a “penny” would be devices from models that were produced in the late 1980s - early 1990s, for example, the BMW E30.
For the VAZ 2101 it is necessary to select the most suitable torpedo based on instruments and indicators
A legend born in the USSR
Once upon a time, back in the 70s, a small car had quite pleasant comfort, stability and controllability.
The Lada engine was very dynamic (1.2 l/64 hp engine), thanks to this, “Kopeykas” were incredibly popular in their “infancy”.
Today the youngest “Kopeyka” is 26 years old, and this is not even “student” age.
Most of these cars are in disgusting technical condition, but rare cars that have been repeatedly “reanimated” still quite confidently continue to roam around our vast expanses.
“Kopeyka” underwent its first tuning immediately after its “birth”, back in Soviet times.
The name of the person who decided to make radical improvements is Stasys Brundza.
He was a racer and 10-time USSR champion.
Lithuanian guys, Stasis and his friend, created a real rally car!
At the same time, it was not the usual “Kopeyka” that was tuned, but one specially purchased and selected at the Tolyatti plant.
The masterpiece had a custom-made 1600 cc engine, into which they “stuck” something that no one had heard of in the Soviet Union at that time.
The camshaft was machined specially, the phases were changed, the valves were modified, as was the chassis, for which a 4-speed gearbox was developed with a cam mechanism.
The car boasted incredibly luxurious Dunlop tires
“Kopeyka” developed an unrealistic speed for those times, namely: it accelerated to 100 km/h in 9 and a half seconds!
Engine tuning
When starting to tune the engine - and on production models it is, to put it mildly, rather weak: initially 64 horsepower and up to 120 “horses” in small-scale modifications - you also need to take care of the transmission and suspension.
When boosting the engine, it is necessary to modify the suspension, otherwise there is a risk that the car will skid when cornering. For greater stability, it is recommended to lower the suspension slightly - for this purpose, you can replace the springs with shorter, stiffer ones. You can also install a double stabilizer - it will provide better vehicle handling and speed of suspension adaptation to road unevenness. It is also worth considering increasing the rigidity of the body, for example, installing a roll cage.
There are several basic ways to increase engine power.
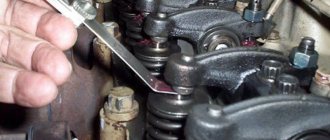
Camshaft replacement
A new camshaft with modified cam geometry can be installed. This will make it possible to qualitatively change the gas distribution: the cylinders will be more saturated with the combustible mixture, and the torque will increase.
To replace the camshaft you will need:
- keys for 10 and 17;
- flat screwdriver.
Replacement is carried out in the following sequence:
- Using a 10mm wrench, remove the valve cover.
- Using a flat-head screwdriver and a 17mm wrench, remove the camshaft mounting nut.
- Unscrew the timing chain tensioner bolt and remove the camshaft sprocket.
- Unscrew the remaining nuts and carefully pull out the housing along with the camshaft.
Installation of the new camshaft is carried out in reverse order. First you should replace the rockers (valve drive levers) with new ones. This will help avoid engine knocking.
Video: replacing the camshaft on a “classic”
Boring of intake manifold channels
Boring the intake channels will increase the filling level of the engine chamber with the air-fuel mixture.
To perform this operation you will need:
- drill;
- several types of sandpaper of different grain sizes;
- rags, rags;
- calipers;
- lubricant (universal WD-40 will do);
- vice.
Boring occurs as follows:
- The collector should be removed and installed in a vice for ease of operation.
- You need to wrap a rag around the drill bit, and sandpaper overlapping it on top. At the first stages of work you will need paper with a coarse grain, at the final stages, for sanding - with a fine one.
- Insert the drill into the valve and start boring. Important: do not push the drill too hard, otherwise the sandpaper may slip and the drill will damage the commutator.
Video: do-it-yourself intake manifold boring
Sound tuning or Red dress for Lada
Anything can inspire you to tune a Lada - “Kopeyka”: a chamomile field or “Lady in Red”, a composition by Chris de Burgh.
If, looking at the chamomile airbrushing, you want to sing: “And I love a married man,” then the “Lada in Red” differs from other cars not only in its cute lanterns and bright color.
Although its tuning is dominated by interior transformation.
The trunk accommodated a 12-inch Magnat X-bass 1200 subwoofer, with ports directed into the cabin, upholstered in velvet.
There is also a pair of powerful amplifiers mounted on the back wall of the subwoofer. Not boxes of tomatoes and rabbit food.
The main Pioneer DEH 5900MP device is built into a custom-made console, due to the fact that the original “penny” does not have a convenient place for an audio system.
The front acoustics are made of dual tweeters and dual midbass.
An ordinary music lover could get by with an investment of $100.
Often, Kopeyka owners do not want or do not have the opportunity to install an expensive speaker system.
One of the “proletarian” ways to solve the sound problem: a car radio for 50 USD. and speakers for about the same price.
Lada suede chairs in red are chic and comfortable.
Carpet and leatherette were used to decorate the doors, the seats were new, as was their upholstery, and armrests were added.
They decided to get rid of the rotary windows, replaced the handles with new ones, and installed electric windows.
The instrument panel gave way to a dashboard from the VAZ-2107
Several more indicators with arrows appeared.
"Kopeyka", rock and roll and the police
Hot rod culture, as a whole ideology of modification, can be applied not only to American cars, but also to the Kopeyka, giving it, along with a safety frame made of pipes, the spirit of freedom of the 40s and instilling a love of rock and roll.
The gearbox, brake system and engine have been “fatefully” modified. The body was turned into a 2-door and shortened by 15 centimeters, and the roof was lowered a little.
The car's suspension was significantly changed: the beam was strengthened, a rear stabilizer was installed for lateral stability, the arms were lengthened, and gas-filled shock absorbers appeared.
The glass was made to order, and the Kopeyka was painted with expensive enamel and covered with more than one layer of varnish. The battery was moved to the trunk, the wheel arches widened to accommodate 17-inch wheels.
Once upon a time, “Kopeyka” was the face of the traffic police, until it was removed from mass production.
Today there are only two copies of 2101 in the world, and one of these two is a museum piece.
The car, painted yellow and blue, has not undergone any special modifications: there are red and blue beacons, a SGU control unit and a radar.
Various directions of tuning "Kopeyka"
Today you can buy a VAZ 2101 for nominal money, and owners sometimes invest $10,000 or $40,000 in the reconstruction and tuning of the car, achieving incredibly interesting results.
Refinement of the VAZ 2101, like tuning of any other car, can be divided into tuning of the body, engine, chassis and interior.
Changing the concept of the body due to the bumper, skirt, spoiler and other parts revolutionizes the image of the car beyond recognition.
When tuning the interior, including the VAZ 2101 (see photo below), car enthusiasts, as a rule, say goodbye to the upholstery and dashboard without regrets, install new seats and a variety of all sorts of necessary, as well as completely unnecessary, sensors.
Some tuning fans can stuff their favorite Kopeyka with electronics beyond recognition, turning an ordinary Zhiguli into an analogue of the Terminator.
Some, on the contrary, treat almost antique rarities with reverence and preserve the old design.
Based on the above, tuning the first-born VAZ can be divided into two important categories: “retro” and “engineering”.
Radical tuning of the Kopeyka engine (VAZ 2101) is its complete replacement, for example, with an engine from a Nissan Skyline. Naturally, replacing the engine provokes a “correction” of the entire system.
The new Kopeyka engine is inexpensive, it is also subject to significant modifications, for example, the displacement is changed.
And lightening the flywheel leads to lightening the car’s engine; the Kopeika picks up speed much faster.
When you encounter a turbo version of the 2101 on the road in traffic (for example, with a TD04L turbine with a built-in wastegate), you will definitely be surprised to see how the Zhiguli easily overtakes respectable foreign cars.
Modifications to the trunk reflect the owner's hobby.
There, in the trunk, they can install anything: a refrigerator, a hookah, a cabinet with a library.
However, no joke, truly unexpected decisions are not uncommon.
Upgrade "penny". Installation of double stabilizer
Question: why do you need a stabilizer? Answer: it increases the stability of the car when cornering and simplifies the process of driving the car. So, let's make the necessary purchases:
- Front stabilizer VAZ 2101;
- Four stabilizer struts from the 10th model;
- Several stabilizer bar cushions;
- Cleaning agent and anti-corrosion compound.
Now we make fastenings for the first stabilizer. We remove the bushings from the posts and cut the posts using an angle grinder. Then we weld the rings and return the rubber bushings to their original place.
We take out the new stabilizer and make cuts along the edges. 10 cm. We remove the fastenings to the spar, leaving only one stick without canopies. We remove the stock anti-roll bar from the VAZ 2101. We take 2 stabilizer pads and place them in the place where the stabilizer is attached to the side member. After installing the pillows in the appropriate places, we move on to the cut stabilizer and insert the pillows into the mounts.
The fact that the VAZ 2101 tuning in the photo simply amazes the imagination of many car enthusiasts is the main proof of the correctness of the decision to revive the legendary “penny”. Car modernization has gained well-deserved popularity due to its simplicity of design, good dynamic properties, low cost, unpretentiousness and maintainability.
The VAZ 2101 is a champion in the field of modifications and alterations.
Remaking the body of a “penny” is not a simple process. It is often accompanied by increased structural rigidity. This is done with the help of additional arcs and beams. Thanks to deep body tuning (which is most often done), a radical change in the appearance of the car is achieved.
A seemingly simple grille located along the entire front of the car will look quite stylish. When choosing a lattice, you should pay attention to the size of the cells. It is better if they are not large. The installation of a new voluminous bumper, which will also improve the aerodynamic parameters of the car, will help make the car's design more sporty and aggressive.
Upgrading car headlights can be done using:
- painting the substrate;
- mask painting;
- tinting;
- installation of LED strip;
- replacing the standard backlight.
Several of the large number of options for external changes to the car can be seen in the photo - tuning a VAZ 2101 may not be limited to installing bumpers or body kits, a new grille, headlights. You can also do airbrushing to improve the driving characteristics of the car. Install new wheels with original rims.
BMW dashboard for VAZ 2107 (where to buy, how to install)
#1 ar_lev
- Moscow city
- Car: VAZ2107
Dear, a huge request for help))) I really want to install a 2107 BMW dashboard in my basin, my hands are growing out of nowhere)) Therefore, an installation specialist is also required. I also need your advice on where to buy a BMW dashboard, as I understand it is suitable for the BMW 3-series E30 model.
Post edited by ar_lev: 13 April 2010 - 14:39
- Top
#2 Golden_cat
- City: Moscow, Shaitanovo)
- Interests: managing this car club and communicating with its wonderful members =)
- Car: KoshKmobil'074, Kalinosport TsTsnezhok
etc.
Private Messages are also available
- Top
#3 ***PARTIZAN***
- Moscow city
- Car: Mazda RX-8 16V Turbo
look for the torpedo at disassembly. prices vary in different cities. installation is insanely easy. you cut the panel from the front and fasten it on the sides with self-tapping screws (once you see the panel you will understand what to fasten it to)... there is only one difficulty - the stove. I still haven’t made the air ducts =)) install the instruments from 2105 and you will be happy PS make the panel for the instruments out of cardboard, then transfer it to aluminum and cover it with leatherette. that's all)) I also made the panel for the mafon myself..(there was no money for the original one)
Malfunctions and their elimination in lighting and light signaling systems
During operation, the following malfunctions are possible in lighting and light signaling systems:
The reasons for the lack of light may be a burnt-out lamp, a malfunction of the central or lower light switch, or disturbances in the circuit (fuse blown, open or short circuit, poor contact in the socket or at the places where the wires are connected).
Weak light is possible due to darkening of the lamp bulb due to prolonged deposits of filament fumes, poor contact in the socket or lamp circuit, high battery discharge, low generator voltage, dirty lenses and headlight reflectors. The dirty reflector is washed with water (without using rags) and dried at room temperature, with the reflector mirror facing down. The increased voltage drop in the lighting circuit (due to increased resistance) weakens the current. The voltage drop between the “+” terminal of the generator and the high beam clamp on the panel near the headlight is allowed up to 0.8 V, between the “+” terminal and the low beam or brake light terminal - up to 0.4 V, in the sidelights and rear lights circuit - up to 0.2...0.3 V.
The brake light does not work if the wires from the mechanical, hydraulic or pneumatic switch are disconnected, contact is broken at the circuit terminals, or the switch is faulty. A malfunction of the brake light switch can be easily detected by connecting the wires connected to it. The brake lights come on at this time.
A faulty light switch can be determined by connecting its terminals together with a piece of wire. An open circuit is found using a test lamp or tester. A short circuit in the circuit of the sidelights or headlights of a lighting system with a central switch of the P-44 type is determined when they are turned on by the characteristic clicks of the thermobimetallic fuse and oscillations of the current indicator arrow with the possible blinking of the corresponding lamps. A short circuit in the circuit of the rear lights is indicated by the clicking of the fuse when the headlights or sidelights are on. . The thermobimetallic fuse clicks when the lights are on if a short circuit occurs in the brake light circuit.
Flashing light occurs in cases of poor contact at the connection points of the wires in the socket. Rapid burnout of lamps occurs at increased generator voltage, maintained by a voltage regulator, when using a lamp designed for a voltage lower than that used in the network. When replacing a burnt-out lamp, you must install a working one recommended by the factory. The use of lamps not intended for this headlight is unacceptable.
The following malfunctions may occur in the turn signal circuit:
The burnout or open circuit of one signal lamp causes an increased blinking frequency of the working and control lamps. If the common circuit is broken, the signal lamps do not light up.
A circuit of signal lamps closed to ground causes welding of the contacts of the electrical thermal breaker, deformation of the armature and charring of the winding. A short to ground in the control lamp circuit causes burnout of the wire connecting the “cl” terminal of the breaker to the fixed contact.
| Home Auto Electronics Maintenance and repair of vehicle lighting and light signaling systems |
Generator faults
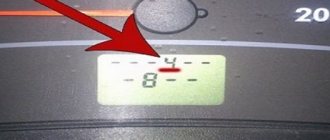
If a red light comes on on the panel, this can only mean one thing - power from the generator is simply not reaching the equipment. In such a situation, you cannot turn off the power plant and you will have to get home without stopping, since you may not be able to start the car again.
After you get home, the problem is solved step by step as follows:
- check the generator belt, if it is torn - this explains everything, the shaft rotates, but does not transmit energy further;
- if the belt is intact, you need to check its tension; its presence does not solve the issue, because it may simply slip; to do this, just press it with your hand from above, if it bends 10 or 15 cm, then everything is fine;
- Having unscrewed the nut securing the generator to the body, use a pry bar to move the device, after which it is tightened back;
- you need to check if the fuse is intact and replace it.
After all these steps have been completed step by step, you need to start the engine and check whether the warning light goes out.
Wiring during dismantling
If this does not happen, then the problem is not resolved. In such a situation, you should check the thin conductor connecting the generator to the battery. It may be broken or the terminals may simply be oxidized. It is also reasonable (if the problem is not found or nothing is clear with the conductor) to throw an additional wire in place of the conductor and check the signal indicator.
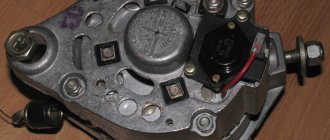
If a positive result is not achieved again, it is worth checking the generator itself. It is better for novice car enthusiasts to contact a service center, while experienced ones can check the operation of the voltage regulator of this device.
Moreover, in order to do this, you do not need to remove the generator at all. It is necessary to start the engine and give it time to run at medium speed. The measurement is carried out with the headlights on, installing the voltmeter probes on the corresponding terminal of the regulator and the generator ground.
The normal voltage is considered to be 13 - 14 V. If this indicator turns out to be higher or lower, then the regulator must be replaced. A higher reading indicates that the regulator is not rectifying the voltage and is sending “spikes” to the battery; a lower reading means that the internal resistance or semiconductor elements of the regulator have failed. It is advisable to replace the regulator; it should be repaired only with deep radio engineering skills.