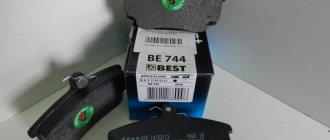
Pads for VAZ 2106
Despite the fact that the model has long been discontinued, there are plenty of original spare parts on the car market. In addition to factory parts, a number of components manufactured by foreign companies are available for sale. Obviously, the price of domestic brake system elements will be cheaper than their foreign counterpart.
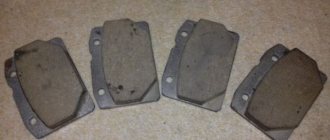
Brake pads must be replaced if the limiting friction lining thickness of 2.0 mm is reached. Below this norm, there is a high probability of deformation and splitting of the lining into pieces. Elements of the brake system must be immediately replaced if engine, transmission oil or antifreeze gets on the surface.
The process of replacing pads is not complicated; every driver can do it, even without experience in servicing equipment.
Possible problems during the replacement process
Usually the entire process of removing old pads and installing new ones goes without problems. However, according to reviews from car enthusiasts, some difficulties and problems may arise. They can often be easily resolved and corrected.
Inability to remove the drum on the rear system. One of the most common problems. To solve it you need:
- Release the handbrake tension.
- Apply and apply VD-40 lubricant.
- In cases where none of the above options are suitable, a few light blows with a hammer can help. However, it is important to use a softening pad, for example, a wooden block.
A drop in the amount of liquid in the tank - this problem is less common, but it does occur. You can solve it like this:
- Add fluid until the norm is reached.
- Bleed the brakes by pressing the pedal a certain number of times.
- Add a little more brake fluid.
Difficulties in putting the drum in place are also common. In this case, you should loosen the handbrake cable.
Brake pads should be changed according to the regulations. If they are worn out ahead of schedule, then you should not wait, but replace them immediately. This is very important, because the life of both the vehicle driver and passengers depends on the correct operation of the system.
Brake pad malfunctions
The following characteristic signs indicate problems with the pads:
- sounds unusual for brake operation (creaking, squealing, grinding);
- car skidding when braking;
- the need to apply more force to the brake pedal;
- black or metal dust on wheels;
- increased braking time;
- The pedal does not return to its initial position when released.
Brake pads must be changed when the friction material thickness reaches 1.5 mm. If this is not done, a grinding (squealing) sound will occur. In addition, such sounds may be present when installing low-quality pads.
Shocks when braking
The appearance of shocks during braking can be caused either by the condition of the pads themselves, or by a damaged surface of the brake disc or drum, soured pistons in the cylinders, or other malfunctions. To identify the problem, you will need to disassemble the brake mechanism and carefully inspect the parts for wear and damage.
Car skidding
There can be many reasons for skidding - severe wear of the pads, damage to the discs, loose caliper mounts or suspension malfunctions.
Once a situation arose with my car when, while braking, the car began to pull to the side. It would seem that it is necessary to diagnose the brake system. However, after a detailed examination, I discovered that the cause of this phenomenon was a damaged longitudinal rod (rod) of the rear axle. It was simply torn from the eyelet. After replacing this part the problem disappeared.
Video: why a car pulls to the side when braking
Stiff or soft pedal
If you notice that the pedal has become unusually tight or, conversely, soft, then most likely the pads have become unusable and will have to be replaced. Additionally, it is worth inspecting the hoses supplying fluid to the brake cylinders and the cylinders themselves. If the piston sticks in them, then the problem with pedal stiffness may also manifest itself because of this.
Appearance of plaque
Plaque can appear both when using low-quality pads, which leads to their rapid erasure, and with normal parts. However, in the second case it should be minimal. Dust can also appear during aggressive driving, i.e. during sudden starts and braking.
From personal experience I can say that after installing the front pads from AvtoVAZ, I observed black dust on the discs. The plaque was clearly visible because the discs were painted white. From this I can conclude that the appearance of black dust from the process of erasing the pads is a normal phenomenon. Perhaps installing more expensive parts will help get rid of this phenomenon. However, if you are sure that the car has good quality pads and their condition is normal, then there is no reason to worry.
Pedal sticking
If the brake pedal does not move back when pressed, this indicates that the pad is sticking to the disc. This phenomenon is possible in frosty weather when moisture gets on the brake elements, but it would be useful to inspect the pads. If the car cannot be stopped for a long time when you press the pedal, then the reason lies in worn out pads or air getting into the hydraulic system. You will need to inspect the brake components and possibly bleed the brakes.
About grooving brake drums
As mentioned above, some defects that arose during the operation of brake drums can be eliminated using the so-called groove. It should be said right away that it is not possible to sharpen a drum yourself in a garage. Because for this, firstly, you need a lathe, and secondly, you need the skill of working on this machine, and a serious skill at that. A novice driver can hardly boast of having a machine in his garage and the corresponding skills. Therefore, he has only one option left: to seek help from a qualified turner.
For high-quality drum turning, you can’t do without a lathe.
So what is a brake drum groove? It usually consists of three stages:
- preparatory stage. The turner removes about half a millimeter of metal from the inner walls of the drum. After this, the machine is turned off, and the drum is carefully inspected for internal defects. The preparatory stage allows you to determine the general level of wear of the drum and the feasibility of further work. Sometimes, after the preparatory stage, it turns out that the groove is useless due to severe wear, and it is easier to replace the drum than to grind it;
- main stage. If, after preliminary processing, it turns out that the drum is not very worn, then the main stage of turning begins, during which the turner smoothes and grinds all small cracks and grooves. During this work, about 0.3 mm of metal will be removed from the inner walls of the drum;
- The final stage. At this stage, the sanded surface is polished using a special paste. This procedure eliminates even the smallest defects that are not visible to the naked eye, and the surface becomes perfectly smooth.
It should be noted here that the groove will help get rid of internal defects on the drum, but it will be useless if the geometry of the drum is broken. For example, the drum was warped due to an impact or due to severe overheating. If the drum is cast iron, then it will have to be changed, since it is extremely difficult to straighten brittle cast iron using metalworking tools. If the drum on the “seven” is light alloy, then you can try to straighten it. And only after that start grooving.
General job description and tools
You will need:
- repair pit (can be done on a flat area, driving the front wheel onto a hill. But this greatly complicates the work)
- jack,
- balloon wrench (balloon),
- garage tools: pry bar, wrenches, screwdrivers, etc.
General procedure:
- We hang the front of the car with a jack.
- We remove the wheel.
- We turn the steering wheel all the way so that it is convenient to work.
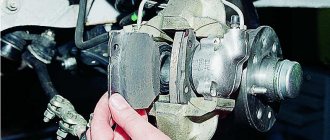
- We find out the scope of work, check the caliper, brake disc, integrity and connections of hoses and pipelines.
- Remove the brake hose from the mount.
- Use a balloon to press out the brake piston.
- The level of brake fluid in the expansion tank will immediately rise.
- We remove the fasteners from the bracket on the caliper and remove the bracket itself.
- We replace the pads.
- We assemble the entire assembly in reverse order.
We present the entire process of replacing brake pads using the example of a VAZ classic car.
Replacing Front Brake Pads VAZ 2106
replacing front brake pads
for VAZ 2101-VAZ 2107
Welcome! Brake pads. They wear out over time, like any other part of the brake system, but, nevertheless, if you, for example, take brake fluid, you need to replace it every 2-3 years (how to change the fluid, see the article: " replacement
brake pads on a VAZ "), but the situation with the pads is somewhat different, they need to be changed only after they are completely or actually completely worn out, but if you ignore this replacement, car brakes will be much worse, because do not delay with this, but
how to know whether it is time to change the data shoe or not, and we will also explain in this article how to make a fake data shoe
, so to speak, we will try to explain everything on our fingers, but in this case, If you still have any questions, ask them in the comments and we will answer them for you!
The note! To change the brake pads, you first need to bring tools specially equipped: with a hammer, as well as some penetrating oil, which makes the sour calipers even easier to tap (if you don't know what kind of fingers you have) then, a little later, you will understand everything and, thanks to the penetration of the lubricant, you can, for example, use WD-40 if you have it, or something else), and you will also need to stock up on a caliper (not necessary, but better if d), take it with you a medium sized beard (not too big) or you can use a not very sharp screwdriver, instead you will need a jack to lift the car, a wrench that does not support put the car on them or just slide it under the rear wheels so the car doesn't fall off from the jack when replacing it, and take pliers with you, since it will be very difficult to open the pads without them!
Original
ArticlePrice (RUB)ArticlePrice (RUB)
| VIS 0021929 | 550 | VIS 0005937 | 570 |
| 68822 | 550 | 21010-350209002 | 570 |
| 2101-3502090 | 550 | START 12151 | 570 |
| 63276 | 570 | 21010-3502091 | 570 |
Change the brake pads of the rear wheels should be designed to have a minimum thickness of 1.5mm, if they have different chips and cracks, the connection between the pads and the surface of the pads is broken. To make it easy to replace brake pads, the rear wheels of the vehicle are suspended or raised and mounted on supports. Replacement brake pads must be created in pairs machine side.
During the repair we will need: wrenches “8”, “17”, a hammer, a screwdriver, a caliper, a reflector, two fastening blades, pliers and a wrench for wheel nuts. If so, proceed to replacing the blocks.
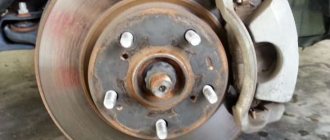
- Remove the brake drum (see Removing and installing the VAZ-2106 brake drum).
- Disconnect the ends of the clutch spring from the blocks and remove the spring (see Replacing the cylinder protective caps).
- Holding the clamp spring pin behind you, press down on the top cup and turn it a quarter turn in all directions to remove the clamped spring. Then remove the lower cup and compression spring rod.
Use a wire brush and a clean rag to remove dirt from the brake mechanism. (It is not allowed to enter the brake mechanism to clean the pads: gasoline, kerosene, diesel fuel and other mineral solvents).
- The left brake shoe can now be removed to disengage the lower clutch spring.
- Remove the gasket.
- Now remove the pressure spring of the right pad in the same way and remove the pads from the brake flap.
Replacement of rear pads on VAZ 2101-2107 (CLASSIC) (Lada).
in the video, make rear trims for the VAZ 2107. Changes are similar to VAS 2101,2102,2103,2104,2105,2106.
- Disconnect the parking brake cable end, unscrew the parking brake lever pin, remove the washer, lever and drive lever pin.
- To reverse removal, install the parking brake lever parts into the new assembly.
Now we start installing new brake pads on the car.
- Visual inspection of the brake drum, the internal diameter of which must be no more than 251 mm. If the diameter meets the requirements, it is necessary to get rid of the shoulder resulting from wear. To remove the shoulder, attach the brake drum to the half flange at the rear, center the drum and rim along the mounting holes, and secure with two bolts. Then start the engine at minimum speed and engage first gear. The drum will rotate and, at the same time, lift the bead while capturing the file. Simply grind the beads without touching the working surface of the drum; Don't press the file too hard.
- Now install the rear right brake pad reverse.
- Next, install the spacer bar in place. Please note that the bar is not symmetrical and has a single slot on one end and a double slot on the other. The end of the strap, which has a double slot, should be oriented towards the right rear shoe.
- Attach the lower tension spring to the right rear shoe first at one end, then insert the lower end of the front shoe into the brake shoe slot at the other end at the front left.
- Install the front left shoe in the reverse order of removal, install the upper extension spring.
- Install the brake drum.
- Install the wheel and check that it rotates easily.
- Press the brake pedal several times until the pistons are in the working position.
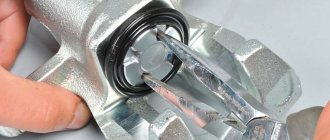
How to properly install pressure springs
This question has divided all professional car mechanics into two camps. Some argue that it is correct to install from the brake disc side, as shown on the left side of the screenshot below, others - from the brake cylinder side, as shown on the right.
The first ones say - there is no difference, the main thing is that they press the pads and do not let them “rumble”. The latter explain it this way: if you install “gulls” on the disc side, then with their edges they will press the brake element against the disc, increasing wear on the friction clutch. If you install it with the side facing the cylinders, they seem to move them apart; they do not come into contact with the disk, so there is no wear during movement.
If you think logically, then the second part of the people is right. The springs have a design in which they, with their rounded edges, attract the pads in the direction of their installation. Therefore, if you place the springs on the inside, their edges will slightly press them against the disk - they will wear out faster. If from the inside, then there will be no such effect.
Video on how to shoot a classic in a garage:
When product replacement is required
Both the front and rear wheels are characterized by the use of 4 brake pads to ensure effective braking. Only in design these products are very different, although the principle of operation is similar.
The rear pads of the VAZ 2107 are presented in the form of an arched steel structure, on the outer part of which a friction layer is applied. It is due to the friction of this layer against the inside of the drum that the car stops. If you do not replace the brake elements in a timely manner, this will be fraught with the development of unpredictable consequences, because the most important thing for any car is the serviceability of the braking system.
It will not be possible to determine this fact without removing the wheel and dismantling the drum. But this is one of the main ways to determine whether the brake system is faulty. There is a second option, which is more convenient and does not require dismantling the rear wheel. To do this, you need to listen for signs of squeaking of the rear wheels, as well as grinding and lack of braking effect, but this can lead to damage to the drum itself. You can squeeze the handbrake while standing on a slope and check that it is working correctly. Of course, the cable on the handbrake may become loose, but if you tighten it and still have no effect, then it’s time to start replacing the pads. If the rear brakes are not functioning, then it is time to change the pads. It is recommended to change them as a set on both rear wheels, since they are often worn out at the same time. What is the process of replacing rear brake pads on a VAZ 2107 will be determined further.
On a note! All four pads on the rear wheels need to be replaced at the same time, even if the friction linings are worn unevenly.
Instructions for replacing rear pads
At the beginning of the work, it should be noted that the handbrake must initially be lowered to its lowest position. This will allow you to dismantle the brake drum and thereby get to the worn parts. To begin replacing the brake pads of a VAZ 2107, it is necessary to remove the rear wheel:
- There is a drum behind the wheel, which also needs to be removed. There are no problems with this, so we move on.
- After removing the drum, it is necessary to inspect the worn pads. If the thickness of the friction lining exceeds 1.5 mm, then there is no need to replace the products. Before carrying out further work, it is necessary to clean the mechanism from dirt and dust. To do this, you can use a brush or cloth.
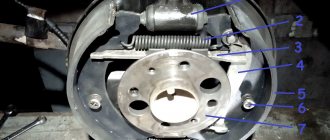
- If the products need to be replaced, then you need to take a screwdriver and then remove first the upper, then the lower connecting springs. If you can’t dismantle it with a screwdriver, then you should use pliers. The photo below shows the springs that should be removed.
- Next, you need to remove the clamps, which consist of a rod, a washer and a spring. These washers must be rotated 90 degrees to remove them through the slots. This is what the washers that hold the pads look like.
- Similar procedures are carried out with the second block.
- After removing the springs and clamps, the pads are removed independently.
- The parking brake locking pin is straightened. The photo below shows the location of the locking pin. Now you need to unscrew the parking brake lever. This can be done using pliers. After this, the washer is removed, then the lever.
- During the dismantling process, you will have a question, what to do with the parking brake tip? It must be disconnected from the product and then left hanging.
- If necessary, it is recommended to replace all parking brake parts that were removed from the old product with new ones.
The rear brake pads on the VAZ 2107 should be installed in the reverse order of removal. Before installation, remember to bring the brake cylinder pistons as close as possible. Despite their simple design, installing them is much more difficult than the front ones.
But having completed the procedure once, all subsequent repairs will be much easier for you.
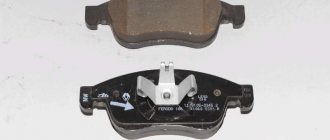
The cost of new pads starts from 800 rubles per set, but it is important to purchase high-quality products, and not Chinese “consumer goods”. Not only the service life of the products, but also the braking of the car will depend on this. This completes the replacement procedure, if you have any questions, be sure to ask them
This completes the replacement procedure; if you have any questions, be sure to ask them.
Signs of faulty brake pads
In order to fully replace a set of (rear and front) brake pads on a VAZ-2107, you need to know the signs of a malfunction:
- on the metal plates that protect the block from friction, cracks and chipped places are visible;
- the front pad is about 2 mm thick, and the rear pad is 1.5 mm thick;
- the plates are smeared with oil.
It is important to remember that removing the wheel will help determine the degree of pad wear. In order to see the condition of the rear ones, the owner needs to remove the brake kit drum. The process always requires more time and effort.
Experts emphasize the existence of other ways to determine possible problems with pads:
- when braking, the car pulls to the side;
- You hear a certain sound (creaking) when you press the brake pedal.
When should you change rear pads?
As mentioned above, if you hear a squeaking sound from the rear of the car when braking, then it’s time to check the rear brakes. This is the first sign that the pads need to be replaced. In addition, their resource does not exceed 40-50 thousand km, knowing the quality of spare parts, it is even less.
After opening the drum and visual inspection, if the thickness of the friction lining is less than 2-1.5 mm, we change the pads . It may be that the thickness is still sufficient, but chips are found on the working surface or the material has delaminated. There were times when it simply fell into the drum and there was nothing to slow it down. At the same time, a strong metallic grinding sound was transmitted into the cabin when the brake was pressed.
An indirect sign of the need for replacement can be a non-working “hand” brake. The handbrake tension adjustment cable is tightened, you are standing on a slope, lifting the parking brake handle, and the car is rolling - it’s time to change it. This method is not 100% correct, because there may be other factors that affect the serviceability of the handbrake.
Signs of wear on VAZ 2110 pads
- The characteristic sound during braking is a creaking, grinding sound.
- When pressing the pedal, a shaking (beating) is felt; this occurs if the pad is deformed.
- “Sinking” of the brake pedal, change in pedal sensitivity.
- Increased braking distance.
- Black carbon deposits on the wheel rim.
- When the friction lining reaches one and a half millimeters.
Replacing brake pads (linings) yourself will not be particularly difficult, and given the current cost of service at stations, it is also quite important for the average driver. Let's look at this process step by step below.
How to choose spare parts
How long the pads will last depends on the driver’s driving style (aggressive driving) and the conditions under which the car has to be driven. The pads wear out faster if the car moves around the city in jerks: either picking up speed in fairly short sections, or using sharp braking.
The procedure for replacing brake pads is carried out on both wheels of the same axle at once. Wherein:
- Be sure to analyze the condition of the parts and mechanisms of the brake system.
- To assess brake disc wear, use a caliper and measure its thickness.
- Check the entire assembly for damage and find out if the geometry of the structure is broken.
Replacing rear brake pads on VAZ 2101-2107 cars
Reasons why you should start replacing the rear brake pads on VAZ-2101, VAZ-2104, VAZ-2105, VAZ-2106, VAZ-2107, Classic cars:
- The thickness of the rear brake pads is less than 2mm
- The lining of one of the pads has come off the metal surface (brake pads are always replaced as a set).
- oil or brake fluid getting on the linings.
List of tools and choice of work location for replacing rear brake pads on VAZ-2101-2107, Classic cars. Everything is simple here. It is better to carry out the work on a viewing hole or a lift, for two reasons - convenient access to the parking brake adjustment mechanism and the ability to quickly remove a stuck rear brake drum. An arsenal of necessary tools: a hammer, pliers, socket wrenches for 12, 13 and 7. Also, a special hook for removing and installing the tension springs of the rear brake pads will be useful. You can make such a device yourself or buy its analogue at the car market. Yes, you can do without it, using a screwdriver or pliers, but it will waste much more nerves.
And now the actual process of replacing the rear brake pads:
- After installing the car on the inspection hole, first unscrew the nut for adjusting the tension of the handbrake cable.
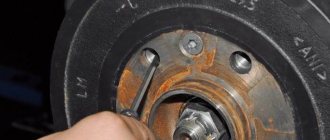
2. Loosen the wheel bolts and jack up the car. Unscrew the bolts and remove the wheel. We tap the guide bolts with a hammer and use a 12 wrench (in some cases a 7) or pliers to unscrew them.
- As a rule, the brake drum does not want to be removed, since it manages to become thoroughly stuck to the axle shaft over a certain period of time. There are two ways to solve the problem of dismantling the drum. The first way is to spray the brake drum with penetrating lubricant and, using two M8 bolts, try to tear the drum off the axle shaft. Often this is a long and ineffective way. The second method is to take a wooden block and a hammer and decisively and quickly knock down the brake drum.
- After removing the drum, the first thing we pay attention to is the position of the parking brake lever. If you have completely unscrewed the handbrake cable adjustment nut, and the lever is not near the block, then the handbrake cable is bitten and must be replaced with a new one. If you leave it as it is, then after installing new pads, it will be problematic to tighten the drum, and the parking brake will not work.
- Next, remove the upper tension spring. We press on the cup of the support post, scroll it until the slot in the cup matches the shank and remove the two cups and springs from the post. After this, all that remains is to remove the tail of the parking brake cable from the lever. We clean the support disk from dirt and rust. We check the condition of the brake cylinder; if there are signs of brake fluid leakage, the cylinder should be replaced with a new one. The same must be done if the pistons of the brake cylinder have become sour and have lost mobility.
- Next, we move on to preparing new brake pads. To do this, remove the parking brake drive lever from the old block, pull out the cotter pin and remove the washer, lever and axle. We install the lever on the new block. Please note that the handbrake cable drive levers are left and right and should not be confused.
- After preparing the back of the pads for installation, you should have something like this:
Next is the installation process:
- We install the pads. First, we hook the handbrake cable to the rear brake shoe lever, install the support post, insert the spacer bar (the double slot faces the rear shoe), hang the front shoe on the support post, tighten the pads with the upper spring, then tighten the lower one. Before installing the brake drum, lubricate the axle shaft with copper grease, this will prevent the drum from sticking in the future. We put the drum on and tighten the guide pins.
All! All that remains is to press the brake pedal a few times, thereby setting the pads to the working position and adjusting the handbrake. The wheels must be free and the parking brake lever must be fully lowered. Tighten the adjusting nut until the rear wheels are completely locked when the parking brake lever is raised 4-6 clicks. When the handbrake is lowered, the wheels should turn freely, without jamming
We remove the old ones
We jack up the rear wheel of the VAZ 2107 and remove it. You must first take the necessary safety measures: install shoes under the wheels, place a safety stand under the body. This task is usually not difficult. Next it will be a little more difficult. It happens that the brake drum gets stuck to the axle shaft, and it is impossible to remove it using standard means.
In this case, the drum is “torn off” - the guides are unscrewed, the car is started, the gear is engaged and the speed is increased, and then the brake is sharply pressed.
READ Replacement Rear Brake Pads for Skoda Fabia
Be very careful when performing this operation - ensure that the VAZ 2107 is securely secured so that it does not fall off the jack.
- We remove the brake drum and check the condition of the brake pad linings. In addition to wear, there may be a partial breakage of the linings, since, unlike the front ones, the rear ones are not solid. We determine whether one or both pads need to be replaced.
- Using a flat-head screwdriver, remove the lower tension spring;
- Using pliers, remove the spring clamps from the guides, turning them until the slots match;
- Using a screwdriver, press on one end of the upper spring and remove it.
This is the last action, after which nothing holds the pads anymore, and they fall.