Structurally, all Dusters, even the second generation, have drum brakes. They are also found on models such as Renault Captur and Arcana. The design is as similar as possible. Therefore, the instructions with photographs are suitable not only for Duster, but also for Kaptur and Renault Arkana. The process is quite complicated and requires quite a lot of time and patience. After all, the main problem may be the inability to remove the drum. But if you really want to, you can do everything yourself without going to a car service center.
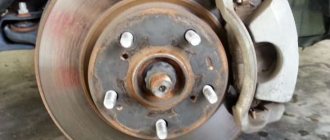
To start work, we hang up the rear wheel, having first loosened the fasteners, finally unscrew the wheel and begin to disassemble it.
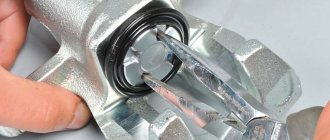
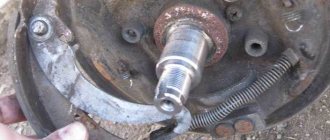
Task number one is removing the drum. To facilitate the process, it is necessary to bring the pads together as much as possible so that they do not stand apart and do not interfere with the removal of the drum. To do this, using a slotted screwdriver, through the threaded hole into which the wheel fastening bolt is screwed, we rotate the ratcheting nut of the mechanism for automatically adjusting the gap between the pads and the drum, thereby reducing the length of the spacer bar.
For clarity, the operation is shown in the photograph with the drum already removed, in order to understand the essence of the process. We rotate the ratchet nut on the left and right wheels by the teeth from bottom to top, this is what will allow the pads to be moved away from the working surface of the drum.
Signs you need to replace your brake pads
The main signs of friction lining wear:
- reduction in the volume of working fluid in the compensation tank in the absence of leaks;
- reduction in the efficiency of mechanisms when the pedal is suddenly applied;
- presence of extraneous sounds when using the brakes.
The manufacturer does not regulate the service life of brake linings, since the wear rate of the material depends on operating conditions and driving style.
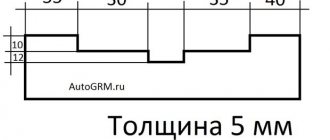
Some cars are equipped with an ESP system that stabilizes the trajectory by braking the wheels. The operation of electronics additionally loads the mechanisms and accelerates wear of the pads. The machine manufacturer recommends installing new parts with a remaining friction layer thickness of 2 mm. The service life of parts, according to owners, ranges from 40 to 80 thousand km.
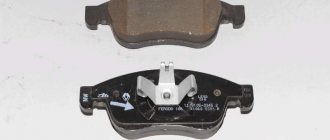
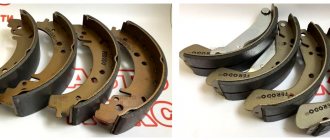
What parts to choose for replacement
Before replacing the rear brake pads on a Renault Duster, spare parts are purchased, the design of which depends on the type of transmission. For crossovers with front-wheel drive, an original set is available with article number 7701210109 (price from 2.7 thousand rubles).
The Renault Duster 4x4 modification is equipped with linings with number 440607493R (price 3.6 thousand rubles). When servicing, you may need a repair kit 7701205518 (cost 2 thousand rubles). The set does not depend on the type of drive; it is possible to use an analogue of ATE (code 03013792282).
Analogs of pads for 4x2 modification:
- Brembo S68546 (from 1.85 thousand rubles);
- Girling 5187809 (from 1.8 thousand rubles);
- TRW GS8780 (from 2.2 thousand rubles);
- Valeo 564104 (from 2.1 thousand rubles);
Analogs of pads for 4x4 modification:
- Brembo S68524 (from 1.48 thousand rubles);
- Valeo 564210 (from 2.6 thousand rubles);
- Textar 91082900 (from 3 thousand rubles);
- Ferodo FSB4194 (from 3.2 thousand rubles);
Spare parts, maintenance
Products from the Dustershop77 range that may be of interest to you:
| Image | vendor code | Name | Manufacturer | Price | Availability | Add to cart |
| BR-001-GARD-URDP | Mud flaps enlarged (widened) Duster-GARD front | Duster-Guard | 1300 / 1100 rub. Discount: 1000 rub. | >10 | ||
| DC495 | Discount card (Dusterclubs.ru, Dustershop77.ru) | 700 / 500 rub. Discount: 500 rub. | >10 | |||
| DC218 | Air deflector “Warm feet” for Duster, Logan, Sandero, Largus | 500 / 300 rub. Discount: 250 rub. | >10 | |||
| patriot-001-1 | Gearbox coupling and gas tank protection (steel) | Patriot | 5400 / 4500 rub. Discount: 4000 rub. | 5 | ||
| 005-008502 | Trunk sill protection | Russian Artel | 1500 / 1100 rub. Discount: 900 rub. | 4 | ||
| PT014-7010402-RDU112901 | Trunk sill trim PTGroup | Pt GROUP | 1300 / 1100 rub. Discount: 850 rub. | >10 | ||
| NRD-009102 | Frill under the windshield (RA) | Russian Artel | 1800 / 1700 rub. Discount: 1600 rub. | 4 | ||
| DC654 | Frill with fastening without 3M tape (Duster/Terrano) (ArtForm) | ArtForm (Yuago) | 3500 / 2500 rub. Discount: 1900 rub. | >10 | ||
| R12711 | Wind deflectors (window deflectors) COBRA/Autoplex | COBRA/Autoplex | 2000 / 1600 rub. Discount: 1500 rub. | 6 | ||
| RA0052 | Door sill trims (front+rear) RA | Russian Artel | 2500 / 1600 rub. Discount: 1400 rub. | >10 |
Step-by-step instructions for all-wheel drive cars
The linings are replaced as a set; it is prohibited to use elements with different thicknesses of the friction layer. If there is uneven wear, the car may move to the side when braking.
Before changing the pads, check the amount of fluid in the reservoir. The level is brought to the Max mark (for example, using a rubber syringe or a medical syringe). When installing new linings, excess fluid may leak into the engine compartment.
Algorithm of actions when replacing pads:
- Place the car on a level surface and turn off the engine.
- Secure the vehicle with wheel chocks and release the parking brake lever down.
- Raise the body with a jack and install a steel safety stand under the threshold.
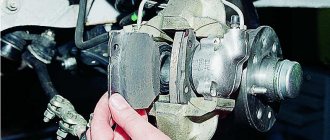
- Unscrew the bolts and remove the wheel from the hub.
- Push the pads toward the center using a flathead screwdriver, which is inserted into the drum through the holes for the wheel bolts. The automatic clearance adjustment mechanism includes a spacer insert with a ratchet wheel. The tip of the screwdriver moves from bottom to top, reducing the length of the bar and moving the lining away from the working surface of the brake mechanism. The operation of the adjustment unit is shown in a video filmed by the owners of a Renault Duster.
- Using a Torx 40 socket, unscrew the 2 screws located on the front of the drum.
- After the bolts are unscrewed, you need to pull the metal casing towards you. If removing the part is difficult, then it is necessary to additionally bring the pads together. After removing the cover, it is strictly forbidden to press the brake pedal, since the pistons will be squeezed out of the brake cylinder.
- Use the tip of a screwdriver or the jaws of pliers to unfasten the tip of the upper spring from the metal frame of the front pad.
- Remove the opposite hook of the spring from the hole in the rear cover.
- Remove the lower spring in the same way.
- Remove the additional elastic element that maintains the gap between the friction lining and the working surface of the drum.
- Press in and use pliers to turn the stamped washer that holds the trim on the support rod.
- Pull out the rod from the opposite side of the drum mechanism.
- Remove the front trim retainer using a similar method.
- Move the rear block away from the shield, which will allow you to remove the tip of the cable going to the handbrake lever.
- Remove the block and spring installed on the metal end of the cable.
- Remove the front block, which is removed along with the spacer plate and adjustment mechanism.
Mechanism assembly
The springs and position adjuster are cleaned of dust; damaged parts must be replaced with elements from the repair kit. The washed screw mechanism and ratchet are coated with a layer of lubricant that is resistant to high temperatures. When reassembling the strip, take into account the multi-directional threads in the left and right holes. The regulator is mounted on the front pad, which is secured with a support rod. The rear block is fixed on the cable, and then the clamp and adjusting springs are installed.
A layer of dust (from wear of the linings and metal surface) is removed from the surface of the casing with a steel brush; if the height of the side exceeds 2-3 mm, then it is recommended to replace the part. After assembling the unit, the position of the pads is adjusted.
To adjust, you need to press the brake pedal, and then raise the parking brake lever all the way 4-5 times (with the ratchet button pressed). With each lift, a ratchet is activated, which moves the pads towards the working surface.
The correctness of the setting is checked by the number of clicks; turning the wheel by 7-8 teeth is considered the norm. The adjustment stops when the clicking in the mechanisms stops. Then the level of working fluid in the tank is checked, and if the volume decreases, topping up is done.
Adjustment
As mentioned above, adjustment of the Renault Duster hand brake occurs after repairing or replacing the cable. Due to the fact that the handbrake design on the Renault Duster has a self-regulating device, tension adjustment occurs without any problems, but the handbrake itself must be tightened independently. Adjustment occurs by moving the handle down and up, as well as by fully pressing the pedal. During this process, several clicks of the ratchet occur, after which the handbrake begins to work properly. If the line has weakened, it needs to be tightened; this can be done correctly as follows:
- Remove the plastic panel located between the passenger and driver
- Raise the rear of the car using a jack
- Press the brake with your foot several times and hold the pedal pressed.
- We take the key to 10 and rotate the adjusting washer clockwise, adjusting the cable Read also: Car clutch pedal sensor
- We raise the handbrake to the working position and at this moment about eight clicks should be heard, if there are fewer of them, then you need to loosen the cable by unscrewing the adjusting nut counterclockwise
After the Renault Duster handbrake has been adjusted, it is necessary to make a final check; to do this, lower the handbrake and spin the rear wheels, they should spin freely. Place the handbrake in working condition, in this position the wheels should be motionless.
The handbrake adjustment should be made after replacing any brake elements, as well as after any work related to the brake system.
Replacing pads on a front-wheel drive Duster
In the modification with a 4x2 transmission, a torsion beam with modified drum mechanisms is used at the rear. We remove the wheels and bring the pads together with the tip of a screwdriver, then you need to dismantle the metal protective cap located on the hub. Under the plug there is a central nut, which is unscrewed using a 36 mm socket. The casing with the pressed-in rolling bearing is pulled off the pads. Further actions are identical to the procedure for servicing the rear brakes on a Renault Duster with all-wheel drive.
When reassembling, it is recommended to install a new central nut, which is tightened with a torque wrench to a torque of 175 N*m. The element is automatically fixed on the threaded axis; there is no need to install cotter pins or deform the edge. If there is no new nut, then the self-locking functionality is restored by deforming the existing chamfer with a hammer. The part is placed in a vice with jaws spaced 12-15 mm apart, focusing on the edge, and then the chamfer is crushed at 3 points.
We change it with our own hands
To replace the rear pads, the Renault Duster must be placed on a flat surface. Also, the entire set of parts should be used in the procedure. That is, during the replacement operation, 4 pads must be installed. If the procedure affects only one brake, the vehicle will roll to the side while driving.
The procedure begins with the brake fluid being removed from the reservoir located under the hood using a syringe. Subsequently, the wheel is removed (or both at the same time). To remove the drum, you will need a flathead screwdriver. The latter must be placed in the hole where the wheel bolt is screwed in. Then, using a screwdriver, you need to find and unscrew the ratchet nut, thereby reducing the length of the spacer.
The procedure for replacing brake pads on 4WD and 4WD crossovers is slightly different.
Replacement for Renault Duster 4x4
Using a Torx-T40 wrench, remove the 2 screws holding the drum in place. After completing the operation, do not press the brake pedal. This may cause the pistons to protrude from the wheel cylinder.
The rear wheel brake on Duster 4x4 models includes the following elements:
- spring cup;
- supporting support;
- front and rear pads;
- compression spring;
- upper and lower extension springs;
- spacer bar;
- wheel cylinder;
- governor's spring;
- parking brake lever and cable;
- brake shield
Replacing four brake pads (two per wheel) on a Renault Duster is carried out in the following steps:
- Using a screwdriver, remove the upper and lower compression springs.
- Using a screwdriver or pliers, remove the slack adjuster spring.
- Using pliers, the spring cup of the rear bearing support strut rotates. It should stop when the groove lines up with the shank.
- The bowl with the spring is removed.
- The support is removed from the brake pad.
After completing the manipulations, it is necessary to perform similar actions in relation to the part located in front.
After this you need:
- Remove the rear clamp from the shield.
- Use a flat blade screwdriver to disconnect the end of the parking brake cable from the lever.
- Remove this element and the cable spring.
- Remove the front block and spacer after removing the spring.
Before installing new parts, clean the threads of the ratchet nut and the tip of the spacer bar. Then fat is applied to these elements. The mechanism responsible for adjusting the gap is mounted at the rear. To do this, manually screw the tip of the space bar into the appropriate hole.
Installation of new products on Duster is carried out in the reverse order. Before installing the drum, it is necessary to remove traces of dirt and metal shavings from the surface.
In the end, the position of the parts installed on the Duster should be adjusted. To do this, press the brake pedal several times and then lock it. Then raise and lower the parking brake lever several times. While performing these manipulations, you can hear clicks resulting from the operation of the mechanism for adjusting the distances between the brake pads and brake drums. The procedure must be carried out until the extraneous sounds disappear.
Finally, check your brake fluid level.