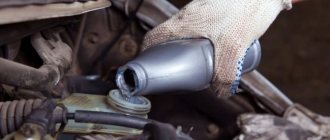
Since ancient times, some Taz drivers used first gear to prevent the car from rolling away, even with a handbrake, my dad always taught me to set the speed. But this can end badly if you don’t turn off the speed and start the car. Over time, the parking brake, due to constant use, stretches the cable, you can tighten it a limited number of times, then you have to remove it, because tightening it is already useless.
He stops holding the car and is not fixed. You can tighten the handbrake on the Priora with just two 8 keys in the hole. This is usually done in your garage. Replacing the drive and handbrake cable on a Priora will require additional keys. Of all the brake systems of the Priora car, the parking one stands out separately. It saves you from unpleasant surprises - while it is working, the car will not roll away in the parking lot. When the handbrake doesn't hold, you should start repairing it right away, maybe you just need to tighten it. Lada Priora received the part as early as 2108 - it has not been changed since then.
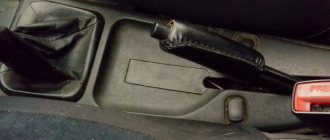
When the driver raises the handbrake handle higher and higher to hold the car in place, this indicates that the parking brake system is not working. Most often this can be solved by tightening it, just tighten the cable and the handbrake will hold. There may be several malfunctions in the parking brake system of a Priora car; read the article to the end and find out about them.
Handbrake (parking brake) on Priora - article number and price
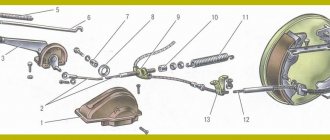
The assembled parking brake system of the Priora car has the catalog name “Handbrake drive” - number C170. Main components:
- cable bracket: 2108-03508214-20, 30 rubles;
- handbrake cable: 2110-03508180-01, price - 400 rubles;
- parking traction axis: 2110-03508073-00, price - 500 rubles;
- laying of parking rod 2110-03508089-00;
- parking drive rod: 2108-03508089-00, price - 250 rubles;
- parking brake lever (assembled): 2110-03508012-00, price - 600 rubles. Button – 2110-03508039-00;
- lever assembly with rod: 2110-03508010-00, price - 1300 rubles;
- traction protective cover: 2108-03508046-00, price – 40 rubles;
- cable equalizer: 2108-03508075-10, price – 50 rubles.
How much does it cost to tighten the handbrake and can you do it yourself?
Actually the question is rhetorical, as you understand in different regions, the cost can range from 200 to 1000 rubles. For example, in the capital, the price is often 500 – 1000, but in the regions you can raise it for 250 rubles.
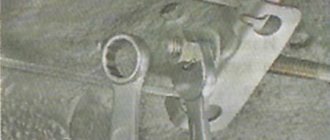
And to be honest, the work itself only takes a few minutes, the main thing is to find a hole or a lift, a key of 10 and off you go. You need to tighten the middle bolt, the one that is in the middle, it is the handbrake, tighten the nut and thereby tighten the cables.
Of course, if they are rusty or torn, then everything is much more complicated; it is better to trust the master, because replacing the cables from the rear drums is not at all an easy task.
That's all, read our AUTOBLOG, I think it clarified the situation.
(11 votes, average: 4.36 out of 5)
Similar news
Rust converter composition. Can I do it myself?
How to unscrew a brake pipe. If it has soured and the edges are torn off.
Anti-squeak plates for brake pads. Why are i needed?
Basic faults
According to the law, a malfunction of the handbrake is accepted in two cases:
- If, at a 16% slope, the handbrake does not hold the equipped car (without cargo and passengers, but with a full tank of gasoline, the driver’s weight is taken to be 75 kg).
- If, on a 23% incline, the handbrake does not hold the vehicle at full load (the maximum permissible vehicle weight has been reached).
In reality, more often than not, a malfunction of this brake mechanism of the Lada Priora is noticed not by measuring the steepness of the slope, but by clicks. When another click of the handbrake is added to the usual “set of sounds” when leaving the car, every car enthusiast understands that it’s time to tighten the cable.
But the problems don't end there. For the parking brake system they can be as follows:
- The cable has stretched too far. Over time, it undergoes deformation. It can be tightened, but to a certain extent.
- The cable broke. When the “limit” is reached, the mechanical device will have to be replaced.
- The handbrake indicator on the dashboard does not light up or go off. This is due to the sensors.
- The lever button is stuck.
Why did it happen so?
Perhaps the automatic requests do not belong to you, but to another user accessing the network from the same IP address as you. You need to enter the characters into the form once, after which we will remember you and be able to distinguish you from other users exiting from this IP. In this case, the page with the captcha will not bother you for quite a long time.
You may have add-ons installed in your browser that can make automatic search requests. In this case, we recommend that you disable them.
It is also possible that your computer is infected with a virus program that is using it to collect information. Maybe you should check your system for viruses.
If you have any problems or would like our support team, please use the feedback form.
In the article we will talk about the handbrake system and describe how to tighten the handbrake on a Priora. This will help the owners of this car to limit themselves to independent work, without having to pay for the services of a service center. Knowing the design of the system, regulation will not take much time.
How to change the handbrake on a Priora - step-by-step guide
Replacing the handbrake cable is needed when a regular tightening is no longer an option; you will have to change the cable or drive. In order to replace the cable on a Priora car, prepare a Phillips screwdriver and a set of keys.
Replacing the cable is carried out as follows:
- Place the car in the pit, lower the handbrake, and engage the gear.
- Jack up the rear of the car, put supports on it, and remove the wheels. Further actions will be described on one side, they will need to be repeated on the other side.
- Loosen the main muffler and hang it up. Do the same with the resonator.
- Slightly loosen the handbrake rod locknut. Remove the cable equalizer.
- Remove the cable end by pulling it through the special bracket.
- Remove the brackets that hold the cable in place.
- Using a screwdriver, press down on the actuator lever to move it further away from the brake pad. The lever should move to the forward position. After this, you can disconnect the cable tip from the brake lever.
- Loosen the nut on the rear beam that holds the cable, and then pull it towards you.
- Pull the cable through the bracket that is attached to the body, then through the brake shield.
- Check the parking brake and make adjustments. If necessary, tighten the nut more.
In order to change the Priora handbrake lever, you will need a set of keys, pliers, and a Phillips screwdriver.
Replacing the handbrake of Lada Priora (VAZ Priora)
Operations performed when repairing the parking brake lever on a VAZ 2170 2171 2172 Lada Priora
The parking brake lever is a brake system and not only the operation of the brake system during parking, but also your safe movement depends on its serviceability. So, in particular, the rear brake pads are set using the hand brake; in the event of a malfunction of the hand brake system, the rear brakes may not be sufficiently effective.
You will need: two 13mm wrenches, a 13mm socket wrench (head), a Phillips screwdriver, and pliers.
Removing elements of the parking brake system
We replace the parking brake cables when they are broken, pulled out, or stuck inside the sheaths, when adjusting the parking brake fails to keep the car stationary on a slope - up to 25% inclusive. We remove the parking brake lever to replace it or to replace the lever rod. The cables should be replaced simultaneously - left and right. We show the replacement of the left cable. Move the parking brake lever to its lowest position. We unscrew the locknut and the adjusting nut from the parking brake lever rod (see “Adjusting the parking brake”).
Adjusting the handbrake: how to tighten or loosen
The parking brake is an integral part of the automobile braking system. Its purpose is to prevent spontaneous movement of the vehicle when parking.
Replacing the Priora parking brake cable
The handbrake is used in extreme cases - for example, when the brake fails. Without a handbrake it is difficult to move on a sloped road. As you can see, the parking brake is a useful mechanism.
Therefore, keep the handbrake in working condition and regularly carry out diagnostics, tighten and adjust it.
Checking the serviceability of the handbrake
Every car enthusiast can carry out the simplest diagnosis of proper operation of the parking brake. Select a section of road with a slope of 23–25%. Stop, put the gear in neutral and tighten the handbrake. If the car does not move after releasing the main brake pedal, then the handbrake operates.
How to use the handbrake
On a note. Car maintenance service workers recommend checking the operation of the parking brake at least once a month.
When tightening the parking brake lever, pay attention to the number of clicks of the ratchet mechanism. If the handbrake is in good condition, there should be from two to four clicks. If there are fewer of them, then you need to release the parking brake drive
Otherwise we tighten it up. Let's look at step-by-step adjustment of the handbrake using the example of a Lada Kalina car.
If there are fewer of them, then you need to release the parking brake drive. Otherwise we tighten it up. Let's look at step-by-step adjustment of the handbrake using the example of a Lada Kalina car.
It is convenient to carry out adjustments on an inspection hole or overpass. It's better to do it with an assistant. You will need the following tools: two open-end wrenches for 13, a wrench, an extension, sockets for 10 and 13, WD-40.
In motorsports, the handbrake helps put the car into a controlled drift. This requires certain skills and abilities.
Which handbrake cable is suitable for the grant?
Remove the muffler from the rubber pads and move it to the side
To get to the handbrake adjustment mechanism, you must first remove the muffler from the rubber cushions and move it to the side. There is protection above the middle part of the resonator. It needs to be removed. The protection is secured with 4 bolts, unscrew them using a wrench and a 10mm socket.
Unscrew the protective screen over the central part of the resonator. It is secured with 4 bolts with a 10mm head.
Pull up the parking brake
- Lower the handbrake lever down.
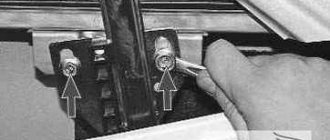
- Loosen the drive locknut with a 13mm wrench. Using a 13mm wrench, unscrew the locknut on the handbrake rod
- Tighten the nut on the lever rod. The length of the drive will decrease, the tension will increase.
- Check the operation of the handbrake. Tighten it up to 4 clicks.
- Spin the rear wheels. If they are fixed, then tighten the locknut.
If the wheels rotate with difficulty when the handbrake is lowered, then the parking brake must be loosened.
- Lower the parking brake handle down.
- Loosen the locknut.
- Unscrew the nut on the lever rod, the cable tension will decrease.
- Check how the wheels rotate. If they rotate freely, tighten the locknut.
Checking operation after adjustment
After replacing the brake cables, drum shoes and adjusting the parking brake drive, the handbrake operation is checked and adjusted.
Place the car on an overpass or inspection hole. We will divide the adjustment procedure into 2 stages. At the first stage, we check the operation of the parking brake when it is not tightened.
- Hang up the rear wheels.
- Lower the handbrake lever down.
- Rotate the rear wheels by hand; if the pads rub against the brake drum, then you need to release the parking brake drive.
- Loosen the locknut on the lever rod. Unscrew the nut on the lever rod a few turns.
- Repeat steps 3, 4 and ensure that the wheels begin to rotate freely without any extraneous noise.
Second stage: checking the operation of the handbrake
- Tighten the lever 4 clicks and try to spin the wheels. If they spin freely, then you need to tighten the handbrake drive.
- Release the locknut.
- Tighten the nut on the rod a few turns.
- Release the parking brake lever and tighten again 3-4 clicks.
- Spin the wheels one by one. Full locking in a correctly adjusted parking brake occurs at 4 clicks.
- Repeat steps 3–5 if the handbrake operates at the 5th click or higher.
After adjustment, tighten the locknut. Install the protective screen and hang the muffler on rubber pads.
When operating your vehicle, do not neglect the parking brake. Its serviceability will improve driving safety and help avoid troubles on the road or parking lot. Check the handbrake every month. If any malfunctions occur, fix them as quickly as possible.
Manual brake lever with rod assembly for Lada Granta / VAZ 2190 from 2011
- Dmitry Kuznetsov
How to remove the handbrake lever. General leadership
1). Parking Brake Components.
2) . Remove the top panel of the console . Using a screwdriver, release the 4 latches and remove the top panel of the console. Remove the rear end panel of the console. Remove the glove box on the console. Remove the cover.
3) . Glove box mounting bolts . Remove the 4 bolts and remove the glove box.
4) . Remove the parking brake lever . Unscrew the locknut and the adjusting nut. Remove the 2 bolts and remove the parking brake lever. Raise the lock. Disconnect the parking brake cable from the lever. We unscrew the screw and remove the parking brake sensor assembly.
How to remove the hand brake lever on a VAZ 2114
1). Set the lever (1) to its lowest position.
2). Disconnect the cable ends (10) from the levers (13) of the manual drive of the shoes and from the equalizer (6). To do this, unscrew the lock nut (9) and the adjusting nut (8) from the rod (5).
3). Then remove the washer (7) and equalizer (6).
4). Having taken out the cotter pin and axle (12), remove the washer (14), lever (13) and release bar (15) of the pads.
practical guide
The need to replace the parking brake cables arises if the cables, as a result of corrosion, have lost the ability to move in the sheath, have become very stretched, or have broken threads.
If it is necessary to replace one of the cables, we also change the other cable.
Removing the parking brake cables:
1. We prepare the car for work.
2. Remove the brake drums.
4. Remove the rear protective screen.
5. Loosen the locknut of the parking brake lever stroke adjusting nut and unscrew the locknut.
6. Using a socket wrench with a 13 mm deep head and a cardan joint, unscrew the adjusting nut and remove it from the rod.
7. Remove the adjusting rod cable equalizer.
8. Disconnect the cable ends from the equalizer.
9. At the brake mechanism of the left rear wheel, use a large slotted screwdriver to move the spacer lever forward and remove the cable eyelet from the hook of the spacer lever.
10. Using a 10 mm spanner, unscrew the nut of the bracket securing the cable to the left arm of the rear suspension.
11. Remove the front cable end from the hole in the body bracket.
12. Remove the cable from the two brackets securing it to the underbody.
13. Remove the cable from the rear suspension beam bracket.
14. We take the cable out of the hole in the support shield of the rear brake mechanism and remove it.
How to remove the handbrake lever on a VAZ 2109
1). From the bottom of the car, unscrew the locknut and the equalizer adjusting nut.
2). Remove the equalizer from the lever rod.
3). Remove the protective cover.
4). Remove the protective cover of the gear shift lever from the floor tunnel lining.
5). Remove the floor tunnel lining.
6). Remove the floor tunnel lining by sliding it back.
7). Unscrew the four mounting bolts and remove the lever.
 . Remove the retaining ring, remove the axle and disconnect the rod from the lever.
9). Unscrew the button and remove the pawl spring. You just need to do this carefully, since the force of the compressed spring acts on the button.
10). Reinstall the lever in the reverse order of removal.
How to remove the hand brake lever on a VAZ 2110
How to remove the hand brake lever on a Lada Kalina?
1). Remove the floor tunnel lining.
2). From the bottom of the car, unscrew the lock nut and the parking brake adjusting nut and remove the equalizer from the rod.
3). From inside the cabin, unscrew the screw of the front fastening of the parking brake lamp switch bracket.
4). Remove the 4 bolts securing the parking brake lever.
5). Remove the parking brake lever by removing the rod from the hole in the floor.
6). To replace the rod, remove the cotter pin (1) and the washer (2).
7). Remove the rod from the axle.
. Replace the worn or cracked plastic bushing.
Replacing handbrake cables — Lada Priora Universal, 1.6 l., 2011 on DRIVE2
My father inherited a car with a very poorly functioning handbrake, which didn’t suit me at all. The handbrake only worked for a couple of clicks, but it only held on in a straight line; any slope and the car was already rolling. I decided that the problem was in one of the cables that was jammed. At one point I decided to change the pads. As it turned out, they were not the only ones that required replacement. Spare parts: Hand brake cable 2 pcs. RUB 412. Rear brake pads set for ABS? R. (bought a long time ago by my father) Brake cylinder 2 pcs. 500 rub. Brake fluid There is not a lot of information about replacing cables or anything complicated, we won’t stop.
Full size
We knock down the drum. Copper grease is not the best option for lubricating aluminum drums (oxidation occurs), we use ceramic grease
Full size
It is better to replace a drum with such grooves on the working surface because the new pads will then have the same pattern
Full size
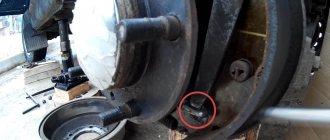
The handbrake cables were in perfect order. The finger of the handbrake foot is jammed dead.
Full size
The pads are in a sad state.
Full size
On both sides, one of the cylinders is sour and does not move, the second is leaking. The bleeder fitting on the cylinders does not open.
Full size
The old cables were not jammed, but the braid was cracked in some places.
The most difficult thing for me was to hammer in these splined elements
There is no photo of the final result.
Full size
Mileage: 81,000 km
How to remove the hand brake lever on a Niva Chevrolet?
1). Disconnect the rear cable from the guide from the tip of the front cable.
2). Remove the floor tunnel lining.
3). We unscrew the 2 bolts securing the lever bracket to the floor and remove the lever.
4). Remove the locking ring of the lever axle.
5). We take out the lever axis.
6). We pull the cable inside the cabin.
7). Install the new cable and lever in the reverse order of removal.