Car audio is an art and you can’t argue with that. To achieve clear and powerful sound inside the car, owners resort to various tricks.
The acoustic trunk of the VAZ 2114 is one of the ways that will help you get real and strong sound inside the car. You can build an acoustic trunk for a VAZ 2114 yourself, fortunately there is nothing complicated about it. Music, thirty years ago, at least in our country, was a rarity in a car. More precisely, it was there, but the sound evoked, to put it mildly, strange sensations.
Today, car audio is a whole culture, a special sphere where beauty, art and high technology are combined in the most amazing way.
Acoustic trunk in VAZ 2114
On the other hand, all this can become lyrical for a certain number of drivers who are not going to spend crazy money to get real acoustic comfort. Yes, music, let it sound, but not necessarily at the highest level; average quality is enough for us.
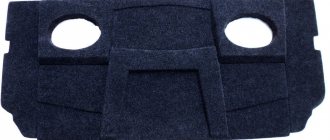
Acoustic shelves and podiums in the trunk
Especially in order to provide the car interior with average-level acoustics, very inexpensive, often homemade, acoustic shelves and podiums were invented. The shelves, in particular, very successfully replace the standard ones, and due to this alone the sound quality characteristics are significantly improved. And even the simplest-looking acoustic shelf can give an average sound to a music lover.
What can acoustic shelves and podiums provide?
So:
- The overall level of sound quality inside the car will improve.
- Extraneous sounds will disappear when playing music, especially clearly audible at high volume levels.
- It will become possible to install dynamic heads of various sizes that simply do not fit into the standard places prepared by the automaker.
Note. The presence of acoustic shelves and podiums will allow you to install large and heavy speakers in your car, the sound power of which is not comparable to small speakers.
- Installing acoustic components will make it possible to correctly mount speakers for a car radio and build entire acoustic scenes.
- The aesthetic component of the car is significantly improved.
An acoustic trunk shelf is not just an effective way to transform a car into a modern vehicle with all the amenities, but also a clear improvement in comfort, noticeable when traveling long distances. Listening to music on the road is pleasant, and listening to good music is doubly pleasant.
Note : The trunk of a VAZ 2114 car can not only be used to install an acoustic shelf, but itself act as an entire acoustic center. The speakers can be embedded into the trunk floor, in the corners and even on top, creating a real ensemble.
Like any acoustic system, the trunk of a car after modernization must meet the following requirements.
Speakers embedded in the sides of the trunk
- Have sufficient rigidity of the panels, thereby eliminating resonance phenomena that negatively affect the purity and strength of sound. Large speakers have considerable weight and, when playing at full power, must have reliable support underneath them.
Note. The design must be made in such a way that it minimizes almost all resonance phenomena, including rattling and so on. This is achieved by using a panel of sufficient thickness, the presence of stiffeners and the absence of flat areas with a large area.
- A tightness must be created, which will eliminate the occurrence of an acoustic short circuit, reduction in sound quality, etc.
Taking into account these above factors, a competent acoustic environment is created in the trunk of the VAZ 2114. Basically, typical acoustic trunk shelves should be made of wood or chipboard, but samples made of carbon fiber and carbon fiber are also known, which are no less effective. In addition to rigidity, sufficient thickness and good fastening, the acoustic shelf and podiums must be combined with the appearance of the interior. Because of this, they are covered with the same skin as the interior itself. Carpet most often plays the role of cladding. The shelves themselves in the trunk can have different types of designs, but today only two options are common:
- Single shelves in the trunk, which are more often used in sedans and are popular in VAZ cars. It is a simple panel with special holes for speakers.
- A prefabricated acoustic shelf, which already consists of three parts, and most often, this design is applicable in hatchbacks and station wagons, but is also suitable for the VAZ 2114. The main part of such a shelf is the central part, which folds down or is removed when loading luggage. As an addition, there are two fixed shelves on the side, into which the speakers are built.
Store shelves already have special holes for speakers, but an ardent music lover who expects strong sound and pure acoustic effect will not be satisfied with this option. Often shelves are made by hand, using multi-level acoustic podiums.
Troubleshooting solutions
An excellent way out of their current situation is to install the rear shelf of the VAZ 2114 yourself. Today, on numerous websites dedicated to cars, you can find a lot of options for making the necessary design on your own. If you don’t have the skills to work or free time, then an excellent solution is to buy an acoustic platform at an auto supply store. It is possible to select several modifications that differ from each other both in design and in the materials used in manufacturing. The price of the accessory depends on its design and the specific store, on average it ranges from 1,200 to 3,000 rubles.
Benefits of replacing the rear shelf
The main thing that car enthusiasts notice after installing a new, modified element is a more confident design that does not bend under the weight of even the most impressive-sized sound speakers installed on it. In addition, the acoustic characteristics of sound transmission are noticeably improved. This happens due to the fact that wood is the best conductor of sound impulses generated by speakers. In addition, the strength of the shelf and the reliability of its fastening prevent the appearance of unnecessary deformations, looseness, annoying squeaks and extraneous noise.
DIY acoustic trunk
Trunk with acoustic effect
As mentioned above, making an acoustic trunk yourself is not so difficult. It is enough to know the basic information and technology, and then act based on the scenarios of your own imagination. The process begins, of course, with preparing the trunk floor:
- A thick piece of cardboard is taken, from which a pattern is made for the future floor.
- The sketch is transferred to plywood, preferably not too thin, and outlined.
- Then the shape is cut out.
Preparing the floor for the acoustic trunk
- We take the foam rubber and shoot it at the ends of the plywood. This is done so that the plywood does not creak and sits softer.
- We cover the workpiece with carpet and install it in place.
Now the most difficult thing is to make the boxes so that they do not make noise on bumps, and everything looks perfectly beautiful. Of course, all this is done not only from an aesthetic point of view, but also in order to significantly increase acoustic comfort.
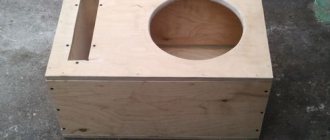
- Again, we cut out blanks for the boxes from plywood.
Subwoofer boxes
- The pieces of the workpiece are held together with glue and self-tapping screws.
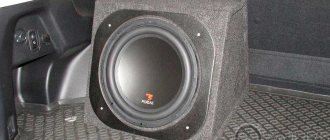
- The right and left homemade boxes are installed in the trunk and, like the floor itself, are covered with carpet.
- We install high-quality speakers and radio.
- Enjoy great sound.
Algorithm of actions
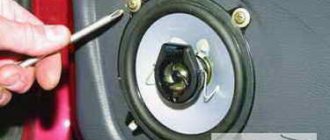
The first task is to dismantle the standard elements, leaving only the metal base.
Attaching the acoustic shelf
After that:
A drawing is drawn, markings are made on plywood or chipboard. The dimensions of the new surface are practically no different from the dimensions of the standard one. Chipboard sheet is thicker than plywood. If you were able to buy plywood or had it on hand, you can fold it in two or even three layers and glue it with wood glue. A shelf made of one layer of plywood may not be able to withstand the weight of the speakers and will crack. It turns out that the efforts were in vain, a mistake was made. The new part is cut out using a jigsaw. Its length may not correspond to the length of the one that was dismantled. You need to check this - try placing it on an iron base in the cabin. The original shelf is usually slightly larger in size due to the specific fixation. The new one should be one centimeter shorter in length. In order not to break the symmetry, shorten the board on both sides by 0.5 mm. Cut out holes for the speakers. Markings are applied, taking into account their future location. Don't rush to cut out the parts - if you make a mistake, you'll have to take new sheets of plywood or chipboard and start the whole job all over again. Holes for the speakers are cut in the metal base. Markings are made on the metal frame. They are cut using a grinder
This must be done carefully - there is a risk of sparks when the disk and surface interact. It is necessary to use personal protective equipment, such as goggles and gloves, a carpenter's coat or an apron
The car interior should be protected from accidental damage. Using an additional layer of plywood or chipboard, you can complicate the configuration of the acoustic shelf and achieve the effect of tilting the speakers in any direction. To do this, you need to draw a drawing of an additional part that will help create an angle. The outline should be transferred to a sheet of plywood or chipboard, cut out this element, glue it with wood glue to the inside of the main sheet, and additionally secure all parts with self-tapping screws. The edges are smoothed with a fine-section file and sanded. The resulting product can be coated with a wood primer and varnished so that the material does not deteriorate and lasts a long time. It can be negatively affected by high or low temperature in the car interior and air humidity. A cover is sewn from carpet. Carpet performs a thermal insulation function and reduces vibration. It is necessary for the salon to be beautiful and stylish. It will be difficult to guess that in fact the acoustic shelf is not purchased. The created structure is installed in the cabin and the speakers are connected.
Speaker shelf Job completed. The sound system will now function much better. When selling a car, you may feel a little embarrassed when telling a potential buyer about the upgrade. But if a convertible top is made, a new engine or a new steering wheel is installed, the interior, the skirt protects the bumper, the LED system is complicated, a self-made acoustic shelf will not cause surprise or disappointment to the buyer.
Acoustic shelf in the trunk
Option for an acoustic shelf in the trunk
As mentioned above, a shelf is also installed in the trunk. It may be a folding version, and on the sides there will be fixed shelves with speakers.
Basic moments
So:
- Installation of the shelf is carried out using self-tapping screws and corners.
- The process of installing the shelf is simple, especially on the VAZ 2112.
- The side panels can be left in the form of boxes, or you can remove the trim and make new ones (for example, like this).
Acoustic side shelf
- When installing fixed side shelves, you should ensure their rigidity and reliable fixation to the maximum extent possible.
- There are two ways to install speakers in side shelves: open installation, where the speakers are installed after installing the shelf, and hidden installation, where the speakers are installed in place beforehand.
Note : Regardless of how the speakers are installed, the wires are routed out in advance.
- When installing an acoustic shelf in the trunk, the damping effect should be taken into account. In this case, the trunk and shelves will need to be provided with a good sound-absorbing effect. If initially the walls and floor of the trunk of the VAZ 2114 were lined with thin and low-quality material, then everything can be changed. An expensive fleecy carpet laid on foam rubber or other vibration- and sound-absorbing material will solve this problem.
Noise and vibration insulation for acoustics
On this passage, full of optimism, we end our article. More detailed instructions for making acoustic shelves with your own hands can be downloaded from the Internet.
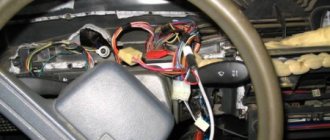
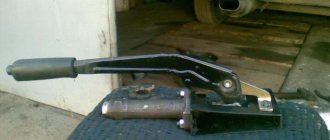
Front strut
Installing a front strut will help to correct the balancing in some way. It is a piece of pipe that can be easily installed with your own hands.
Again, you will first need to choose a spacer option. Today there is an abundance of front struts on the market, with front struts available in a wide range from various manufacturers.
Owners of used V8s are advised to choose an adjustable strut. The fact is that over time, on an old car, the strut cups get closer together. If the spacer is not adjustable, it will become difficult to install it (you will have to lift the car, use a mounting tool, etc.).
Here's how to install the front brace.
- A nut is unscrewed from each support (use a 13mm wrench);
- The distance between the support plates is adjustable (if an adjustable spacer is installed);
- The spacer is placed and the nuts are screwed into place.
As you know, the front strut for cars was invented by athletes. Even on cross-country V8s, it was widely used to strengthen the body when driving off-road. These amplifiers are also used in circuit racing. Here they offered a chance to increase steering sensitivity. In a word, the beginning of the use of spacers was associated with the beginning of the operation of the car in extreme conditions, when there were prohibitive loads on the body.
The body of the G8 is quite rigid and under normal operating conditions there is no particular reason to strengthen it. But today few people drive on good, ideal roads. Reinforcement in this case will not only help improve driving comfort, but will also significantly extend the life of the car body.
Do-it-yourself acoustic shelf for VAZ 2114
Acoustic shelf for VAZ 2114
An acoustic shelf for a VAZ 2114, made of plywood and covered with carpet, will improve not only the interior of the car. On the VAZ 2114, the acoustic shelf is a component that solves several problems at once: sound output improves, squeaks in the trunk disappear, speakers can be installed in any size, even the largest ones.
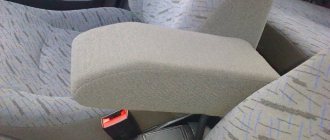
Types of armrests
Some car enthusiasts know that the manufacturer does not provide for the installation of an armrest on the VAZ 2114. Moreover, an armrest was never on the list of possible options during the release of the 2114 model, but this accessory is very popular among many car enthusiasts. This is precisely why some companies have launched the production of armrests for the VAZ 2114
This compensated for the lack of such an important element for the car
All presented armrests can be divided into several categories:
- Model armrests. They were created for certain car models.
- Universal armrests that are designed for installation on almost any car (regardless of the manufacturer).
The armrests also differ depending on the presence of a special compartment for small items.
They can be divided depending on the design:
- with bar;
- no bar.
An element with a bar allows you to store various small items, as well as documents, inside.
Many car enthusiasts accumulate a lot of different items over the years spent behind the wheel, so an armrest with a bar will be a great way to bring order to the car interior.
An acoustic shelf is essential
VAZ 2114 acoustic shelf
You can buy a shelf in a store (the choice today is very rich) or make it yourself from available materials. Let's focus on the second option, which appeals to the majority of Russians who are not accustomed to spending extra money (why, if all you need to do is put in a little effort).
According to most drivers who have little or good knowledge of car audio, installing 4 speakers according to the scheme: 2 at the front and 2 at the rear will be the ideal solution. There will be no problems with the front acoustics in terms of reproduction, since in front of the VAZ 2114 there are standard places for installing 13-inch speakers.
Note : Note that such speakers play well, there is enough power, but still, if this is not enough, then podiums are placed in the doors, where larger speakers are installed - 16 inches.
Acoustic shelf for VAZ 2114
Let's leave the front speakers alone and move on to the rear. There are more problems here. The standard places for speakers in the rear, not only on the VAZ 2114, but on all other cars, are no good, as they are too small.
You can’t install large speakers here, and small ones can’t cope with reproducing more or less noticeable bass. In addition, the standard shelf on the VAZ 2114 is too “flimsy” and is also unable to support the 6x9 oval speakers intended for it.
The factors listed above simply force a motorist who is partial to good and high-quality music to act.
What to do?
There are three ways to solve this problem. The choice in favor of one option or another directly depends on your requirements, wishes and sometimes financial capabilities.
| Solution option | Explanation |
| Completely dismantle the sides and shelf | Nothing will make noise in this situation, but you will deprive yourself of space to install an audio system. You can forget about high-quality sound inside the car |
| Purchase a ready-made podium for durable material with holes for speakers | A good option that requires certain financial costs. All you have to do is install it in place. Disadvantage - it is not always possible to find a shelf that is ideal for all parameters |
| Make a podium with your own hands | This option provides minimal financial costs and the opportunity to create a shelf that will meet your smallest requirements. The downside is that you have to do the work yourself, which not everyone can handle. |
Having a stronger and thicker shelf not only eliminates noise, but also improves the sound quality of the audio system. The thick shelf acts as a highly efficient enclosure.
Today we will look at how you can create an acoustic podium with your own hands, which will be placed on factory sidewalls. You can also try to make an option with your own sidewalls, but it is much more complicated and extremely difficult for a beginner to cope with. Let's not make things difficult for you. The option with standard sidewalls is very good.
Manufacturing
Acoustic shelves for VAZ 2114
In principle, there is nothing difficult to make. You will need to arm yourself with a little patience (and Moscow was not built right away), follow the instructions clearly, and have the necessary tools and materials at hand.
What do you need
Acoustic shelves for VAZ 2114
To successfully carry out the operation, you must prepare the following:
- Plywood – a sheet 18 mm thick is suitable;
- A piece of material for reupholstery - carpet is ideal, but if the interior is upholstered in leather or leatherette, then for a harmonious perception we replace the carpet with a piece of the corresponding material.
Note : Carpet is good because it is very convenient to work with. This material has amazing obedience if you know how to handle it.
- Glue for carpet - the best option is aerosol or Nairit;
- Stain;
- Special staples for an 8 mm stapler (for wood) and the furniture stapler itself;
- Painting tape;
- Several self-tapping screws.
As for tools, you should have a good jigsaw, a plane and a drill or, better yet, a screwdriver on hand.
Installing an acoustic shelf on a VAZ 2114
Useful video
You can get interesting tips and recommendations by watching the video below:
The car has a short history so far - this model rolled off the assembly line in 2001. Outwardly, it resembled the previous model, but the VAZ 2114 received a slightly modified body. The main distinguishing feature of the car is the smoothed angularity of the front end and hood due to new wings and hood and narrowed headlights.
The decor of the car has also changed slightly, a new design for the dashboard, the interior trim has also undergone changes and made the car more attractive.
But the fact that all these changes did not affect the chassis at all provided a huge springboard for creativity and improving the model with your own hands. That is why the VAZ 2114 is still undergoing all kinds of improvements along with tuning classics, for example, tuning the VAZ 2106. But this is not only the installation of a new bumper, radiator grille, headlights and taillights, etc. This is also the use of scientific knowledge. Interesting design solutions for external tuning can be seen in the video: