For tuning purposes, you can make a hydraulic handbrake yourself. VAZ of any model is equipped with a hydraulic brake system, but the parking brake is of a cable design. This impairs performance, since the cable tends to stretch, so the effectiveness of the handbrake is reduced. And drum brakes themselves have low reliability.
Braking efficiency is extremely low. But for the hydraulic handbrake to fully function, it is imperative that the rear wheels have disc brakes. The second, negative side is that according to traffic regulations it is forbidden to make changes to the brake system. Therefore, when carrying out such an upgrade, you act at your own peril and risk.
The main purpose
You can install and configure a hydraulic handbrake on a VAZ-2109 yourself if you have certain skills and tools. Despite the prohibitions, such designs can be found on sale and can be installed on any make and model of car. It is advisable to carry out all work on an inspection pit or a lift. With the help of a hydraulic handbrake you can greatly increase the efficiency of the braking system. The design provides for a regulator that allows you to distribute the force between the front and rear circuits. The regulator allows you to prevent complete blocking of the rear wheels.
Now about the unpleasant, about the shortcomings, that is, the disadvantages of this scheme:
1. If the “right front - left front” circuit fails, braking efficiency will be significantly reduced;
Agree, there are not so many shortcomings, and besides, they exist always and everywhere, but if you clearly measure the force using the handbrake handle of the car, braking is carried out very effectively and this fact has been personally verified in practice. However, a true lover of do-it-yourself tuning will never miss the chance to retrofit your car with a hydraulic handbrake , making it more advanced, as well as an excellent opportunity to gain invaluable experience and a lot of pleasure from the result.
What can a hydraulic handbrake do?
Using this design of the handbrake, you can completely block the rear wheels in order to warm up the tires on the front axle. This will prove useful for racing enthusiasts. Ordinary drivers will find the lock useful in reducing the chance of skidding when turning on wet roads. The device is installed near the handbrake lever so that it can be easily accessed. If the regulator is installed correctly, the force on the rear brake will be distributed smoothly, and the efficiency of the front will increase.
Adjustment
- All manipulations are performed in the position when the handbrake is “off”
(the lever is fixed in the lowest position). To access the brake mechanism, remove the plastic plugs located on the brake shield. It is enough to pry them off with a screwdriver; - Then the eccentric nut is loosened
(no more than 2 turns). Further actions consist of moving the brake pads apart - to a position at which the drum is braked, after which the bolt is turned in the opposite direction, as a result of which the brake pads move in the opposite direction. The movement is carried out until the drum begins to rotate; - The process is monitored through inspection windows located in the lower part of the brake shield;
- At the end of the operation, the eccentric nut is tightened with reasonable force. It is important to prevent the eccentric from turning;
- The brake mechanism is adjusted in a similar way on the other side of the car, after which the plastic plugs are installed in place.
Hydraulic hand brake kit
In automobile stores you can purchase a hydraulic handbrake kit. You can install it yourself, but you will need a few additional elements:
- Copper washers for brake mechanisms, 10 pcs.
- Metal tubes in the amount of 5 pcs. To save a little, you can purchase a complete set for Gazelle cars.
- Plugs.
- Twists.
- Brake hoses for VAZ-2101-2107.
- Tee for the brake system.
- Plastic clamps, 50 pcs.
- Brake regulator for VAZ cars of any model.
- GTZ for VAZ-2101. If this is not the case, then you can use any other cylinder.
In addition to all this, you will need brake fluid for subsequent refilling of the system. After all, the modification includes inserting an additional circuit into the brake lines.
We lay the brake line into the interior.
Using the technical hole in the speedometer drive cable, it is necessary to extend the brake pipe into the interior. It must be bent in such a way that it does not touch anything in the engine compartment, then connect it to the GTZ. Using the previously prepared “twist”, you need to lengthen the line using an additional metal brake pipe; a regulator will be installed at the place of twist a little later.
Preparatory work
Before starting tuning, you need to get rid of the old, imperfect system. To do this, the mechanical drive is completely dismantled. Please note that after installing the hydraulic handbrake, the operation pattern of the caliper drive will completely change. If by default the mechanisms worked in pairs, which are located on wheels located diagonally, then after the modification the circuit will turn out to be axial (rear and front). But before installing the hydraulic handbrake, you need to remove the old one.
Communities › VAZ: Repair and Modification › Blog › Do-it-yourself HA and hydraulic handbrake
I want to tell you how I installed the HTD and handbrake
Since ready-made kits with a cable are expensive and our cat is crying for money, we decide to do everything ourselves
I just had the standard calipers on the front become free (calipers from 2112 with perforated discs were installed on the front)
plans for washers + camber plates and all sorts of little things were purchased for them
plus you will need a bunch of new brake pipes and 2 tees (in my case)
Some tubes can be selected according to length, while others will have to be cut and re-rolled
(it’s better to ask Google how to do this)
First of all I installed the brakes themselves
combining this procedure with replacing bearings and installing wheel studs
Also, in order to put the brake disc on the rear hub, you need to grind off the step at the hub
I gave the hubs to a turner, but I saw how they did it with a grinder))
the next thing that was done was the handbrake
How to remove the handbrake cable
To dismantle the old handbrake you will need to perform several steps:
- Place the car on an overpass, inspection hole or lift. It all depends on what amenities you have. If there are no such amenities, then it is better not to even start doing the work.
- Raise the rear of the car with a jack, having previously installed stops under the front wheels.
- Install supports under the rear beam.
- Since the hydraulic handbrake can also be installed with drum brakes, the design does not need to be changed much. Remove the wheels and drums from the rear axle.
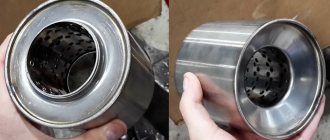
- To avoid interference, remove the resonator and muffler.
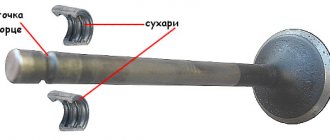
- Remove the equalizer from the rod.
- Dismantle the cable by removing it from the blocks on both wheels.
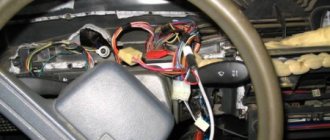
- Now you need to perform several manipulations inside the car. Open access to the handbrake lever and unscrew the fasteners. Then remove it completely from its seat.
Now you can begin installing the new system; to do this, you can use one of two popular methods.
Why do you need a hydraulic handbrake?
If you want to radically modify the brake system of your car, you must install a hydraulic handbrake between the main brake cylinder. It helps to achieve the correct redistribution of braking force, which is concentrated on the rear axle. At the same time, we note that there is also a significant increase in the power of the front brakes. In fact, a hydraulic handbrake is a simple device that is very reliable in operation. Its design has virtually no wear parts and components, so this system is completely compatible with other elements of modern braking systems. The use of such brakes with a hydraulic handbrake allows for much more efficient cooling of the brakes. In addition, due to such tuning, the braking distance is reduced due to the more efficient operation of disc brakes. Well, in terms of design, disc brakes are more compact and lighter.
Installation method No. 1
According to experts, there are two ways to install a hydraulic handbrake on a VAZ. The simplest and most accessible involves performing the following manipulations:
- Another brake cylinder must be installed in the engine compartment. The clutch master cylinder from a VAZ-2101 is ideal.
- Remove the brake fluid expansion tank.
- You will need to make a small adapter yourself. Cut the thread and install the washer (it should have a thread for the fitting).
You begin assembling the entire system from the original GTZ to the clutch cylinder, then to the regulator, handbrake, and rear brake circuit. To connect all the components together, use tubes from the Gazelle car. Just choose those that fit in size. The tubes are fastened to the places where the handbrake cable was fixed.
Installation method No. 2
First you need to do a few manipulations under the hood:
- Unscrew the tube that goes to the left brake mechanism and put a plug on it.
- Unscrew the tube going to the front right wheel. Install it in the hole intended for the right rear brake mechanism.
Before starting work, be sure to drain all liquid. Try to do everything carefully so as not to damage the hydraulic mechanisms. Try not to let the liquid come into contact with the metal, as it will corrode it. Further actions:
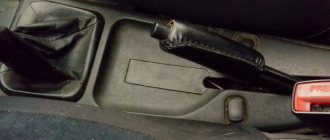
- Install a new handbrake between the seats.
- Install the bolt instead of the regulator pendulum. Screw it to the bottom of the body. It is recommended to temporarily remove the front seats so that they do not interfere and do not get dirty during work.
- A tube is laid from the engine compartment along the bottom to the new handbrake.
- You lay pipes from the regulator along the bottom of the cabin.
- Select the tube sizes and install them on the rear axle.
- Attach a flexible hose to the rear beam on the bracket.
- Be sure to install a rubber ring so that the hose does not rub during operation. To make it easier to put on, cut this ring.
- Connect the hose to the tubes. To secure metal tubes, use plastic zip ties.
Nissan Laurel RB25DET Neo Fiber Fab › Logbook › Installation and connection of the Custom hydraulic handbrake
I assembled the hydraulic handbrake itself a long time ago, but I never got around to installing and connecting it. And recently I finally got to the pit, it was my turn.
Components: 1. the hydraulic handbrake itself (see how to make it in my BZ) 2. soft copper tube 6 mm, 6 meters with a margin (better, of course, 5 mm, but I didn’t find it here) 3. ordinary Zhiguli fittings 4. fittings for crimping, a very cool thing 5. heat shrink 6. made of iron 4mm platform for the handbrake 7. rubber seals from Lada cars (it’s better to take a larger one, it will be more convenient to lay the tubes) 8. flaring machine
I used these fittings on the master cylinder and on the tee in the rear circuit. Of course, I wanted to put them everywhere, but we don’t have them with Zhiguli carvings.
Completion of work using the second method
When carrying out repairs, try not to allow the hose to become twisted. This may cause damage and fluid leakage. First you need to tighten the edge on which the thread is external. Then the edge with the internal thread is tightened. How to make a hydraulic handbrake yourself? The final stage looks like this:
- Fix the position of the new system, check the tightness of all threaded connections.
- Fill the expansion tank with brake fluid.
- Bleed the system according to the scheme from the far cylinder to the near one. Add fluid to the reservoir in a timely manner. Otherwise, pumping will need to be done again.
- Check the functionality of the brake system. Are the calipers pressed out normally?
Afterwards, assemble all the disassembled components and replace the wheels. Before your first ride, make sure the brakes work properly. If there are problems, fix them immediately. When driving for the first time, do not accelerate to high speed so that you can at least stop the car with the engine. All of the above methods are suitable for installing a hydraulic handbrake with your own hands on a VAZ of any model, as well as on cars from other manufacturers (including foreign ones).
Feel.
The largest dump trucks in the world
At first, everything was somehow unusual - pedal travel, force, braking, force calculation, and so on. I was very pleased that now the VAZ parking brake was not “dead”, as it was before, now by pulling it, it was possible to adjust the force, thus stopping the “eight” in various ways, as they say in their own way. The hydraulic handbrake perfectly fulfills its direct duty - it holds the car in place on an incline. Since that day, I “forgot” what overbraking is, braking is carried out very intelligently and the wheels of the rear axle, in the event of emergency braking, are blocked a little later than the front ones. I haven’t done any “somersaults” or tricks with the new braking system yet, it’s a little scary, I’m not used to it yet, and besides, the experts advised not to take risks yet, but just get used to the new braking system and its operation.
That's all for me, I hope that my story in detail will be useful for someone, and someone, following my example, will install a VAZ hydraulic parking brake for themselves. I look forward to your comments and thoughts regarding the above.
Hello everyone! Here is a report on installing a hydraulic handbrake on a classic with standard drum brakes. But my installation has one peculiarity - I completely left the standard cable handbrake. The idea is that by tightening the handbrake cables, the brake pads are separated, reducing the working stroke both when the handbrake is operating and when the brake cylinders are operating. Having thrown out the standard handbrake, we increase the working stroke of the brake cylinders since the pads are not spread apart. Well, the standard handbrake remains for regular use. Who thinks about this, we can discuss it in the comments) I’m not particularly special in jigging, I don’t pretend to be the truth. The handbrake is vertical, adapters for standard brake pipes are included.
Regarding the tubes - when I was looking for information on which tubes to install - few people write exactly which ones are suitable. I checked it myself - in my case (look at how the handbrake is located and how the tubes pass into the cabin) they are used - from the GTZ to the hydraulic handbrake - the front right from 2110, from the hydraulic valve to the hose to the axle - the front right from 2108/09
. But with a caveat - the front tube was barely enough, and the rear tube, as we see, is a little long. But overall everything turned out great.
The place where the tubes pass into the cabin - in this place at the bottom of the tunnel there is a slight recess, just so that there is space and the tubes do not touch the cardan. The hole for the tubes is in a place where there are two metals, so we put rubber bands to protect the tubes both inside and out.
The standard brakes also had a force regulator (sorcerer). I connected the hydraulic handbrake without it. According to the advice found on Drive, we pump the brakes with the hydraulic handbrake depressed. Everything progressed surprisingly quickly.
I'm going out to test. What he was afraid of was that he would over-brake his butt because of the ejected sorcerer. Nevermind, everything is fine, it grabs the front first. The pedal travel became a little longer, which was unusual at first. The handbrake engages very clearly and immediately, at the very beginning of the stroke. There is some inconvenience in this; they installed it with an eye to the full stroke of the handle. There is an idea to try to loosen the cables of the standard handbrake so that the stroke of the rear cylinders and, accordingly, the hydraulic stick handle is greater.
Thus, we get a hydraulic handbrake while fully maintaining the standard cable handbrake
The handle of the stick makes it a little difficult to engage reverse gear, but we’ll just forget about it) Thank you for your attention and I hope my report will be useful to someone)
Cost of tuning
Now is the time to draw up a detailed estimate for the spare parts used during tuning of the brake system. The price of all components may vary, depending on whether you are purchasing new or used. Approximate cost:
- Hydraulic brake assembly - cost about 2,700 rubles. You can also find cheap Chinese copies, but decide for yourself whether you should trust them. The quality of such products is very often low.
- Regulator – 400-500 rubles.
- Brake pipes for a Gazelle car – 300-400 rubles.
- Clutch cylinder (main) for classics - about 450-500 rubles.
- And small consumables - copper washers, plastic clamps, VAZ-2101 brake hose, fluid - you will spend about 500-600 rubles on everything.
By conservative standards, the cost of tuning will cost about 5,000 rubles. If this is too much for you, then abandon this idea and simply install a new handbrake cable instead of the stretched old one. Before starting work, it is recommended that you familiarize yourself with the advice of specialists and communicate with those who have already done similar work. They will be able to give you a lot of practical advice regarding improving the brake system on a particular car.
Do you need rear disc brakes?
The answer is ambiguous, since disc brakes have clear advantages over drum brakes. If you are already tuning the system, then do not be lazy and install discs on the rear axle. Their advantages are even in the smallest details - replacing pads is much easier than on drum pads (and the cost of the set is lower). Wheels from the 2109 model are ideal for the rear wheels of front-wheel drive VAZ cars. There are minimal alterations, everything becomes as if it were “original.” But if your budget for tuning is limited, then you can use a standard system. Drum brakes work relatively well, and the use of hydraulics will forever eliminate the need to tighten the cable. And the car will stand normally on any slope without rolling down.
Causes of malfunction and their elimination
As a rule, the reasons why the handbrake does not work are quite simple and do not require long or expensive repairs:
- torn cable. One of the common causes is a broken cable on the handbrake or under the car. The problem is solved by simply replacing the cable;
- jammed cable. Due to damage to the sheath in which the cable moves, it may become jammed, preventing you from using the handbrake. And the cable itself consists of many steel strands, which, if damaged, can also prevent proper operation. The solution is to replace the cable;
- dirty brakes. If dust, dirt, ice or reagents that are sprinkled on roads in winter get on the pads, this can cause the brakes to not work properly. The solution is to press the brake pedal several times smoothly while the car is moving. Thanks to friction, the pads will be cleaned;
- incorrect adjustment. It may happen that the cable system is not adjusted properly, the bolt is not tightened correctly, or the length of the cables is incorrectly selected. The solution is to adjust the system and correct tension of the cables;
- pad wear. The pads are subject to abrasion during operation. Every time you apply the brakes, the pads gradually become unusable. The solution is to replace the pads;
- oil in the pads. Oil or brake fluid leaks can cause the car to not hold up with the handbrake. The most important thing in this case is to identify the cause of the leak - it could be the rear axle seal or the brake cylinder. The solution is to eliminate the leak and clean the pads. If the pads are very oily, replace them.
We recommend: Audi all-wheel drive: what is Quattro and how it works, all-wheel drive models