April 30, 2019 Lada.Online 146 607 107
Adaptation of the automated transmission (AMT) is necessary for the correct operation of the clutch release actuator. If this operation is not performed, then malfunctions in the operation of the transmission may occur (jerks, jolts while driving, as well as increased wear of the clutch). AMT adaptation should be performed as the clutch wears out or after replacing it. You can perform AMT adaptation at the LADA dealership or yourself.
Attention! You perform all actions at your own peril and risk. The instructions were written not by specialists/engineers, but from the words of owners of Lada Vesta and Lada XRAY (SrgKlsnkv and sva775) cars. The procedure was not tested on other LADA models with AMT (Granta, Kalina, Priora).
Required
:
- adapter ELM327 (available in the AliExpress catalog)
What is adaptation and when is it carried out?
Adaptation of a robotic gearbox is the process of resetting the existing settings of the electronics that control the unit. Subsequently, the device is calibrated for new operating modes, ensuring smooth gear shifting and proper clutch operation. The manual transmission adaptation procedure is carried out in the event of malfunctions in its operation, as well as when performing various repair work on the transmission, in particular:
- Complete replacement of a robotic gearbox or its partial repair with disassembly.
- Replacement of the electronic transmission control unit, the electric drive responsible for changing gears.
- Replacement of failed sensors that control the operation of the robotic gearbox.
- Replacement or repair of the clutch drive and sensors, as well as other parts that make up the clutch mechanism.
Adaptation of the device should only be carried out in cases where it is really necessary. Carrying out this procedure too frequently has a negative impact on the clutch assembly and leads to premature wear of the units. Possible positive effects that appear after frequent adaptation are short-term. Here are some of the most common misconceptions regarding robotic box adaptation:
- The procedure does not affect the smoothness when the car starts to move.
- Adaptation will not help prevent jerking when driving at low speeds if other transmission parts are worn.
- The position of the rack in the clutch mechanism does not indicate the need for adaptation.
Problems with the hydraulic clutch
The brake fluid enters the working cylinder from the master cylinder through pipelines. The following malfunctions occur with these two main parts of the mechanism:
- excessive wear of rubber cuffs in cylinders;
- brake fluid leakage (lack of tightness at the pipe connections);
- damage to cylinders, pipelines, etc., which causes cracks to appear.
The hydraulic drive is highly reliable, but it can also fail if air gets into the system. The main sign of airing: incomplete disengagement of the clutch. Because of this, the gears will either be switched on with great difficulty or will be almost impossible to do.
Typically, air enters the system when the level of brake fluid in the master cylinder reservoir is critically low, or due to loss of tightness. To troubleshoot problems, it is enough to bleed the system; a special fitting is provided for this.
There is no need to adjust the hydraulic clutch drive while the vehicle is in use.
The durability of the system depends on the driving style of the owner and operating conditions. A working clutch will not slip and fully transmit torque from the engine to the gearbox when the pedal is released. When the pedal is depressed, the transmission must be completely disconnected from the power plant.
You can check the performance of the hydraulic drive of the Lada Vesta manual transmission yourself, following a certain algorithm.
| What to do | What will happen |
| Turn off the engine and press the clutch pedal two or three times. | There should be no jamming, creaking, knocking or any other extraneous sounds in the drive mechanism. |
| Start the engine. | If at the same time a howling sound is heard from the manual transmission, which becomes more distinct when the pedal is depressed, it means that the release bearing is badly worn and needs to be replaced. |
| With the engine running, depress the clutch pedal and engage any speed. | At the same time, there should be no creaks, knocks, or crunches. Otherwise, extraneous sounds indicate incomplete disengagement of the clutch. This usually indicates airing of the system. If there is no air, it means there is a malfunction of the master or working cylinder, or a broken diaphragm spring. |
| With the engine running, turn on the speed and smoothly release the clutch pedal. | When the car starts to move, there should be no jerking or extraneous noise. Otherwise, the cause of failure may be damage to the discs, damper, or oil getting on the discs. |
| While driving, you need to press the accelerator pedal sharply. | If the revolutions have increased, but the car has barely accelerated, it means the clutch is slipping. It is easy to understand about slipping by the characteristic burning smell from the friction linings of the disc in the cabin. The problem is solved by replacing the disks. |
If after performing all these steps no problems are identified, the clutch can be considered working. The service life of the unit is reduced not only due to incomplete shutdown or slipping, but also when driving off-road, with a maximum load, when driving with a trailer or tow, or an aggressive driving style.
Typical faults
You can often hear that robotic gearboxes are extremely unreliable. The first models of such units actually failed quite often, but newer models are slightly inferior to traditional manual and automatic transmissions in survivability and performance. The fact that they are becoming increasingly popular in the automotive industry also speaks in favor of robot boxes. However, their characteristic malfunctions are worth talking about. The main symptoms of malfunctions include:
- Clutch slipping;
- Too slow response to increasing engine speed;
- The appearance of sound noise (knocking, buzzing or howling);
- Operation of the indicator light on the dashboard;
- Jerks when automatically shifting gears during smooth movement;
- Leaking transmission fluid;
- Complete failure of the transmission.
As the reader already knows, automatic transmissions are essentially modified “mechanics”, which means they are characterized by the same malfunctions as conventional manual transmissions. In particular:
- Worn speed selector fork;
- Wear of rolling bearings.
Electrical components of the manual transmission can also fail. Despite the fact that almost all electrics in robotic units have a long service life, breakdowns are not uncommon. Especially when it comes to manual transmission of obsolete models. The following malfunctions can be noted:
- Burnout of contacts of electric drives;
- Damage to wiring;
- Failure of sensors;
- Burnout of contact groups;
- Control unit malfunction.
As a rule, electrical equipment fails due to overheating.
It is important for a car enthusiast to monitor the performance of the cooling system. For example, the system channels may become clogged - this will lead to obstructed coolant flow with subsequent overheating of individual manual transmission elements
It is also worth monitoring the condition of the oil. Not only does it prevent dry friction, but it also absorbs and removes excess heat.
Change of oil
Also, in addition to the need to repair the entire structure of the automatic transmission, there may be a problem with changing the oil in the unit. At the same time, despite the manufacturer’s assurances that the oil in such boxes does not need to be changed, by the end of the first hundred thousand kilometers the transmission fluid becomes contaminated.
Another erroneous belief is that automatic transmissions are unpretentious to any type of oil. It is worth noting that this belief is only half true. So, for example, if you choose a low-quality oil, the mechanical components of the gearbox, as well as its valve body, will be practically unaffected. But a problem may arise with further operation of the solenoids - valves of the valve body.
When using low-quality or unsuitable oil for a given gearbox, the valves begin to oxidize, which can subsequently lead to interruptions in their operation. The problem can be detected during vehicle diagnostics.
What is a robotic box?
A robotic gearbox is essentially a complex mechanical device with additional electronic components that control its operation. The electronics themselves are responsible for changing speeds and operating the clutch; the driver only gives the appropriate commands using the lever. The digital unit takes into account the vehicle's driving mode, driving style and other conditions, ensuring smooth movement and minimizing wear of parts.
From the driver's point of view, the robotic gearbox allows you to drive with the same comfort as when using an automatic transmission. But at the same time, its use makes it possible to use fuel more economically. And the unit itself is more reliable and costs less than its fully automatic counterpart.
For correct operation, once a year or every 10-15 thousand mileage, it is necessary to adapt the robotic box so that the electronic filling takes into account the wear of transmission parts or is adjusted after replacing components and assemblies. This procedure should only be performed at specialized service stations that have the necessary equipment, knowledge and experience.
Some conclusions
Summarizing the various information reported by Kalina-2 owners on forums, we can draw the following conclusion. No one has any complaints about the operation of the engine, gearbox or transmission, and never had any. Complaints, as a rule, are caused by the quality of the implementation of additional options. Many of which, by the way, can be called excessive luxury for a car of this class. All existing complaints relate only to the blocks and parts that VAZ purchases from suppliers, and not to the main components of the car. There is nothing more to add here.
Not long ago, the AvtoVAZ Lada Kalina model was released for sale, operating on an automatic transmission.
In principle, a robotic box can be called a modified unit. It is worth noting that this type of transmission is installed only on units with a volume of 1.6 liters and a power of 98 hp.
In move
I checked how the Lada Vesta drives with such a box. In 5th gear the revs stay just above 1500. Of course, the load on the engine is light, but the car goes uphill. This is not very correct or comfortable. The motor is running tight, not in the best mode. Even when the speed is reduced to 50, the program still tries to pull in 5th gear. It seems to me that this is a minus of the normal mode.
Thus, you can drive in “Sport” mode (urban dynamic). In sport style, 3rd gear drops only to 50 km per hour, 4th to 65. The revolutions do not fall below 2000. For the city, this is optimal driving, as the engine runs quietly. There is no such problem as in the standard gearbox, when when going uphill, the 5th speed stubbornly holds on.
Reviews
| № | Positive |
| 1. | Semyon (www.zr.ru): mileage 70,000 km, clutch is normal. |
| 2. | Andrey (autobann.su): the pedal travel is natural, not increased. I noticed that in severe frosts the PS becomes a little tight. |
| 3. | Georgy (lada-vesta.net): there are no comments on the DS, it works as usual. |
| 4. | Stepan (otzovik.com): standard pedal travel, 68,000 km of active drive without maintenance and repairs. |
| 5. | Vladimir (www.zr.ru): positive review, no comments. |
| 6. | Alexander (autobann.su): I have a pre-installed DS with a stock from Renault Logan, I heard that the quality of the French is better than the domestic one. |
| 7. | Mikhalych (https://forumvesta.ru): all standard units and components are working properly, without any violations. |
| 8. | Vitaly (lada-vesta.net): Lada Vesta is assembled with high quality, I have no complaints. |
| 9. | Timofey (otzovik.com): in four years of operation, I replaced the sensor once, I don’t consider it a defect or defect. |
| 10. | Stanislav (www.zr.ru): I use Lada myself and recommend it to others. |
| 11. | Gennady (autobann.su): mileage 85,000 km without repairs or equipment replacement. |
| 12. | Alexey (https://forumvesta.ru): soon 100,000 km, the condition of the car is a solid “4”. Much depends on the driver, how he observes the technical inspection deadlines. |
| Negative | |
| 13. | Konstantin (www.zr.ru): the Russian sensor served for two years, after which the rod failed. Replaced it with a French one from Renault Logan. |
| 14. | Vitaly (otzovik.com): the DS is not tightly fixed, periodically it turns out of the grooves. |
| 15. | Grigory (autobann.su): after a year of using the car, the DS flew. Fortunately, it was under warranty and was replaced free of charge. |
| 16. | Kirill (lada-vesta.net): I pumped the system several times, but to no avail. |
How does a master adapt AMT?
From the driver's point of view, the master simply programs the control unit using special equipment. In fact, this is how the sensors are trained and the actuators remember the desired position, and the clutch is initialized. And also the drives are adapted and the same “robot training” takes place.
After the procedure, the AMT “remembers” the positions of the clutch and gear lever, taking into account the wear of parts on this particular machine. That is why adaptation must be carried out after any transmission repair.
IMPORTANT: Sometimes the incorrect operation of the AMT is not due to a settings failure, but to a failure of the clutch or other transmission components
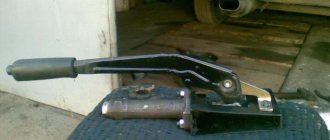
Replacing the AMT clutch actuator
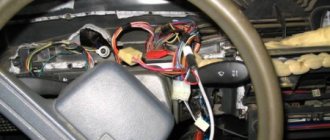
- Disconnect the negative terminal of the battery.
- The engine air filter has been removed.
- Remove the screw securing the wiring harness.
- Remove the three screws securing the AMT actuator unit.
All that remains is to disconnect the connector (press the fasteners, the direction is indicated by the arrow) and pull the actuator out through the top.
Install actuator 1, Figure 8-6, clutch release on bracket 3 and tighten three self-tapping screws 2. Screw tightening torque 7. 12 N.m (0.7. 1.2 kgf.m) (replaceable attachment Torx T30, knob, torque wrench).
Attach block 4, Figure 8-5, of the additional wiring harness to connector 2 of actuator 1 of the clutch release mechanism and secure the harness to bracket 3 with two fastening brackets 6.
Install actuator 3, Figure 8-4, clutch release assembly with bracket and additional wiring harness on the gearbox, install the outlet hose bracket on the actuator bracket and tighten, without tightening, two bolts 2 and nut 4 of the fastening (replaceable head 13, knob).
Adjust the extension of rod 6, Figure 8-7, of the actuator, for which you need to:
- move the actuator 5 in the direction of the arrow until the rod 6 touches the clutch release fork 7 and mark the position of the bracket 4 relative to the gearbox using a non-stress method.
- using the mark, additionally move the actuator in the direction of the arrow by an amount of 6±2 mm and finally tighten two bolts 1 and 2 and fastening nut 3. The tightening torque of the bolts and nuts is 16...25 N.m (1.6...2.5 kgf.m) (replaceable head 13, wrench, torque wrench, ruler or caliper).
Figure 8-7 — Installation of the clutch release mechanism actuator: 1,2 — bolts securing the actuator to the gearbox; 3 — nut securing the actuator to the gearbox; 4 — actuator mounting bracket: 5 — clutch release actuator; 6 — actuator rod; 7 — clutch release fork
Connect the additional wiring harness connectors to the gear shift actuator connectors, the control controller connector, and the input shaft speed sensor.
Secure the additional wiring harness with brackets built into the harness to the radiator outlet hose, to the left engine mount bracket and to the fan housing.
Common problems with Durashift EST
1) Gears do not shift due to damaged wiring
The wiring harness is not protected from negative environmental influences. The switching suffers from moisture and dirt, especially in the area located between the electric motors and the gearbox controller, which is located as close as possible to the ground.
2) Clutch failure
The clutch resource ranges from 120–180 thousand km. Its development is related not only to the quality of service, but also to driving style. If during long stops the gearshift knob is moved to the neutral position, this contributes to less overheating, long service life of the performer and the clutch itself.
3) Sensor errors
Most errors are related to incorrect position of the clutch or shift mechanism.
4) The motors in the servos are not functioning properly
Servo drives use complex pulses to control motors. The motors themselves are equipped with brush units with Hall sensors. When they become dirty, the operation of the mechanism is disrupted.
Signs of clutch failure
The occurrence of malfunctions in the Vesta clutch mechanism is most often associated with improper operation (inexperience of the driver, aggressive driving style), an initial defect in the part, or breakdown of other components interacting with it. Of course, you will immediately notice problems with the clutch - the car will begin to behave differently:
- Gears are difficult to shift/do not work at all;
- Pedal too soft/hard;
- The car jerks;
- The device is activated in the upper position of the pedal.
There can be many reasons for this behavior of Vesta, and not all of them are related to the intermediate part between the internal combustion engine and the gearbox. Often the problem comes from the fluid system. There may be a malfunction of the brake master cylinder, clutch slave cylinder, damaged hoses, a simply low DOT4 level or an air lock.
Such problems (especially problems with the cylinder of the unit) have exactly the same effect as the failure of the entire unit. The clutch consists of a housing cast together with the drive/pressure plate (basket) and the driven disc. The release bearing of the Lada Vesta acts on the petals of the basket, which, in turn, with the help of damper springs, press the inner disk away from the flywheel - the clutch opens.
How to set up a Toyota Corolla robot
The Japanese began producing an improved robotic transmission with the release of the 2007 Corolla. Although until 2009, owners of these cars encountered significant difficulties in operating the robot. Since 2009, a modernized actuator (gear shifter) has been released. This drive was developed taking into account all the mistakes of previous models. Now, every year, even more practical actuators are produced, when replacing them you will forever forget about sudden MMT failures.
Actuator Toyota Corolla
Robot adaptation is, in other words, individual tuning and adjustment of the clutch. Diagnostics can be carried out using special devices or without them. If you decide to adapt the Toyota Corolla robot yourself, then follow the step-by-step instructions.
Self-adaptation of the Toyota Corolla robot:
Block DLC3 and contacts CG and TC
- Turn off the ignition and put the car on the handbrake.
- We make a paper clip (jumper) of contacts CG (4) and TC (13) in the DLC block. Now we wait about 15 seconds until the system prepares for diagnostics.
- Turn the key to ignition mode. When turning the ignition on, do not press the brake or start the engine.
- Immediately after turning on the ignition, pump the brake 6-7 times for 3-4 seconds.
- Wait for the return buzzer signal, it will be executed in 2 clock cycles.
- After two short signals, hold down the brake pedal and carry out the following gear shift combination: N – E – M – “plus” – M – “plus” – M – “plus” – M – “plus” – M – E – N, then release the pedal and wait 5-10 seconds.
- Press the brake again.
- We are waiting for the buzzer to respond, a short signal will appear, which will mean that the clutch clamp is adjusted. Release the brake.
- Then press the brake pedal and hold it. We move the gearbox lever to the “minus” position. Let's release the pedal.
- Turn off the ignition and wait 10-15 seconds.
- Remove the clip from contacts CG (4) and TC (13) in the DCL block
After carrying out a number of adaptation works, it is necessary to finally complete it, check all elements for serviceability and compliance with the specified parameters.
You won't need the DLC3 block for final setup. Just follow the instructions:
Set the box position to “neutral”. Turn on the ignition and wait about a minute. Turn off the ignition and wait 15-20 seconds. Turn on the ignition again. We start the engine in the “neutral” position and hold the brake pedal. Pay attention to the instrument panel. When the engine is running, you will see the “N” indicator flashing.
We wait until the “neutral” indicator stops flashing, you can turn off the engine. This completes the adaptation of the Toyota Corolla robot.
Sar scanner clutch adaptation Vesta
Short description:
Monitor the operation of your car in real time, read errors, freeze frames and other diagnostic data, measure acceleration and much more!
Description:
Application for diagnosing and monitoring a car using the ELM327 adapter.
Program features: 1) Customizable dashboard with multiple screens. Output the data you need in the form that is convenient for you. 2) Reading errors (quick and in-depth). 3) Error reset (quick and in-depth). 4) Monitoring the results of ECU self-diagnosis. 5) Reading freeze frames (the state of engine parameters at the time the error was registered) 6) Checking the vehicle’s readiness for emissions tests. 7) Supports all OBD2 compliant cars (go to carscanner.info for more information). Car Scanner includes pre-configured connection profiles for a wide variety of vehicles. Some connection profiles will provide you with additional capabilities (especially for Toyota, Mitsubishi, GM, Opel, Vauxhal, Chevrolet, Nissan, Infinity, Renault, Hyundai, Kia, Mazda vehicles). 9) Dashboard mode can be used as a projector on your car's windshield. Get for free what was previously only available to premium cars! 10) You can make accurate acceleration measurements using Car Scanner! 11) Car Scanner can record the displayed data for subsequent analysis. 12) Car Scanner can monitor fuel consumption and keep detailed statistics of fuel consumption and fuel costs. 13) Coding of VAG cars on MQB and PQ26 and MLB-EVO platforms. Since there are a lot of questions, I emphasize: at the moment ONLY CARS ON MQB and PQ26 PLATFORMS
.
Other brands and platforms yet
supported. Please don’t ask me “when will xxx be?” I don't know. It will be when it's ready.
PLEASE NOTE: The list of displayed parameters is different for each vehicle and is 100% dependent not on the Car Scanner program, but on the vehicle's control unit.
For the program to work, an adapter compatible with ELM327 is required.
PS. And now the unofficial part