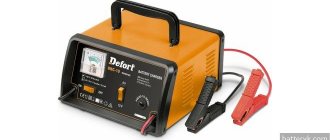
When connecting a discharged battery to an automatic charger, many motorists leave the battery for several hours, it automatically turns off, after which all that remains is to remove the terminals and return the battery back under the hood.
But if you carefully observe the charging process, you will notice the following. When the battery gains the required charge, the banks, that is, the compartments with the plates and electrolyte, begin to gradually boil. If this is a charger without auto-shutdown, boiling will continue until the charger is turned off.
It is believed that with the correct course of the charging process, after a full charge, all 6 compartments (cans) of the 12V battery begin to boil. But it happens that one of the cans does not boil. Motorists have natural questions regarding this phenomenon.
The battery bank does not boil when charging - an overview of the reasons
An elementary explanation for the phenomenon would be failure of the battery itself due to prolonged or incorrect operation. In this case, the compartments will be destroyed and the electrolyte will be cloudy. The power source cannot be restored. The problem will have to be solved by purchasing new equipment. There may be no boiling for a number of other reasons:
- Compartment closure. The charge may not proceed due to the presence of a foreign body in the can or destruction of the lead plates.
- Charge imbalance. Occurs due to uneven distribution of electricity output by compartments (change in voltage parameters). Operating the battery in this mode leads to its rapid obsolescence. Therefore, it is recommended to balance the charge from time to time. A rare event.
- Manufacturing defect.
Whatever the reason for the lack of boiling in the compartment, there is no need to rush to dispose of the battery. In 55-75% of cases, the problem can be fixed and the power supply can be restored.
Important! The appearance of gas (bubbles) indicates that the battery needs to stop charging. Overcharging the battery will cause the water level in the jars to decrease (boil away) and expose the lead plates.
The plates that are not completely immersed in the electrolyte will begin to heat up intensely, which will lead to their rapid destruction. More often, those car owners who increase the density of the electrolyte by recharging the battery notice that one or two battery banks do not boil when charging. This leads to its rapid failure.
Prevention of electrolyte boiling while the engine is running
In order for your battery to last as long as possible, you need to adhere to simple and simple rules for preventing electrolyte boiling:
- First of all, in the summer, check the electrolyte level in the batteries being serviced.
- It must be remembered that the plates must always be covered with electrolyte. And if the level drops, then you just need to add distilled water. You need to know that you cannot add regular water to the battery.
- In addition, regularly visually check the condition of the device. It should be clean and there should be no deposits on the terminals.
- And lastly, when visiting service stations, don’t be lazy and ask to check the charging current that the car’s generator produces.
That's all, good luck on the roads and never break down.
What to do if the can does not boil?
Often such batteries are disposed of. But this can always be done. If you have time and desire, you can experiment initially. In 6 out of 10 cases it is possible to revive the battery. The following measures are taken:
- Restore the jar.
Inspection for the presence of foreign objects and sludge. Foreign debris must be removed. Rinse the container. Often, basic cleaning (removing the element causing the short circuit) is sufficient. The battery is restored by 95%. After cleaning, only the serviced jar should be charged.
- Equalize the charge of all battery compartments.
It is not difficult to cope with the task; you need to connect the load. This is done using terminals. The battery will be completely discharged within 24-48 hours (depending on the load). As soon as all the compartments are discharged, the battery must be charged. Check if the jars are boiling.
- They are dismantling the cloudy compartment.
The procedure is necessary to assess the condition of lead plates. In 96% of cases, turbidity is caused by their complete destruction. Often, if one bank does not boil when charging the battery due to complete loss of plates, then the situation in the remaining compartments is no better. The battery will have to be disposed of and replaced with a new one.
Cleaning and restoring the battery on your own is not an easy task and is fraught with danger, because you will have to deal with electrolyte (acid). Therefore, when disassembling the battery, you need to take safety measures - wear gloves, a respirator, and goggles.
Important! Do not charge the battery with high current. It is wiser to follow the manufacturer’s recommendations, which are stated in the instructions for the equipment. And charge for the amount of time specified in the technical documentation. If you want to increase the density of the electrolyte, it is better to do this without recharging the battery.
Actions to restore the battery
To resuscitate the battery, you will need to open the compartment. This procedure must be done extremely carefully, otherwise there is a chance of damaging neighboring cans. It is recommended to make markings on the cover and cut out pieces of plastic next to the jumpers with a hacksaw. It will be safer to remove the bag with lead plates using wire hooks. It is recommended to carry out the entire procedure with gloves. More details about what to do if, when charging the battery, one can does not boil and you want to restore the battery:
- Evaluate the contents of the package. The plates should not be exposed or crumble.
- You can rinse the jar with distilled water.
- Place the bag inside the clean compartment. If the plates are scattered, they are replaced. Only components need to be taken from a battery of the same brand, technical characteristics and power. Worn parts must be identical to the spare parts. If there is no replacement, you will have to buy a new battery.
- Solder the jumpers. The use of a soldering iron is not recommended. It is wiser to make the solder with a copper tip, not forgetting to connect the negative to the negative output, and the positive to the positive. Use lead rod for soldering.
- Fill with electrolyte.
- Install plastic. It can also be soldered with hot plastic.
All that remains is to charge the battery. The compartment should now be boiling.
Video
It’s better to see once how specialists eliminate the consequences of closing cans. Watch the video to see how to reset a closed battery.
Discussion in the "Audi Repair" section started by serj32, January 5, 2011.
You are using an outdated browser. This and other sites may not display correctly. You need to update your browser or try using a different one.
When the electrolyte begins to boil while charging the battery, many motorists wonder about the possible consequences of this phenomenon. For each battery, similar processes have different intensities: from the release of small bubbles to active boiling. We will tell you why this happens and what measures need to be taken in these cases.
Identifying the cause of the breakdown
There is no need to start cutting the battery right away. Initially, it is worth assessing the condition of the electrolyte in the compartment, which shows no signs of life. It is convenient if the battery is sealed in transparent plastic. If the case is made of dark material, use a battery hydrometer to pump out the electrolyte. In the absence of a device, you need to come up with a way to pour the contents out of the jar.
If the electrolyte:
- Transparent. The compartment is either not fully charged, or the bank is short-circuited. The charge needs to be balanced. Initially, completely discharge the battery, and then put it on a full charge. If there is no boiling in the problem compartment, cutting cannot be avoided.
- Muddy. There is an 85% chance that the lead plates fell off. You will have to replace or buy a new battery.
Initially, it is recommended to try basic manipulations - discharging and charging, and only then resort to emergency measures. The main thing: do not forget about your own safety.
Methods for determining a boiling battery
If you have a serviceable battery, then this process is easiest to determine visually. For example, as shown in the video below:
If you have the most common maintenance-free battery today, then the boiling process can be determined by indirect signs.
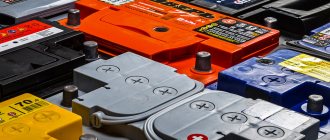
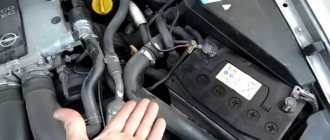
- The first most common sign of boiling is the appearance of a greenish coating and abundant oxides on the battery terminals, such as those shown in the figure below;
- Another sign of boiling is the smell of electrolyte appearing in the engine compartment. It is quite sharp and can be heard even by people without a keen sense of smell;
- Another sign may be the appearance of rust on the hood in the area of the battery and severe corrosion of the battery shelf;
- There are also exotic ways to determine the boiling process. Some drivers, when they suspect a boiling battery, connect a balloon or a condom to its gas outlet tube. If the battery is boiling, it will begin to inflate;
- Another exotic way is to use a medical stethoscope. If you apply it to a boiling jar, you can hear a characteristic gurgling sound;
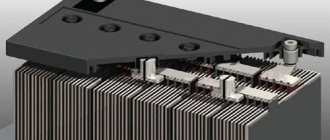
How can you check the battery “banks” separately?
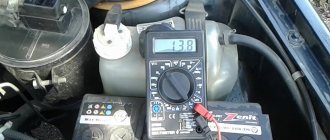
In conclusion, we will consider a fairly simple technique that allows you to clearly assess the condition of each battery cell. It consists of measuring the voltage of each “can” separately, and allows you to identify the above-described defects - short circuit, polarity reversal, sulfation and imbalance.
To check, you will need a fairly accurate multimeter and a lead probe. As an excellent alternative, you can use solder in the form of a wire (without flux inside) used for soldering radio components. The battery should be fully charged before testing. Next, one of the multimeter probes is fixed to the positive terminal of the battery, and the second (lead) is carefully lowered into the electrolyte of each compartment. The device readings are recorded for further analysis.
Important! The lead probe must be lowered only into the electrolyte, without touching the plates. Otherwise, there is a risk of creating a short circuit between differently charged electrodes. In some batteries, directly under the plugs there are not plates, but massive lead bridges. It is safe to touch them with a probe.
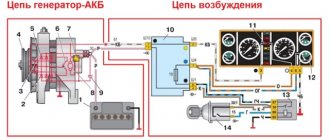
As a result of checking a “healthy” battery, you should get something like the following picture.
As can be seen in the image, at each subsequent cell the voltage is added with a very specific pattern. This happens because each cell produces a voltage of approximately 2.1 V when charged, and in a battery they are all connected in series. Accordingly, in a working battery, approximately 2.1 V will be added in each subsequent compartment when measuring voltage.
If any of the “cans” is sulfated or unbalanced, then when measuring the voltage, not 2.1 V will be added to it, but less. In each subsequent compartment the numbers will also be smaller than shown in the diagram above. If the cell is completely short-circuited, then when measured it will show the same voltage as in the previous “bank”. That is, in fact, if you take it separately, it will produce zero volts.
To get more accurate figures, it is necessary to take into account the so-called delta of the potential difference between the probe and the electrolyte. This indicator is extremely small (about 0.09 V), and when measured with a cheap multimeter it will not spoil the weather much. By the way, it is precisely because of this delta in the diagram that the voltage between the positive and negative terminals differs from the voltage between the positive terminal and the electrolyte of the last cell (by 0.09 V).
Is the boiling process normal or not?
A car battery only looks like a solid device from the outside. It is actually made up of self-contained compartments called cans. Their number is equal to the number of plugs, usually 6 compartments. In fact, they are only partially isolated from each other - they are connected to each other by the electrolyte poured into the battery. Insulating the plates is a necessary measure to reduce the risk of failure of the entire battery due to short-circuiting and other troubles.
In a normal, fully charged state, each bank is capable of producing a voltage of 2.1 V. Since they are connected in series, the potential difference between the extreme terminals of the battery will be the arithmetic sum of the voltages in each of the banks, that is, 12.6 V.
Under normal conditions, the car battery does not need to be recharged, since this function is performed by the generator. The autonomous power supply is used only when the engine is turned off. Usually to start the engine, but many motorists consider it okay to listen to music or use gadgets even when the power unit is idle.
One way or another, there are situations when the battery is so discharged that the driver begins to experience difficulty starting the engine, and to normalize the situation, the battery is charged.
Expensive chargers from well-known manufacturers can do this automatically, turning off charging as soon as the voltage in the banks reaches the nominal values. Cheap chargers will continue to supply voltage to the battery terminals, and when the density of the electrolyte reaches a certain value, under the influence of current, the water that is part of the electrolyte begins to decompose into oxygen and hydrogen. Both gases will tend to the surface of the liquid in the form of bubbles. This process is called boiling of the electrolyte.
When the liquid begins to boil, this is a signal that the battery needs to stop charging. If this is not done, boiling will contribute to an increase in the density of the electrolyte: the proportion of light water will decrease, and the concentration of sulfuric acid will increase. The more water evaporates, the lower the electrolyte level will be. If boiling occurs for a long time, the battery plates may become exposed - they are usually covered with a one and a half centimeter layer of liquid. In contact with air, the heated plates begin to collapse, which leads to a decrease in their original capacity.
So you need to control the charging process, especially when using inexpensive or homemade chargers.
However, some motorists deliberately recharge the battery if its density is below nominal, reducing the proportion of water. This method is applicable, but you need to understand that in this case the electrolyte level decreases, and it will need to be topped up.
So boiling, if short-lived, is unlikely to cause much damage to your battery, and in some cases it will even be beneficial.