Replacing the brake cylinder of VAZ 2113, 2114, 2115 with your own hands
If the braking of the car has worsened, a leak has appeared at the gas turbine engine, the fluid level in the system decreases, the master brake cylinder of the VAZ 2114, 2113, 2115 needs to be replaced. This is an important component of the car, it distributes forces between the circuits. If it fails, the functionality is incorrect, and the movement of the machine is unsafe. But the GRC does not break down right away; as a rule, it all starts with nuances. The procedure is simple, do-it-yourself repairs are possible without the help of a car mechanic. Before you figure out how to repair the GTZ, so that the work is correct, it is advisable to familiarize yourself with its structure.
Tools that a master will need in his work
To dismantle the GTZ, as well as remove the rear brake cylinder of the VAZ 2115, it is advisable to have an assistant and the following tools:
- pliers;
- standard set of wrenches for cars;
- special key for fittings;
- metal brush;
- screwdriver;
- large syringe;
- wide container or rags;
- TJ.
Replacing the gas turbine unit can also be entrusted to car service technicians; as of October 15, 2022, the average cost of work for service stations is 850 rubles
. But by performing the operation yourself, you can save not only time and money, but also assess the condition of the brake system as a whole and the components adjacent to it. Below in the text is the order of work.
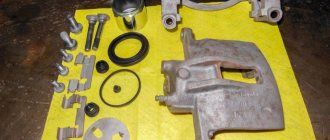
Disassembly and assembly of the cylinder
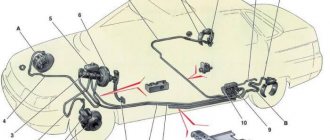
To begin, you can remove the reservoir from the master cylinder. Then you need to unscrew the locking screws (numbered 10 in the figure), after which we remove all the parts one by one.
Before assembling all the parts, wash them with isopropyl alcohol, dry them or wipe them with a clean dry cloth, but do not allow them to come into contact with kerosene, diesel fuel or mineral oils, which will harm the seals.
Important! It is necessary to wash the O-rings in isopropyl alcohol, but no more than 20 seconds, after which you need to blow them with air.
We put the working surface of the pistons and the cylinder mirror in order. They must be clean, free of rust and other effects. It is better to replace the O-rings with new ones every time, even if they are in good condition.
Before assembly, check the elasticity of the piston spring. Its length under a load from 34.3 to 41N should be 36 mm, under a load from 62.3 to 72N - 21mm, and in a free state - 57.5 mm.
The process of assembling the brake master cylinder is the reverse of disassembly. Don't forget to lubricate all parts with brake fluid. In this case, it is better to replace the gaskets under the locking screws with new ones.
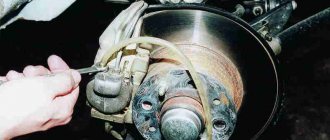
Worth knowing: The most common defect that causes brake fluid leakage is a leak in the rear cuff of the brake master cylinder. A leak can be determined by the presence of oil (greasy dirt and flow down) from the junction of the master cylinder and the vacuum brake booster). It is enough to open the hood and inspect this joint.
Replacing the vacuum booster on VAZ 2114, 2115, 2113 cars
— First, you should familiarize yourself with what was described above about replacing the brake master cylinder. If you only need to replace the vacuum brake booster, then you don’t have to completely unscrew the master brake cylinder, but just disconnect the fittings that are on the left side and move the brake cylinder to the side so that it does not interfere with us when replacing the vacuum booster.
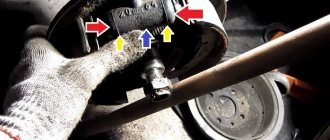
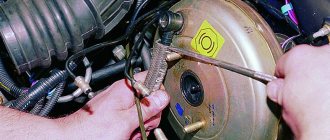
— now you should disconnect the hose from the check valve (Figure 5a) and remove the brake pedal locking pin bracket from the interior, and then remove the pin itself (Figures 6 and 7).
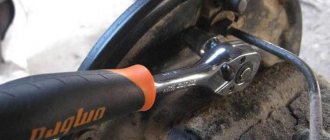
— using a “13” wrench (whichever is more convenient, socket or union), unscrew the 4 nuts for securing the vacuum that are attached to the car body, shown in Figure 8. They are very inconvenient to change, but I think you can handle it.
The process of replacing the turbocharger and brake fluid
When the tools, new mechanism and fluid are prepared, you can begin dismantling the old VAZ 2114 spare part:
- The first step is to disconnect the negative terminal from the battery. Replacing the master cylinder involves completely removing the old brake fluid - this is best done with a syringe;
Advice! When assembling the system, motorists often confuse brake pipes. To make your work easier, it is recommended to sign them with a marker. This applies to any parts in the VAZ 2114 car.
- Once the threads have been removed, dismantling the main unit can begin. Using the “18” socket, you need to remove the nuts that attach the main cylinder to the amplifier;
The vacuum booster may also need to be replaced. In this case, remove the fitting and turn the main unit to the side. After this, you need to unscrew the hose and go into the interior of the VAZ 2114 car, where the pin locking bracket is located. After removing all the fasteners, you can install a new fluid pressure booster.
Some signs of its malfunction
The driver should be alert to the following comments in the operation of the brake system:
- Liquid leakage from the tank;
- The brake pedal sinks when pressed;
- The appearance of air in the car brake system;
The manifestation of at least one of these signs should cause an immediate response from the driver to eliminate it.
Restoring the performance of the GTZ is impossible without removing it, so it will have to be removed from the car.
Main malfunctions of the turbocharger and brake system
In order to diagnose the breakdown in time and fix it, it is important to know the signs of a malfunction in the master cylinder.
1. Severely worn pads or a leak of working fluid in the brake system can cause a decrease in its level. As a result, operation of the vehicle is prohibited until repair work is completed.
It is important to carefully examine the condition of the brake system pipes, assess the condition of the turbocharger, check the working cylinders, connecting hoses and calipers. If a leak is detected, the damaged unit must be replaced.
2. If the turbocharger becomes jammed or fails, braking efficiency may decrease, and the risk of “softening” the brake is high. This occurs due to a decrease in working fluid in the system or air entering it. The situations described above are also possible when the liquid boils.
Main brake cylinder ATE VAZ 2108-21099, 2110-2112, 2113-2115
- We guarantee fast processing of your order during business hours (we work from 11-00 to 20-00, Saturday and Sunday are days off).
- We guarantee reliable packaging of your order (when sending it by Russian Post or transport company).
- We guarantee the fastest possible dispatch of your paid order (within 2-4 business days after receipt of payment).
- We guarantee a refund or exchange for another product (with recalculation) within 14 days from the date of receipt of the order (the product must be in good condition, without traces of installation, delivery costs are not reimbursed).
- We guarantee a free exchange of goods (transportation costs at our expense) if the purchased goods turn out to be defective.
Payment Methods
Delivery in Russia and abroad
Pickup in Moscow
- Description
- Reviews
APPLICABILITY: VAZ 2108, 2109, 21099, VAZ 2110, 2111, 2112, VAZ 2113, 2114, 2115.
The largest manufacturer of automotive security systems in the world!
The company's work is divided into 2 areas: Continental Temic - electronic components and Continental Teves - one of the world-famous manufacturers of electronic and hydraulic brake systems, chassis control systems, electronic air suspension systems, sensors.
Continental Teves works closely with Continental Temic as part of the joint operation of Continental Automotive Systems (CAS), which allows them to jointly create unique solutions.
ATE Products:
— Brake discs — Sports brake discs (Power Disc) — Motorsports brake pads (Power Pad) — Brake pad kits — Repair kits — Brake master and slave cylinders — Clutch master and slave cylinders — Brake calipers — Handbrake and clutch cables — Brake hoses
ATE supplies its products to all major car manufacturers, including VAG (VW, AUDI, SKODA), FORD, GM, BMW, TOYOTA, etc.
Symptoms of problems
The general technical condition of the car (including the brake system) can be checked using a personal diagnostic adapter - a car scanner. These types of devices are widespread and have a wide price range. We would like to draw your attention to the budget model of Korean production Scan Tool Pro Black Edition.
At a cost of about 2 thousand rubles. This scanner is capable of fully diagnosing your car (engine, gearbox, transmission, abs, srs and much more), which will pay for itself in 1-2 trips to the service station. The adapter is quite easy to use, has Russian-language software and is compatible with most cars produced in 1993. The device will also be useful when buying a used car, as it can show its real mileage and VIN.
The fluid brake system consists of many parts that can become unusable: pipes, wheel cylinders, calipers, drums and pads. Typical signs of a faulty master cylinder:
- After pressing the pedal, the car stops slowly. The reason is that the cuffs of one or two pistons have lost their tightness - they have cracked or “floated”.
- To slow down, you need to press the brake pedal hard. The phenomenon occurs due to swelling of the rubber of the piston seals.
- The brake pedal travel is too short. The fluid inside the cylinder has nowhere to go because the compensation hole is clogged. Another option is that the passage is blocked by a swollen rubber seal.
- A common symptom is pedal failure, the brakes coming on at the end of the stroke. This indicates complete wear of the cuffs; as a result, liquid penetrates behind the piston and rushes into the expansion tank - the cylinder “bypasses.”
- The pads do not release the brake discs and drums and get very hot when driving. Options: one of the pistons is jammed or the bypass hole is clogged.
The listed symptoms of a GTZ malfunction are similar to malfunctions of other elements. Pedal failure also occurs when a large amount of air enters the tubes or loss of fluid in one of the working cylinders. Sluggish deceleration and increased force on the pedal are often caused by a breakdown of the vacuum booster - a cracked membrane or a lack of tightness at the joints of the hose that takes off engine vacuum.
There are signs that clearly indicate the performance of the main hydraulic cylinder and the malfunction of other elements:
- during braking, the car pulls to the side - the problem lies in a certain circuit or wheel;
- jamming of the brake mechanisms of one wheel;
- creaking and squeaking when braking;
- heating the discs and pads on one wheel.
If you eliminate these symptoms, it will become easier to check the brake master cylinder in a garage. This also includes obvious brake fluid leaks and the knocking sound of worn calipers.
Vacuum booster
The braking system of a car certainly cannot be called perfect, so it has to be supplemented with devices that help improve efficiency. One of them is a vacuum booster.
Application and purpose
Today, a vacuum amplifier is in great demand because it is highly efficient.
Its tasks are extensive, but the amplifier copes with them all perfectly:
- The degree of resistance of the brake pedal increases;
- Reduces the load on the brake system;
- Acts as a highly efficient auxiliary unit;
- Has a positive effect on the service life of the brake system, etc.
This element has the following components:
- Dense body, for the manufacture of which a high-strength polymer is used;
- The diaphragm, which is also called the collecting node;
- Monitoring or control specialized valve;
- Pusher. It allows you to return the engine elements to their original position when there is no power;
- Main piston rod of the brake system cylinder (main);
- Switch return spring.
The body of this spring has two cellular divisions, which are divided into vacuum and atmospheric. Cells are often called chambers.
- The vacuum chamber is a cell directly connected to the brake master cylinder.
- The atmospheric chamber is a cell located opposite the brake pedal. Its open part of the body rests on the brake pedal.
It is also worth noting the diaphragm, which performs two very important tasks:
- Corrects the position of the piston in space;
- Pumps brake fluid to the main brake cylinders.
Installing a vacuum booster involves a serious change in the sensitivity of the pedal, so it is strongly recommended not to apply a large and sudden force to it in the “first couple”. Pressing should be done carefully and smoothly.
Advice from professionals
- Before completely assembling all the parts into one whole, it is important to treat them with isopropyl alcohol, blow them off and wipe them with a rag.
- Do not allow parts to come into contact with kerosene, gasoline or other oils, as they can damage the integrity of the seals.
- Before replacing the main brake cylinder on a VAZ 2114, it is necessary to restore the working body of the unit in proper condition, remove oxidation, plaque and other contaminants.
- It is important to monitor the sealing of the mechanism and change the O-rings in a timely manner, even if they are still in good condition.
- All units must be lubricated with brake emulsion during assembly.
- It is imperative to change the sealing gaskets that are located under the screws.
- After replacing the main brake cylinder on a VAZ 2114, it is necessary to bleed the hydraulic brake drive to remove air from the system.
- When dismantling blocks with wires, it is necessary to close all openings in the main mechanism and pipeline to prevent dirt and dust from getting inside, or to protect yourself from liquid leakage.
- When disassembling the unit, it is first better to remove the barrel of the master cylinder, and then unscrew the locking screws, which will allow you to effectively and easily access all other components of the system.
- The most common cause of master cylinder failure is leakage of brake fluid, which indicates a faulty cuff of the unit. To see oil stains, you need to open the hood and look at the joint of the unit.
vote
Article rating
Sequence of work
To carry out the work correctly, you need to provide a level platform for the car and a place to place spare parts and tools. If unexpected situations do not arise, this operation, like replacing the rear brake cylinder of a VAZ 2114, can be completed in half an hour.
- Remove the negative terminal from the battery contact.
- Now you need to disconnect the block from the sensor located on the cover of the GTZ barrel.
- First you need to clean the sensor contacts with a brush or solvent, removing deposits and accumulated oxides from them.
- Now the tank is accessible.
Open the lid and pump out the liquid. Now you can install the GRC. Its installation begins with the tank - it needs to be washed. - The cylinder is secured in its original place on the amplifier with two nuts.
- Place a wide container or rags under the body. The barrel is filled with liquid to the maximum level.
Now you need to check the ability of the GTZ to operate. An assistant will be needed for this. He must press the brake pedal, but very lightly. At this time, the master, having blocked 4 holes with his fingers, must wait for liquid to appear in them: first in the front ones, then in the back ones. The person driving at this moment must hold the pedal, and the master must first connect the front tubes, then the rear ones. Record them.You can also watch the replacement of the GTZ in the video: