The cooling system of the VAZ 2114 is of great interest to motorists. Model 2114 machines have a hidden cooling system based on the use of a special cooling mixture. The movement of the cooling mixture occurs under the influence of a mechanical pump. The assembly principle of many Russian cars is carried out rather poorly, so the performance of many mechanisms, including the cooling system of the VAZ 2114, leaves much to be desired.
To identify and carry out the necessary repair work, you need to have an understanding of the condition and method of operation of the cooling system.
Disadvantages in the cooling system
The VAZ 2114 engine cooling system has a big drawback, because... requires constant monitoring, frequent maintenance and necessary repairs.
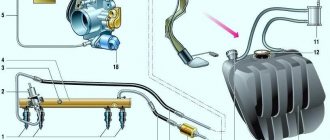
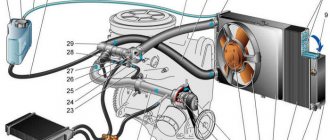
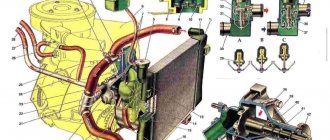
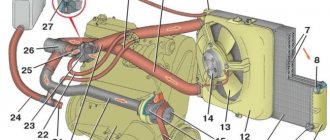
VAZ 2114 cooling system diagram
Cooling diagram for VAZ 2114 : 1 – element in the form of a plug for the expansion tank; 2 – expansion tank; 3 – hose for draining liquid from the pipe; 4 – hose passing between the radiator and the expansion tank; 5 – hose leading from the radiator; 6 – tank to the left of the radiator; 7 – aluminum tube; 8 – plug systems; 9 – tank to the right of the radiator; 10 – drain plug; 11 – middle of the radiator; 12 – casing for electric fan; 13 – plastic wings of the electric fan; 14 – electric motor; 15 – toothed pump pulley; 16 – pump impeller; 17 – camshaft drive belt; 18 – engine block; 19 – pump pipe; 20 – radiator hose with supply function; 21 – heater radiator hose with drain function; 22 – hose supplying coolant to the throttle pipe; 23 – exhaust pipe; 24 – hose for refilling; 25 – heater radiator hose with supply function; 26 – thermostat; 27 – coolant temperature sensor; 28 – coolant level indicator sensor.
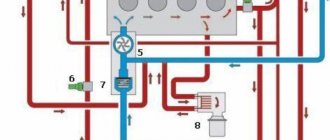
Operating principles of the 2114 cooling system
The performance indicator is based on the internal heat exchange effected by the cooling mixture. This option is the most effective.
The movement of the cooling mixture is carried out by force under the influence of a pump operating from a drive belt. The cooling mixture is filled into the system by pouring into the expansion tank. The volume of the VAZ 2114 cooling system depends on the engine size.
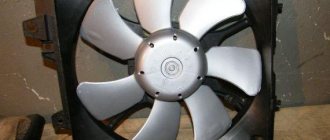
An electric fan is installed on the shaft of an electric motor; its operation is based on sensor readings, thanks to which it begins to perform its functions or stops them.
The thermostat valve is considered an important component of the system; it is equipped with valves: main and additional. It also includes a storage device that senses changes in temperature fluctuations in the air.
How does a thermostat work?
When the coolant temperature reaches approximately 87 degrees, it activates the main valve, which releases liquid into a large circuit. When the temperature reaches 102 degrees, the valve stops at 8mm.
The first “jamb”: the stove tap
The first problem area of the VAZ 2114 is the tap at the antifreeze inlet into the stove. On the one hand, its undoubted advantage is that if the fitting on which the pipe is inserted accidentally breaks, it is enough to replace the valve. For example, on most foreign cars of the 1990s, this fittings are an integral part of the stove radiator. If you break them during repairs, you will have to replace the entire radiator. But on the other hand, due to this design, the quality of coolant circulation is much worse. This means a comfortable stay in the cabin.
In addition, on the VAZ 2114 the supply of hot antifreeze to the stove is mechanically controlled using a cable. And this cable gets dirty and “stretches.” The cable itself may become loose over time. As a result, the stove will not work properly.
Usually, if you have problems with cold air from the stove, it is recommended to tighten the cord.
Adjusting the heater tap cable
The problem arises due to the general unreliability of the mechanical cable control system for internal heating on the VAZ 2114. We have already talked about this. Loosening or stretching of the cord from time to time leads to the fact that the faucet of the stove does not close (open) completely when moving the slider on the control panel. To solve this problem you will need:
- Find the heater valve control cable. It works under the panel in the area of the accelerator pedal.
- Pull the cable so that when the shutter is fully open, it also opens fully. Sometimes, with a strong tension, the cord is shortened a little for this. Don't overdo it or the faucet won't turn off. Warm air will blow even in summer.
Mostly it works. But it may happen that you will have to pull yourself up regularly. Often the problem recurs periodically. The fundamental measure to solve this is as follows: remove the tap from the system.
Removing the stove tap
This modernization allows you to eliminate the “extra” element from the system, increasing the overall efficiency of the system (improving circulation) of the VAZ 2114.
The operating procedure is as follows:
- Remove the faucet.
- To make (you can’t do without a turner) a pipe of the desired shape, connect the pipes to it.
- To improve circulation, a pressure pump is also installed in the system (usually installed on GAZelle, it can be found in GAZ spare parts stores). The pump runs on electricity. It is advisable to turn it on using a switch installed in the cab so that the pump can be forced to turn on as needed.
It is recommended to use this method of regulation only in regions with cold winters (where the temperature stays around -20 degrees Celsius and below for more than one and a half months a year). In all other regions, a regular oven should suffice!
Changing the coolant strictly according to the maintenance regulations
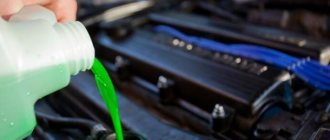
It is important to change the coolant frequently to prevent engine damage, because Over time, it loses its properties and is subject to heating.
To carry out work on changing antifreeze or antifreeze, you need to know the important components:
- Know the period during which you can use cooling liquid, antifreeze for 2 years, antifreeze for 5 years.
- Monitor the mileage for fluid changes, usually from 20,000 to 40,000.
- Check the condition of the fluid, paying attention to the color; if the color has changed after use, the fluid must be replaced.
Of course, the best choice would be antifreeze as a coolant, because... It has a longer shelf life, unlike antifreeze, and the system wears out less. But the price indicator for antifreeze is much cheaper.
When flushing the cooling system, you must:
- Drain all coolant from the system, tighten the plugs tightly and fill with distilled water to the maximum mark.
- Start the engine and warm up until operating temperature is reached.
- Let it run at about 3000 rpm. Be sure to monitor the movement of the engine temperature scale to avoid overheating.
- Then turn it off and leave it for 7 minutes, after which we pour the water out of the system. In case of water contamination, repeat the procedure until the effect of clean water is achieved.
Plug, sensors and expansion tank
And a little about the little things that, as it may seem, do not greatly affect the operation of the engine. However, if the spark plug is interrupted, the engine will boil. The reason is that it has two valves that work together to maintain the pressure just above atmosphere. Therefore, when the valves become clogged, the pressure in the cooling system increases sharply (the liquid expands and the air that was in the tank has nowhere to go).
Personally, on my VAZ 2109 the tank swelled once, a little more and it will burst! Now I’m writing and I’m surprised how it didn’t come to this. When I stopped and opened the hood, I just went crazy: the tank was round, like a ball, bubbling, steam was pouring all over the place. Therefore, the condition of the plug is extremely important for the normal operation of the system.
Similarly with the sensors - the one that is installed near the thermostat (if the fuel system has an injector, such a circuit is used), it serves not only to generate a signal to turn on the indicator, but also to turn on the electric fan. The signal from the sensor is sent to the electronic control unit, which is responsible for promptly turning on/off the electric fan.
Why is the cooling system malfunctioning?
The main malfunction of the cooling system occurs as a result of incorrect operation of the thermostat. In a particular case, the only solution will be to replace it.
Before you begin work on replacing the thermostat valve, it must be checked for serviceability by starting the engine while it is cool. When the engine warms up to about 90 degrees, touch the pipe at the bottom of the radiator, it should be warm, this indicates the serviceability of the valve; if the pipe is cold, the valve must be replaced.
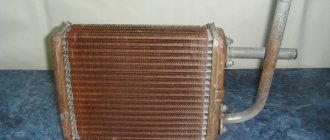
VAZ 2114 car models have an aluminum radiator; it is equipped with two additional tanks; the left one has a partition.
The cooling system is quite simple, so you can carry out repairs yourself. The radiator is the main component of the car’s cooling system, its main function is to prevent engine overheating by removing warm air from the engine to the outside.
The radiator consists of:
- The radiator itself.
- Bottom tank with pipes.
- Top tank with pipes.
Why the OS does not work
The cooling system most often stops working due to improper operation of the thermostat. You can't do anything other than replace it.
If you don’t know which cooling radiator is best to choose for the VAZ 2114, look at the existing one. Buy an analogue from the manufacturer, or purchase a device with the closest characteristics.
The fourteenth model is equipped with an aluminum radiator with two additional tanks. The radiator design includes:
- Radiator;
- Upper tank with pipes;
- Bottom tank with pipes.
Radiator replacement
Radiator VAZ 2114
- Initially, the plug from the expansion tank is unscrewed, and the radiator plug and cylinder are also removed.
- The cooling mixture is poured into a clean container.
- The radiator ventilation system is disconnected from the power supply.
- We disconnect the rubber tubes from the radiator system and expansion tank.
- All bolts are disconnected from the surface of the casing.
- Carefully holding the radiator, we take out the casing along with the fan.
- At the end of the work, the radiator is completely free and can be removed.
Before you begin, remember that when removing and subsequently installing the radiator, the engine must be in a cold state.
After replacing the radiator or repair work, it is installed in place and secured in the same way, but in reverse order. After installation, be sure to start the engine and check the result.
The second “jamb”: dampers
Another problem with the VAZ 2114 stove is the operation of the shock absorbers. In the car, their position is regulated by three other cables. They also weaken over time and do not work properly. A sign of a violation of their regulation is that hot air comes only from the central air duct, and cold air flows to the passenger and the front window defroster.
These cables are adjusted in the same way as the stove tap cable. When the slider is moved to the far right position, the doors should be fully open.
If you plan to adjust the heater when replacing the radiator, you should also pay attention to the condition of the dampers themselves. If they leak, they need to be covered with foam rubber or other insulating material. Any leaks lead to the dilution of the hot air flow with cold air and, as a result, to a deterioration in the operation of the furnace.
Modification of the left deflector
The left (driver's) deflector is located further from the hot air inlet. As a result, all the losses affect him more than anything else. It also happens that hot air is everywhere except for him. Of course, the driver will not like this very much, especially if he usually drives alone in the car.
To improve the heating system and provide a sufficient flow of warm air into the driver's air duct, an additional fan is installed inside it.
A computer processor cooling fan is ideal for this (you can buy it at any computer store, it costs about 500 rubles). They are available in different sizes and capacities, choose the right one according to the supply in the market. Or, if there is an old computer somewhere in the garage, take it from there - it will work.
- Pull out the deflector.
- Prepare a hole for installing the cooler.
- Prepare the wiring. If an additional pump is installed in the system, it is worth installing the power supply through the same switch. You can make a separate switch or, as a last resort, connect it from the ignition switch. It will turn on automatically when the engine starts.
- It is important to completely seal the remaining holes, otherwise the expected result will not be achieved.
After all these manipulations, you can restore or even significantly improve the operation of the stove. If your job involves constant driving around the city, these precautions are a must.
DIY engine radiator repair
The main problem as a result of which the radiator needs to be replaced or repaired is leakage of the cooling mixture, as a result of the presence of a hole or defects in the system.
Liquid usually leaks at the joints of plastic and metal parts. If the leak is small, just pour a special mixture into the radiator along with the cooling liquid, and under its influence the leak will disappear on its own.
If the leak is large enough, the radiator will have to be replaced.
Before proceeding with replacement, check the radiator for leaks; to do this, you must:
- Fill the bathtub with water.
- Plug the holes in the pipes tightly.
- The radiator is released into the water approximately 30-40 cm and a pressure of 0.2 MPa is applied.
- See if bubbles appear or not.
The radiator must be replaced after an accident in the event of a frontal or side impact.
But first, check
However, before you begin dismantling the furnace and making technological changes to its operation, make sure that other parts of the system are working correctly. Improvements won't work if the problem is different.
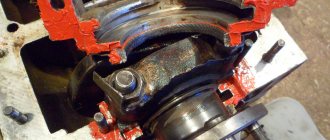
- Make sure the pump is running. A broken impeller impairs heat transfer. If your car often overheats in the summer and the heater doesn't work well in the winter, this may indicate this problem.
- Make sure your thermostat is working correctly. If it is locked, the stove does not heat up at all. Antifreeze does not disappear in a large circle. If it is locked open, the machine (and with it the stove) heats up very slowly, the air becomes a little warm.
- Make sure the heater fan is running. It should work in all speed modes.
- Make sure the cabin filter is not clogged. Where? Almost, it's probably your problem. Open the hood, you will find it in the part between the engine compartment and the passenger compartment, approximately in the center.
- Make sure your heater core is not clogged. It is recommended to wash it periodically (every 2-3 years) with special products.
And only after making sure that modernization is necessary and everything else works, proceed to disassembling the VAZ 2114 stove and modifying it. It is quite possible and even necessary to do this yourself. It is unlikely that car services will undertake such work.
Thermostat repair
The thermostat sensor also serves to maintain the set temperature norm. It blocks the movement of the cooling mixture into the radiator until the engine heats up to the desired temperature of approximately 90 degrees. Liquid begins to flow through the thermostat when Celsius reaches 95 degrees. Using a thermostat, the engine takes minimal time to warm up. The thermostat is located between the engine and the cooling radiator.
Common problems:
- The valve is closed - the engine, when not warmed up, holds speed very poorly and may stall.
- With the valve open, you can drive during frosts, or turn on the heater to maximum mode, otherwise the engine will overheat.
When carrying out repair work on the thermostat, it is allowed to lightly tap the housing with a screwdriver to move the valve.
If it is necessary to completely disassemble the thermostat, it is important to tightly close the pipes to avoid antifreeze leakage, only then disassemble the thermostat. At the end of the repair, it is better to replace the antifreeze.