3.8/5 — (81 votes)
VAZ 2106 engine cooling system diagram Today we will look at all the elements that make up the VAZ 2106 cooling system, and most importantly, we will learn how to replace the coolant, thermostat, and water pump. In the very first photo you can see all the elements of the system; it is on this basis that the entire story will now be built. It will also be discussed how to replace the coolant in the system, as well as how to get rid of air locks.
The amount of antifreeze in VAZ 2106
The technical specifications for any car indicate the volume of coolant that must be poured into the expansion tank for the normal operation of all systems and mechanisms. Let's find out how much antifreeze a VAZ 2106 will need to ensure uninterrupted engine operation.
What is coolant
First of all, you need to decide on the type of cooler, since the VAZ 2106 is filled with antifreeze and antifreeze. For this purpose, let's look at some of the differences and similarities between coolants.
Antifreeze
- this is the development of Soviet scientists and almost every second person is accustomed to calling any cooler this way. It consists mainly of water, ethylene glycol and additives of mineral origin.
This cooler can be mainly used in engines made of heavy metal alloys
, since the property of forming films on the internal parts of the engine and the system as a whole has a detrimental effect on aluminum parts.
Antifreeze almost does not protect against corrosion and it also tends to form sediment, which, when accumulated, clogs narrow hoses.
Antifreeze
- this is already a development of foreign automakers, which with each new type they are trying to improve, make it better and safer for the engine.
Antifreezes exist in the following classes: G11, G12, G12+, G12++, G13.
But, let’s say, the G11 class is similar in composition and quality indicators to the domestic cooler, so you can safely interchange them.
How to replace antifreeze in a VAZ 2106
Before you start replacing the cooler, you need to know how many liters of antifreeze to pour into the VAZ 2106, how best to do this so as not to cause harm, what type of liquid to choose so that it fits your car’s engine as best as possible.
Only after you have clarified all these points can you begin to replace the antifreeze or antifreeze yourself. But, if you are still not confident in the thoroughness of your knowledge, then it is better to contact qualified specialists at a service station.
Procedure for replacing antifreeze
So, having clarified all the necessary points, we found out that in the VAZ 2106 the volume of coolant is about ten liters
, so you need to take exactly ten liters of coolant. Before use, the concentrate must be diluted according to the instructions or purchased ready for use.
Coolant replacement steps:
- Check the sensor, which is responsible for the qualitative and quantitative indicators of antifreeze in the system.
- Drain off any remaining old antifreeze. To do this, you need a container into which the waste material will drain.
- Make sure that the engine has completely cooled down, because if this does not happen, you can easily get a serious burn.
- Place the car on a slope to better drain all unnecessary liquid.
- Unscrew the plugs and bolts from the radiator and expansion tank.
- Be sure to rinse the entire system several times with water or special products. This is primarily necessary when you want to use another type of cooler.
- Fill with new antifreeze and turn on the engine. Let it work for a while.
- Now you can check the sensor readings, temperature and how much antifreeze is in the tank. If the quantity is insufficient, you can add antifreeze to the required level.
- Tighten all the plugs and bolts and the car is ready for further use.
https://www.youtube.com/watch?v=https://www.youtube.com/watch?v=tVZI0WCXRXk
https://youtu.be/https://youtu.be/tVZI0WCXRXk
_
Expansion tank
It would seem that one can talk about such a simple and uncomplicated element as an expansion tank. On the one hand, any container that satisfies certain conditions can be used as it. But without this unit the cooling system of the VAZ-2106 will not be able to work normally. The volume of liquid always changes, it is not constant. But there is no more room for it in the pipes, engine jacket and radiator. And the reason that the volume of a liquid changes is the constant fluctuation of its temperature.
When the temperature increases (heating), the distance between the molecules of the substance increases. Everyone knows this from a physics course. Now imagine if the temperature of the antifreeze increased from zero to 80 degrees. Of course, its volume will also become larger. And the excess liquid has to go somewhere. They go through the pipe into the expansion tank. When the temperature drops, the volume steadily decreases. And all the excess that went into the tank is returned to the radiator and pipes.
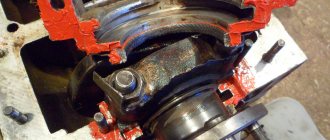
How to remove the pump on a VAZ 2106 car
Regardless of the chosen method of troubleshooting, the water pump will have to be removed from the car. The operation cannot be called complicated, but it will take a lot of time, especially for inexperienced drivers. The whole procedure is performed in 4 stages.
- Preparation of tools and work location.
- Disassembly and dismantling of the element.
- Selecting a new spare part or repair kit for an old pump.
- Restoration or replacement of the pump.
After disassembly, the removed pumping unit should be examined for restoration. If only primary symptoms of wear are noticeable - a slight play of the shaft, as well as the absence of damage to the housing and the main bushing - the element can be restored.
Buying and supplying a new spare part is much easier than disassembling and restoring a worn-out pump
Required tools and supplies
You can remove the “six” water pump on any flat surface. The inspection ditch simplifies only one task - unscrewing the generator mounting nut in order to loosen the belt. If desired, the operation is performed lying under the car - it is not difficult to reach the bolt. The exception is cars that have preserved side casings - anthers, screwed on from the bottom with self-tapping screws.
No special pullers or devices are required. The tools you need to prepare are:
- a set of heads with a crank equipped with a ratchet;
- wide container and hose for draining antifreeze;
- a set of ring or open-end wrenches with dimensions of 8-19 mm;
- mounting blade;
- flathead screwdriver;
- knife and brush with metal bristles for cleaning flanges;
- rags;
- protective gloves.
From consumables, it is recommended to prepare antifreeze, high-temperature sealant and aerosol lubricant such as WD-40, which makes it easier to loosen threaded connections. The amount of antifreeze purchased depends on coolant losses due to pump failure. If there is a slight leak, it is enough to purchase a 1 liter bottle.
Taking this opportunity, you can replace the old antifreeze, since the liquid will still have to be drained. Then prepare a full filling volume of antifreeze - 10 liters.
Disassembly procedure
The procedure for dismantling the pump on the “six” is greatly simplified compared to the newer front-wheel drive VAZ models, where you have to remove the timing belt and disassemble half of the drive with markings. On the “classic” the pump is installed separately from the gas distribution mechanism and is located outside the engine.
Before starting disassembly, it is advisable to cool the warm engine so that you do not have to burn yourself with hot antifreeze. Drive the car into the workplace, apply the handbrake and disassemble according to the instructions.
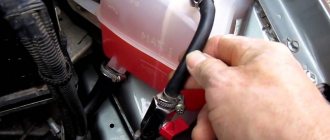
- Lift the hood, find the drain plug on the cylinder block and place a cut canister underneath to drain the antifreeze. The mentioned plug in the form of a bolt is screwed into the left wall of the block (if you look in the direction of travel of the car).
- Partially drain the cooling system by unscrewing the plug with a 13 mm wrench. To prevent antifreeze from splashing in all directions, place the end of a garden hose lowered into the container against the hole. While draining, slowly open the radiator and expansion tank caps.
- When the bulk of the antifreeze has flowed out, feel free to screw the plug back, tightening it with a wrench. There is no need to completely drain the liquid from the system - the pump is located quite high. After this, loosen the lower nut securing the generator.
- Remove the belt drive between the crankshaft, pump and generator. To do this, use a 19 mm wrench to loosen the second nut securing the generator to the adjusting bracket. Using a pry bar, move the unit body to the right and remove the belt.
- Using a 10 mm spanner, unscrew the 3 M6 bolts holding the belt pulley to the pump hub. To prevent the shaft from spinning, insert a screwdriver between the bolt heads. Remove the pulley.
- Separate the belt tension adjusting bracket from the pump body by unscrewing the 17 mm nut on the side.
- Using a 13 mm socket, loosen and tighten the 4 pump mounting nuts. Using a flathead screwdriver, separate the flanges and pull the pump out of the housing.
After removing the pumping unit, perform 3 final steps:
- plug the open opening with a rag and use a knife to clean off the remaining cardboard gasket from the landing pad;
- wipe the block and other components where antifreeze previously splashed;
- remove the pipe at the highest point of the cooling system connected to the intake manifold fitting (on the injector, the heating pipe is connected to the throttle valve block).
The pipe at the highest point is turned off for one purpose - to open the way for air displaced by antifreeze when filling the system. If you ignore this operation, an air lock may form in the pipelines.
We independently change the thermostat on a VAZ 2106
Before starting work, you should select tools and consumables. To replace the thermostat we will need:
- new thermostat;
- coolant (5 liters);
- basin for draining old antifreeze;
- flat screwdriver.
It should be noted here that the thermostat cannot be repaired. The reason is simple: inside it has a thermoelement with liquid or solid filler. It is the one that fails most often. But such elements are not sold separately, so the car owner has only one option - replacing the entire thermostat.
Sequence of work
Before performing any manipulations with the thermostat, you need to drain the coolant. Without this operation, further work is impossible. It is convenient to drain antifreeze by placing the car on an inspection hole and unscrewing the cap of the main radiator.
- After draining the antifreeze, the car hood opens. The thermostat is located to the right of the engine. Three hoses come to it.
- The hoses are attached to the thermostat pipes using steel clamps, which are loosened using a flat-head screwdriver.
- After loosening the clamps, the hoses are removed from the pipes manually, the old thermostat is removed and replaced with a new one. The hoses are returned to their place, the clamps are tightened, and new coolant is poured into the radiator. The thermostat replacement procedure can be considered complete.
Video: changing the thermostat yourself
So, the owner of a VAZ 2106 does not need to go to the nearest car service center to replace the thermostat. Everything can be done with your own hands. This task is entirely within the capabilities of a novice driver who has at least once held a screwdriver in his hands. The main thing is not to forget to drain the antifreeze before starting work.
Where does the cooling fan blow?
In this article we cannot ignore the question of where the mechanism that interests us blows. This is exactly what users ask experts and fellow car enthusiasts on dozens and hundreds of forums dedicated to vehicle maintenance.
In fact, the answer to this is very simple.
If in your car the air flow is directed not to the engine, but to the radiator, this only means that the fan was connected incorrectly after maintenance or repair work. Most likely, the terminals were simply mixed up. Install them correctly and never again wonder where the fan should direct the flow of cooled air.
Causes of overheating: thermostat
When the engine cooling system is operating normally, coolant flows through the block
cylinders This causes the liquid to heat up, so the system has a thermostat connected to a valve that opens and releases part of the coolant into the radiator, where it returns to normal temperature and again begins to circulate along a given path. As the temperature rises, the thermostat opens the valve and the antifreeze passes through the radiator completely so that the engine does not overheat. What happens if the thermostat fails?
The valve stops opening, antifreeze does not enter the radiator, and the engine boils. If you touch the bottom of a faulty thermostat with your hand, it will be cold, which means the valve is stuck closed. Boiling antifreeze can get into the piston part of the engine and the oil sump, which will lead to critical wear of the machine's engine.
If overheating occurs, you need to stop immediately and turn off the engine, because it will not last more than 10 minutes. Short-term overheating is not so bad, but prolonged exposure to increased temperature will lead to a complete stop and unserviceability of the engine, including melted pistons.
The process of removing a thermostat from a car
If there is a suspicion that the thermostat is faulty, you need to check the radiator and its pipes by touch. If the thermostat breaks and gets stuck open, the engine does not immediately begin to warm up, but takes longer to warm up. The radiator gradually heats up beyond measure; if the valve is jammed, its lower (outlet) pipe will be hot. These signs indicate a failed thermostat.
The cause has been found, now it’s time to fix it, which will require replacing the thermostat. Make sure the motor is completely cool before removing it. For convenience, you can remove the battery, and in some cases, the generator.
It is necessary to drain some of the coolant from the cylinder block and radiator. After this, remove the generator if it prevents you from getting to the thermostat mounting clamps. We loosen the clamps with a screwdriver, remove the pipes and take out the device itself. We first check the new thermostat with running hot water (the temperature should be about 80°). When the water warms up to 87°C, the thermostat valve should open, which means that the new device is working properly.
The thermostat is installed in place in the same way; all that remains is to add antifreeze, making sure that there is no air left in the cooling system, otherwise the engine may start to heat up.
Purpose
Engine cooling serves to forcibly remove temperature from heated parts. During the working stroke, a temperature of 700 - 800 degrees is created in the cylinder. If it is not forcibly lowered, the rubbing parts may expand greatly, and the crankshaft will jam.
Scheme of work
In addition to the fact that the liquid circulates inside the cylinder block, it is also further cooled when it enters the radiator. Thus, engine operation can be continuous.
Problems when paying with bank cards
Sometimes difficulties may arise when paying with Visa/MasterCard bank cards. The most common of them:
- There is a restriction on the card for paying for online purchases
- A plastic card is not intended for making payments online.
- The plastic card is not activated for making payments online.
- There are not enough funds on the plastic card.
In order to solve these problems, you need to call or write to the technical support of the bank where you are served. Bank specialists will help you resolve them and make payments.
That's basically it. The entire process of paying for a book in PDF format on car repair on our website takes 1-2 minutes.
If you still have any questions, you can ask them using the feedback form, or write us an email at
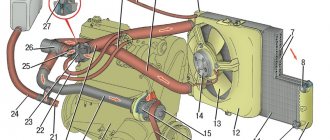
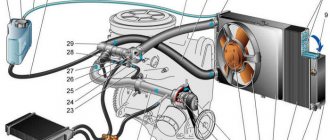
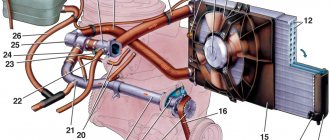
Cooling system
System Description
- Coolant drain pipe from the heater radiator.
- Coolant drain pipe from the intake manifold.
- Coolant drain pipe from the heater radiator.
- Coolant supply pipe from the cylinder head to the heater radiator.
- Thermostat bypass hose.
- Outlet pipe.
- Radiator inlet hose.
- Expansion tank.
- Tank cap.
- Steam removal hose.
- Radiator filler neck.
- Upper radiator tank.
- Radiator pipe.
- Radiator cooling fins.
- Fan electric motor.
- Fan.
- Coolant pump pulley.
- Rubber radiator support.
- Lower radiator tank.
- Radiator outlet hose.
- Alternator and coolant pump drive belt.
- Coolant pump.
- Liquid supply hose to the pump.
- Thermostat.
The cooling system serves to cool heating engine parts and maintain normal coolant temperature.
On VAZ-2103 and VAZ-2106 cars, the engine cooling system is liquid, closed type, with forced circulation of coolant, with an expansion tank.
The coolant pump serves to ensure forced circulation of fluid in the cooling system. The pump is a centrifugal type, driven from the crankshaft pulley by a V-belt.
The fan is electric driven and has a four-bladed impeller. The electric fan is turned on and off (depending on the coolant temperature) using a sensor located in the lower radiator tank.
The thermostat speeds up engine warm-up and maintains the required thermal conditions. It consists of a body and a cover, with a solid heat-sensitive filler, and has two valves: the main and bypass. The opening of the main thermostat valve begins at a coolant temperature of 77-86 °C, the stroke of the main valve is at least 6 mm.
The radiator serves to cool the liquid by air flow passing through the radiator core. The radiator is vertical, tubular-plate, with upper and lower brass tanks. A drain plug is screwed into the lower radiator tank, and a filler neck is located in the upper tank. The radiator filler plug contains inlet and outlet valves, through which the radiator is connected to the expansion tank.
The expansion tank is made of plastic and is attached with a clamp to the right mudguard of the body.
Removal and installation
For this operation you will need the following tools: wrench 13 mm, 17 mm; screwdriver.
1. Drain the coolant from the engine (see “Replacing the coolant”).
2. Loosen the clamps and disconnect the coolant inlet and outlet hoses from the engine.
Coolant supply hose
Device
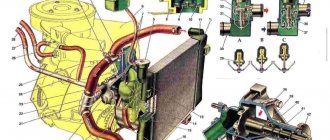
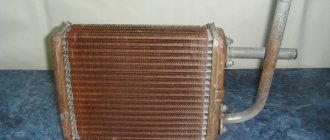
The first place where the fluid begins its flow is the radiator. On VAZ 2106 models, two types of radiators were installed - copper and aluminum. The first one is of higher quality, and if cracks appear on its surface, they can easily be welded. In contrast, any crack on an aluminum part is its certain death.
The radiator figuratively consists of three parts: the upper barrel, the cooling honeycomb and the lower barrel. The upper tank has a filler neck for adding coolant. During operation, hot liquid that has gone through one cycle is collected in this tank. Further, it descends into the lower barrel, through the honeycombs, simultaneously being cooled by a fan. And in the lower tank, the liquid is already completely cooled and ready for use.
Radiator design
Tubes are connected to the radiator from above and below: two wide and one narrow. A narrow tube connects the radiator to an expansion barrel, designed to allow excess liquid to enter it during heating and expansion. The upper wide tube connects the part to the thermostat, which, in turn, uses a valve to regulate the flow of coolant. Fluid can flow from the thermostat either back to the engine cylinder block or to the radiator.
For forced circulation, the system includes a pump that pumps antifreeze, creating pressure inside the block. Between the cylinders, a specially made void is provided, where this liquid enters.
Malfunctions
Quite often, on VAZ 2106 cars, the engine cooling system fails and requires repair. The main elements that are most subject to wear are the radiator and thermostat. More rarely, the cause of failure is in the pipes. In order to determine that there is a malfunction in this particular system, it is enough to know its characteristic symptoms.
The first thing that immediately becomes noticeable is engine overheating. At the same time, in the area of the legs of the passenger and driver, high temperature and hot air flows will be felt. The cause of this malfunction may be either a failure of the thermostat or radiator, or wear of the pipes.
The difference is that when cracks appear in the pipes, a leak of antifreeze or antifreeze will be visually noticeable. It will ooze out, either from cracks or from joints. When you open the hood, there will be visible places on the engine parts that differ significantly from the basic condition, especially in their shine. This effect is obtained due to the constant exposure of the coolant to the same part of the coating.
'); if("undefined"===typeof loaded_blocks_drive){loaded_blocks_drive=[]; function n(){var e=loaded_blocks_drive.shift(); var t=e.adp_id; var r=e.div; var i=document.createElement("script"); i.type=”text/javascript”; i.async=true; i.charset=”utf-8″; i.src=»https://www.drivenetwork.ru/data/»+t+».js?async=1&div=»+r+»&t=»+Math.random(); var s=document.getElementsByTagName("head")||document.getElementsByTagName("body"); s.appendChild(i); var o=setInterval(function(){if(document.getElementById(r).innerHTML&&loaded_blocks_drive.length){n(); clearInterval(o)}},50)} setTimeout(n)}loaded_blocks_drive.push({adp_id:e ,div:t})})(47602)
If the radiator or thermostat is broken, there may not be any drips, but in this case, the antifreeze simply does not enter the radiator, but constantly circulates in the system, not having time to cool, and as a result, boiling away.
The most common cause of antifreeze leakage from a VAZ 2106 engine is wear of the radiator cap valve. It is not possible to determine its failure immediately. If after each trip the antifreeze level decreases, then carry out the following procedure. Immediately after the engine warms up, open the hood and pull out the choke a centimeter so that the crankshaft speed reaches 2000 - 2500 rpm. Keep a close eye on the lid. If, over time, liquid begins to emerge from under it, then this is clearly the reason.
Stove tap
Perhaps, in the “sixes”, and in all the classics, this is the most unreliable element. Unfortunately, the quality of this unit is good, but its design is such that it is impossible to operate this crane for a long time. Its function is to block the flow of hot liquid that enters the stove radiator. In many ways, it is only because of this tap that the cooling system of the VAZ-2106 breaks down. Malfunctions of this unit can be seen by several signs. The very first is the presence of antifreeze on the carpet near the passenger seat.
The failure of the tap is accompanied by the fact that it either does not open the supply of hot antifreeze or does not shut it off. In this case, by the way, the metal flag located on the faucet body will move. The reason for this behavior is the destruction of the ceramic plates with which the feed is adjusted. The owners go to all sorts of tricks - they turn off the liquid supply pipe for the summer, and install half-turn water taps, which can be purchased for pennies. True, it is necessary to make adapters to connect them.
General characteristics of the VAZ 2107 cooling system
The VAZ 2107 engine of all models has a sealed liquid cooling system with forced circulation of coolant (coolant).
Purpose of the cooling system
The cooling system is designed to maintain the optimal temperature of the power unit during its operation and timely, controlled removal of excess heat from heating components. Individual elements of the system are used to heat the interior during the cold season.
Cooling system parameters
The cooling system of the VAZ 2107 has a number of parameters that affect the operation and performance of the power unit, the main of which are:
- amount of coolant - regardless of the fuel supply method (carburetor or injection) and engine size, all VAZ 2107 use the same cooling system. According to the manufacturer's requirements, its operation (including interior heating) requires 9.85 liters of refrigerant. Therefore, when replacing antifreeze, you should immediately purchase a ten-liter container;
- engine operating temperature - The operating temperature of the engine depends on its type and volume, the type of fuel used, the number of crankshaft revolutions, etc. For the VAZ 2107 it is usually 80–95 0 C. The engine is heated to operating condition depending on the ambient temperature for 4–7 minutes. If there is a deviation from these values, it is recommended to immediately diagnose the cooling system;
- coolant operating pressure - Since the cooling system of the VAZ 2107 is sealed, and antifreeze expands when heated, a pressure exceeding atmospheric pressure is created inside the system. This is necessary to increase the boiling point of the coolant. So, if under normal conditions water boils at 100 0 C, then when the pressure increases to 2 atm, the boiling point rises to 120 0 C. In the VAZ 2107 engine, the working pressure is 1.2–1.5 atm. Thus, if the boiling point of modern coolants at atmospheric pressure is 120–130 0 C, then under operating conditions it will increase to 140–145 0 C.
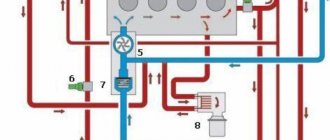
Six system diagram
It must be said right away that it consists of two circuits - small and large. Look at the photo and pay attention to the arrows, they indicate in which direction the antifreeze is moving. 2106 is not the only model with a similar circuit; all classics have similar system designs. It is necessary to make a reservation: antifreeze and antifreeze are one and the same thing. In fact, antifreeze is a brand of antifreeze, and it differs from the one you are used to seeing only in the quantity and quality of additives. Tosol is a Soviet designation for antifreeze.
Thermostat operation at different antifreeze temperatures
If we go into detail and decipher the word “antifreeze”, then it can be literally translated – “against the cold”. It is a liquid that does not freeze. Vodka is also antifreeze. It just doesn’t contain the necessary additives. Well, okay, enough of the ranting, we still need to figure out what the cooling circuit of the VAZ 2106 consists of. So, let's start from the very beginning. You come to your car in the morning, sit behind the wheel and start the engine. At this moment, the liquid in the system begins to forcefully move in a small circle.
Pump 2106 makes the liquid move. Its price in stores is about 700 rubles. But this is only a cover with an impeller. We'll look at the detailed design below. Now your engine is running, warming up, and flashes occur in the combustion chambers. As a result, the surface of the cylinders heats up to a high temperature. But all the heat is transferred to the liquid, which flows through the engine cooling jacket.
And when it warms up to a temperature in the range of 80..85 degrees, the VAZ 2106 thermostat comes into operation, its price is around 400 rubles. It closes the circulation in the small circle and releases antifreeze in the large circle. A large cooling circle is the inclusion of one additional unit in the circuit - a radiator. It is worth mentioning that fluid circulates through the heater radiator constantly, regardless of the position of the thermostat valves.
Expansion tank six
And if antifreeze boils in the expansion tank of a VAZ 2106, then we can assume two breakdowns - failure of the thermostat or pump. In most cases, of course, the thermostat is to blame. This device is very delicate and fragile, and inside the cooling system there is usually so much debris that settles on the surface of the thermostat valves. And if it breaks, the liquid circulates in a small circle without getting into the cooling radiator. And here it doesn’t matter at all whether you are driving in a traffic jam or on the highway at normal speed. The antifreeze will still boil.
Repair of a worn part
To restore the functionality of the pump, you need to replace the main parts - the bearing and oil seal, and, if necessary, the impeller. The bearing is sold assembled with a shaft, the stuffing box element and impeller are sold separately.
The bearing and shaft for the “six” pump are sold assembled
To disassemble the pump, prepare the following equipment:
- puller type “bolt inside a bolt”, external thread - M18 x 1.5;
- M18 driver and tap with a thread pitch of 1.5 mm - first and second numbers;
- vice;
- hammer;
- wooden guide.
The essence of the procedure is to alternately remove the impeller, shaft with bearing and oil seal. The work is carried out in the following sequence.
- Using a puller, press the shaft out of the impeller. If the impeller is made of plastic, first cut an M18 x 1.5 thread in it for a removable device.
- Unscrew the locking screw of the bearing assembly and knock out the shaft from the side of the landing sleeve. Try to hit in weight, but if the roller does not give in, rest the flange on the unclenched vise and hit through the adapter.
- Turn over the freed shaft with the bearing, place the hub on the jaws of the vice and, using the attachment, separate these parts.
- The worn oil seal is knocked out of the socket using an old shaft, the short end of which has a larger diameter and is used as an extension. Pre-clean the bearing race with sandpaper.
As a rule, the functional elements of the pump do not fail individually. The impeller blades break off due to play on the shaft and impact on the housing; for the same reason, the oil seal begins to leak. Hence the advice - disassemble the pump completely and change the entire set of parts. The undamaged impeller and pulley mounting hub can be left.
After repair, only the housing and the pulley hub remain from the old pump; it is better to replace the remaining parts
Assembly is performed in the following order.
- Carefully press the new oil seal into the socket using a pipe adapter of a suitable diameter.
- Place the hub onto the new shaft and bearing.
- Clean the inner walls of the bushing with fine sandpaper, insert the shaft into it and hammer it in until it stops. It is better to hit the end of the roller while it is in weight. Tighten the locking screw.
- Replace the impeller using a wooden spacer.
When driving the shaft, be sure to make sure that the hole on the bearing race coincides with the hole for the locking screw in the bushing body.
After completing the repair, install the water pump on the car using the instructions above.
Video: how to restore a VAZ 2106 pump
The pump plays a key role in the VAZ 2106 engine cooling system. Timely detection of a malfunction and replacement of the pump will save the power unit from overheating, and the car owner from expensive repairs. The price of the spare part is scanty compared to the cost of the piston and valve group elements.
Liquid pump
This element of the system allows you to improve the circulation of fluid through the pipes and radiators. Of course, due to the fact that the hot antifreeze moves, displacing the cold one, the system will somehow work. However, it is extremely important to give additional acceleration to ensure two conditions. Firstly, the liquid should not be heated to critical temperatures. Secondly, it must cool as quickly as possible. Short-term heating and cooling allow you to maintain the temperature at a given level.
The liquid pump is a rotor in an aluminum casing, which has an impeller on the inside and a drive pulley on the outside. It is with the help of the impeller that the cooling system of the VAZ-2106 works normally (the flow diagram of the fluid flow is shown in the figure above). The impeller is made of plastic. But there are also aluminum samples, but it is unwise to use them for the reason that they can quickly collapse if water is used rather than antifreeze. The most common pump failure is a bearing failure. It can break gradually if the drive belt is over-tensioned.
How to replace a temperature sensor
Before proceeding with the replacement, it is necessary to cool the engine, since on a hot engine there is a risk of burns from antifreeze. Cold antifreeze will flow out calmly, but when the engine is hot, it will flow out in a powerful stream. In order to make the replacement, we need a key for 21. We remove the terminals from the battery, then remove the protective cover from the sensor and disconnect it from the electronic control unit.
We unscrew the DT almost all the way and keep the new part ready. As soon as a few turns remain, you need to unscrew it manually and immediately plug the hole with your finger so that the antifreeze does not escape. After this, screw the new sensor into place and connect it to the ECU.
The instructions for replacing the sensor indicate that along with it, it is necessary to completely change the antifreeze in the car, but many prefer not to do this and quickly replace it with a movement of the hand so that as little coolant as possible leaks out.
Let's sum it up
So we figured out why there is pressure in the engine cooling system, why it can be excessively high or, conversely, low. There is often nothing complicated about checking it yourself, although a lot depends on the car. For example, it happens that the coolant temperature sensor fails. It can provide incorrect data to control devices, thereby misleading the driver. It can show both a high temperature of the power unit and, conversely, a low one. But this will not mean that the system is not working correctly.
If there are any breakdowns in the cooling system, they must be repaired as soon as possible. It is advisable not to operate a vehicle with a stuck cover or thermostat. After all, for some engines overheating is fatal, and major repairs are not cheap at all. In general, it is worth regularly checking the coolant level in the system to ensure that there are no leaks or other defects. It is also recommended to periodically clean the radiators from dirt, as this can cause increased engine temperature.
Didn't find the information you are looking for? on our forum.
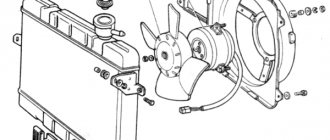
Radiator fan
It serves to increase the efficiency of the cooling system. With its help, a powerful air flow is created. The VAZ-2106 radiator cooling system can be built using a fan either mechanically driven or electrically driven. The latter is installed on earlier models. Its advantage is that it only works when the liquid temperature reaches a critical value. But a mechanically driven fan (it is simply mounted on the pump rotor) produces airflow constantly, regardless of the temperature in the cooling system. This makes it quite inconvenient to use in cold weather.