In the winter season, you need to have a good, and most importantly working, stove in your car. Well, it often happens that the heater radiator becomes clogged or begins to leak, in other words, it fails and requires replacement. In today's article we will talk about how to replace a stove radiator on a VAZ. We’ll also look at how you can repair and clean it.
Replacement
In order to carry out this procedure as simply as possible, you will need the following tool:
Flat and Phillips screwdrivers Small ratchet handle Head for 7 and 10 Extension
First you need to do a number of preparatory work:
Draining the coolant Removing the heater housing with fan
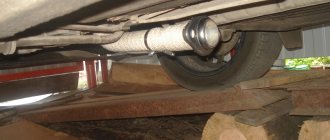
Next, under the hood of the VAZ 2106, you need to unscrew the clamps on the coolant hoses that go to the radiator. This is clearly shown in the photo below:
And we remove them by applying a certain force, pulling towards ourselves:
After everything done above, we go back to the salon and unscrew the nut securing the cable on the heater faucet, this is where you will need the head 7. The faucet is located on the right side (passenger side):
You don’t even need to unscrew it all the way, as the cable will come off the faucet on its own:
Now unscrew the two radiator mounting nuts, which are clearly visible in the photo:
Now you can pull it down, as clearly demonstrated in the picture, with considerable effort:
And holding the tube, we pull the heater radiator back:
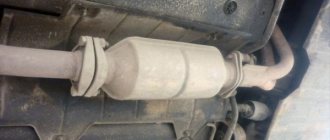
The result of the dismantling work is shown below:
If you need to replace the faucet, this is done very simply: unscrew the two nuts securing it to the radiator:
And remove it by lifting it up a little from the studs:
The price of a new one depends on the metal it is made from. Copper is expensive and costs about 1,400 rubles, but aluminum can be bought for only 600 rubles. When replacing, all procedures are carried out in reverse order.
Replacement of front seats at the link.
How to remove
The heater core is removed if it malfunctions or if cleaning is necessary. One way or another, the procedure for removing the heater core is quite simple.
Also, this operation is necessary if any problems occur in the heating system, be it a breakdown of the fan motor or a leak in the radiator itself.
To remove the heater core you will need the following tools:
Wrench 7; 10mm wrench; Screwdriver;
If you already have all this at hand, then the process of removing the heater core will go quickly and without unnecessary difficulties.
First things first, drain the coolant from the system. To do this, you need to open a specialized tap on the heaters and move the control lever to the right.
Let's move on to work under the hood. From there you should have access to the heater hoses. To open this access, you will need to unbend the brackets that hold the vacuum hose and move the hose and wiring harness to the side by hand.
Release the radiator pipes from the heater hoses. To do this, loosen the fastening of these hoses;
Remove the seal from the radiator pipes. To do this, unscrew the bolts securing it and, using a screwdriver, pry it off the edge and pull it off the pipes. Find the holes where the bolts were. Now you see that they contain spacers. Remove them and set them aside;
We dismantle the fan along with its casing;
We are trying to lower the heater radiator as much as possible. You can do this exactly as much as the crane control rod allows you. We remove the above-mentioned pipes from the hole on the front panel;
Then we remove the fastenings of the crane control rods, after which we finally remove the radiator from the car;
How to change
open-end wrenches for 7 and 10; flat and Phillips screwdriver; Antifreeze supply is approximately 1.5 liters;
Having moved the heater control lever to the right all the way, open the heating tap and drain the Antifreeze from the heater radiator;
in the engine compartment, release the fastening of the vacuum hose and wiring harness and move them to the side, thereby providing access to the heater hoses;
loosen the hose clamps and remove them from the pipes;
then unscrew the two bolts that secure the seal to the shield;
carefully remove the sealing gasket from the radiator pipes so as not to damage it;
Please note: two spacer washers are inserted into the gasket; it is advisable not to lose them.
remove the electric heating fan together with the casing (how to dismantle the electric fan is described below);
Warning: Before removing the electric fan, disconnect the negative terminal of the battery.
How to rinse
Instead of a brush, you can use a paint brush. In fact, the process is not simple, it will not take much time. When preparing your car for winter, you need to flush the heater radiator and do it with great attention and accuracy. Starting in the fall, you should check the cleanliness of the interior heater radiator. It will need to be explored both outside and inside. If upon inspection it becomes clear that the surface of the stove is not sufficiently cleaned of the presence of excess deposits, then you need to solve this problem with the help of a brush. When the work is done, you need to blow out the radiator grille with compressed air. If, after dismantling the radiator, a rusty, cloudy-looking liquid pours out of the heater, then you need to clean the system from the inside in the same way. They do it this way: pour a chemical solution inside, which is designed to clean the cooling system. The radiator must be flushed without removing it from the cooling system. In this case, the entire cooling system of the car’s engine is completely flushed. The chemical solution is poured into the expansion tank, it is located under the hood of the car.
There are plenty of ways, but if you are not confident in your abilities, it is better to contact a service center where qualified technicians will help you. Service station workers wash radiators many times; they probably know which is the best method for a specific car brand. It often happens that after flushing the radiator in the cabin heater, it is necessary to eliminate certain shortcomings that were made during the assembly of the car on the factory assembly line. By making diagnostics and adjustments, you can ensure that the stove works at maximum efficiency.
In most cases, the stove does not work well due to contaminated radiator honeycombs and its internal part. To fix this problem, remove the radiator and pressure wash it in a car wash. To do this, you will need a hose, one end is connected to the tap, and the other end to the radiator pipe. Then turn on the water and wash out the dirt that has formed in the radiator. But this method does not always bring the desired result, because a plaque from oxidation appears on the walls of the radiator, and it cannot be washed off with ordinary water, then additional funds are used. Such a remedy would be citric acid. You need to take one and a half liters of water, bring it to a boil, add a small packet of citric acid and wash the radiator with this solution. When half of the radiator is filled with water, you need to close the outlets from it and beat it thoroughly. Then open the pipes and drain the dirty liquid.
In addition, you need to wash the radiator from the outside as well, because it gets dirty from the outside too.
But if you wash the radiator in this way, as car owners say, you can only do harm, since a large flow of water can bend the radiator honeycombs. This is possible if you use the sink incorrectly, but if you use it correctly, everything will be fine.
To do this, you need to take the vario nozzle, set the maximum speed and wash at a distance of 60 cm, and not point-blank. This should be done at right angles. After washing, you need to put the radiator back in place.
When can flushing the heater radiator help?
If there is no damage or leaks, theoretically you can do without replacing the old heater. It is advisable to flush the radiator separately from the cooling system. You need to carefully choose cleaning products and follow all manufacturer’s recommendations. The selection of the reagent depends on the nature of the contamination and the metal from which the radiator is made.
You can start washing with a test blow with distilled water to understand the degree of clogging of the stove. Then we use the reagent, which will need to be washed out of the system after work. If everything is done correctly, the throughput of the tubes will increase, and the interior will again be heated normally.
There is no universal way to flush a radiator without removing it. Vehicle designs vary, and it is not always possible to clean the installation both inside and outside without dismantling. Moreover, the location of the heating system elements can create some difficulties in its maintenance and replacement.
Design and main malfunctions of VAZ stoves
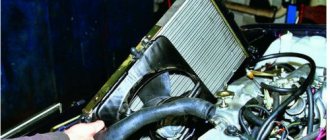
The standard radiator of the VAZ 2106 stove, despite its small size, copes with its task of cooling the liquid and warming up the interior quite well. The design of the interior heater can be seen more clearly below.
The operating principle of this device is shown in the figure.
The “six” type of heating system is one of the most common designs based on the use of liquid from the cooling system of the power plant. It consists of three main components - the stove itself, the price of which is acceptable for Russian car enthusiasts, mounts with control devices in the form of taps and air ducts with a radiator.
The air intake damper and valve of the VAZ 2106 stove are connected to control devices using flexible and elastic rods. The maximum right position of the upper device means the maximum opening of the tap and the greatest flow of coolant through the radiator into the heating system. If the lower device occupies this position, then this means the maximum opening of the air intake damper, which directs the greatest air flow through the stove further into the heating system.
Plastic deflectors with a variable angle of airflow into the cabin make it possible to change the direction of air flow and direct it in the desired direction. Structurally, sometimes called the air flow distribution cover, it is not connected in any way to the system central stove control switch. This damper is adjusted to open and close using a lever device mounted for comfort on the driver's side of the seat.
The volume of air moved through the VAZ 2106 stove, a video about which can be watched on the Internet, is regulated by a three-position toggle switch. With this switch you can set 2 fan speed ranges, both the lowest and highest levels. It is strictly not recommended to start the electric heater fan with the air intake damper retracted and the tap in the “open” position.
The main defects of the VAZ 2106 stove include the following:
- defects in the stove motor, as a result of which it does not start;
- depressurization of the radiator heating system or pipelines, which is why the stove in the VAZ 2106 does not heat well and the cabin becomes cool;
- sometimes the stove blows cold when there is not enough coolant in the system, and if, when adding it to the norm, the defect is not eliminated, you need to cover the front part of the radiator of the cooling system with thick cardboard and the situation should improve.
to “Repair #9 VAZ 2106 part 1, replacing the stove radiator, a story about the problems of the classic stove”
Hello. I recently discovered a problem that liquid was accumulating on the shelf under the glove compartment. I think it's antifreeze. What to check or what to do in this case? Thank you
Tolia, how do I use the diode lamps in the VAZ 2103 device?
If only I shined a flashlight on it, nothing can be seen))
where did you buy the stove??
Well done Tolyan! Thank you !
Thank you very much, I was freezing all the way and now the top type is just the lever not working))
the fool wanted to become famous, so he collects moss from the swamp and shows all sorts of bullshit
If the hot air is supplied weakly, provided that the heater radiator is not clogged and the coolant in the system is completely filled: - firstly, the air damper is closed, or it is clogged with leaves and other debris, secondly, check the heater radiator valve (stove) - perhaps it is not fully open or clogged, third, check the supply of coolant from the engine to the heater radiator, and fourth, check the return pipe going from the stove to the pump, it happens and it gets clogged. And the engine must be warmed up to at least 60-70 degrees.
Come on dude, tell us and share your experience. Come to me, maybe you’ll be interested in something Airbrushing on a VAZ-2107 (tuning the seven) - a car for pumping
FUCKING GRAPE HOW DOES IT PISS ME OFF KICK EVO CRY OF THE SOUL
If the stove is not working, it may also be airy
and you change this fucking speedometer is enough and everyone is already laughing about how you put the needle on the poor wretched car
shit can't be seen
Words are fucking useless)) everyone knows how to turn the stove on and off or change the name of the topic or write realistically how to change it big top fuck
what the heck, where were you taught? it’s called a heater fan. just in case, just so you know. ))))
The problem is in the fuse)))) Fuck you fucking idiot)))) fucked up
I look and am surprised! Zhiguli has always been famous for its stoves! Namely, copper radiators, which give off heat like no other metal. You just took it and changed it to aluminum! Why didn't the stove heat up? Elementary! I should have just taken it and cleaned it, ideally unsolder it, but I cleaned it with citric acid! And from a stove that didn’t provide heat, I got “Tashkent” and these aluminum ones don’t heat up compared to copper ones! I advise you to look at my Bortovik, for repairing the stove https://www.drive2.ru/cars/lada/2103/21033/krsvompi/journal/2300474/, I described it in detail and clearly!
Normally fucked up. Apparently the man tried. Look, fuck!
Did you even do it yourself? Because I made 10 mistakes in 1 minute! and not just the radiator, read the book!
Tolya! People! Please tell me - VAZ 2106, the air coming out of the stove is warm, but it’s barely blowing. What could be the problem? Maybe the air intake is covered with snow? What is the problem please? Last winter everything was ok, but now it’s out of the blue
Everything is great, except for one thing: there is no video of the actual repair, I would like to see it in the future
How to remove the stove on a VAZ 2105
Auto repair school Articles, tips and tricks on do-it-yourself car repair and maintenance
Article categories
New questions
Most popular
Top 5 (By votes)
- home
- Articles
- VAZ 2101, VAZ 2102, VAZ 2105, VAZ 2106, VAZ 2107, Zhiguli, Classic
- Replacing the radiator. Replacing the radiator.
Article categories
Replacing the heater radiator on a VAZ-2101, VAZ-2102, VAZ-2106, VAZ-2107 car
Motorists often remember about the heater radiator only when the autumn-winter period begins. No, there are times when they remember him earlier.
For example, the unexpected appearance of antifreeze or water (depending on what is poured into the cooling system) under the feet of the driver or front passenger. The reason for this phenomenon is a leak in the car's heating system.
But, most often, the driver learns about the malfunction of the heater radiator only when cold weather sets in. When you want warmth and comfort in the car interior.
You pull the heater switch knob towards the heat, turn on the fan and then, suddenly, instead of a warm flow of air from the air ducts, you get a flow of cool air or, another option, the formation of a puddle of antifreeze in the car interior. And as a result, a spoiled mood and a cool, uncomfortable environment in the car.
But, everything can be fixed (for any car) and quite in a short period of time (this is said about the VAZ-2101 and VAZ-2102 ).
In principle , replacing the heater radiator and other troubleshooting of the heating system on other Zhiguli - VAZ-2105, VAZ-2106, VAZ-2107 is not much different, there is a little more fiddling with the radio panel (bar), but this article will describe the process of repairing the heating system and replacing the heater radiator on a VAZ-2101, VAZ-2102 car.
Causes of heating system malfunction:
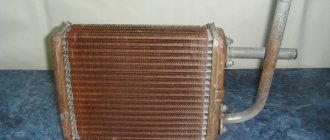
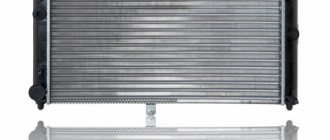
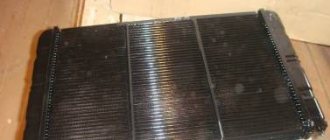
- The cause of an antifreeze leak in the car interior may be a rusted heater radiator or a metal pipe or heater tap . The exact cause can be determined by visual inspection. If the whole problem lies, for example, in the heater tap or pipe, then they can be replaced without disassembling the radiator casing and the Bar panels. If the culprit of the coolant leak is the radiator itself, then there are two options for solving the problem. First, if you have a copper radiator (old type), it can be repaired by cleaning, soldering, tinning, etc. The main thing is to find a specialist - a radiator technician. The second option is that you have an aluminum heater radiator . Everything is simpler here, it is better to replace it with a new one, it cannot be repaired.
- When the heater is turned on, cold air continues to blow from the air ducts. The reason is a violation of the coolant circulation in the car system, due to the fault of the heater tap not working (it is constantly closed) or the radiator itself is clogged. If the faucet is jammed, it should be replaced, but point 1 of this article will help us choose the right solution for the radiator (see above).
How to quickly and easily replace a heater radiator (stove) on a VAZ classic 2105
How to quickly and easily replace the heater core ( the stove ) in a classic VAZ 2105
. This video shows how easy and fast it is.
Heater radiators
Heating radiators (also known as heater radiators, also known as heater radiators) are heat exchangers that use the heat generated by the engine to heat the vehicle interior. They allow you to maintain a comfortable temperature and prevent the car windows from fogging up.
For reference: different names of this node have equal rights of use. For example, “heating radiator” and “stove” come from the function of this heat exchanger, “heater radiator” and “stove radiator” - from the installation .
LUZAR manufactures hundreds of heater radiators for a wide range of cars presented on the Russian market. They can be purchased in partner stores throughout Russia or online.
Many models of heater radiators are supplied to car factories in Russia and Ukraine - both for passenger cars and for trucks and buses.
The production range of manufactured stoves is constantly increasing; New types are being developed for the most popular cars in Russia.
Powerful R&D allows us to conduct research in the field of improving heat exchangers and create new designs that provide increased performance properties of heater radiators. Main areas of research:
- use of different types of tubes
- changing the location of the tubes
- change in the “fillability” of the core
- use of turbulators-swirlers
- use of various aluminum alloys
- testing of solders with different characteristics
- improving the corrosion properties of metal
- ... and many other R&D areas.
Aluminum or copper?
We recommend installing a copper radiator , as it is universal, repairable and has greater heat transfer compared to aluminum.
You have probably heard the saying more than once: “In the car - Tashkent” or “stove - Tashkent”. So, by installing a copper heater core, you will get a very warm car. Older people still remember those Soviet times... and there are still legends about the smooth ride and warmth of the interior in the VAZ 2106 car.
Some owners of old Zhiguli cars may have problems replacing the radiator. When installed, a new aluminum radiator may simply not “fit” into the stove body. The difference in the cases (01, 05) is very small, but it is there, so pay special attention to this fact. Before purchasing, ask the seller a question regarding the dimensions of the radiator, or better yet, bring the old one and compare them on the spot.
In order not to make a mistake, take a copper radiator. It is universal and fits all models.
Coolant replacement
Antifreeze circulating through the cooling circuit of the VAZ 2106 gradually loses its anti-corrosion properties, becomes dirty and forms scale. Therefore, periodic replacement of the fluid is necessary at intervals of 2-3 years, depending on the intensity of use. Which coolant is better to choose:
- initially the manufacturer recommended pouring G11 class antifreeze, colored blue or green (this also includes antifreeze, invented in the USSR);
- it is allowed to fill with liquid of classes G12 and G12+, made on the basis of ethylene glycol, the color is predominantly yellow and orange;
- the best and most modern option is G13 antifreeze based on propylene glycol, color – pink or purple.
The color of antifreeze is given by special dyes added by manufacturers at their discretion.
G13 class fluid is significantly more expensive than ethylene glycol antifreeze, but more durable. Minimum service life is 4 years.
To replace antifreeze in the cooling circuit of a VAZ 2106, you need to purchase 10 liters of new fluid and follow the instructions:
- While the engine is cooling, remove the dust shield located under the radiator drain plug. It is fastened with 4 8mm key screws.
- Open the stove tap, place a container under the drain neck of the body exchanger and remove the plug. A small amount of liquid will drain.
Immediately after unscrewing the plug, no more than a liter of liquid will flow out of the unit - Remove the expansion tank cap and slowly unscrew the top radiator cap. Antifreeze will flow out of the hole again.
The bulk of the antifreeze will drain out after opening the top cover of the heat exchanger - Remove the cap completely and wait until the system drains. Screw the plug into the drain hole.
Brass radiators may not have a drain outlet. Then you need to unscrew the temperature sensor or remove the large lower hose and drain the antifreeze through the pipe.
To prevent air pockets from forming when filling the circuit with new fluid, you need to remove the hose at the highest point of the system. On carburetor versions this is the manifold heating tube, on injection versions it is the throttle valve.
During the process of pouring antifreeze, air will exit the system through the removed pipe located at the highest point
Fill through the upper neck of the radiator, observing the removed pipe. As soon as antifreeze flows from the hose, immediately put it on the fitting. Then install the heat exchanger plug and add fluid to the expansion tank. Start the engine, warm it up to a temperature of 90 °C and make sure that the radiator housing is warmed up from top to bottom.
DIY replacement instructions
Replacing a heat exchanger consists of two stages: removing the old unit and installing a new device.
For the procedure, you should prepare the following tools and materials:
- Phillips screwdriver;
- a set of keys;
- sealant;
- a container for draining the working fluid, you can use a 5-liter water bottle;
- new heat exchanger;
- clean rags.
Photo gallery “Replacement and installation of a heat exchanger on a VAZ 2107”
In addition, you need to stock up on coolant and two rubber gaskets.
Features of dismantling
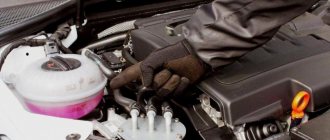
Before removing the heater radiator on a VAZ 2107, you need to drain the antifreeze from the heating system. To do this, it is better to install the machine on an overpass, inspection groove or other device that will allow you to reach the drain plug. To make the glass flow faster, it is advisable to warm up the engine.
The dismantling procedure consists of the following steps:
- To drain the antifreeze, unscrew the cap on the radiator and expansion tank.
- Having gone under the car, you need to place a container under the cylinder block and, unscrewing the drain plug, drain the liquid from the system. When the coolant has completely drained, you can screw the plug back in.
- In the engine compartment, use a screwdriver to loosen the fastenings of the clamps holding the heating system pipes. Then disconnect both hoses and heater tap tubes. Wipe off the spilled liquid with a rag.
- Further work is performed in the salon. You need to remove the radio shelf. To do this, two self-tapping screws are unscrewed.
- After dismantling the shelf, the heater tap will be accessible. Use a wrench to unscrew the cable fastening and move the free end to the side.
- The heater casing consists of two parts, which are held together by two steel brackets. Unfasten the brackets and remove the lower part of the case.
- Now the radiator can be carefully pulled out along with the heater tap.
- Then unscrew the stove tap and inspect the gasket. If it is unusable, then we replace it with a new one.
- Having unscrewed the two bolts of the inlet pipe, inspect the gasket. You should also check the functionality of the tap and replace it if it is faulty.
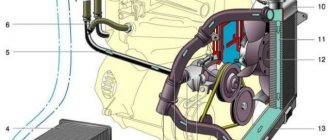
Design and operation of the VAZ 2106 cooling circuit
The main element of the cooling system - the water jacket - is part of the engine. The channels that vertically penetrate the block and cylinder head have common walls with piston liners and combustion chambers. The non-freezing liquid circulating through the ducts - antifreeze - washes hot surfaces and takes away the lion's share of the generated heat.
To transfer heat to the outside air and maintain a stable operating temperature of the engine, the cooling system of the “six” uses a number of parts and assemblies:
- mechanical water pump - pump;
- 2 radiators - main and additional;
- thermostat;
- expansion tank;
- electric fan triggered by a temperature sensor;
- connecting rubber hoses with reinforced walls.
Antifreeze is heated in the cylinder head and pumped to the radiator by a water pump
Water cooling of the engine is one of the most conservative car systems. The design and principle of operation of the circuit is the same for all passenger cars, only modern models use electronics, high-performance pumps and often have 2 fans instead of one.
The operation algorithm of the VAZ 2106 cooling circuit looks like this:
- After starting, the engine begins to warm up to an operating temperature of 90-95 degrees. The thermostat limits the heating - while the antifreeze is cold, this element closes the passage to the main radiator.
- The liquid pumped by the pump circulates in a small circle - from the cylinder head back to the block. If the cabin heater valve is open, a second flow of liquid passes through the small heater radiator, returns to the pump, and from there back to the cylinder block.
- When the temperature of the antifreeze reaches 80-83 °C, the thermoelement begins to open the damper. Hot fluid from the cylinder head enters the main heat exchanger through the upper hose, cools and moves to the thermostat through the lower pipe. Circulation occurs in a large circle.
The higher the temperature of the flowing liquid, the more the thermostat opens the passage to the main heat exchanger - At a temperature of 90 °C, the thermocouple damper is fully open. The antifreeze expanding in volume compresses the spring of the valve built into the radiator cap, moves the lock washer and flows into the expansion tank through a separate tube.
- If there is not enough liquid cooling and the temperature continues to rise, the electric fan is activated by a signal from the sensor. The meter is mounted in the lower part of the heat exchanger, the impeller is installed directly behind the honeycomb.
While the thermostat damper is hermetically closed, only the upper part of the main radiator heats up, the bottom remains cold. When the thermoelement opens slightly and the antifreeze circulates in a large circle, the lower part also gets warmer. Based on this feature, it is easy to determine the functionality of the thermostat.
I had an old version of the six, which was not equipped with an electric fan. The impeller stood on the pump pulley and rotated constantly, the speed depended on the crankshaft speed. In summer, in city traffic jams, the engine temperature often exceeded 100 degrees. Later I resolved the issue - I installed a new radiator with a temperature sensor and an electric fan. Thanks to efficient airflow, the problem of overheating was eliminated.
The expansion tank of the “six” does not work under pressure, so it lasts up to 20 years
Unlike more modern passenger cars, the expansion tank on the VAZ 2106 is a plastic container with a regular air valve in the plug. The valve does not regulate the pressure in the system - this function is assigned to the top cover of the cooling radiator.
Removing the side panels and glove compartment
To do this you will need a set of small screwdrivers and patience. You need to unscrew everything that is visible.
- Floor mounting screws;
- Right and left sides;
- Screws for securing cables, etc.
There are self-tapping screws that are covered with special plugs and are not visible at first, pay attention to this.
Try to pull the entire panel towards you; if it doesn’t work, check if everything is unscrewed. It's better to do it together.
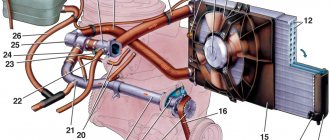
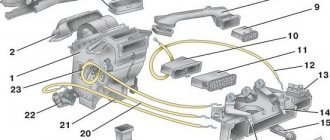
- Radiator of the heating system, for warming up the air and blowing inside the glass in the car interior.
- An air blower into the car interior, which is a classic electric motor equipped with an impeller. The component regulates the air flow to the dampers of the heating system or air conditioning unit.
- The damper of the thermoregulation mechanism, which regulates air flow through the radiator.
- A special execution system that controls and separates air flows.
- Control rod, pipe, air lines, hoses.
Preparing to replace the heater core
Stove failure may be due to specific reasons. Its incorrect operation may be associated with a malfunction of either one part or several parts at the same time. The stove may break down for the following reasons:
- Poor circulation of coolant due to clogging of the heater radiator channels with dirt particles.
- Coolant leak in the heating system mechanism.
To correct this situation, it is necessary to clean or replace the broken radiator of the Daewoo Nexia stove, which is a rather complicated process.
In order to save time, it is recommended to mark existing harnesses and wires.
Replacing a radiator consists of operations in which:
- The car is installed on an overpass or inspection hole.
- Electrical power from the battery is disconnected by disconnecting the negative terminal.
- The protection from the engine is removed, allowing for more access to the radiator.
- Drain the coolant from the coolant system.
Next, you can dismantle the heat exchanger by disassembling the central panel of the car and removing the tightening clamps and hoses.
What models of radiators can be installed on Daewoo Nexia
As numerous car owners note, a factory-installed radiator does not in all cases effectively heat the car interior during cold periods.
To ensure the required temperature level in the car showroom and more comfortable operating conditions, you can install other radiators in the car.
You can replace the factory radiator in three different ways, using the radiator of the Luzar, Daewoo Lanos or VAZ-2106 model.
Radiators are classified according to various criteria, one of which is the manufacturing model. So, according to this criterion, radiators are:
- Copper radiators, with typical properties and high cost;
- Brass radiators;
- Aluminum radiators, which are the cheapest.
Since all the models listed above have approximately the same technical and operational properties, the choice of the most suitable model must be made based on the build quality of the product.
When choosing a radiator, you need to focus on certain nuances regarding:
- How integral is the structure of the device;
- what is the quality of the seams along the edges;
- to what extent are the dimensions respected?
- whether there is any structural damage.
Features of heating in a Daewoo Nexia car
The Daewoo Nexia must be equipped with an additional heating device for the interior heater. Its use should be related to the purpose of warming up the air flow.
There is no need for frequent replacement in this brand. This is done only in cases of its breakdown or if the owner wishes to heat the interior more efficiently. Typically, the product is produced within 6-8 years of continuous operation of the car.
The component is replaced if the product is damaged, which manifests itself in the fact that coolant is leaking, or if the heating of the interior is insufficient when the heater is on.
The radiator removal operation is best carried out from the side of the engine compartment. When removing a product from a car interior, various elements must be dismantled.
How to dismantle a stove radiator yourself
Stages of self-dismantling:
- Dismantling the floor-type center console, allowing you to gain good access to the radiator housing.
- Removing all pipes connected to the heating radiator from the side of the engine compartment.
- Closing the holes in the radiator housing with rags or rubber plugs.
- If the car's heating system has an electric interior heater, you should disconnect its electrical connector, which is located to the left of the car's heater and the ground wire.
- Dismantling the adapter from the stove heating radiator from the bottom of the machine.
- Removing the spring metal brackets securing the radiator casing to the car body.
- Release the lock, which is located in front of the radiator housing.
- Removing the product body.
- Removing the radiator from the housing.
Air cooling fan operation
If, due to heat or other reasons, the main radiator cannot cope with cooling and the temperature of the liquid continues to rise, an electric fan mounted on the rear plane of the heat exchanger is switched on. It forces a large volume of air through the plates, increasing the cooling efficiency of antifreeze.
How does the electric fan start:
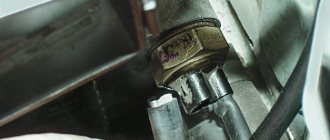
- When the antifreeze warms up to 92 ± 2 °C, a temperature sensor is activated - a thermistor installed in the lower zone of the radiator.
- The sensor closes the electrical circuit of the relay that turns on the fan. The electric motor starts, forced airflow of the heat exchanger begins.
- The thermistor opens the circuit after the liquid temperature drops to 87-89 degrees, the impeller stops.
The fan motor is started by a command from a sensor that closes the relay contacts
The location of the sensor depends on the design of the radiator. In units made of aluminum, the thermal switch is located at the bottom of the right plastic tank. In a brass heat exchanger, the sensor is located on the left side of the lower horizontal tank.
To check the cooling thermal switch you will need to remove and clean the terminals from oxides
The thermistor of the VAZ 2106 fan often fails, short-circuiting the circuit or not responding to an increase in temperature. In the first case, the fan spins continuously, in the second, it never turns on. To check the device, just disconnect the contacts from the sensor, turn on the ignition and close the terminals manually. If the fan starts, the thermistor must be replaced.
Replacing the VAZ 2106 temperature sensor is carried out without emptying the system. You need to prepare a new element, use a 30 mm wrench to unscrew the old device and quickly swap them. In the worst case scenario, you will lose no more than 0.5 liters of antifreeze.
The Zhiguli temperature sensor is made in the form of a 30 mm hexagon wrench
When purchasing a new sensor, pay attention to 2 points: the response temperature and the presence of an o-ring. The fact is that the thermal switches of VAZ 2109-2115 cars are externally similar to parts from the “six”, including the threads. The difference is in the switching temperature; for front-wheel drive models it is higher.