The exhaust system of many budget cars and middle-class models is not durable in practice. As a rule, the following system elements are the first to fail: muffler, resonator. Unfortunately, the popular models VAZ 2114, 2115 and many others were no exception.
In general, the exhaust system 2114-2115 is a weak point and may require attention after 2-3 years of active use. In turn, the mufflers are usually the first to fail. In such a situation, the owner can immediately replace the muffler on a VAZ 2114 or the muffler on a 2115, as well as repair an existing element.
Next, we will look at the example of model 2114, how to replace or repair the exhaust system of a VAZ 2114, it is better to immediately change the muffler of this system or carry out repairs, in which cases it is advisable to make this or that decision, etc.
Exhaust system connecting parts
- the sealing gasket serves to connect the manifold and the exhaust pipe;
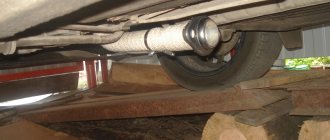
- a movable hinge connects the converter flange and the exhaust pipe;
- the metallographic ring is located between the flanges;
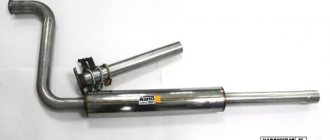
- the connecting parts between the muffler pipes are a clamp with flared ends and conical rings;
- the exhaust pipe is secured with DISPOSABLE nuts to the studs of the exhaust manifold and to the walls of the bracket.
Mufflers and pipes are a single system, and if they break down, the entire muffler device must be replaced with new ones.
Malfunctions
- Various mechanical damage;
- Burnout of asbestos gasket;
- Fatigue and wear of the metal and, as a result, burnout;
- Defects at the joints;
- Cracks.
Considering the above, first of all, the driver must determine the source of infection and work out a schematic way to eliminate it. Let's imagine that the muffler on your car has burned out.
, this is the most common phenomenon on many cars and the VAZ 2115 is no exception.
- We must drive the car onto a viewing hole or a stationary overpass;
- We turn off the engine, squeeze the handbrake, wedge the wheels with boots or put it in first gear, you can choose any option;
- Let the exhaust system cool down a little, as it heats up under the influence of exhaust gases. You can easily burn your fingers. We always carry out all work wearing gloves.
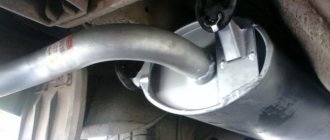
- After making sure that the pipes have cooled down, using capes we unscrew the connecting clamps between the muffler and the resonator, otherwise known as the secondary muffler.
- From the rubber clamp-holder, remove the hook with which it secures the muffler to the bottom of the car;
- There will be an O-ring between the connections, be careful not to damage or lose it. Carry out visual diagnostics and replace with a new one if necessary. As a rule, the negative impact affects a short service life;
- Having removed the muffler, we put it aside so that it does not interfere with the process.
- We pre-lubricate the new ring with heat-resistant sealant, in this way we extend the service life;
- Install the system components in reverse order.
- After installation, be sure to start the engine and test the system. Pay attention to ensure that there are no gas leaks, otherwise your work will be down the drain.
- If everything is fine, you can continue on your way. If not, eliminate the shortcomings.
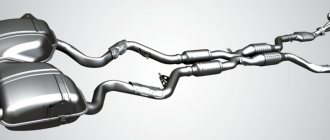
Schematically the exhaust system looks like this:
A flow of gases emerges from the combustion chamber through the exhaust manifold, exhaust pipe, neutralizer, resonator, and the muffler itself.
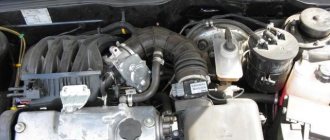
Burnout of the gasket can also be a weak point or “sore”
between the cylinder head and the exhaust manifold. Despite the tight pressure around the perimeter with the help of four stud bolts. The asbestos gasket still burns out, and the engine emits an unpleasant and loud sound.
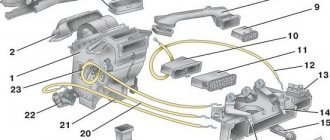
Gas exhaust system (muffler diagram)
For 1.5l engines
Gas exhaust system for 1.5l engines
- Reception pipe connection bracket.
- Pad.
- Bracket seal.
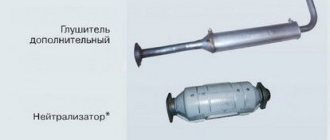
- Secondary muffler. (Muffler resonator)
- Muffler suspension cushions.
- Main muffler.
- Muffler pipe connection clamp.
- Hinge O-ring.
- Neutralizer.
- Connecting ring.
- Oxygen concentration sensor.
Exhaust system
For 1.6l engines
The exhaust system on 1.6-liter engines is distinguished by the absence of a converter (a metal corrugation is installed instead) and the presence of a catalytic manifold (installed immediately after gasket number 3).
For information, the toxicity standard for VAZ 2114, 2113, 2115 is R 83.
What is a car muffler for?
Regardless of the make and year of manufacture of the car, all its systems serve one purpose - to ensure stable operation of the engine and movement. The exhaust system may seem insignificant compared to systems such as the brakes or fuel. However, it is the vehicle's exhaust system that has the most direct impact on engine performance.
The muffler is an integral part of the exhaust system . Its main purpose is to remove exhaust gases outside the car. In addition, the part also serves to reduce noise, since residual fuel can burn in the exhaust system pipes.
The pipe comes out from the rear left side of the car
How to attach
The muffler on the VAZ 2114/2115 is attached to the car body. To ensure that the pipe is securely fixed and does not vibrate during movement, two fastening methods are used:
Bolts and nuts for fastening the muffler pipes are made of special heat-resistant alloys
The muffler is attached directly to the exhaust manifold with bolted connections, which guarantee complete tightness of the joints. The middle part is also fixed with bolts and nuts. And the resonator and exhaust pipe are suspended on special hooks on the bottom with elastic bands. These suspensions are easy to remove and put on, but at the same time provide rigidity even when driving on uneven roads.
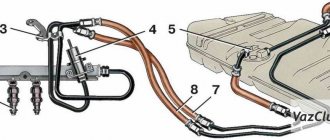
Schematic design of the exhaust system on a VAZ 2114/2115
The gas exhaust system of the VAZ 2114/2115 consists of several parts. Connecting to each other in series, all parts ultimately serve one purpose - reducing noise and removing exhaust emissions outside the body.
1 — bracket for fastening the exhaust pipe; 2 - gasket; 3 — clamping device for the bracket; 4 — additional muffler; 5.7 — “pillows” for muffler suspension; 6 — main muffler; 8 — clamp connecting the muffler pipes; 9 - neutralizing device; 10 — hinge sealing ring; 11 - sensor that monitors the oxygen concentration in emissions; 12 — exhaust pipe for mufflers
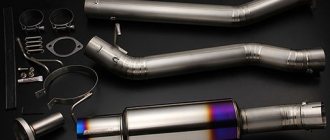
Direct exhaust system
Almost all the elements of the exhaust system were purchased by me in the first year after the start of the car modification project. The very first of them was purchased an exhaust manifold ( spider 4-2-1
) in the online store stinger-shop in April 2013. I was originally looking for a stainless steel manifold in the budget price range but couldn't find anything. Although, probably, I didn’t really bother, that’s why I stopped at the stinger store website. Moreover, this particular brand was especially widespread among exhaust systems at that time; I had never even heard of STT at that time, and sites like tuningsport, clubturbo, meta-s acted only as speculators. At least that's how it was in my mind. At the time of ordering, I did not find a section for manifolds made of stainless steel, so I put in the cart “Exhaust manifold / spider 4-2-1 (SPORT) 16 V “Stinger” for VAZ 2108, VAZ 2109, VAZ 2199, VAZ 2113, VAZ 2114, VAZ 2115” made according to the description from steel 08 ps. It cost 1800 rubles. Before paying for the order, I asked the store manager about the possibility of making the selected manifold from stainless steel. The answer was yes. After which I paid for the order in the amount of 2800 rubles.
After receiving the order, I was interested to check whether the manifold is actually made of stainless steel. Initially, I was like the amateur method – the magnet method. Having found out that the metal from which the collector is made has magnetic properties, I used a more accurate method - chemical. After cleaning a small section of the pipe with sandpaper, I applied a few drops of copper sulfate to it. After a short time, the color of the metal remained virtually unchanged. For the experiment, I repeated this on ordinary carbon steel, where copper precipitation occurred almost immediately, as evidenced by a rich reddish tint at the site of the reaction. Now I was sure that the spider was indeed made of stainless steel. The only thing I remembered later was that I did not check what steel the flange adjacent to the cylinder head was made of. By “later” we mean the complete preparation of the spider for installation, after which I no longer wanted to know anything, so we will assume that the material of the product satisfied my wishes.
Next, I would like to touch on the issue of the quality of workmanship of the purchased product. Here, as always, I was dissatisfied. Although, if judged objectively, the collector is more likely to correspond to the price-quality ratio.
The first step in modifying the manifold was additional welding of the pipes from the inside at the junction with the flange adjacent to the cylinder head. I believe that this should have a beneficial effect on the strength and durability of the product, as well as on the hydrodynamic performance of the collector channels. After welding, the following picture was obtained in each of the four channels.
After that, I had to process the channels and pin holes according to the same coordinates in which the exhaust channels of the cylinder head were processed during its modification. But before this, it was necessary to bring out the contact plane of the flange, since after welding it was significantly deformed. I had to build a device to install the collector on the grinding machine, which was later used when milling on a milling machine.
The processing was carried out on a surface grinding machine model 3B70V. The only thing that had to be done for smooth installation and further processing of the part on the machine was to remove the handle from the steering wheel of the longitudinal feed of the table.
As a result, the thickness of the flange at the edges was about 8 mm, in the center about 10 mm. Due to this deformation, some of the mounting holes had to be modified subsequently, as their coordinates were shifted. Further processing of the channels was carried out on a model 67M20VF2 machine, which, after modernization, received a relatively modern NC-202 CNC system.
The working area of the machine did not allow processing all the holes in one setup, so we had to set it up a second time.
After processing the canals, shells opened up in some places, which were later welded back and processed. Unfortunately, there are no photographs of the final appearance of the collector channels. Most likely, I simply forgot to do them due to the rush to install it and the desire to start the engine as soon as possible. Here, on the machine, I also modified the two-layer metal gasket, drilling holes in it for the pins.
Considering that the manifold was ready for installation, I tried to mount it under the hood. The first thing I noticed was the contact of the secondary manifold pipes with the thermal shield of the brake pipes and the fuel return line.
Looking ahead, I will say that this problem could not be solved, and this thermal screen still had to be abandoned. Secondly, the deviation of the end pipes from the horizontal plane of the body bottom is too large and, in my opinion, their location is low, given that the suspension will use an anti-roll bar from a Lada Granta car, manufactured by TechnoMaster.
Well, the third argument, which initially bothered me, but I turned a blind eye to it, was the imperfection of the channel connections in the internal cavity of the collector. This technology for joining pipes in the manufacture of a collector requires quite precise fitting to achieve the required ( correct)
) channel geometry, but with the serial type of production and taking into account the cost of the product, the quality can change dramatically from one to another. As a result, the manifold was sawed and welded again in place. To connect the primary and secondary pipes, I decided to use stamped tees used by ProCar in the manufacture of exhaust manifolds.
The first two tees had to be slightly modified by cutting off their inlet sockets, which are designed for a pipe with a diameter of 43 mm. But even at the same time, the tees sat with a fairly large gap on the primary collector pipes.
The last tee fit just perfectly, all the pipes fit tightly into its holes. This was very convenient for preliminary installation and tacking of the exhaust system.
As a result of welding the manifold, it turned out to be a little shorter, and it was not possible to place a hole on it for the oxygen sensor. I decided to make it later on the resonator pipe, which had to be lengthened by the missing amount, fortunately I had a small piece of the 51st pipe that I somehow got from a very good friend Densa17.
The underbody thermal shield in the area of the gearbox gate was either missing initially after purchasing the car, or I sent it to scrap when dismantling the standard exhaust system. I can’t say for sure now, but in any case I had to purchase it. In addition, the end pipes of the manifold were too close to the bottom, relative to the serial location of the standard intake pipe.
As always, I turned to the site avtozapchasty.ru for help in purchasing a screen. Order number 21080-1206020-10.
The screen itself had to be modified a little by cutting off its stamped collar on the front side, since it touched the collector. Otherwise there were no problems with its installation.
When choosing a resonator and muffler, I gave my preference to FOX. I purchased everything from the clubturbo online store in the form of welded components ready for installation. The resonator and muffler itself are made of stainless steel, the pipes are made of 08 ps steel. In May 2013, the muffler arrived; its price at that time was 3,450 rubles. I received the resonator only in August of the same year due to its absence at the time of ordering the muffler, I paid 2900 rubles for it.
The connection of the resonator and muffler implied the use of a serial clamp with a ring from the Lada Priora car. With this connection method, the pipes had a certain profile at the ends, which locally reduces the flow area of the pipeline. Without bothering to find out the extent of the influence of this “bottleneck” on the characteristics of the exhaust system, I decided to switch to flange mounting. To do this, I purchased a exhaust pipe gasket from the same Priora, scanned it and made two flanges according to the resulting dimensions. Now the line has a constant flow area along its entire length, not taking into account the insert for the oxygen sensor.
Because the car’s suspension was lowered by -50 mm. I tried to place the muffler as high as possible, thereby trying to avoid its contact with the rear beam when the car was moving. Because of this, the muffler was slightly tilted relative to the horizontal, and its end pipe touched the body. As a temporary solution, I simply shortened the end pipe a little. When installing the exhaust system, I used serial rubber muffler pads, later replacing them with polyurethane ones.
After completing the main welding work with the exhaust system, all that remained was to manufacture and place an insert with a plug for the oxygen sensor on the resonator pipe and paint the bare metal.
I asked a turner colleague to turn out an insert with a stainless steel plug. Then I milled a hole in the pipe for it. The axis of the hole is located at approximately an angle of 15-20 degrees to the horizontal.
Now the exhaust system was completely ready for use. Next in line is the cooling system.
Do-it-yourself repair and replacement of muffler for VAZ 2114, 2115
Every car exhaust system has a muffler, and for many car enthusiasts its purpose is obvious. Driving around the city with a loud and toxic exhaust will be uncomfortable, and fines for exceeding the permissible noise level and harmful emissions from the operation of the car today are quite large. When operating VAZ cars, the muffler is often not given due attention, although it is useful to know how to correctly diagnose the degree of its wear. Timely replacement of the damper is mandatory, since its malfunction can pose a threat to human health and the operation of the car engine.
Removing and installing the catalyst
Removing and installing a catalytic converter on a VAZ 2115 is a relatively simple task. The procedure itself is carried out in several stages:
1. Using keys “17”, unscrew the fastening of the catalyst to the exhaust pipe of the exhaust manifold. We take out the bolts and spring washers;
2. Place a suitable stand under the catalyst. The fact is that the catalyst on the VAZ 2115 car is not fixed with the help of any rubber hangers, and therefore, in order for it not to fall on your head, after unscrewing the fastening bolts, it must be secured somehow. This can be done either by installing a stand under it, or by temporarily securing it with wire;
3. Now unscrew the catalyst from the inlet pipe of the additional muffler and carefully remove it.
We install the new catalyst in the reverse order.
Silencer - purpose, device, operation
An important element of the exhaust system is the muffler; operating a car without it is impossible. As a rule, the muffler is located at the rear of the vehicle and, in conjunction with the exhaust system, serves to remove harmful gases from the engine, bypassing the vehicle interior.
Car mufflers are made from stainless, aluminized and regular black steel. Stainless steel “silencers” are practically not available for sale due to their high cost and long service life (their service life is 10–15 years). Aluminized mufflers are installed on VAZ 2114/2115. They are common in the domestic and European markets (service life 3–7 years). Regular black steel mufflers are cheap substitutes and last only a few months, so are rarely used.
What is a “glushak” for?
Main functions of the muffler:
- reduction of noise during fuel processing;
- reduction in the rate of gas release and their temperature.
The muffler is attached with special rubber pads to curved metal hooks, softening vibrations from the car exhaust
All elements of the exhaust system are exposed to high temperatures, so the coating (anti-corrosion paint, mastic) that is applied to the muffler burns out. The exhaust system of the VAZ 2114/2115 is mounted under the body on the bottom of the car.
An additional muffler or, in other words, a resonator is designed to eject burnt gas into the exhaust pipe and receive the next portion.
The resonator is an important part of the exhaust system; it directly affects engine power. The faster the exhaust gas is removed from the resonator, the faster and more power the car develops.
The design of the pipe consists of all the necessary elements, therefore, when exhausted, the exhaust gas is correctly distributed throughout the exhaust pipe
The muffler on the VAZ 2114/2115 is attached to the bottom of the car with special rubber bands, clinging to flat hooks on the side and top. Why is an elastic band used, and, say, not a metal fastener?
As exhaust gases pass through the exhaust pipe, vibrations intensify, the muffler begins to vibrate, and if the mount is solid-state, the vibration will be transmitted to the cabin. The rubber muffler mount softens vibrations and is therefore used on all cars.
For the VAZ 2114/2115, the muffler is a volumetric sealed metal chamber, divided inside by various partitions. The entire exhaust gas flow passes through the muffler sections and is finally extinguished and cleaned. If you look at the muffler diagram, it will look almost the same on all cars.
The principle of removing exhaust gases from a car muffler
Replacement options
If you want to ensure a minimum of problems with the gas exhaust system in the future, look for stainless steel products similar to factory ones, since the exhaust pipe circuit has poor anti-corrosion protection. The shelf life of the structure will depend on the quality of materials, so stainless steel will be the most profitable purchase. To select suitable components, focus on the diameter of the old pipes.
For new steel components, do not forget to purchase an additional metal-graphite sealing ring, and also update the VAZ muffler. A rubber gasket under a stainless steel system is also useful.
Why does a sports exhaust system not make sense for the VAZ 2114? There is information that special pipes and mufflers that provide direct exhaust exit can increase engine performance by 10-15%. This effect can only be observed in cars whose engines have at least 200 hp. With. power. For the sports update to be profitable, the engine power will also need to be increased. So this type of tuning is suitable for those drivers who want their classic 2114 to become a car for racing or high-speed driving on the highway.
Replacing the muffler on a VAZ 2114/2115
Muffler failure on a car can happen for various reasons:
- mechanical damage;
- influence of atmospheric and mud precipitation;
- burnout of the internal elements and walls of the muffler.
Signs of a malfunction most often manifest themselves in increased exhaust sound: the car is very loud, rumbles, an abundance of exhaust gases appears from under the car in the muffler area and the smell of unrefined fuel.
How to change the "glushak" with your own hands
In many cases, the muffler cannot be repaired and requires urgent replacement. This is not as difficult to do as it seems. You will need:
- new muffler + repair kit (rubber cushions, corrugation, metal-graphite ring installed under a clamp at the junction of the pipes of the additional and main mufflers);
- tools;
- portable lamp;
- inspection hole or jack;
- two hours of free time;
- hands growing from the right place.
The repair kit consists of 5 rubber pads, two clamps and O-rings, a gasket
It is recommended to purchase replacement parts from trusted suppliers, as otherwise you may stumble upon a low-quality fake.
After purchasing parts, you need to make sure that they are actually suitable for replacement. You need to check all fasteners, holes and bends.
If all of the above corresponds to the parameters, you can begin dismantling the broken muffler. After installing the car on the inspection hole, check the condition of the fasteners and connecting bolts of the clamp between the additional muffler pipe and the main muffler pipe.
How to remove the muffler
It is recommended to dismantle the unit in the following sequence:
- Before unscrewing the nuts, treat the threads with WD-40 or rust remover and wait 10 minutes.
- Using a socket wrench or a 13mm socket, unscrew the two nuts holding the clamp.
- After removing the clamp, remove the sealing ring.
- Remove the rubber pads holding the muffler.
- Disconnect the muffler from the resonator.
If you have difficulty unscrewing the nuts, you can use a hammer and chisel. To do this, you need to rest the chisel against the edge of the nut and, with sharp blows of the hammer counterclockwise, try to “knock down” the thread. Otherwise, you should cut the bolts with a grinder.
Installing a new part
Installing a new muffler is done in the reverse order, but it is necessary to lubricate the gasket ring with high-temperature sealant. This will ensure a reliable and tight connection.
If there is no inspection hole, you can use a jack after placing a stop under the front wheels.
OUR CENTERS ON THE CITY MAP
Do you want to inexpensively buy and replace a muffler resonator for a VAZ 2115? "MSK Silencer" - urgent replacement of Lada 2115 resonators with a 1-year warranty.
What is a muffler resonator?
The resonator is a closed metal module with perforated partitions, the main function of which is to slow down the speed and reduce the pressure of the exhaust gases.
As a result, acoustic pollution of the surrounding space is reduced. The resonator chambers are offset relative to each other, which makes it possible to level out strong gas pulsations, increasing the service life of the exhaust system and the engine as a whole.
Causes and symptoms of VAZ 2115 resonator failure
The main reason for the failure of the resonator is a heavy load on the infrastructure from the inside (high temperatures and pressure) with the influence of external factors (moisture, reagents, cold, etc.) from the outside.
Being under such a double attack, this device often fails, which requires qualified repair work. A malfunction of the muffler resonator can be determined by the following symptoms:
- increased noise when the engine is running;
- metallic rattling in the corresponding section of the exhaust system;
- reduction in engine power due to strong pulsation of exhaust gases
If you want to know how much it costs to replace a resonator, check out our price list published on this website. It is worth noting that repair work in this category can often be complicated by the presence of other exhaust system faults discovered during the preliminary diagnostics.
We are ready to eliminate any defects by purchasing the necessary parts ourselves. As a result, you will receive a car with a fully functional muffler, the characteristics of which correspond to the standard parameters.
“Doctor Silencer” is a network of specialized service stations for professional replacement of VAZ 2115 resonators. Service stations are located in all districts of St. Petersburg.
Signs of a resonator malfunction: decreased engine power, unusual sounds (popping, ringing) under the body, the smell of exhaust gases in the cabin. It is possible to repair the resonator if the areas of damage (burnouts, cracks, corrosion) are small. But more often a faulty resonator has to be replaced.
We offer options for replacing the Lada 2115 resonator:
- replacement with a new standard resonator,
- replacement with a new universal resonator.
It is profitable to replace the VAZ 2115 resonator with us:
- Experienced, competent mechanics and professional diagnostic equipment will quickly diagnose and determine the cause of the resonator malfunction.
- Careful replacement, welding in neutral gases followed by anti-corrosion treatment.
- If necessary, we will replace the exhaust system hangers.
By contacting us to replace the resonator, you will receive correct operation of the exhaust system for a long time at a low price.
Replacing a muffler on a VAZ 2115 is not at all as simple as some people think. This will require time and a lot of money. But you can always independently carry out such a pleasant procedure as replacing the muffler of a VAZ 2115. The owner himself will decide what type of this part to install and will monitor the process with his own eyes. The muffler is one of the car parts that attracts the most attention. Although it is located under the car, being the main element of the exhaust gas cleaning system, a lot of effort and time is devoted to tuning it.
Repair of muffler VAZ 2114/2115
Before replacing the muffler, it is necessary to inspect it for damage. In some cases, you can get by with minor repairs and not spend money on buying a new part. Restoring the performance of the muffler is carried out according to the following algorithm:
- The muffler and weld seams are cleaned with emery cloth.
- The entire part is inspected for cracks, burns, and damage.
- If a defect is detected, use semi-automatic welding and weld the cracks. A metal plate with a thickness of at least 1.5 millimeters can be welded onto the burnout areas. Seal small cracks with high-temperature sealant.
All working areas must be sanded for a better result.
Welding is used if the muffler metal is strong enough. The seams are welded in a thick layer to avoid background and new burnout.
Reasons for part failure
The muffler is affected by several different factors that can lead to failure, these are:
- Atmospheric precipitation, dirt. Precipitation means the occurrence of rain and snow. A mass that periodically falls on a hot pipe causes temperature changes, destroying the strength of the metal. Unfortunately, it will not be possible to protect the muffler in any way; moisture will in any case affect the metal. A smart solution would be to avoid driving through deep puddles and drive slowly on contaminated sections of the road. If the muffler and pipe are dirty, it is necessary to clean it with water (you can use a pressure jet from a hose). After cleaning, it is recommended to start the engine so that any water that has entered the muffler evaporates.
- Condensate. When the unit is idle for a long time, condensation forms in the muffler, causing a corrosive process. This leads to inevitable destruction of the internal parts of the muffler. This happens extremely rarely, but before the trip it is recommended to increase the operating speed by pressing the accelerator several times. The flow of exhaust gases removes moisture from the silencer.
- Chemical influence. As a result of the release of exhaust gas, a lot of toxic chemical particles settle on the walls of the muffler, destroying the metal, and allowing road reagents to get into the muffler.
- Physical influence. Hitting stones and blows from the muffler when driving on roads also lead to a lot of damage.
The chemical and physical effect on the muffler metal is a natural process. It will not be possible to disassemble and clean the muffler, since the container cannot be opened, and only the attention and professionalism of the driver on the road will help protect it from impacts and stones. Diagnosing and repairing minor damage at the initial stage will help avoid serious problems in the future.
The influence of various negative factors can lead to damage to the corrugation or other parts of the muffler