How to set up Lovato 4th generation HBO?
I decided to install gas equipment on my car and contacted a specialized office. They supplied me with Lovato equipment, but they couldn’t set it up correctly. My city is not large and the other companies that I could find did not install and service Lovato.
Main problems:
- the car barely pulled on the gas
- gigantic gas consumption
- Along with gas,
gasoline was consumed at the same time - after installing the gas system, the car started on gasoline with explosions in the exhaust system
After many attempts, I realized that they couldn’t adjust the gas for me like that and I would have to figure it out myself. Hopelessness is the engine of progress, we had to look for options. After googling a little, I found a huge number of manuals, but all of them were in one way or another incomplete and did not reveal the essence of the setup. I had to figure out a lot of things myself.
Lovato Easy Fast
Lovato Easy Fast is the official software for setting up Lovato LPG. To run the software, you do not need a license key, and it can work with both an original and a homemade cable. It is strange that the manufacturer does not distribute its product on the official website.
I used Lovato Easy Fast 1.7.4, it was easy to google and download.
Lovato Easy Fast - main menu
Main parameters of the “Configuration” section
Configuration Tab
- This tab contains the characteristics of your engine and gas system. Make sure all parameters are correct.
Switching
Lovato Easy Fast - “Switching” section
- Allow injectors to warm up - in this mode, in case of frost, the injectors will first turn on, work for a while, and only then gas will be supplied. This parameter will increase gasoline consumption.
- Idling Which fuel system will provide idle speed. Feel free to put on the gas.
- for switching : when decelerating, which corresponds to decreasing pressure on the gas pedal, and when accelerating, which corresponds to increasing pressure on the gas pedal. Most often, switching occurs without these actions, but sometimes in order to switch the car to gas, these conditions must be met.
- Reducer temperature for switching: Until the reducer warms up to the set temperature, the system will not switch to gas. If the gearbox is in good condition, we set as little as possible.
- Starting on gas with a warm engine after turning the ignition key, if the engine is warmer than the specified temperature, it will automatically switch to gas.
- Switching delay when the engine is hot: if the engine is hotter than the gearbox, but not hotter than the starting temperature on gas, then this rule works.
- Operation at high speeds.
- Gas In this menu you can configure the addition of gasoline when gas injectors cannot cope.
- Adding gasoline is a more detailed setting of the “Gas” option.
- Gasoline, everything is simple here, we exceeded the speed, turned off the gas, turned on gasoline.
Map
Lovato Easy Fast - “Map” section
- The Time/Rpm table is the most interesting part, this is where the settings will be made
- Sensitivity of additional injection - adding gasoline to the gas-air mixture during sudden acceleration.
Main parameters of the “Self-configuration” section
Lovato Easy Fast - “Self-configuration” section
- Time Gas time of opening of gas injectors
- Benz time. petrol injector opening time
- D.Gas gas pressure
- Self-tuning button automatic idle speed adjustment
Jet selection
There is a misconception that the jets are located at the end of the hose and are installed in the manifold; in fact, the jets are installed directly into the gas injectors.
Where can I find Lovato LPG jets?
Make sure you have the correct jets selected. Here is a table of diameters, depending on the power of one cylinder.
| Power per cylinder, hp | Diameter, mm |
| 13-20 | 1,6 |
| 20-26 | 1,8 |
| 26-29 | 2,0 |
| 29-34 | 2,2 |
| 34-39 | 2,4 |
| 39-45 | 2,6 |
If necessary, drill out the jets.
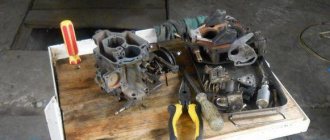
What is needed for proper installation?
To properly install gas equipment on a car, you will need a certain set of equipment and tools:
- HBO set 4;
- gas hoses with clamps 60-80cm long, Ø4-5mm and Ø12mm 50-100cm (for a 4-cylinder engine); 40-70cm vacuum tube Ø6mm; a cooling system hose with two metal tees corresponding to the size of the inlet/outlet on the gearbox - the length of all lines is selected individually for the car;
- thermoplastic gas tube of the required length (you can use copper or aluminum);
- auto tools;
- drill and/or screwdriver;
- drills (Ø4.8mm, crown 30mm);
- tap 6mm;
- electrical tape, heat shrink tube, hair dryer;
- soldering iron (materials for soldering wiring);
- multimeter;
- metal clamps/brackets with self-tapping screws (for fastening lines under the bottom);
- a can of anti-corrosion treatment or auto enamel;
- engine intake manifold gasket.
You will also need a lift/overpass or inspection hole.
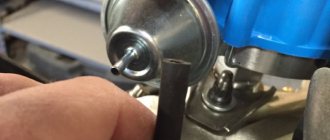
Self-tuning
Before tuning, it is recommended to drive a little on gasoline, this is necessary so that the gasoline brains “feel” the normal mode and correct the correction factors.
All self-tuning can do is accurately determine the timing of gas injection at idle. All other engine modes require manual adjustment. It’s a pity, most often gas workers limit themselves to only this mode.
We connect the cable to the car, turn on the Lovato Easy Fast program, initialization occurs, which takes some time. In the lower right corner the cable icon is displayed with a green check mark. From this moment you can start setting up.
Let's start setting up:
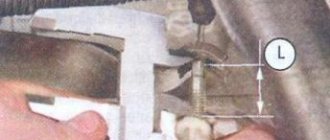
- Go to the Self-Configuration menu.
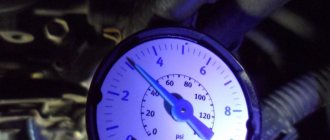
- Close the gas screw of the gearbox completely and open it a few turns. The gas pressure should be within 1.2
-
1.4
bar (indicator in the program at the top). - Click the auto-tune button.
Self-tuning start button
Self-tuning in progress
During tuning, the engine may stall or stall altogether, which indicates an incorrect injector diameter.
After successful completion of auto-tuning, press the “Gasoline” button (upper right corner), the car switches to gas, compare the “Gas time” and “Gasoline time” indicators, these 2 times should be approximately the same, as a rule, gasoline time is less than gas time by 1- 2 ms. The closer these indicators are, the better the engine will perform at high loads and at idle. If the gas time is too high, it is necessary to drill out the injector jets or increase the gas pressure; if it is too low, then reduce the gas pressure.
Manufacturer's offer
The Lovato gearbox design is characterized by versatility, simplicity and reliability. For Turkish artisanal producers, the manufacturer is a role model. Almost all generations of Turkish gearboxes have adopted the design of a flattened “drum”, at the ends of which there are two stamped covers. belongs to a family-type enterprise that was founded in the post-war period in conditions of acute fuel shortages. In modern conditions, Lovato is one of the leaders in the global gas cylinder system market. Repair, namely adjustment, of Lovato analogues depends on the following factors:
- mechanism generation;
- number of regulators;
- fuel system.
Manufacturer product range:
- Lovato propane vacuum reducer for 90 and 140 kW. The device is intended for 1st generation LPG systems on carburetor-type cars with a power of up to 123 horsepower. The reducer is intended exclusively for conversion to propane.
- Lovato electronic propane reducer 90, 140, 170 kW. The device is intended for 1st, 2nd and 3rd generation HBO systems on cars of injection, mono-injection and carburetor types with engine power up to 123 horsepower. The reducer is designed for propane-butane.
- Lovato methane gearbox. The 2nd generation device is used for converting cars and buses to methane fuel.
The essence of correct settings
The fourth generation of gas brains, unlike all previous ones, uses the native signal from gasoline injectors and adapts it into a signal for gas injectors, taking into account special coefficients that are stored in the fuel map. This allows you to take into account all the individual characteristics of any engines and install LPG on them without much effort. The whole point of good tuning comes down to the fact that you need to force the gasoline brains to work on gas and continue to think that they are running on normal gasoline.
Many people believe that using a fuel gas card you can “strangle” the engine and thereby save fuel, or add gas and make it more powerful. You need to understand one simple connection.
Problems, as with auto-tuning, arise from different adjustments throughout the fuel map. Somewhere the engine overfills, somewhere it underfills, and in the end this results in poor traction, high consumption and the gasoline brain gradually forgets how to work with gasoline correctly and when you switch to it, jerks, failures, and explosions occur in the exhaust system. It follows from this that there is only one correct throttle setting. If you want to tune your car, flash the petrol brain.
How to connect all elements of the gas system?
Each 4th generation LPG kit must contain a connection diagram for an injection car; the system is installed according to it. For different manufacturers it may differ slightly (for example, the electrical circuit), but the general installation principle for all types of gas equipment is the same.
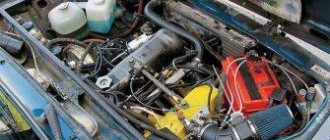
The installation process begins from the engine compartment. To begin with, it is advisable to protect the paintwork of the car by covering the lining and fenders with rag material. Remove the battery terminals.
Correct installation of gas injectors
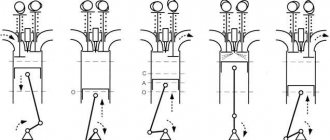
In order to install HBO injectors, it is necessary to dismantle the intake manifold. You can, of course, not remove it, but then you are likely to encounter a number of difficulties:
- it is inconvenient to drill the manifold;
- violation of the correct/synchronous positioning of the nozzle nozzles (inserts);
- metal shavings getting into the engine cylinders.
If a plastic manifold is not so critical, then duralumin/aluminum, especially cast iron, is unacceptable to drill on the engine. This can lead to damage to the CPG (cylinder-piston group) or valves and their seats. The uniformity of gas supply depends on the correct location of the fittings.
So, after dismantling the manifold, as close as possible to the intake valves and the holes of the gasoline injectors, at the same angle (approximately 45˚), towards the center of the intake passage (along the air flow), we drill holes with a diameter of 4.8 mm. Also, to connect the vacuum, we make a hole in the manifold receiver, closer to the throttle valve.
Here it is important not to damage the walls of the wells of the standard injectors; also, mark and mark the drilling points in advance with a marker. Consider the possibility of reassembly so that the fittings do not interfere with the fastening of the manifold to the cylinder head.
Then, use an M6 tap to cut the thread and screw in each fitting using a hexagon or an appropriate wrench. Do not use excessive force; the brass inserts are easy to break off.
Some nozzles have tapered threads, so additional sealing is not worthwhile. But in some cases (for example, a hole has become loose) or for greater confidence, you can use a special sealing adhesive/thread locker.
We install the manifold in the reverse order, not forgetting to install a new gasket. Next, we screw the ramp with the injectors tightly to the engine, using a strip and dampers. We put on gas hoses/sleeves from the injectors to the fittings, securing them with clamps. There are four rules to consider here:
- the length of the hose should not be more than 15-20cm (the shorter the better);
- hoses must be cut to the same/equal length;
- do not exceed the nozzle angles recommended by the manufacturer;
- It is advisable to place the parts in an accessible place; hidden installation will complicate their maintenance.
Installation method without removing the intake manifold
There is an option without removing the intake tract - installing adapters for gasoline injectors.
The advantage of them is that you don’t need to drill anything, installation is convenient and quick, and standard gasoline injectors heat up less from the engine. The downside is that they are not suitable for all brands of internal combustion engines. Adapters do not have a negative impact on the injection quality of standard injectors (according to numerous reviews from car owners and installers). Whether or not to install gas supply through adapters is a personal matter.
How to connect the LPG reducer to the cooling system?
To correctly connect the LPG reducer to the engine cooling system, you need to follow the recommendations from the equipment installation diagram.
- the evaporator must be firmly attached to the car body/frame using the included strap, below the expansion tank (sometimes this requires the manufacture of a special bracket);
- when choosing an installation location, it is important to take into account the accessibility for adjustments and maintenance of the evaporator reducer (replacing a filter or repair kit), also preventing dirt from getting on the housing;
- heating must be connected parallel to the interior heater (stove);
To install the gearbox, you will need to drain the coolant (antifreeze/antifreeze) from the system. Or use special clamps to avoid drainage and leaks.
In the section of the stove radiator pipe (supply hose), we place an adapter tee/fitting, connecting it with a hose to the inlet of the evaporator. The tee must be installed before the shut-off valve, if there is one. We secure the structure with clamps. In a similar way we connect the output of the radiator and the gearbox. At this stage, you can fill/top up the coolant.
It is advisable to use a minimum amount of hose to avoid heat loss, while securing it at a distance from moving elements, eliminating chafing and kinks. It is best to use automotive plastic tube holder clips of the appropriate size.
Fine tuning(Online tuning)
After successful completion of self-tuning, you can proceed to the precise configuration of the fuel map.
Fuel correction:
Install the ODB adapter in the car's diagnostic socket, connect to it via Bluetooth from your phone using Torque (or a similar program). Display graph information about long-term and short-term correction. The essence of these parameters is to adjust the fuel. If any situation arises when the engine is supplied with a mixture that is too lean or too rich, then the opening time of the injectors is compensated by this coefficient. For example, clogged injectors will make the mixture leaner and the correction factor will increase. As a rule, this parameter cannot go beyond ± 25%. If a mixture problem persists for too long, the short-term correction is included in the long-term correction.
When setting up LPG, we will need to check the fuel correction coefficients for gasoline and gas and “press” the gas correction to the gasoline one in different operating modes.
Setting algorithm:
Setting up is best done with two people. Driver and adjuster. A more or less flat section of the road is selected, on which the same engine speed can be maintained for a long time.
Each cell in the fuel map corresponds to an injector opening time of 20 ms. Each injector is 8-bit, which means it has 256 time levels. 0-minimum value means that the injector is closed, 255 maximum value means that the injector is open full time.
It makes sense to make adjustments only in operating modes; say, if you do not “turn” the engine more than 4500, then there is no point in adjusting the map higher. The setting is carried out in stages, at each stage the engine speed increases by 500 rpm. The car moves for a long time at an adjustable speed.
Let's start setting up:
In the Lovato Easy Fast program, go to the “Configuration” section in the “Map” tab.
- Gasoline supply is turned on (using a button in the program)
- The driver sets a constant engine speed and precisely maintains it during tuning.
- At these revolutions, correction factors are read out via ODB.
- The gas is turned on (by button in the program)
- The correction factors are read again.
- The cell under the point on the fuel map is configured. If the correction factor is too large, the cell value is reduced, if small it is increased. I recommend selecting the entire column and changing it by several units at once. (After highlighting, press the Enter key.)
HBO lovato fuel correction map
After setup, the card is inspected for sudden changes in modes. A well-tuned map is smooth, i.e. neighboring cells do not differ much in value. If there are uneven lunges, I recommend manually “straightening” the area around them.
If everything is configured correctly, you will get minimal gas consumption and maximum thrust.
Setting up HBO without an ODB adapter
It’s a shame, but it’s not always possible to read the correct values from ODB. Sometimes the adapter is not just not compatible with gasoline brains. Let's consider the option of setting up Lovato HBO, when for some reason it is not possible to read the correction coefficients.
This method is not accurate; you will not be able to set ideal fuel map coefficients, but the adjustment error will be within acceptable limits.
Setting up without ODB is very similar to setting up with an adapter, but in this case, we will not be checking the correction factor, but the gas supply time. This is perhaps the most unstable value and it changes several times per second, one way or another, this is the only thing we can work with now. You need to read the average value of this value, for example, the parameter jumps from 4.5 to 5.0, in this case the average value is 4.75. To correctly adjust the timing of gasoline, it is important to drive on the smoothest possible road, with extremely equal speeds; any deviation is critical.
Let's start setting up without ODB:
- Gasoline supply is turned on (using a button in the program)
- The driver sets a constant engine speed and precisely maintains it during tuning.
- At these speeds, the average value of the gasoline injection time is read from the Lovato Easy Fast program.
- The gas is turned on (by button in the program)
- The average gasoline injection time is read again.
- The cell under the point on the fuel map is configured. If the gasoline injection time when operating on gas is longer than on gasoline, the cell value increases, if less it decreases. I recommend selecting the entire column and changing it by several units at once. (After highlighting, press the Enter key.)
Gasoline injection time
Gas injection time
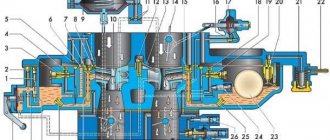
Gearbox OMVL CPR-LPG K901401. Service manual.
Maintenance of the CPR-LPG gearbox is carried out using two repair kits:
- Filter repair kit 900167: consists of a filter element and three rubber rings.
- Gearbox repair kit 900165: consists of a membrane and a shut-off valve gasket.
Maintenance frequency.
Servicing the built-in filter.
Close the flow valve on the multivalve.
Vent the system (if possible).
Unscrew the nut of the input line assembly (13mm wrench (tightening torque 15Nm)), then disconnect the input line assembly from the gearbox.
Attention.
- There may be gas in the inlet line that will escape when you disconnect the inlet line. For safety reasons, it is recommended to carry out this operation in ventilated areas.
Unscrew the steel filter holder from the gearbox housing using a 22mm wrench (tightening torque 35Nm), remove the housing with filter assembly.
Filter element.
Now you can unscrew the filter element from the metal housing.
Replace the filter element with a new one (01649).
O-rings.
If necessary, you can replace the rubber O-rings of the filter housing. To do this, remove the old rings by lifting them up and sliding them off the body.
Carefully install the new large ring(202177); then replace the two small ones (204022).
Attention.
- Do not use metal tools to remove o-rings to avoid damaging the filter housing.
Assembly after service.
Reassemble in reverse order and tighten the filter housing on the gearbox to a torque of 35Nm. Reinstall the inlet line assembly and secure it with a nut with a torque of 15Nm. You can apply silicone lubricant to the O-rings to make assembly easier.
Open the flow valve on the multivalve, start the engine and switch the car to gas.
Use soaping to detect gas leaks.
Replacing membranes.
First, disconnect the inlet assembly and replace the filter element as described above.
Then disconnect the vacuum, gas and water hoses from the gearbox.
Attention.
- There may be a coolant leak: before disconnecting, clamp the hoses using clamps.
Removing the gearbox cover.
Using a T25 Torx wrench, unscrew the four cover mounting bolts (tightening torque 5Nm). Attention: hold the cover so that it does not get torn off by the internal spring.
After removing the cover, remove the spring and aluminum spring seat.
Dismantling the membrane.
To remove the membrane, it is necessary to disassemble the safety valve by unscrewing the fixing nut using a 14 mm wrench (tightening torque 3.5Nm). Then you need to remove the valve spring.
Remove the centering plastic plate, noting its position. Then carefully remove the rubber membrane and replace it with a new one (01963).