The occurrence of any problems with gear shifting does not always mean a serious breakdown of the gearbox. If gears are difficult to engage, difficulties have arisen with selecting a gear, which prevents engagement, etc., then in some cases it is sufficient to adjust the gear shift drive. At the same time, you can adjust the manual transmission drive either at a service station or independently.
How to adjust the gear shift drive
The occurrence of any problems with gear shifting does not always mean a serious breakdown of the gearbox. If gears are difficult to engage, difficulties have arisen with selecting a gear, which prevents engagement, etc., then in some cases it is sufficient to adjust the gear shift drive. At the same time, you can adjust the manual transmission drive either at a service station or independently.
Read in this article
- Adjusting the gear shift drive
- What's the result?
Adjusting the gear shift drive
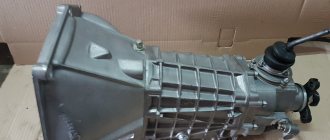
Before regulating anything, you need to have an idea of how this or that mechanism works, how it works, etc. First, let's look at the design and principle of operation of a manual gearbox (gearbox) in general terms.
The gearbox converts and transmits torque from the engine to the drive wheels so that the car can move off and change speed. There are four types of gearboxes: manual, automatic, robotic and CVT.
The first two types are the most common today. Taking into account the fact that a manual transmission or “mechanics” has a simpler design, we will consider just such a unit as an example.
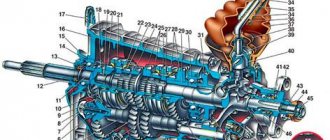
A mechanical transmission is, relatively speaking, a set of shafts (input and output) and a set of gears on each of the shafts. The gears on the shafts mesh and thus interact with each other.
Using the gear shift lever, the driver can determine which pairs of gears will work, that is, select the desired gear. At the same time, on a manual transmission you also have to depress the clutch so that the torque is not transmitted to the gearbox (to the input shaft).
Like any other mechanism, the shift drive has certain settings that get lost over time. This may cause problems with transmission control. In other words, if the gears are difficult to engage, there can be many reasons, one of them being the need to adjust the drive.
We also recommend reading the article about what a gearbox yoke is. From this article you will learn about the purpose, design, principles of operation, as well as signs of problems with the mechanism and how to adjust the gearbox rocker if necessary.
By and large, all adjustment of the gear shift mechanism in a garage comes down to working on the gear selection rod. It is also called the backstage. In a nutshell, the linkage is the device that connects the gearshift lever to the gearbox. When it wears out, problems arise such as:
- increase in shift lever play;
- incorrect gear selection (another one is switched on instead of the selected one);
- when switching you have to put in more effort than before;
- Extraneous sounds occur when the lever moves.
If the described problems occur, it may often be necessary to completely replace or adjust the linkage.
At the same time, the procedure for setting up the scenes is not complicated. The main thing is to know how to adjust the drive. General recommendations will be given below, as some nuances may arise depending on the make and model of the car. To adjust the gear shift rod you will need the following tools:
- 12 socket wrench;
- pliers;
You can adjust it in two simple ways. There will be one common action for them: loosen (and then tighten again) the rocker clamp. Its location may vary depending on the model and make of the car (you can check it in the manual).
- In reverse gear. The method allows you to solve the problem of incorrect activation of speeds in the vast majority of cases. It consists in the fact that after loosening the clamp (you will need a key for this), reverse gear is engaged (with the engine turned off, in compliance with safety precautions). The shift lever is set to the desired position and the clamp is tightened again.
- Also, gear shift adjustment can be carried out in first gear. To do this, you need to turn it on and then loosen the clamp. Next, the rocker drive is rotated clockwise until the gearbox selector hits the plastic stop of the reverse gear. It feels good. Then the clamp is tightened again, after which the adjustment can be considered complete.
What's the result?
As you can see, problems with gear shifting do not always mean that expensive or major gearbox repairs are necessary. In many cases (if there are no other signs and reasons), it is enough to know how to adjust the gearbox, that is, the linkage on a manual transmission. However, you can perform this procedure yourself.
Finally, we note that with regard to automatic transmissions, even taking into account the fact that such a box has a complex design, you can also configure the automatic box. We also recommend reading the article on how to adjust the automatic transmission cable. From this article you will learn about why adjusting the automatic transmission cable is needed, as well as what results and changes in the operation of the automatic transmission can be achieved through this adjustment.
In this case, correctly adjusted automatic transmission cables allow you to get rid of jerks and kicks of the automatic transmission, as well as achieve smoothness and precision during gear shifting.
Fighting the ringing
Typically, a ringing sound appears after adjusting the gear shift lever. To correct this drawback, you need to install a spring to hold the lever. The development of mechanical engineering makes it possible to replace the parts of the VAZ 2110 backstage with similar, but more advanced ones. For a VAZ car, the Kalina rocker is ideal.
In this case, the cardan from the new model is modified to be 20 mm longer than on the ten. This sound is directly related to the part itself; the Kalina rocker has no play, and all the vibration is transmitted into the car interior, to the gear shift lever itself. The easiest way to get rid of rattling is to install a spring.
Adjusting the Ural and Dnepr motorcycle gearbox
As soon as you are faced with the problem of unsatisfactory gear shifting, you should be wary. This can probably be attributed to a broken gearbox gear. When the latter is not a problem, you can turn to adjusting the gearbox with screws located on the box near the base of the lever.
There is no need to panic and rush to turn the screws. However, it is still worth checking the condition of the balls and holes for the nature of the breakdowns; it is still worth organizing the gearbox of a Ural motorcycle; do not forget to check the serviceability of the shift sector. If the situation inspires confidence in reliability, then the next step will be adjustment, carried out as follows.
Motorcycle Ural gearbox adjustment
- First, put the motorcycle on the stand. Use the hand lever to set second gear, press the pedal to 3rd gear. If the ball coincides with the hole, the lower screw should not be touched. When there is a hole in the 3rd gear that does not coincide with the ball, a misalignment occurs (when the manual shift lever is pushed forward, the Ural motorcycle gearbox coincides with the ball), you will need to slightly unscrew the bottom screw. If the hole jumps over the ball, i.e. switches (the lever should be moved back), then the logical action is to screw in the lower screw.
- Then we move from the third to the second. When the hole in the second gear does not reach the ball (the lever should be moved back), you will need to unscrew the upper adjusting screw. When the hole jumps over the ball (when the manual shift lever is pushed forward, the speed is turned on) - tighten the top screw.
Assembly of the Ural/Dnepr gearbox
Similar articles:
Grinding in Ural motorcycle valves
Adjusting the front fork on a Ural motorcycle
Adjusting the ignition of a Ural motorcycle
comments powered by HyperComments
Setting up switches at home
Now let’s figure out how to set up the speed system yourself. Shifters on multi-chain bikes are divided into front and rear. The latter are the most vulnerable when riding in a variety of road conditions, the risk of damage is higher than the front ones, but adjustments must be made at the very beginning. Obviously, the rear derailleur serves more chainrings, so it takes longer to adjust.
Attention! If there is damage and the tensioner is not located parallel to the frame and cassette, then the system will not be able to be adjusted correctly!
Rear Derailleur Setting:
First you will need screws L and H - they are clearly visible, you don’t need to look for them. There is also a cable adjuster, tension and fixing screws.
- Using H, the roller is aligned with the small rear sprocket. By tightening screw L, we align the roller with the large rear sprocket.
- Set the highest speed on the shifter.
- Pull and secure the cable using the locking bolt.
- Large gears must engage without interference, otherwise the adjuster will loosen the cable slightly. Additional tension will be needed if the gears do not reset well.
Actually, the setup itself has been done, all that remains is to adjust the switching accuracy. This is especially true for systems with a large number of stars. To do this, the chain is installed on a large sprocket at the rear and a small one at the front. By tightening the tension screw, we achieve the optimal position of the roller - as close as possible to the cassette. The same must be done vice versa: install the chain on the maximum sprocket at the front and the minimum sprocket at the rear. The roller should not rub against the cassette, just be located next to it.
Rear switch: 1 - lock, 2 - cable adjuster, 3 - tension bolt, L, H - screws
How to properly set the front switch:
- Check the device's fastening.
- At minimum speed, release the cable tension.
- Use screw L to create a gap between the switch body and the chain (1 mm).
- Secure the cable with the adjusting bolt.
The same should be done with the H-screw. The maximum speed should be set, and the gap with the chain should not exceed one millimeter.
"Shiman" front derailleur
The speed adjustment on both bicycle derailleurs is carried out until the chain moves freely from one sprocket to another. If it is difficult, you need to adjust the correct position of the cable using the adjusting bolt.
After all manipulations, the entire system is checked. To do this, you need to ride the bike and try all the recommended gear ratios. Let us note that on mountain bikes, adjusting the transmission is a common periodic procedure, and if the transmission suddenly becomes difficult, we do not rush to draw conclusions about the breakdown, but do what is described above.
Don't think that a high-quality transmission doesn't need to adjust the shift system. Yes, perhaps for components from shimano this will have to be done less often, but sooner or later you will still have to face it.
We've just been introduced to a simple way to adjust the front and rear derailleurs. Is this really necessary? Adjustment of the shift mechanism is necessary for the transmission, like tires for a wheel. Timely assistance to the “traffic hub” will not only solve current problems, but also prevent them in the future. Eliminate all inconveniences in a timely manner and enjoy the ride!
Good day! On Cherry (Amulet) the gears are difficult to engage, a friend suggested that it is necessary to adjust the gearbox drive. Can this be done in a garage and if so, how? (Pierre)
Good afternoon, Pierre. Indeed, poor gear shifting may be caused by the need to adjust the gearbox drive. You can do this with your own hands if you understand the full responsibility of the actions.
[Hide]
Gearshift rocker: purpose, device, adjustment of the gearbox rocker
Many drivers, while operating a vehicle, sooner or later encounter various vehicle malfunctions. As for the gearbox, in addition to the gearbox itself, with mileage the gearbox rocker often requires attention, especially in the case of a manual transmission.
In practice, the automatic transmission rocker can also malfunction, but it is in the manual transmission that the manual transmission rocker fails noticeably more often. Next, we will talk about what a gearbox linkage is, how the mechanism works, and also what types of gearbox linkage malfunctions are usually found.
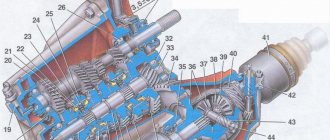
Gearbox slide: device and principle of operation
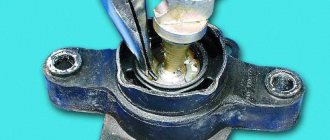
Let's start with the fact that the name backstage is common. In fact, experts call this element the gearbox control drive rod. The rocker itself is a fairly strong part, but the design consists of several components, which somewhat reduces reliability.
The main purpose of the gearbox linkage is to connect the gearshift lever (switch) with the rod, which is connected to the gearbox. The slide is located between the gear shift lever in the cabin and the gearbox. The location may be different, that is, it depends on the ground of the car (under the gearshift lever, under the bottom, closer to the driveshaft, etc.).
At the same time, the linkage in a manual transmission can wear out quite quickly, since driving a manual transmission, unlike an automatic transmission, involves constant work with the gear shift lever. Typically, the service life is about 100-150 thousand km, but problems may appear earlier.
As mentioned above, the slide consists of several parts, and the wear or breakdown of any of them leads to the fact that the performance of the entire mechanism will be impaired. Also, the rocker in a car suffers from factors such as dust, dirt, moisture, insufficient lubrication, etc.
It should be added to this that if the driver himself works aggressively with the gearshift lever, or operates a car in which shifting gears is difficult, for example, due to problems with the clutch, etc., this also has a direct impact on the linkage and shortens the service life of the mechanism.
Let's move on to the design of the gearbox backstage. Let us note right away that each manufacturer strives to increase reliability, as well as achieve clarity and ease of gear engagement, reduce backlash, etc. As a result, the design of this mechanism may differ on different cars. However, we can highlight the main (basic) elements in the design of the gearbox rocker:
- gear lever;
- gear traction;
- fork and fork finger;
- fork seal;
- oil seal retainer;
Also in the device you should highlight the backstage body, cable, and spring.
Normally, thanks to these parts, gear shifting occurs smoothly, without unnecessary effort, gears are engaged clearly, and backlash is minimal. If problems arise with the mechanism, signs of a faulty link appear quite clearly. As a rule, problems with the clutch lead to certain difficulties when shifting gearboxes.
Among the main problems it is worth highlighting:
- gear shift lever play;
- difficulties when changing gears, when more effort needs to be applied to the lever;
- knocking or crunching when operating the lever;
- gears do not engage or the wrong gear is selected by the driver (gear shifting is no longer clear);
Let us immediately note that some play is acceptable due to wear, but a significant increase in it not only reduces operating comfort, but can also cause more serious damage.
In other cases, when the required gears are engaged with great effort or the gear cannot be engaged, maintenance of the rocker and adjustment, replacement or repair is necessary, since driving with a damaged rocker can be considered extremely unsafe.
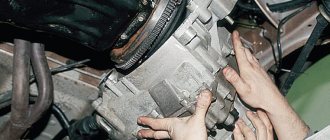
Adjusting the gearbox rocker
As a rule, if certain problems arise with the gearbox and gear shifting, you need to start by adjusting the rocker. The specified adjustment of the scenes is a standard operation that does not require any special financial costs.
- At the initial stage, you should make sure that the link is working, that is, the unit can have a certain output, but at the same time its full functionality must be maintained.
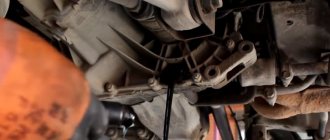
- Next, the car should be driven into a pit or raised on a lift, put on the handbrake, and if necessary, wheel chocks are placed under the wheels.
- Now you can move on to cleaning the scenes. The engine must be turned off. The gearbox linkage must be cleaned of dirt, then lubricated with a suitable lubricant.
- The rocker can be adjusted in reverse gear. To adjust the rocker for reverse gear, you first need to loosen the clamp on it, then move the gearbox lever to the position where the reverse gear engages best. The clamp can now be tightened.
The rocker is also adjusted in first gear, especially if it is not possible to engage reverse.
To adjust the rocker in this case, first gear is engaged and the rocker clamp is loosened. Then you need to rotate the rocker drive counterclockwise until the gearshift lever stops in the plastic lock of the reverse gear. The clamp can then be tightened. Let us add that above were general recommendations regarding adjusting the scenes. Certain differences may occur on different vehicles. To do the job efficiently, you need to study the manual for a specific model in advance.
Let's sum it up
As you can see, the manual transmission gate is constantly subjected to various loads, it is influenced by external factors, etc. For this reason, even such a relatively simple and fairly reliable mechanism requires periodic cleaning, lubrication and adjustment.
Otherwise, gear shifting problems may occur or gears may not engage. In such situations, it is necessary to adjust the gearbox mechanism.
If the adjustment does not give the desired result, then you will need to change individual elements in the structure or replace the entire mechanism assembly. At the same time, often only replacing the rocker allows you to achieve softness of the gearshift lever and at the same time precise gear shifting.
Adjusting the Kamaz double-disc clutch
Adjusting the clutch of KamAZ 5320, 43118 and other models consists of adjusting the position of the clutch, pedal, booster pusher and basket. The need for the procedure is checked by measuring the distance from the bottom of the pedal to the floor surface - the distance should be no more than 16 centimeters.
Most KamAZ trucks use a double-disc clutch system (CC) with a radial position of power springs. To operate the mechanism, a special hydraulic drive equipped with a pneumatic amplifier is used. This scheme allows for a reduction in the effort required to depress the clutch pedal.
Clutch system diagram for KamAZ 4310 and 53215
Main elements of the device:
- Flywheel.
- Middle drive shaft.
- Driven pulley.
- Pressure disk.
- Crater device.
- Protective cover.
- Support fork.
- Gear shift lever.
- Deactivation clutch with bearing element.
- System shutdown plug.
- Thrust ring for shutdown levers.
- Release spring.
- A - play between the clutch bearing and the release lever ring.
Connection diagram for the clutch drive KamAZ 43118 and 65115
Main components of the circuit:
- Clutch pedal.
- Main cylinder.
- Cylindrical element of a pneumatic booster device.
- Pneumatic booster follower mechanism for a device with two discs.
- Air duct.
- Working hydraulic cylinder.
- Shut-off clutch equipped with a bearing element.
- Shift lever.
- Stock.
- Pipelines and pipes of the hydraulic drive.
Driven disks in SS KamAZ 55111 or 43114 are manufactured using heat-resistant friction linings, which prevent rapid wear of structural elements. The device also includes a vibration damper that occurs when the engine cranks. The pedal of the drive unit is located on special bushings and usually functions without the need for regular lubrication. More modern versions of KamAZ 55102 and 6520 use Euro class single-plate clutches.
Clutches in KamAZ systems may differ from each other in the amount of transmitted torque.
The main feature of the improved versions of the SS is the presence of a built-in indicator that determines the wear of the friction linings. The gap is measured by the distance between the body of the amplification device, as well as the washer located on the rod. In case of serious wear, this figure may be about 2.3-2.5 cm. In some SS for KamAZ 43114 and 4308 with a PGU, it may not be possible to adjust the position of the rod.
Photo gallery: types of clutch systems
Single-disc SS for a truck Pictured is a multi-disc clutch system
Preparing for adjustment
Before properly adjusting and bleeding the clutch on Kamaz 740, 5511 or other trucks, you must perform the following steps:
- Check the tightness of the drive device. To do this, you need to depress the clutch pedal several times. The presence of a serious air leak can be determined by hearing, and a weaker one can be determined by using a soap solution. If brake fluid is leaving the system, this can be determined visually. If problems are detected in the tightness, the components are tightened or the pipes are replaced.
- Carry out diagnostics of the fluid level in the expansion tank of the drive device. The volume of consumables should be about 15-20 mm below the edge of the tank neck. If required, the fluid level is replenished. It is not recommended to mix supplies from different manufacturers when performing this task.
- Check the operation of the pedal release springs, as well as the system release fork pulley lever.
- Tighten the bolts that secure the pneumatic reinforcement device CC. This procedure is performed using a torque wrench. The tightening torque should be about 90-100 Nm.
- Drain condensate, if any, from the pneumatic hydraulic booster.
Adjusting the clutch operation
To complete the task, you will need a special homemade product in the form of a piece of wire, one side of which should be 2 mm and bent at an angle of 90 degrees. The thickness of the rod is at least 3-4 mm. This size is optimal for controlling the gap between the tab outline and the disc release component. Adjustment is made using the nut of the pneumatic booster device. The legs must be brought to the ring through a hole located in the upper part of the crankcase.
You need to adjust the clutch like this:
- The locking screws are unscrewed with a wrench.
- The stoppers and plates are dismantled.
- Each nut is loosened and released 5 turns; for convenience, it is recommended to use a ratchet. If the penny protrudes beyond the surface of the ring, it must be recessed, checking in advance for the presence of ferodo at the bottom.
- When performing this task, you can also change the spring elements if they are worn out. The paws should be positioned so that they are in equal contact with the ring.
- The disk area runout is checked. If necessary, the bearing device is lubricated. The adjustment gap should be about 29-30 mm.
Adjusting the clutch pedal free play
According to the official regulations, the stroke for moving the pedal should be about 6-12 mm, and the measurement itself should be done from the central component of the plate. The pedal must be released until the main cylinder starts working after pressing it. Adjustment is carried out using an eccentric pin; when making adjustments, the pedal must be pressed against the upper stop. The castle nut is tightened as much as possible and the full stroke is replaced, which should be 185-195 mm.
about adjusting the clutch pedal
The “EIGHT ATMOSPHERES” channel in its video showed in detail how to increase the clutch pedal pressure on a KamAZ Euro.
Gearbox slide: what it is, signs of wear, how to adjust it yourself
Not all motorists have any idea what the name of this or that part in their car is. In this case, we are talking not only about the mechanisms “hidden” in the engine, but also about the devices with which they interact literally every day. One of these parts is the gearbox linkage.
Please note: The name "slide" is not official for this mechanism, but it is generally accepted. In fact, this part is called the transmission control rod.
Contents: 1. What is a gearbox rocker 2. Signs of gearbox rocker wear 3. Adjusting the gearbox rocker
What is a gearbox rocker?
Many drivers mistakenly believe that the rocker refers to the gear shift lever, but this is not entirely true. If we are talking about a gearbox rocker, we mean a composite mechanism whose task is to connect the gearshift lever and the rod. That is, the driver cannot see the backstage, much less touch it. This element is located between the lever and the gearbox itself, and it is located under the bottom of the car, near the driveshaft, and in some cases under the gearshift lever itself.
As can be understood from the description, the rocker regularly has to deal with serious loads, so this element must have good strength. Despite this, the slide is susceptible to damage. If it does not contain enough lubricating components, drops of water, dust or other “debris” have entered it, there is a high risk of part failure.
Please note: On some cars, the rocker can last 200-300 or even more than thousands of kilometers without replacement. But, if we take the average result, the gearbox usually fails after 100 thousand kilometers of operation.
Signs of gearbox wear
The driver must pay attention to possible failure of vehicle components, including knowing the characteristic signs of wear on the gearbox linkage in order to take timely action to replace it. Despite the fact that the mechanism is quite reliable, you should be aware of the following “symptoms” of its imminent breakdown:
- Increased play at the gearshift knob. This can be noticeable both when the handle is in neutral and in one of the gears;
- Difficulty shifting gears. For example, one or more gears are difficult to “stick”, or maybe a crunching noise occurs when the lever moves in their direction;
- It feels like changing gears has become more difficult, as if the lever has become much heavier;
- Gears are engaged incorrectly, for example, instead of fifth, third is engaged or vice versa.
Drivers often ignore the appearance of play in the gearbox, believing that this is a normal situation. In fact, if backlash occurs, it is imperative to diagnose the gearbox, and, if necessary, adjust or replace the linkage. The fact is that a slight play is already a fairly serious symptom of a faulty gearbox linkage. If it “breaks” while the car is moving, this can lead to serious consequences for both the car and the driver, since in such a situation there is a high risk of getting into an accident. That is why, if you notice problems with gear shifting, be sure to contact a service center for diagnosis and repair of the linkage, if necessary.
Adjusting the gearbox rocker
It is not always necessary to completely or partially replace the scenes. Quite often you can limit yourself to simple adjustments. At the same time, it is possible to adjust the link with your own hands, without contacting a service center. There are two ways to adjust:
- In reverse gear. In order to adjust the rocker for reverse gear, you need to loosen the clamp on it, and then move the gearshift lever to the position that corresponds to the ideal engagement of reverse gear. After this, the clamp is tightened, and the work is considered completed;
- On the first transfer. If it is not possible to engage reverse gear, you can adjust the gearbox rocker in first gear. To do this, engage first gear, and then loosen the rocker clamp. Next, rotate the rocker drive counterclockwise until the gearshift lever stops in the plastic reverse speed lock, and then tighten the clamp.
It is worth noting that the general processes for adjusting the gearbox linkage are described above. It is important to say that the process may differ depending on the car, so before starting work it is recommended that you read the instructions specifically for your car model.
(353 votes, average: 4.49 out of 5)
Why do bike gears shift poorly?
Typically, the thought of needing to fix problems with derailleurs comes when the chain is too difficult to shift between sprockets, or the gears do not shift at all. The problem comes suddenly, as an option, you can contact a specialist.
However, this issue can be resolved in the service in a couple of minutes, but you will have to pay the money in an hour. Maybe you should tinker with it yourself?
Before we begin the instructions for setting up the bicycle speed system, let’s determine why it does not work correctly:
- Switches are damaged. To solve the problem, a complete replacement is needed.
- Deformed cock – protection of the rear shift device. Usually they advise changing it, but you can fix it once.
- Worn spring or stretched cable. Replacement and adjustment of switches is required.
Very often, all transmission components are in good condition, but the gears still shift poorly. New parts, or parts with little wear, installed in the transmission unit are a common cause of poor chain movement along the sprockets.