Leaking oil seals is not the most pleasant thing. This problem is the same for both the engine and the gearbox. In this article we will analyze a situation that is standard for front-wheel drive cars - leakage of the gear selector rod oil seal. First, you need to understand what a gear selector rod is, and only then understand how to replace the gear selector rod oil seal.
What is a gear selector rod and why is it needed?
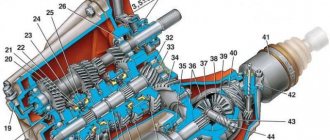
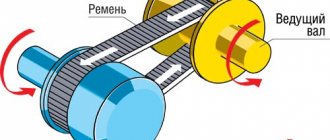
Older cars had a classic layout, with the rear wheels driving and the gearbox located under the car's interior. The gearshift knob was brought into the cabin and made it possible to control the transmission directly. In front-wheel drive cars, there is an urgent need for a special mechanism that would allow control of the gearbox located under the hood, while sitting in the car's interior. This device is called the gear selector rod, or, as drivers are accustomed to calling it, the rocker.
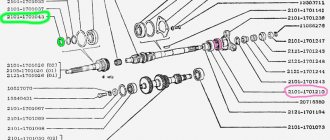
This part is inserted into the gearbox and connected to the gear shift handle mechanism. Using special levers, the gearbox handle acts on the rod and changes its position, which leads to a gear change.
The rod is connected to the gearbox through an oil seal, since there is oil inside the box that is under constant pressure. To prevent pressure from squeezing the oil out, a system of seals is provided in all parts of the gearbox connecting to external mechanisms.
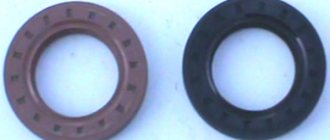
The oil seal is a round rubber product, inside of which there is a hole for the rod. The material used may vary. It all depends on the make and model of the car, although many manufacturers make oil seals of the same size but from different materials. They all differ in their properties, but they have the same function - to prevent oil leakage from the car transmission by increasing the tightness of the moving parts of the unit.
How to independently diagnose the gearbox seal
The first indicators indicating the need to replace the gearbox seal are oil marks on the asphalt after the car has been idle for a long time. But it is important to understand that there may be several reasons for this defect (for example, an incompletely tightened oil filter). But, if the problem is still with the oil seal, it is important to detect and fix the problem in time, because oil outside the box can lead to the need to replace it. To avoid such consequences, it is worth periodically checking the oil and monitoring its level in the gearbox and in the engine. In addition, a malfunction of the oil seal can cause a crunching noise when changing gears.
How is the rod seal replaced?
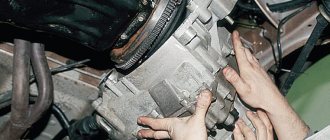
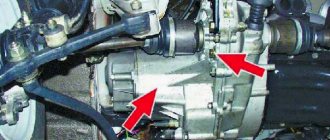
First of all, the malfunction must be diagnosed. To do this, check the oil level in the gearbox. If it has become noticeably lower, drive the car onto an inspection hole or overpass. Pay attention to the junction of the rocker and the gearbox; if traces of oil are found there, the oil seal must be replaced.
First you need to purchase all the components. These include: the oil seal itself (you choose the material of manufacture yourself; there is no significant difference between them, but the difference in price is noticeable) and the boot of a small cardan. In most cases, this boot is either torn or will be damaged during dismantling. That is why it is necessary to purchase additional spare parts in advance so as not to open the hood again.
Two ways to replace the gearbox seal on a VAZ-2110
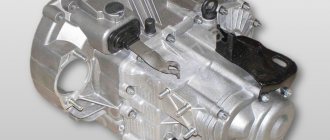
It is easier to change the oil seal with the gearbox removed.
Replacing an element that has become unusable can be done in two ways.
- The first of them is very labor-intensive , since it will be necessary to remove the gearbox. But replacing the oil seal will be much easier.
- The second method seems less time-consuming and labor-intensive , but in practice it is very difficult to carry out this procedure. Only experienced motorists who have repeatedly had to repair their cars can replace the oil seal directly on the car without removing the gearbox.
Troubleshooting
Experienced car owners know the visual reasons why they can determine the failure of the rocker seal. Naturally, for such reasons it is impossible to accurately determine the cause of the leak, but this gives a signal to carry out diagnostics, in which the cause of the oil leak can be accurately identified.
The most important sign is oil stains under the car, especially in the gearbox area.
An oily rubber boot indicates a malfunction of the rocker seal.
But these spots do not always indicate oil seal failure. It happens that this is due to the oil filter, which sometimes does not tighten properly. In any case, the driver is obliged to monitor for any oil leaks in the checkpoint area . To do this, you need to monitor the oil level. This is the only way to save the box from damage, which will certainly happen if it operates with a minimum amount of oil.
Another way that indicates the oil seal is worn out is a characteristic crunch that is heard when changing gears . But only an experienced VAZ-2110 owner can diagnose this crunch. In any case, if you hear unusual sounds when shifting into gear, it is better to diagnose the gearbox.
Set of tools required for replacement
A minimum set of tools for replacing the oil seal without removing the gearbox.
In order for the replacement of a part to take place without problems, you need to prepare the place and the necessary set of tools in advance. You will need:
- A set of keys and sockets, and for 13 you need two keys and there must be a key for 10. There must also be a socket head for 22.
- A chisel or screwdriver will be needed to knock out the oil seal.
- The hammer is small so you can get under it.
- Silicone sealant.
- Awl and hook.
Additional accessories
A regular self-tapping screw will allow you to do without a special puller.
For those who decide to replace the gearbox seal without removing it from the car, you will need additional equipment:
- Several long screws.
- A piece of pipe for pressing in a new oil seal.
It should be noted that the replacement process without removing the gearbox is much more complicated. In addition, there is a possibility of damaging the part being replaced during pressing.
How to change the rod seal - Video instructions
- Make a mark of the position of the rod and cardan so that after assembling the parts you do not have to adjust the gear shift. Then use a 13mm wrench to loosen the tie rod clamp.
- After this, pull the boot off the cardan. Unscrew the 10mm bolt used to secure the cardan to the gear selector rod. The cardan must be dismantled along with the boot.
- Now drain the oil from the gearbox. This is done so that after removing the oil seal, oil does not pour on you. Screw screws of sufficient length directly into the oil seal. After that, grab them and pull them towards you with all your strength. The seal should come out. As soon as it comes off, take a new oil seal and lubricate it with a special sealant.
- Let the sealant sit on the part for a while. After this, take a tube of the same diameter and use it to press the new oil seal into the gearbox. Oil can only be refilled after 24 hours, depending on the type of sealant chosen.
- Now change the boot on the cardan and install it. Reassemble the parts in the reverse order according to the marks made. After assembly, do not forget to fill the gearbox with oil.
This completes the replacement of the gear selector rod oil seal. The described instructions are suitable for all cars of the Samara and Samara 2 families. As you can see, this is not a complicated operation and is performed in a regular garage. Anyone, even an inexperienced driver, can handle it.
Diagnosis of the problem
So:
- Signs indicating the need to replace the gearbox seal are, first of all, oil traces left on the asphalt after the car has been parked.
- Before changing the oil seal, you should first make sure that this is the problem.
- Because oil leakage is often caused by a poorly screwed oil filter.
- Failure to identify an oil leak problem in a timely manner can have serious consequences.
- If you do not detect an oil leak from the gearbox in a timely manner, it will leak out completely, and then instead of the oil seal, the price of which is 50-100 rubles, you will have to repair the gearbox (see Repairing the VAZ 2109 gearbox - we do it right), and the price will increase significantly.
- To prevent this, it is necessary to periodically check the oil level in the engine and gearbox.
- Insufficient oil level in the gearbox can be manifested by a characteristic crunching sound that occurs when changing gears.
Replacing the gearbox rod seal of a VAZ 2109
You will need:
- An awl like a crochet hook or something similar.
- Keys for 10 and 13.
- The awl is ordinary.
- Plastic cork from a mineral water bottle.
Replacement is carried out on an inspection pit or a lift. If there is nothing else, you can use a cheap alternative in the form of two spare tires laid flat. We take two stronger boards and drive onto this improvised elevation. Naturally, the work will have to be done lying down.
Attention: After driving onto a pit or overpass for repairs, secure the car for your own safety using the handbrake and additional wheel chocks.
Replacing the oil seal in a VAZ 2109 gearbox is carried out in the following sequence:
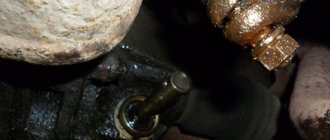
- We get to the rod that changes gears; it is covered on top with a rubber boot.
- If it leaks oil, then it is very easy to find it by looking at the oil stain (see photo below).
Gear shift rod
- We bend the wide part of this boot to get to the cardan located underneath it, which is attached to the rod.
- To gain access to the oil seal, it is necessary to disconnect the cardan from the shift lever and from the rod.
- For this we use the key 13.
- We unscrew the nut completely, this will help loosen the connection of the lever with the cardan.
- We take the lever out of the cardan, thus engaging 1st or 3rd gear.
- We use a 10mm wrench to disconnect the cardan from the rod; to do this, we move the lever to the side.
- We dismantle the cardan.
Disconnect the cardan from the rod
- Next, we remove the rubber boot, now we see the reason for the repair - it is the gearbox rod oil seal.
- It is located in a special recess - this is the place where the rod enters the box.
- Removing this oil seal without using a special tool is impossible, so we take a special awl and get to work.
- You can use a self-tapping screw as an option, the principle is very simple - you need to screw the self-tapping screw into the oil seal and “uncork” it like a corkscrew.
- When you have removed the old one, you can start replacing it.
- It is first necessary to thoroughly clean the seat from sand, oil, and other contaminants.
- Now you can press the new oil seal into the seat.
Replacing the VAZ 2109 gearbox seal is easier using a plastic bottle cap:
- This is done this way: cut out the inside of the plug and install a new oil seal through it.
- You can do without a traffic jam, this is a matter for the owner.
- We assemble the lever in the reverse order of disassembly.
Note:
- When the oil seal was replaced or any work was done related to fastening the gearshift lever and cardan, the rocker located in the car interior shifted greatly, which makes it impossible, in some cases, to change gears.
- Here the whole problem is hidden in the 13 screw, which connects the cardan itself and the lever that switches the speeds.
- Not everyone knows that it (screw 13) is not only fastening, but also adjusting.
- Therefore, upon completion of the work, be sure to check what position your lever is in and adjust its position, if necessary.
- Only now can you safely collect your tools and wash your hands.
- After assembly, be sure to check the oil level; if the level is low, you need to top it up, after which we can check the operation.
- Drive a couple of laps and make sure that the oil is not leaking anywhere else.
- That's all, I hope our instructions were useful to you. As you yourself have seen, replacing this oil seal is not difficult, and there is no point in overpaying for service stations.
Be careful!
Working with the cardan shaft mount (including the box seal) leads to displacement of the rocker, so difficulties arise with switching some speeds. The reason for them is in the fastening and adjusting screw at “13”, connecting the cardan and the gear shift lever. Therefore, after the new oil seal is installed, you need to check the position of the lever and adjust it if necessary.
After everything is assembled, it is worth checking the oil level and, if necessary, adding it. Then check the work to make sure there are no leaks.
Comments from car owners about replacing gearbox seals
- Do you need a girl with thin hands to replace the gearbox seal?
Need advice on replacing the seal on a manual transmission...There is a leak on the left side of the manual transmission, where the three gear shift levers enter into it.
The box is located in a niche, it is difficult to get there... The question is, how to do this? Should I hang the box or ask a girl with thin hands to help?
You need to unscrew the rear gearbox bracket and lower it as low as possible. Then unscrew the lever bolt and carefully remove the lever. There is a rubber ring inserted at the very edge of the box opening. Take it out, pick up another one, for example, I have from a universal set, insert it into the groove. Carefully insert the lever into the same position, in advance with the bolt, to catch the threads of the clutch fork inside the gearbox.
The driveshaft does not need to be unscrewed; at most, the outboard shaft can be removed. The muffler will need to be disconnected, most likely. Here you need to look at availability. Great if there is a lot of space.
- Replacing box seals with your own hands
Everything... changed...)) Regarding unscrewing the outboard - it depends on the specific car, it’s different for everyone. I had to twist it. I changed it in the garage in a pit. Unscrewed 6 bolts and nuts of the elastic coupling. I unscrewed the 4 bolts securing the silencer, removed the fastenings from 4 rubber bands (and for some reason my silencer consists of only 2 parts). It was not very convenient to remove the silencer. It is better to first remove one fastening in the middle, then both fastenings of the rear can, supporting the can with a jack, and then the last fastening in the middle of the car. After this, 6 bolts for fastening the thermal protection, using the same wrench, 2 bolts for the outboard bearing. I pulled the cardan aside and it came out of the tail of the box.Next, the wrench is 30, but you need a very deep socket, because a long rod sticks out of the nut. The standard one didn't fit. Or move the carob. The secondary shaft flange is jammed with a large bolt. I drained the oil by unscrewing the drain plug from the bottom with a 17 hexagon socket (for some reason, 17, although the manual says 19. I first bought it with a 19, then I had to go change it). The filler on the side is also 17. I unscrewed the nut, pulled off the secondary shaft flange, and there was the oil seal. The seal had to be torn out; it was a bit tight. The new one also had to be hammered in, but lightly and through a piece of wood. The whole procedure with analysis takes about 2 hours, but this takes into account the fact that 50% of the time it took me personally to unscrew the 4 bolts of the silencer at the junction of the knees. As a result, I had to saw the bolts. Therefore, if there is no particular need to film the second half, it’s better not to!! )))) All nuts and bolts are quite accessible and can be unscrewed normally. Along the way, I discovered two holes in the silencer and removed the gear shift rod joint, since there was excellent access. Now I'm looking for how to eliminate the play in the hinge.
- Do I need to remove the box when replacing seals?
It is not necessary to remove the box to replace the seals. You need to remove the drives, pull them out, pry the seal with a screwdriver and pull it out, then clean the hole. Then take the sealant, lubricate the new element and carefully press it into the hole (tapping it slowly with something).I don’t know about you, but, for example, on a figure eight, the oil seals of the right and left drives differ in the direction of the oil drain notches: on the right, the arrow points clockwise, on the left, counterclockwise.
- Which box seal should I take?
You only need to install the original element. The non-original one lasted me a week.We recommend
“Replacing the Audi A4 variator: detailed information on cost and repair” Read more
- A key for replacing the gearbox seal.
It depends on which seal: rear or front. If it is rear, then a wrench is not needed, since the nut is splined. A light chipper (you can use a flat screwdriver instead) to pry out the deformed part (driven into the slots), and then a flat screwdriver to turn the nut and unscrew the shank. In this case, it is advisable to change the spline nut as well. If you need to change the front element, then under the clutch housing, it seems, there should be a 17th socket wrench... 8 bolts, if I counted correctly.
Important points!
Sometimes, after replacing the gearbox seal or similar work related to fastening the cardan and gearshift lever, the rocker in the cabin moves greatly, which in some cases makes it impossible to switch some speeds. The problem lies in the mounting screw at “13”, it connects the cardan and the gearshift lever. Few people know that this screw is not only a fastening screw, but also an adjustment screw, so upon completion of work, check the position of the lever and, if necessary, adjust its position. Only after this can you safely collect all the tools and go wash your hands.
After assembly, check the oil level, top up if necessary, then you can check the operation. Do a few laps and make sure nothing is leaking anywhere. That's all for today, I hope the article was useful to you. As you can see, replacing the gearbox seal is not difficult at all, so there is simply no point in overpaying for a service station.
Replacing the VAZ 2108-2109 gearbox seal will require you to have the following tools:
- Keys for “10”, “13”;
- Awl;
- A slotted screwdriver in the shape of a crochet hook or something similar;
- Plastic stopper.
The work is carried out on a lift or inspection pit. If you don't have either, a cheap alternative is two spare tires laid flat. Take two stronger boards and drive out onto an impromptu hill.
Attention! When driving into a pit or any other device for repair, take care of your own safety - secure the car using wheel chocks and a handbrake.