Replacing the gearbox of a VAZ 2110, 2112 gearbox. Photo and video instructions
Today we are undergoing repairs on a VAZ 2110, manufactured in 2004, 1.5 16 valve engine, mileage 176 thousand kilometers, the gearbox needs to be replaced. We will show you detailed photos and video instructions on how to do it yourself. The manual is also suitable for VAZ 2112, VAZ 2111, Priora cars.
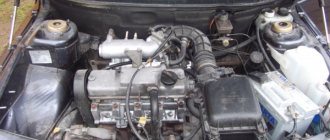
At first, the owner wanted to repair the gearbox, but then after making approximate calculations, it became clear that it would be cheaper to replace it. A problem with the gearbox knocks out first, second, fifth and reverse gears. We open the hood, remove the plastic cover from the engine, unscrew the clamps from the air filter housing, remove the mass air flow sensor connector, remove the terminals from the battery and remove the battery itself.
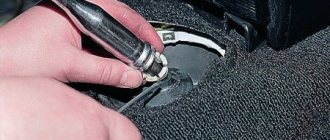
We remove the clutch cable and disconnect the wiring from the starter:
To avoid breaking it, unscrew the speed sensor. To secure the engine, install a transverse crossbar:
Using a 30mm socket, unscrew the drive nut:
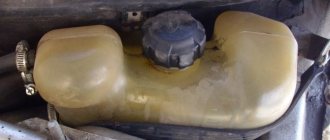
We unscrew the ball joint, there are two 17mm bolts from below. On one side we unscrew the so-called saber (traverse), because the gearbox will rest on it and it will be inconvenient to work with the gearbox. Before pulling out the drive, drain the oil from the box:
Remove the lower arm and remove the yoke:
We take the assembly and pull out the drive, but before that we tighten the drain plug.
We proceed in a similar way on the second side. Unscrew the slide:
After this, unscrew the gearbox mounting nuts:
All we have to do is unscrew the cushion nut so that the box does not fall, install the hydraulic strut, in your case you will most likely have to look for helpers who will hold it.
After this, the box can be removed and replaced with a new starter and release bearing. Be sure to check the condition of the clutch; if it needs to be changed soon, it is better to do it now, while the gearbox is removed.
When installing the new box, I had to turn the crankshaft a little, since the input shaft did not fit into it. We look from above so that no wiring accidentally gets between the gearbox and the engine. The entire process of installing a new gearbox is shown in the video step by step. After the replacement, be sure to check how all gears shift.
Malfunctions
Every car owner with experience begins to feel a malfunction in the car’s gearbox based on characteristic signs. Most gearbox breakdowns are associated with wear of rubbing parts, because they experience constant significant load while driving. However, such wear rarely reaches a critical state immediately. This is usually a gradual process, which is why a novice driver is always advised to learn to “listen” to the car. The sooner you notice a problem, diagnose it accurately and fix it, the less repair work will need to be done and the less it will cost.
It is recommended to regularly check where the vehicle is parked for stains to monitor leakage of technical fluids.
You can classify signs that indicate breakdowns as follows:
- Noise in manual transmission. This may be a crackling, knocking, rustling, grinding, as well as beating of the gear shift lever. Knocking can occur during different phases of the box's operation. An experienced motorist can even determine from such a rustle which parts are at risk. For example, noise when a car turns into a turn indicates wear on the differential gears.
- Gears are hard to engage. In addition to the wear of parts of the gearbox itself, the malfunction may also lie in the clutch. In addition, there is a risk of deformation of the gearshift control rods. Remember that plastic parts break much more easily than metal parts.
- Spontaneous “dropping out” of the gear while driving. Over time, gear teeth become chipped and worn down, becoming shorter. The slightest vibration disengages them and the transmission “flies out”. In this case, it is also necessary to check the engine mounting.
- A sharp click and loss of smoothness when changing gears. If the clutch is working properly, then the cause of such a problem is most often the failure of the synchronizer blocking ring of the desired gear.
- The box “eats” a lot of oil. Increased oil consumption is primarily a leak. It can occur through a depressurized crankcase, as well as worn oil seals, which are located on almost any hole in the box body.
In what cases should the gearbox be removed?
Before removing the gearbox, you should make sure that the malfunctions are related specifically to it and are not caused, for example, by insufficient oil level, loose gearbox mounts, or defects in the clutch release drive.
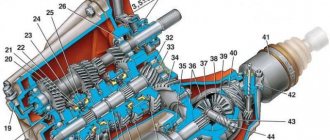
Gearbox VAZ 2110
The need to remove the gearbox occurs when the following malfunctions occur:
- transmissions switch off spontaneously;
- unclear gear shifting;
- increased noise, appearance of extraneous sounds;
- when overtaking, the clutch disappears;
- gears are difficult to shift;
- oil leaks.
In addition, the gearbox should be removed in the following cases:
- when replacing the clutch;
- when replacing an old gearbox with a new one;
- if it is necessary to eliminate the leak of the crankshaft rear oil seal;
- when replacing the front gearbox oil seal;
- when replacing the release bearing;
- when replacing the flywheel;
- when replacing the bushing;
- in cases where the box interferes with any repair work.
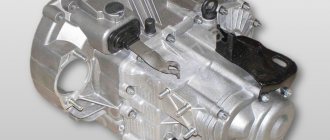
The weight of the box without oil is approximately 30 kg, so it is recommended to carry out the procedure for removing it with an assistant. It is advisable that he has experience in auto repair work.
When to start repairs
Before removing the VAZ 2110 gearbox, it is necessary to determine that the unit has failed. You can understand the problems by the following characteristic symptoms:
- knocking noises are heard from the device;
- the noise increases when turning;
- the box vibrates;
- spontaneous switching off of gears occurs;
- changing gears has become difficult or impossible.
In any case, the question immediately arises of how to remove the VAZ 2110 box, because otherwise it will not be possible to accurately diagnose the unit.
How to remove and install the gearbox on a VAZ 2110 yourself (instructions)
Removing and installing the gearbox on a VAZ 2110 must be done with a partner. Procedure for removing the gearbox Remove the battery The clutch cable must be disconnected from the clutch release fork and removed from the bracket on the gearbox itself
Next, you need to disconnect the electrical harness connector from the speed sensor. Compress the spring and disconnect the connector
VAZ 2110 gearbox itself . Then the next 2 and 3 are used to attach the gearbox to the car engine
At the bottom of the box there is another connector for connecting to the reverse sensor. It also needs to be disconnected
Then you need to unscrew the two bolts securing the torque rod to the gearbox
We loosen the tightening of the clamp securing the gear shift rod and then disconnect it from the gear selection rod hinge by moving it back.
Then we remove the wheel drives and instead of one drive we insert a plug, which we will tie with wire or rope so that it does not fly out when removing the VAZ 2110 box . It is not necessary to completely remove the right drive; you can move it to the side and hang it.
To make it easier to remove the gearbox, I recommend loosening the two bolts securing the ball joint to the steering knuckle
Unscrew the nut of the lower right mounting of gearbox 1 to the engine. Please note that on models with a fuel injection system, a support bracket 2 for the intake pipe is installed under this nut, which must be removed from the stud.
If necessary, you can loosen the bracket fastening nut indicated by the arrow.
Then you need to unscrew the nuts indicated in the lower figure, then remove the cover (1 clutch) and (2 crankcases)
After this, unscrew the bolt of the lower left mounting of the gearbox to the engine
We hang up the engine. For this procedure we use a hoist or board
From the bottom of the car, unscrew the nut securing the left power unit support.
Unscrew the two nuts securing the rear power unit mount to the body.
Unscrew the two bolts securing the rear support of the power unit to the gearbox, holding the nuts from turning with a second wrench, and remove the support.
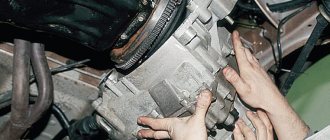
By inserting a screwdriver between the clutch housing and the cylinder block, slide the gearbox off the guide bushings. Be sure to hold it
Move the gearbox as far back as possible, passing the rear cover of the box over the front suspension brace (the input shaft should disengage from the clutch). If the input shaft cannot be disengaged from the clutch, push the engine to the side. Lower the front end of the box and remove it from under the car.
Install the gearbox in the reverse order of removal.
Sequence of work
To get to the checkpoint, you must first provide access to the underbody of the vehicle, so it must be raised. To do this, you can drive the car onto an inspection groove, overpass, or lift it using a lift. Then we do the following:
- First, you need to dismantle the engine protection (mudguard), for which, using a socket wrench, unscrew the mudguard mounting bolts. Next we remove the protection.
Then remove the engine compartment shield from the right side.
When the waste liquid has drained completely, you need to clean the hole and plug from dirt, and then screw it back in.
At the next stage, turn off the power to the car by disconnecting the negative terminal from the battery.
Next, remove the air filter. To do this, you need to disconnect the air supply hoses, crankcase ventilation hoses, as well as the air flow sensor. Do not forget to remove the air filter housing, which is dismantled instead of the hose, sensor and throttle valve.
Instructions for removing the gearbox
The procedure for removing the gearbox is labor-intensive and time-consuming. It’s easier to replace it with a VAZ 2110 by visiting a car service center, but you can do it yourself.
Tools
To carry out the procedure, you will need tools consisting of:
- a set of wrenches, socket or open-end wrenches;
- set of heads with extensions;
- flat screwdriver;
- mounts;
- pliers;
- jack;
- clean rags.
In addition, you should prepare a container to drain the used oil. You can use a plastic 5 liter bottle.
Tools should be prepared in advance so that they are nearby while working.
Sequencing
To remove the gearbox, you need access to the underbody of the car, so it needs to be lifted. This can be done using a lift, or driving the car onto an overpass or inspection groove.
Since the removal work is quite complicated, you will need an assistant.
The following video demonstrates replacing the clutch, the first step of which is removing the gearbox.
When is dismantling necessary?
First, you should make sure that the problem is in the gearbox and not in other structural elements. For example, poor gear shifting may be due to a faulty clutch drive. In this case, it is enough to simply check the pedal adjustments and also lubricate the clutch drive parts.
Jerking while driving may be due to low fuel quality or contamination of the fuel system. Thus, before dismantling the gearbox, be sure to check all possible causes of unusual phenomena, and also diagnose the gearbox.
A separate case is the removal of the gearbox in situations that interfere with repairs. This can happen in the following situations:
- The need to replace the clutch disc or the entire basket;
- Removing or installing the engine;
- Replacing the motor flywheel.
In any of the above cases, you will need to remove the box, as it will interfere with the work.
Do-it-yourself instructions for replacing (removing and installing) VAZ 2110,2112 gearbox
If the transmission is removed in order to repair the clutch, release bearing or flywheel, then it is not necessary to drain the transmission oil and pull the drive out of it.
It is necessary to remove the gearbox on a VAZ 2110 with an assistant. Procedure: 1.Remove the starter, battery and drain the oil. 2. Disconnect the clutch cable from the release fork. To do this, loosen the tightening of nuts 1 and 2, then remove it.
3. Slide the cover off the cable sheath and unscrew the fastening nut. Remove the cable from the bracket on the gearbox. 4. Disconnect the wires from the speed sensor. You need to compress the spring clips. 5. Unscrew bolt 1, which secures the ignition bracket to the VAZ 2110 gearbox, and two bolts 2 and 3, which secure the box to the engine. 6.You also need to disconnect the reverse sensor connector; it is located at the bottom of the car. 7. Unscrew the bolts securing the jet rod to the gearbox, there are two of them. 8. Loosen the bolt of the gear shift rod clamp and disconnect it from the rod hinge, while it needs to be moved back. 9.The next step is to remove the wheel drives; instead of the left one, we put a plug, which can serve as an old CV joint, and tie it so that it does not fall out. It is not necessary to remove the right drive; you can disconnect it from the gearbox, take it to the side and hang it from the body. 10.To make it easier to remove the gearbox on a VAZ 2110,2112, unscrew the left ball joint from the steering knuckle. 11.Unscrew the lower right mount of the gearbox. You should know that on engines with an injection system, a support bracket 2 is installed, which we remove from the stud. 12.If necessary, unscrew the top nut of this bracket. 13. Unscrew the bolts securing cover 1 from clutch housing 2, there are only three of them. 14.Next, you need to unscrew the bolt of the lower left fastening of the VAZ 2110 gearbox to the engine. 15.We hang the engine as follows: install a board on the front fenders, placing rags under it, as shown in the photo below. 16. We tie the power unit to it using a strong rope, cable or, as in the photo, using an old seat belt. The ropes must be in tension. 17.Unscrew the nut securing the left engine mount from the bottom of the car. 18.Then you need to unscrew the two nuts of the rear support of the power unit. 19. We unscrew the fastening of the rear engine mount to the VAZ 2110, 2112 gearbox, while using another wrench we hold the nuts from turning and remove it. 20.Insert a pry bar or screwdriver between the cylinder block and the clutch housing, slide the gearbox off the guide bushings, supporting it. 21. We move the VAZ 2110, 2112 gearbox as far as possible to the left side of the car, passing the rear cover over the stretcher, and the input shaft will disengage. If the shaft does not come out, then push the engine in the opposite direction from the box. As soon as the shaft is disengaged, the box can be removed from under the car. 22.Reinstalling the gearbox is done in the reverse order. 23.Then we install the drive wheels. 24. Fill in the transmission oil, if drained. 25.Then follows the adjustment of the clutch release drive. 26.Adjusting the gear shift lever.
Transmission fluid selection
Practice shows that factory transmission oil is of low quality, so immediately after purchasing a car, a whine is noticed in the operation of the gearbox. To extend the service life of the gearbox and also reduce its noise, it is recommended to replace the gear oil with a higher quality one.
Which manufacturer is better to choose?
Advice: You should not fill your VAZ 2112 with expensive oil, which is synthetic. This is a new oil that is used in modern foreign cars with complex mechanisms. The best option would be semi-synthetic
Opinions about transmission manufacturers differ greatly; some support domestic manufacturers, while others, on the contrary, rely on the recommendations of well-known car factories. Which gear oil is better, and which one you choose, depends only on your personal point of view and the ability to evaluate and listen to the advice of experts.
- Liqui Moly;
- Castrol;
- Mobil.
The AvtoVAZ fan club supports both a selection of reputable brands and Russian manufacturers, for example, Rosneftekhim, Lukoil, Rosneft. In any case, the choice of high-quality gear oil for the VAZ-2112 gearbox occurs through a long selection process, where each car owner goes through a long journey of testing and experimentation.
What will you need?
Some people prefer to take the car to a service center to remove the transmission, but in reality this is not necessary. If you wish, you can do this work yourself. But, here you will need a certain tool. It is also important to understand that you will spend a significant amount of time the first time.
Here you need to clarify that the canister must have a comfortable neck. You'll have to drain the oil from the box, that's what the container is for. Draining the lubricant simplifies the process because the box becomes a little lighter.
You will also need a pen for a viewing hole or overpass
. This will make it much easier to get to the box. Although some craftsmen can dismantle the box without this, simply by driving the car for low speeds.
Diagnostics
Before starting work, you should carry out diagnostics, this will allow you to determine exactly what the reason is and whether it is necessary to remove the box from the car. This will avoid unnecessary and unnecessary actions.
All these are signs of a broken box. Here you will definitely have to repair the unit or replace it with a new one. It is better to fix the problem in a timely manner. A faulty gearbox causes increased loads on the motor, which will lead to accelerated wear. Also, at one moment you can stop on the road with a completely failed gearbox.
In addition to malfunctions, the box may need to be removed to repair other components of the car. There are actually quite a lot of cases when this is required:
- Replacing the clutch. This may involve either replacing the entire basket or installing a replacement disk;
- If for any reason the box needs to be replaced;
- Removing the gearbox oil seal;
- Elimination of leaks through the rear crankshaft oil seal;
- Installing a new release bearing;
- Removing the bushing;
- Removing the flywheel;
- To carry out other repair operations.
As you can see, there are many reasons to dismantle the box. Therefore, you should know exactly how this work is done. In general, this operation is not difficult, but it requires care. After all, the gearbox weighs about 30 kg, which means removal requires physical effort.