Expansion tank VAZ 2110 - replacement, repair, installation + Video » AvtoNovator
The expansion tank of the VAZ 2110 car model, with minor differences, can be found in all other cars of this manufacturer. The direct purpose of the container is to remove heat from the car engine. Like any device, it periodically needs repair.
What does the expansion tank look like?
This is a plastic container into which the liquid involved in cooling the engine is poured. In addition to the hoses connected in a closed loop, the tank also has a built-in float sensor, which transmits data on the temperature of the liquid on the instrument panel of the VAZ 2110.
Expansion tank VAZ 2110
In VAZ 2110 and 2114 cars, the expansion tank is located under the hood on the driver's side, behind the car pillar glass. This is not very practical: the tank is clamped on all sides by metal, which prevents it from expanding when the lid does not work properly and it can burst. During the summer this is a very common problem. In other VAZ car models, the location of the tank is chosen more successfully, both for operation and for repairs.
Possible malfunctions - what to prepare for?
Very often, owners of VAZ 2110 are faced with malfunctions of the valve cover of the tank. It relieves excess pressure when the engine overheats. For one reason or another, the lid may jam, resulting in excess pressure being created, up to the explosion of the container. If you encounter such a problem while driving, do not turn off the car engine under any circumstances, just stop and wait until the radiator cooling fan turns off.
Reservoir valve cover malfunction
The expansion tank is directly connected to the car's radiator and its fan, so it is very important to maintain them in good condition. Periodically inspect all engine cooling elements, this should be done especially often in the summer when the outside temperature is very high.
If you see that the coolant level in the reservoir is decreasing, check the system for leaks. The normal operation of the expansion tank is indicated by small drips from the neck cap to the surface of the liquid. This indicates that the reservoir cap valve is operating correctly.
Replacement or repair - a clear choice
Repairing the tank is possible only if it is necessary to replace components - the tank cap or the liquid level float.
The container has lost its seal
Installing and replacing an expansion tank does not require special knowledge and skills. Before purchasing a new expansion tank, be sure to check that it is original. Such parts will serve you much longer.
New expansion tank
If the problem is in the tank cap, then it is best to replace it with the cap from the expansion tank of the VAZ 2199. Judging by the experience of many drivers, the caps from this model are much better, and they also fit perfectly with threaded connections.
Let's start replacing - what to pay attention to?
To install the tank you will need screwdrivers, pliers, new clamps, a set of wrenches and sandpaper. Sandpaper is necessary for processing the inlet holes on the plastic of the tank, which have a rough surface. It is necessary to make it smooth, this contributes to a better fit of the system pipes.
Replacement of the tank must be carried out according to the instructions specified in its new kit. If the car has been running, you need to wait until it cools down. First of all, open the car radiator cap, this will reduce the pressure in the system. You can completely get rid of the coolant by unscrewing the cap at the bottom of the radiator. If you recently changed the fluid, then when removing the old tank you need to clamp its pipes to prevent unnecessary losses.
Replacing the tank
This is followed by installing a new tank and connecting all pipes to it. The clamps must be clamped without using much force so as not to break the inlet holes of the tank. If necessary, add coolant
In a VAZ 2110 car, it is very important to constantly maintain the average fluid level. After completing all the work and checking the remaining pipes of the system, start the car and let it run until it boils.
When the fan on the radiator turns on, watch the reservoir cap - it should release pressure.
Installing a new tank
If the reservoir cap relieves pressure in the system, but you see a low fluid level on the instrument panel, then replace the electronic sensor, which is located in the reservoir. As a rule, it is purchased separately. Its installation is very simple - just disconnect the chip on the cover and unscrew it, insert a new one and repeat the steps in reverse order.
What does he look like?
Externally, the expansion tank is a plastic container. Liquid is poured inside this container, which is directly involved in cooling the engine.
The design of the element includes hoses closed in a circuit, a float sensor built into the lid or plug of the tank. Whichever is more convenient for you. It is this sensor that transmits information about the current coolant temperature. When the permissible values increase, the corresponding warning light lights up on the dashboard.
Complete structure
Where is he located?
To replace a damaged container, you first need to determine where it is located.
The location of the expansion tank is the engine compartment on the driver's side, right behind the pillar glass.
Such an arrangement in the VAZ 2110 certainly cannot be called successful, since there are metal elements on all sides of the plastic tank. Because of this, problems arise with the expansion of the plastic, sometimes the tank simply bursts.
Depressurization of the tank occurs especially often in the summer, when there is intense heat outside. The manufacturer, represented by AvtoVAZ, took this problem into account when developing new models. And the owners of the “ten” have to put up with this arrangement of the tank.
Container location
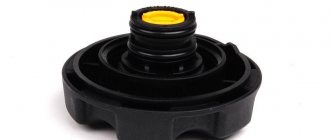
What is an expansion tank cap
Any driver, even the most inexperienced, knows well why an expansion tank is needed in a car. Coolant is poured into it, and the remaining free volume is designed to compensate for the increase or decrease in the amount of expanded liquid.
Accordingly, the tank is closed with a lid. The cover is installed on the tank neck in the upper part.
Many drivers do not attach much importance to the lid - after all, it is important to simply maintain the tightness of the tank, and what exactly to close it with does not matter
Yes, the expansion tank cap is a locking element. However, contrary to popular belief, the lid has a complex structure and performs special functions.
The cover cavity includes a rubber seal and a double valve mechanism
What does the element consist of?
The lid has two valves. They are designed to protect the cooling system from possible damage due to overheating, in addition, these valves stabilize the operation of the entire system.
The two valves are plugs for two closing springs. The lid must fit tightly (without gaps) to the edges of the tank. To ensure a reliable connection, the lid includes a rubber seal. There are two valves built inside:
- the first relieves excess pressure in the tank;
- the second pumps the necessary pressure into the tank if the pump for some reason does not cope with its job.
These valves got their names due to the use of high or low pressure: on VAZs the first valve is called a safety valve, and the second is called a vacuum valve. However, both are at rest as long as the pressure in the tank is within the specified reading range.
The valve mechanisms of the lids on VAZs are springs
Symptoms of a faulty expansion tank cap
Owners of Russian-made cars know how important it is to monitor the condition of all systems in the car’s design. Even such a small element as the cap of an expansion tank can cause a lot of trouble - for example, if the valve mechanisms fail, the operation of the entire cooling system can be disrupted
As a result, the engine overheats and the cylinders jam. In this case, the driver will face expensive repairs.
This is interesting: Technical characteristics of F16D3
Therefore, in order to prevent unpleasant consequences, you need to carefully monitor some features in the car’s behavior while driving:
- Puffs of smoke appear from under the hood - therefore, coolant has hit the hot surface of the intake manifold. Antifreeze could get onto the manifold for only one reason - the safety valve on the cover had failed;
- Cool air comes out of the stove, and the engine gets very hot: this is a sign of failure of the vacuum valve of the cover. Due to malfunctions in its operation, air plugs occur in the cooling system, which leads to overheating of the engine;
- failures of clamps and ruptures of hoses also indicate that the pressure in the system is unstable. And since it is the expansion tank cap that is responsible for the pressure, these symptoms indicate that it is time to replace or repair it.
If plumes of smoke are escaping from under the hood, this may indicate a faulty expansion tank cap.
Location of expansion tank
A plastic reservoir for excess coolant is installed by the manufacturer in different places depending on the model of the “tenth” family:
- in cars of the VAZ 2110-12 series, the reservoir is located on the left side (in the direction of travel) between the pillar glass and the wall of the interior partition; The expansion tank on VAZ 2110-12 models is installed in a narrow niche on the driver’s side
- in VAZ 2114-15 cars, the container is also located on the driver’s side, but is placed in front of the pillar glass.
In cars of the 2114-2115 series, the tank is located in front of the pillar
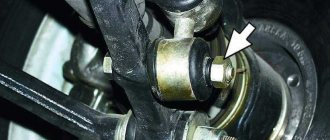
The expansion tank is attached to the body elements with a clamp in the form of a flat rubber belt with a metal hook that hooks onto a protrusion on the side member. There are 3 hoses connected to the tank:
- A large diameter pipe leading from the thermostat is connected to the bottom.
- The upper tube of small diameter goes through the partition to the radiator of the cabin heater.
- The middle small tube connects the tank to the upper fitting of the main cooling radiator.
The reservoir compensates for the expansion of coolant and steam from three elements of the system - the cabin heater, the radiator and the main line near the thermostat
On some modifications there is a reservoir with two fittings and connecting pipes - the large one comes from the thermostat, and the small one from the main radiator; there is no connection to the stove.
Each hose performs a separate function. The thick pipe serves to expand the coolant and fill the system while pouring antifreeze through the neck of the tank. Two thin tubes are designed to drain the steam-water mixture from the stove and the main radiator into the tank when heated to the maximum permissible antifreeze temperature of 95 ° C.
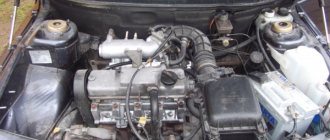
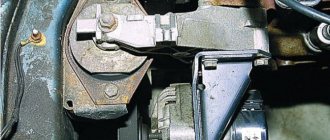
The expansion tank (item 1) is located at the highest point of the cooling system at the same level as the throttle valve
Possible problems
In fact, ruptures of plastic containers do not occur so often, so you should not be alarmed in advance when purchasing a used VAZ 2110.
Much more often, owners of this domestic car are faced with a breakdown of the valve cover of the tank. It is responsible for relieving excess pressure when the power unit overheats.
It is this lid that can jam, causing pressure to build up inside the container, which can ultimately lead to rupture of the plastic.
If such a problem catches you on the road, do not turn off the engine under any circumstances. You need to stop and wait for the cooling fan to turn on.
Preventive measures
As you understand, the expansion tank is directly connected to the radiator and fan, therefore maintaining the tank in working condition is the direct responsibility of every car owner.
Prevention includes the following activities:
- Periodically inspect the condition of the plastic container and its individual elements;
- If you find that the coolant level in the tank is too low, add the missing amount;
- If it soon becomes noticeably smaller again, check the tank for leaks. Most likely, liquid is leaking somewhere;
- Observe the condition of the tank neck. If there are traces of drips on it, that's good. This phenomenon indicates that the valve cover is triggered and relieves excess pressure. Hence the traces of coolant.
Coolant replacement
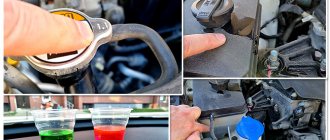
According to the manufacturer's recommendation, the coolant should be replaced after two years of operation or after 60 thousand kilometers, whichever comes first. In addition, if the coolant changes color to a reddish color, replace it immediately, as such a change indicates that inhibitory additives have developed and the liquid has become aggressive towards the parts of the cooling system.
You will need: a “13” key, coolant, a clean rag, a container for drained coolant with a capacity of at least 10 liters.
| WARNINGS Use coolants recommended by the manufacturer (see Appendix 3). Replace coolant only when the engine is cold. Coolant is toxic, so be careful when handling it. When starting the engine, the expansion tank cap must be closed. Screw the expansion tank cap tightly. The expansion tank is under pressure when the engine is running, and therefore, if the plug is loosely tightened, coolant may leak from under it. |
| 1. Place the car on a flat, horizontal platform. If the site has a slope, park the car so that its front is higher than its rear. |
| 2. Remove the oil sump protection and the engine mudguard (see “Removing and installing the oil sump protection and the engine mudguard”). |
| NOTE The crankcase protection and mudguard may not be removed, but in this case you will have to use some kind of device to collect the drained liquid, otherwise it will inevitably spill across the area under the car. |
| 3. Open the heater valve by turning the valve control handle clockwise until it stops. |
| 4. Place a container under the drain plug of the radiator of the cooling system and unscrew the plug. |
| WARNING Antifreeze is deadly poisonous to all living things. Therefore, to avoid polluting the environment, drain it from the radiator through a funnel (for example, made from a plastic soda bottle). |
| 5. Remove the cooling system expansion tank cap by turning it counterclockwise. | 6. Remove the plug from the drain hole on the cylinder block and drain the remaining coolant from the channels of the cylinder block, first placing a container under it. Tighten the plug. |
| 7. Fill the engine cooling system by pouring coolant into the expansion tank until the level is at the “MAX” mark on the wall of the tank. Close the expansion tank cap. Start the engine and let it warm up to operating temperature (before turning on the fans). After this, stop the engine, check the coolant level and, if necessary, add to the “MAX” mark. |
| NOTE With the engine running, monitor the coolant temperature according to the gauge. If the arrow reaches the red zone and the fan does not turn on, turn on the heater and check what kind of air flows through it. If the heater supplies heated air, it means that the fan is most likely faulty, and if it is cold, it means that an air lock has formed in the engine cooling system. To remove it, turn off the engine, let it cool and unscrew the expansion tank cap. Start the engine, let it run for 3-5 minutes and close the expansion tank cap. |
| USEFUL TIPS To ensure that air is removed from the cooling system before adding fluid, disconnect the hose from the throttle body. When pouring liquid into the expansion tank, at the moment the liquid begins to flow out of the throttle body pipe, put the hose on the pipe and tighten the hose clamp. After this, continue adding fluid to the normal level. |
| To better fill the system without air locks, periodically squeeze the radiator hoses by hand. |
After a few days of using the car after replacing the coolant, check its level. If necessary, add coolant.
If, after a very short time, fresh antifreeze changes color from blue to brown, it means that you filled it with a fake, to which the manufacturers “forgot” to add corrosion inhibitors. In addition, one of the signs of a fake is the sudden complete discoloration of antifreeze. The dye of high-quality antifreeze is very stable and only darkens over time. Antifreeze tinted with linen blue becomes discolored. This “antifreeze” needs to be replaced quickly.
Procedure for replacing the container
It is advisable to perform the disassembly procedure on a cooled engine, since hot antifreeze will inevitably get on your hands and cause burns. Special equipment and no special conditions are required, including an inspection ditch. For work, choose a lighted, flat area or a warm room if the replacement is being done in the middle of winter.
From tools and additional materials you need to prepare:
- Phillips screwdriver;
- pliers;
- set of open-end wrenches;
- manual or foot pump with a pointed nozzle on an air hose;
- antifreeze basin;
- rags.
To work, you will need a simple set of tools available in every garage.
It is also recommended to stock up on new clamps to match the size of the pipes; it is better not to use old ones.
Instructions for disassembling and installing a new part
To change the container, you need to empty it of antifreeze. There is no need to completely empty the system; no more than 2 liters of liquid should be drained. This can be done in two ways:
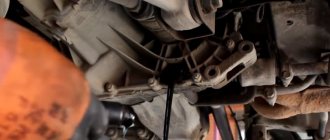
- Unscrew the protective boot under the radiator, place a basin and unscrew the lower plug of the main radiator a few turns. When the antifreeze leaves the reservoir, screw the cap back on.
The plug with a thumb for manual unscrewing is located at the bottom of the radiator
In the first case, you need to remove the expansion vessel plug in advance, and in the second, it must remain closed.
Then work in the following order:
- Remove the 2 small tubes from the container by loosening the clamps with a screwdriver. Take them aside.
The hoses are easily removed from the fittings after loosening the clamps
To remove the element, simply unfasten the rubber retainer
The new part is inserted into the niche in place of the old one and secured with a clamp
On VAZ 2110 and 2114 cars, disassembly and installation of a new part are carried out in the same way. The only difference is the location of the tank.
To add antifreeze to a level between the Min and Max marks on the tank wall without creating an air lock in the system, disconnect the tube from the throttle valve heating unit (this is the highest point of the cooling circuit). Pour liquid into the tank until it runs out of the removed tube, then put it on the fitting and secure it with a clamp. Add antifreeze to the required level.
Before pouring antifreeze into the system, you need to remove one of the pipes connected to the throttle valve block
During the replacement process, you should pay attention to the condition of the hoses leading to the container. If their ends have become soggy and increased in diameter, and cracks have formed on the walls, it is better to change such pipes.
Video: replacing the tank on a VAZ 2110
Installation of an expansion tank from Priora
The capacity of the engine cooling system of the VAZ 2170 is distinguished by thicker walls, thanks to which Priora has forever gotten rid of the “childhood disease” of a bursting tank inherent in the VAZ 2110. There is another reason: in the standard tank of the “tens”, a stream of antifreeze from the radiator pipe hits from the inside directly into the lid , which is why the latter leaks. On the “Prior” part, the fittings are at an angle to the neck, so liquid does not get there.
The tank fittings from the VAZ 2170 are directed away from the filler neck
Since the part from the VAZ 2170 is wider than the standard element, its installation is associated with some difficulties: the tank will not simply fit into the narrow space between the glass and the partition. What should be done:
- Remove the windshield wipers by unscrewing the mounting nuts.
- Remove the upper body panel.
- Unscrew the partition trim from the engine compartment side.
- Try on the new tank by inserting it into the opening. Then cut the sound insulation to size and assemble the assembly in reverse order.
In order for the wide element from Priora to fit into a narrow opening, you will have to remove the partition trim
Expansion tanks for Priora come in two types - with 2 and 3 fittings (the first are installed on a car with air conditioning). You need a second type of part to connect three hoses.
Installation of pipes and filling of coolant is carried out using the technology described in the previous section. As for modifications of the VAZ 2114-15, where the expansion vessel is located in a wide niche in front of the pillar glass, such a replacement will not cause any difficulties.
Video: tank from Priora on a VAZ 2110
The work of replacing the expansion tank on machines of the “tenth” family should be done independently if you want to save personal time and money. A trip to a car service center will take longer and cost more. At the end of the procedure, do not forget to check the operation of the cooling system by warming up the engine to operating temperature and turning on the electric fan.
Source
Causes of failure of VAZ 2110-2115 tanks
The service life of this element is not limited by regulations. This means that the container should be changed as needed, and this occurs quite often. The most common reason for replacement is damage to the integrity of the plastic case during operation. The tank simply bursts and here's why:
- Clogged or damaged lid valve.
The steam coming from the radiators increases the pressure inside the tank because it cannot escape through the plug. As a result, the wall of the container is destroyed. Damage to the plastic wall occurs due to excess pressure in the cooling system - In VAZ 2110-12 cars, the side walls of the vessel are closely adjacent to the body elements - the glass and the partition. As the antifreeze temperature and pressure in the system increase, the plastic has nowhere to swell, causing the body to burst along the seam at the end (usually in the lower corner).
- In the event of a breakdown of the gasket between the cylinder head and the engine block, the cooling system is subjected to a series of water hammers created by the movement of the pistons. The plastic case also often bursts from such an impact.
- The reason may be the expansion tank itself, made from low-quality raw materials or in violation of plastic molding technology.
On low-quality products, cracks may appear 3-6 months after the start of use.
To avoid destruction of the expansion tank, it is recommended to check the functionality of the plug valve before each long trip. Practice shows that problems with the tank most often arise on the road, when it is hot outside, that is, in the summer. A sign of a malfunction is a sharp increase in coolant temperature and a puddle under the engine compartment on the driver’s side.
Causes
The process of boiling liquid in the expansion tank
Temperature indicator in the red zone
What causes the liquid to boil in the expansion tank? Of course, this is due to the cooling system. If you look at this in more detail, the problem will lie in one of the details that caused it. So, let's look at what directly causes the effect:
- Thermostat.
- Radiator.
- Fan and wiring fault.
- ECU.
When all the reasons have been considered, you can proceed directly to troubleshooting methods.
Elimination methods
The 16 valve valve began to boil. Never open the coolant reservoir
Before considering options for resolving the issue, it is worth noting that the engine should not be allowed to overheat, since the consequences can be very unpredictable, and repairs can cost a considerable amount of money. So, let's consider the sequence of actions to eliminate the malfunction.
Thermostat
The most common reason, especially in summer. Thermostat jamming is very common and few drivers have not experienced this. In addition to the fact that hot coolant circulates in a small circle, and even if the fan does not work, then you definitely need to wait for it to boil.
In this case, the solution is quite simple - replacing the thermostat will normalize the operation. Of course, there are times when a new part fails very quickly, but this is directly related to the quality of the product.
Radiator
A clogged radiator can cause pressure to build up, causing fluid to flow into the tank and leave the system. If you add to all this a non-working thermostat, the result is that the liquid will boil.
To eliminate the causes, it is necessary to remove the clogged radiator and clean it. If this does not help and the cooling does not flow normally, then it is necessary to replace the part, since the sediment on the walls of the product has reached a critical level.
Fan and wiring
One of the most common malfunctions is the fan and its malfunctions. This is especially true in the summer, when there is not enough natural cooling. Thus, failure of a part can lead to boiling of the liquid. It should also be noted that the connectors of the fan electrical circuit wires may become oxidized, but no power will be supplied to the unit and it will stop working to provide cooling.
You can fix the problem by simply testing the wiring and the product itself. If necessary, it must be replaced. Also, it is worth checking the fan fuse and fan relay, which may have blown due to a short circuit.
The last reason for boiling is worth looking in the electronic control unit, since the cooling temperature sensor could have burned out. If you connect to the “brains”, then everything will become extremely clear and understandable, because errors will appear on the screen that need to be eliminated.
Coolant boiling
If antifreeze (antifreeze) boils, make sure:
- Does the radiator fan work and when does it turn on? The sensor may be faulty;
- Is the thermostat working? The coolant constantly moves in a small circle, thereby not cooling;
- Is the pump working?
- Is the cooling system, including the radiator, clogged?
- Is the system airy?
- Is the valve on the lid working properly? Low pressure in the system can cause premature boiling of the antifreeze.
POPULAR WITH READERS: Types of work during car body repair
As for airiness, for example, in VAZ 2110, 2111, 2112, from the experience of their operation, the system practically does not become airborne due to its special design.
In other cars, when replacing the coolant, an air lock may end up in the stove and, over time, make itself felt by overheating the engine and burning out the cylinder head gasket
It is important to monitor the instrument readings
First of all
Try replacing the cover with a new one or using a known working one for the duration of the test.
Notice how much the tank swells. If it is not significant and it is clear that it is not due to excess pressure, and you are the owner of a VAZ 2110-12, then you should not worry too much, since this is considered the norm for such cars.
The fact is that new tanks for such cars have a finless design and are made of plastic, which does not hold its shape very well, so over time they begin to swell.
Expansion tanks from Lanos, Priora, Nexia have proven themselves well; they are often installed instead of VAZ ones.
If the tank swells strongly and ruptures, even after replacing it along with the lid, then pay attention to the following points:
- Does the coolant boil?
- What color is the oil in the engine crankcase?
- Are there gases from the combustion chamber in the tank?
- What is the pressure in the cooling system;
- The quality of the tank itself.
What to choose?
If you still need to replace the tank, you first need to choose what exactly you will replace the old tank with.
Today there are several decent options on the market that are perfect for your VAZ 2110.
| Option | Peculiarities |
| Standard tank for "ten" | Factory version, which is optimal in terms of price and quality. Sometimes you can’t think of anything better than native parts |
| Foreign analogues | If you can find the perfect tank, you're in luck. The quality is up to par and it performs its functions perfectly. But finding such an option is extremely difficult. Plus the price is higher |
| Capacity from Priora | Many consider it an ideal choice for the VAZ 2110. It costs about 300 rubles. You can find it by catalog number 2170-1300060. The walls are thicker, which has a positive effect on reliability. Just keep in mind that there are two types:
|
If you choose to replace the tank from Priora, then you should take the version for a car without air conditioning.
Replacing the expansion tank on a Priora
Introduction
The expansion tank in a car is one of the most important elements of the engine cooling system (ECS). This element is made from special, temperature-resistant plastic and, oddly enough, is quite reliable. However, there are times when it fails.
In the event of such a breakdown, every car owner should know the procedure for localizing it. Its cost is relatively small and starts from 200 rubles. In this article you will find all the answers to your questions about the Priora expansion tank.
Why do you need an expander?
To cool the engine, a special liquid based on propylene glycol or ethylene glycol (antifreeze or antifreeze) is used. These types of coolant have large thermal expansions. When the internal combustion engine operates, the coolant heats up and expands. If the cooling system did not use an expansion tank, then due to thermal expansion the radiators or pipes would fail due to excess pressure.
The liquid in the expansion tank increases when heated and decreases when cooled. To prevent excessive pressure or vacuum from forming in the tank due to constant changes in coolant level, its lid is equipped with special valves that release or, on the contrary, allow air into the system in order to compensate for the load on the tank and maintain normal operating pressure.
Tank location
In Priora, the expansion tank is located under the hood on the left side in the direction of travel of the car, between the side member and the windshield. It has a rectangular shape with three or two fittings for SOD pipes.
With two fittings it is used in Prioras with climate control (air conditioning).
With three fittings in Priors without air conditioning.
Inside there are several partitions to strengthen the structure, which can withstand heavy loads.
The coolant level must be indicated on the tank, which should always be between the MIN and MAX marks.
About the cover
Special attention should be paid to the expander cover. At first glance, the lid does not have anything special, but if you look closely, you will notice that it has an unusual bottom.
It contains two valves that operate under specific conditions. As described above, one of the valves releases excess pressure when the engine is hot, and the second, on the contrary, lets air in when the engine cools down.
The serviceability of the cap is the key to the correct operation of the SOD and the integrity of the expansion tank.
Tank failures and their causes
The main damage to the expander is cracks or abrasions. Quite often, cracks in the tank form near the fittings, and abrasions appear on the lower part. This occurs due to engine vibrations in the engine compartment due to uneven roads.
Sometimes it happens that the expander bursts due to excess pressure in the system; this will be caused by a faulty cap, or rather its valve, which did not release the pressure at the right time.
If one of these problems is detected, the expansion tank must be replaced.
Replacement
To carry out the work, you do not need any special knowledge of automotive mechanics; after reading our instructions, you will easily carry out this work. For faster and trouble-free dismantling and installation of the tank, you need to prepare the necessary tools. It is also recommended to replace the cap along with the tank.
Tool for work:
- Crosshead screwdriver;
- Sealant;
- Container for draining the coolant (a two-liter bottle with the neck cut off will do);
Work procedure
It is necessary to allow the engine to cool down to avoid burns during operation.
Unscrew the clamp of the lower fitting and drain the coolant into a prepared container. It is necessary to drain the liquid only from the expander. Then we fix the removed pipe in a vertical position so that the remaining coolant does not leak out.
We unscrew the clamps of the remaining pipes and remove them, also fixing them in a vertical position.
We remove the tank by pressing on the right side and pulling the left up, it should look like in the picture.
Install the new one in the reverse order of removal. It is recommended to apply a small amount of sealant to the fittings for better tightness of the system.
We add the remaining coolant, start the engine and warm it up to 90°C, after which we check the tightness of the system.
The process of replacing the expansion tank on the Lada Priora has been completed, as you can see there is nothing complicated about it.
Replacement or repair?
Is it even possible to repair the tank? If he was torn to pieces, then no.
This element is subject to repair only in the event of failure of components - a float or a cover.
If the seal is lost, regardless of the reasons, repair is impossible. Theoretically, you can glue the plastic together and make patches, but such savings will not lead to anything good.
To replace the cover, use a spare part from the VAZ 2199 model. Although this model is older than the “ten”, the elements are interchangeable. Plus, the quality of the cover from the nine turned out to be better, and the thread matches perfectly.
Simply unscrew the broken cap and screw a new one in its place. That's the whole point of the replacement.
Replacement
So, the old expansion tank has lost its tightness, and therefore it should be dismantled and a new one should be installed in place of the old tank.
To properly replace the coolant container, you will need a certain set of tools and materials:
- Set of wrenches;
- Screwdrivers;
- Pliers;
- Clamps (we strongly do not recommend using old ones);
- Sandpaper.
Sandpaper is required to process the inlet holes of a new tank made of plastic. This is due to their roughness. If you make the holes smooth, the pipes will be stronger and fit more securely.
Installation process
Replacement instructions are included with each new tank. So there shouldn't be any problems with this. Let's describe the main points.
- If the car has just been driven into the garage, be sure to wait a while for the engine to cool down. When removing the container while the engine is hot, the coolant will be very hot. The consequences are not difficult to predict.
- Open the cap on the car's radiator. This will relieve excess pressure from the cooling system.
- Another cap is removed from the bottom of the radiator, which will allow you to drain the coolant. This doesn't always need to be done. For example, if the coolant was changed very recently, simply pinch the reservoir pipes so that you don’t have to drain and refill the coolant.
- Disconnect the coolant level sensor connector.
- Loosen the clamps to remove the steam pipe.
- Loosen the clamp on the filling hose and disconnect it.
- Disconnect the rubber tank securing strap to allow the tank to be removed.
- Reassemble the unit in the reverse order, but now with a new tank.
- If, after replacing the tank, the cap begins to release excess pressure normally, but the low coolant level lamp still lights up on the dashboard, try replacing the coolant level sensor. It is located in the tank itself and can be purchased separately.
- The sensor is installed by disconnecting the chip on the cover and screwing a new one in its place. That's all.
If you chose a tank from Priora, then you will have to remove the hood sound insulation and cut out a small section of it at the level of the top of the tank. This is due to the shape of the tank being slightly different from the standard one.
As you can see, the work is not difficult, no problems should arise. The main thing here is to correctly select a new expansion tank and, according to the instructions, install it in place of the failed component.
Car: VAZ-2110. Asked by: Oleg Paramonov. The essence of the question: why does the expansion tank on the VAZ-2110 crack?
Hi all! I have encountered a problem; the second coolant reservoir on a VAZ-2110 is cracking. I'm going to be so broke. Why does it crack and what to do? Are the spare parts still defective?
Internet auto club IZH-2126
Required parts and materials:
- New type expansion tank VAZ-2110;
- Branch pipe of the expansion tank VAZ-2110;
- Vapor removal tube for expansion tank VAZ-2110 2 pcs.
- VAZ-2110 expansion tank belt;
Additionally, who wants to install an alternative sensor on. fan:Original numbers: AUDI / VOLKSWAGEN 811 959 481AUDI / VOLKSWAGEN 893 959 481
Installation.
First, remove the old (original) tank and mark on the bracket the places where the screws for the bracket will be screwed in. We make markings at the intersection of the middle of the bracket (the intersection of vertical and horizontal lines).
Rice. 1. Bracket for the tank and places where the screws are screwed in.
Next you need to drain the coolant, because... Next we need to remove the upper (supply) radiator hose to the cylinder head pipe.
Rice. 2. Upper (supply) radiator hose, cylinder head pipe.
After the liquid has been drained, you need to make a short hose of the same cross-section with a bend (you can buy a similar hose and cut it off). Rice. 3. A piece of rubber pipe.
Next, we will need a 3/4 3/4 1/2 tee, as well as a suitable fitting with a diameter of “10” mm.
Rice. 4. Tee 3/4 3/4 1/2 and fitting with a diameter of “10” mm.
We insert the tee into the hoses and crimp it with suitable clamps, as shown in Fig. 3.
Now we make a bracket for the expansion tank. To do this, you can take metal plates (thin) with a width of 2.5 - 3 cm and 10 - 15 cm, the length can be taken with a margin of 30 - 40 cm, I cut them with metal scissors by eye. We take a pre-purchased VAZ-2110 tank and wrap it with a metal plate that is less wide so that it follows the contours of the tank. Next, mark on the plate the places where the screws will be screwed in. We take a wide plate and screw it to a narrow plate as shown in Fig. 1. We wrap the tank with a wide plate similar to the narrow one. Then we cut the plates in place, so that the rubber crimping belt of the VAZ-2110 can be pulled onto the tank with force and press the thick plate.
We twist one end of the narrow plate around the retaining ring of the crimp belt and clamp the ring.
Rice. 6. Crimping the ring of the crimping belt of the VAZ 2110 tank.
At the other end of the narrow plate, drill a hole with a diameter of 10 mm and bend it slightly away from the tank.
Rice. 7. View of the finished bracket.
Now we take the finished bracket and use a hammer to hit the heads of the screws to make holes at the previously marked points on the bracket of the old tank. This method is the most appropriate, since it is impossible to get to the bracket with a drill and drill bit. We screw the bracket (the screws will screw in with great effort). We replace the hose going from the engine to the old expansion tank with a hose from a VAZ-2110.
We insert the tank into the bracket and tighten the crimping belt. We insert the hose going to the expansion tank and tighten it at the ends with clamps. We will also need steam removal hoses for the expansion tank of the VAZ-2110 - 2 pcs. We put one hose on the tee fitting, the other on the radiator fitting. We cut the hoses to the required length in place.
Rice. 8. Vapor removal hoses and expansion tank pipe of VAZ-2110.
If the steam removal hoses are simply put on the tank fittings, then the problem of coolant leakage through the tank cap arises, because the pressure of the coolant hits the lid directly. To fix the problem, we will need a disassembled antenna from the radio receiver and an empty tube from the gel pen paste. From the disassembled antenna, we will need a tube of small diameter (about the same as that of a gel pen paste), and the length should be approximately 15 - 17 cm. We expand the holes in the tank fittings with a drill with a diameter comparable to the diameter of the tubes we prepared. We insert the tubes in this way - into the upper fitting of the tank we insert a tube from a gel pen, to it we attach a steam removal hose coming from the radiator, into the lower fitting we insert a tube from the antenna, and we attach the hose coming from the tee. If the coolant pressure inside the tank still reaches the lid, you can bend the tubes inserted into the fittings inside the tank.
Work progress:
- The first thing to do is to partially drain the coolant from the tank; you can drain it by unscrewing the drain plug on the radiator. There is no need to drain completely; as soon as the liquid leaves the tank, you can tighten the drain plug.
- After this, you need to disconnect the tank securing belt;
Loosen the clamp on the steam exhaust hose of the engine radiator and disconnect the hose;
- Similarly, disconnect the heater radiator hose;
- Now you need to loosen the clamp on the thermostat hose of the lower pipe of the tank and remove the hose;
- After this you can remove the tank.
Installation
The tank must be installed in the reverse order. After this, fill the coolant to the level, start the engine and let it run for several minutes at high speeds to get rid of air in the system.
Source
VAZ 2112 replacing antifreeze - subtleties of the process
If you buy a car, put it in a cupboard and admire it, then you definitely won’t need to replace any working fluids. And since a normal car is constantly in use, it requires maintenance. One of the types of work that needs to be done is replacing antifreeze or antifreeze - in a word, coolant. Cooling system design
This article provides instructions on how to replace antifreeze in a VAZ 2112 yourself
Here you will find some features that are important to pay attention to when replacing the coolant, a video on the replacement and a detailed description of the process itself
What is needed for replacement
When carrying out the disassembly process, you must first let the engine cool down, because uncooled liquid will certainly spill or drip onto your hands, and a burn will occur. Specialized equipment and any conditions are not needed; these include an inspection hole. To make the work comfortable and of high quality, choose a bright room with a flat surface, and if the replacement is carried out in winter, it is advisable that it be warm.
Tools required for installation/repair:
| pliers or pliers |
| wrench set |
| foot or hand pump with a nozzle pointed at the end |
| container for antifreeze |
| rags (rag made of special material) |
| crosshead screwdriver |
| unused clamps |
| sandpaper |
We use sandpaper to sand the rough surface of the inlet holes until it becomes smooth, which is necessary for a better fit of the nozzles.
Possible problems
In fact, ruptures of plastic containers do not occur so often, so you should not be alarmed in advance when purchasing a used VAZ 2110.
Much more often, owners of this domestic car are faced with a breakdown of the valve cover of the tank. It is responsible for relieving excess pressure when the power unit overheats.
It is this lid that can jam, causing pressure to build up inside the container, which can ultimately lead to rupture of the plastic.
If such a problem catches you on the road, do not turn off the engine under any circumstances. You need to stop and wait for the cooling fan to turn on.
Preventive measures
As you understand, the expansion tank is directly connected to the radiator and fan, therefore maintaining the tank in working condition is the direct responsibility of every car owner.
Prevention includes the following activities:
- Periodically inspect the condition of the plastic container and its individual elements;
- If you find that the coolant level in the tank is too low, add the missing amount;
- If it soon becomes noticeably smaller again, check the tank for leaks. Most likely, liquid is leaking somewhere;
- Observe the condition of the tank neck. If there are traces of drips on it, that's good. This phenomenon indicates that the valve cover is triggered and relieves excess pressure. Hence the traces of coolant.