Many myths and legends have developed around such a necessary procedure as adjusting the valves on the VAZ 2109, 2114 and 2108. At first, carburetor ones then became injection ones, but the design of the gas distribution mechanism did not change. Until the 2011 release, even the thermal gaps remained the same. Only with the advent of the light ShPG did the gaps become a little larger. The seats are metal-ceramic, and the pistons are light. The frequency of valve adjustment remains the same at 30,000 km.
On a new car, it is necessary to adjust the valves in the first 3,000 km, then at 15,000 and every 30,000 km. If you do not adhere to periodicity, the valves may burn out and the seats in the head may sag. In addition, traction is lost and fuel consumption increases. Thermal clearances on vases 2108, 21083, 2109, 21099, 2110, 21102, 2111, 21114, 2112, 2113, 2114, 2115, 1113, 11113, 2170, 2190, Priora, Granta (with engine 1118 3), should be like this:
- Graduation 0.35;
- Inlet 0.20 mm.
Thermal clearances on new modifications since 2011 for VAZ 8 valve Lada Granta, Kalina 2, Priora, with engine 21116
- Graduation 0.4 mm;
- Inlet 0.25 mm.
Adjusting valves VAZ 2114 8 valves
Many myths and legends have developed around such a necessary procedure as adjusting the valves on the VAZ 2109, 2114 and 2108. At first, carburetor ones then became injection ones, but the design of the gas distribution mechanism did not change. Until the 2011 release, even the thermal gaps remained the same. Only with the advent of the light ShPG did the gaps become a little larger. The seats are metal-ceramic, and the pistons are light. The frequency of valve adjustment remains the same at 30,000 km.
On a new car, it is necessary to adjust the valves in the first 3,000 km, then at 15,000 and every 30,000 km. If you do not adhere to periodicity, the valves may burn out and the seats in the head may sag. In addition, traction is lost and fuel consumption increases. Thermal clearances on vases 2108, 21083, 2109, 21099, 2110, 21102, 2111, 21114, 2112, 2113, 2114, 2115, 1113, 11113, 2170, 2190, Priora, Granta (with engine 1118 3), should be like this:
- Graduation 0.35;
- Inlet 0.20 mm.
Thermal clearances on new modifications since 2011 for VAZ 8 valve Lada Granta, Kalina 2, Priora, with engine 21116
- Graduation 0.4 mm;
- Inlet 0.25 mm.
Main signs of failure
When thermal clearances decrease or increase, the driver may observe a number of symptoms. The car may even stall after warming up to operating temperature (metal expands when heated). Adjusting the valve clearances of the VAZ-2114 is necessary in the following cases:
- Extraneous noise appears from the engine valve mechanism.
- When power decreases significantly, which is especially noticeable at high loads.
- The engine is running unstable.
- Sometimes it shoots and slams into the silencer.
- Gasoline consumption increases significantly, despite the fact that all sensors are in good condition and the power system is functioning normally.
If you notice one or more signs, then you definitely need to check the condition of the valves.
Why do you need to adjust valves?
With mileage, the metal valve stem tends to stretch and contract. The seats in the cylinder head sag, which is why the thermal gap changes. And it is physically needed of a certain value due to the design features of the engine. The consequences of untimely adjustment are not reversible. A clamped valve during operation of an eight-valve engine loses its seal, and the avalanche flow after ignition burns its edges and the cylinder head seat, which is recessed into the body of the head. This type of repair is expensive and does not come with a warranty. It is better to regulate in time, especially since the cost of tuning an 8-valve engine at 600 - 800 rubles per 30,000 km is not so significant.
With correctly adjusted clearances, the car will drive freely, without loss of traction, consuming less fuel. Under no circumstances should you adjust it to hot. Just cool the engine to 30-40 degrees. Otherwise, you can make a mistake and jam the valves.
There are times when the valves have been adjusted, but the knock remains. The reason may not be gaps. On a cold engine, piston skirts and cups and pushers in the body of the head can knock. There can be many reasons, so don’t rush to conclusions, but check everything carefully. There is a special device - a stethoscope, with which you can easily listen to engine noise.
An immunologist explained how older people should strengthen their immunity! You need to drink for 2 months...
Signs of burnt valves. Low compression in the cylinder. Replacing valves
Modern engines are equipped with a complex valve system. In addition to being a complex design, it is also highly precise, but this in no way protects the valves from damage. Unfortunately, burnt valves are a fairly common problem for both gasoline and diesel power units.
Signs of burnt valves can be observed not only on old engines, but also on relatively fresh ones. It is impossible to operate an engine with a burnt-out valve, and therefore it will be useful for novice motorists to find out where this problem comes from, what to do in this case, what are the symptoms of this problem.
Adjustment procedure
The procedure for adjusting the valves on all modifications of the 8-valve vase is the same. There are differences only in injection Grant cars, Kalina 2 with a Grant engine. They have a lightweight piston group and metal-ceramic seats. In this regard, the gaps differ upward by 0.05 mm. Knowing the order and adjustment scheme, you can adjust the valves yourself. The downside is the lack of a set of washers for adjustment. It’s expensive to go to the market to buy them every time, and it’s also expensive to buy the entire range.
Here is a detailed diagram of valve adjustment for VAZ 2108, 2109, 2114, 2115
- First you need to cool the engine. You can use an additional cooling fan from any VAZ car. Place it on top so that the airflow is towards the internal combustion engine and turn on the 12 V power supply;
- When adjusting 8 valve engines (11186, 11113 oka, 1118, 1111) with a mechanical throttle assembly, unscrew the throttle cable from the intake manifold receiver;
- Disassemble the valve cover, timing belt side casing. Disconnect the large and small breather hose going to the throttle body pipe;
- Pump out the oil near the valve cups using a syringe or bulb. It is most convenient to use a regular medical syringe with a white silicone hose at the end;
- Install a device for adjustment - a rack for pressing the valve, also called a ruler;
- Set the first adjustment position. Turn the camshaft clockwise to the mark and tighten 2-3 teeth. For cars with a lightweight piston group (Granta, Kalina 2, Priora), turn strictly by the crankshaft. If you turn the camshaft, the timing belt may slip, and if this is not noticed and the engine is driven, the valves may bend;
- Adjust in the following sequence: 1 outlet and 3 inlet valves;
- Rotate the camshaft 90 degrees. Adjust 5 outlet and 2 inlet valves;
- Rotate 90 degrees. Adjust 8 exhaust and 6 inlet ports;
- We make the last turn by 90 degrees and adjust the 4th exhaust and 7th inlet valves;
- Reassemble in reverse order. We install a new gasket under the valve cover to prevent oil from leaking out.
- On carburetor engines, everything is done in a similar order. First you need to unscrew the filter housing and the suction cable. The frequency is the same as on the injector 30,000 km.
On engines with 16 valves, adjustment is not required, since thermal clearances are selected automatically using hydraulic compensators.
Checking the gaps is also required after repairing the cylinder head. Especially after replacing the guides. When replacing bushings, the seats are countersunk with a special tool and deliberately recessed into the head. Accordingly, you need to follow the sequence, set the optimal gaps and repeat after 1000 km.
Adjusting the 8kL engine for gas increases the mileage between adjustments. If the engine is not intended to operate on gas equipment, the seats and valves will quickly burn out, and in order to somehow extend the service life, the clearances should be made a little larger than standard. Usually they do +0.05 mm. If the gap is not set, that is, does not expand, then the saddle is sunk a decent distance into the head. In this case, you need to measure how much the gap needs to be increased, disassemble the cylinder head and file the end of the valve. The second option would be to replace the seat or the cylinder head itself.
Adjustment table according to factory instructions
| car brand | Inlet | Release |
| Priora 21116 | 0,25 | 0,4 |
| Kalina 2 21116 | ||
| Lada Granta 21116 | ||
| grant 2190 | 0,2 | 0,35 |
| Priora 2170 | ||
| 21114 | ||
| 21102 | ||
| 21099 | ||
| 21093 | ||
| 21083 | ||
| 11186 | ||
| 11183 | ||
| 2190 | ||
| 2115 | ||
| 2114 | ||
| 2113 | ||
| 2112 | ||
| 2111 | ||
| 2110 | ||
| 2109 | ||
| 2108 | ||
| VAZ 99 | ||
| VAZ 083 | ||
| 1118 | ||
| 11113 oka | ||
| 1111 oka |
What is needed for adjustment
As already noted above, you can adjust the thermal clearances of the valves on the vase with your own hands. To do this you need a set of washers, some fixtures and tools. You can make a homemade rail, but it is more cost-effective to buy a ready-made fork for setting gaps at the car market.
Heels for adjustment will be needed in the range from 3.40 to 4.05 mm if the guides in the cylinder head have not been changed. If, however, repairs were carried out, or the car runs on gas, you will have to purchase washers in the range of 2.50 mm for the exhaust valves. Intake valves, as a rule, remain at the same clearance; the seats on them do not flush.
Thus, in this article we briefly examined the procedure for adjusting valves on VAZ cars with front-wheel drive. The consequences of untimely tuning and driving on gas were also touched upon.
How to determine what thickness of washer you need
Checking and adjusting thermal clearances in the Renault Logan valve drive
- you have already traveled 146 thousand km;
- they never checked or adjusted the gaps, because the car drives normally;
- but everyone tells you that adjustments need to be made and you don’t know whether to listen to them or not...
Thank you! It helped me a lot.
The article provides detailed instructions for replacing the oil filter. You will also find out when and why you need to change it, as well as what tools are needed for this.
Are you scratching your head over how to do this? What have you tried to do, but she doesn’t want to go out? Then read this article, which describes in detail how this is done. Everything is much simpler than you imagined.
If you don’t know what this “dish” is and what it is “eaten with”, then read this article. Here you will get answers to why the car needs this element, what malfunctions occur and how to deal with them.
Correct valve adjustment 2114
If on a VAZ-2114 1.5 or 1.6 the valves “knock” on eight valves, this indicates that the components need to be adjusted as quickly as possible. Unfortunately, not all car owners immediately begin to eliminate such a malfunction, which leads to more serious consequences. After all, if timely adjustments are not made, the engine power will decrease significantly, the valve will burn out, and the camshaft may become unbalanced. Don’t know how to properly adjust valve clearances on a VAZ-2114 8 valve? Then we recommend that you familiarize yourself with the information that will be presented below.
The size of the gap is measured
You can adjust the valves yourself quite simply if you follow the instructions exactly and carry out the work step by step. Before starting, you should check the dimensions of the gap, and if they do not correspond to the approved value, and a kind of knocking noise is heard when the engine is running, then the valves must be adjusted. To accurately check the size of the gap, you must wait until the engine has completely cooled.
It should be remembered that if the measuring device is installed on a hot metal surface, then it will not be possible to determine the exact size of the gap due to the error that occurs when the metal expands.
The size of the gap for both gas and gasoline must correspond to the following indicators:
- inlet valve - from 0.05 to 0.2 mm;
- exhaust valve – from 0.05 to 0.35 mm
To work you will need the following tools:
- open-end and spark plug wrenches, it is better to have a set of such wrenches on hand;
- a tool that helps to recess the valve pusher, its cost does not exceed 150 rubles;
- a set of special probes;
- washers for adjustment with a thickness of 3 to 4.5 mm;
- a device called a micrometer.
Step-by-step adjustment
Checking and adjusting valves is a simple job that everyone without exception can handle if they follow the instructions exactly:
- First of all, you need to remove the cover from the cylinder head.
- Remove the protective front cover from the timing belt.
- The candles are unscrewed. For more convenient unscrewing of spark plugs, it is recommended to use an open-end wrench of the appropriate size.
- Excess automobile oil is carefully removed from the top of the head.
- The integrity of the cams is carefully inspected. If during inspection any defects are found on these elements, they must be eliminated.
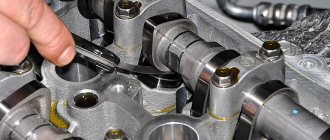
- A special device is installed on the studs to which the head is fixed to help recess the pushers.
- Next, you need to turn the crankshaft strictly clockwise until the mark on the rear cover of the timing belt and the pulley coincide. After the mark matches, you need to rotate the crankshaft 50 degrees.
- Using a set of feeler gauges, the clearance of the 1st exhaust valve and the 3rd intake valve is checked, the count should be taken from the pulley.
- If the gap dimensions correspond to the indicators that were previously given, then the following is done:
- the pushers are recessed and fixed at the lowest point;
- the washer for adjusting the gap is removed and its thickness is measured using a micrometer;
- Having decided on the desired thickness of the washer, you need to take a suitable element from the kit and install it in the pusher. In this case, it is important to ensure that the washer enters the pusher with the side on which its thickness is indicated;
- The gap dimensions are re-checked.
- The remaining valves are adjusted according to the same scheme, each time you need to turn the crankshaft half a turn, and the adjustment sequence should occur in this order:
- 2nd inlet and 5th outlet;
- 6th inlet and 8th outlet;
- 7th inlet and 4th outlet.
The countdown, as before, must begin from the pulley
After reading this article, you can understand that it is quite simple to independently adjust the valves on the VAZ-2114. However, if you do not want to do this work yourself, then you will have to contact a service station. The cost of adjustment at a car service can vary from 600 to 900 rubles. Experts recommend checking the clearance and adjusting the valves every 25-30 thousand miles, even if, according to the driver, the car is working normally.
How to determine that a valve has burned out in a car engine: signs and symptoms
Valves ensure the implementation of working processes in the cylinder. The intake valves are responsible for supplying a portion of the fuel-air mixture, and the exhaust valves are responsible for releasing combustion products. Burnout of one valve has a detrimental effect on the operation of the entire cylinder.
Signs that the valve is burnt out
What does a burnt valve look like?
Signs of a burnt-out valve include engine shaking, smoke from the breather (the breather is a valve for venting the crankcase and releasing excess pressure) and, when the engine operates for a long time with a burnt-out valve, increased fuel consumption. Let us explain the popular concept of “motor troit”. This means a malfunction of one cylinder, which manifests itself in a loss of power and throttle response, vibration and shots in the exhaust pipe. But these signs of a burnt out valve are ambiguous.
The engine can also stall due to broken spark plugs or a weak spark.
Smoke from the breather can also occur if the piston is damaged. But there is a distinctive feature here - the color of the smoke should be bluish, and the spark plug should be covered with oil, which is associated with a broken piston. In case of burnout, the spark plug remains dry. Note that a burnt valve in a carburetor engine and in an injector gives the same symptoms, because The only difference is the fuel injection system.
How can you tell if a valve is burnt out?
If you have checked the spark plugs, but the engine still stalls, then you should proceed to the procedure for finding a non-functioning cylinder. It's not complicated. After starting the engine at idle, remove the caps from the spark plugs one by one. If the engine changes operating mode when removing the cap, this means that the cylinder is working. If the changes are insignificant, then you should look for the cause in this cylinder.
Removing the wires from the spark plugs
Next, you need to check the compression of the suspect cylinder. We measure the compression level with a compression gauge, and then repeat the measurement by pouring a syringe of oil into the cylinder. If the second value is higher than the first, then there is a problem with the piston. If the values coincide, the valve will burn out.
The valves operate at constant high temperatures (400-600°C) and significant mechanical loads. The inlet valve is in more gentle thermal conditions, because cooled by the incoming fuel-air mixture. Exhaust valves, on the contrary, heat up even more due to the exhaust gases.
Exhaust valves are more likely to burn out.
For proper operation of the valves, a clear fit of the valve to its seat must be ensured and the cooling conditions (opening-closing level) must be observed. The appearance of carbon deposits both on the valve itself and on the seat violates both requirements and leads to damage to the valve. Carbon deposits can form due to under-adjustment, wear, manufacturing defects, problems with the cooling system, elevated combustion temperatures, etc. Factory defects are not that uncommon. The part is complex and operates under constant loads, so even a slight heterogeneity of the metal can lead to destruction of the entire part.
To protect yourself from defects, buy only from trusted manufacturers!
Wear is an insurmountable obstacle for all working parts. Therefore, do not neglect checking the valves after a certain mileage! Poor valve adjustment is the creation of insufficient clearances between the valve and the seat, often referred to as stuck valves.
How will the engine work and what will happen if the valves are clamped?
How to understand that the valve is jammed
If after starting the engine runs normally, but during long operation the thrust drops - this is a symptom of pinched valves. Another sign of jammed valves can be shots into the muffler when releasing gas. Because The combustion chamber is not completely closed, compression decreases and a disruption in the working process occurs. When adjusting, it is better to exceed the permissible gap than to make it smaller.
A burnt valve must be repaired as quickly as possible!
The consequence of clamped valves is overheating, increased fuel consumption and, as a result, burnout. It is undesirable to operate the engine with a burnt-out valve; this leads to burnout of the valve seat. What the car owner will end up having to do is replace the entire head.
What to do if the valve burns out?
In the case of burnt valves, repair consists not only of replacing them, but also of finding out the cause of the burnout. Therefore, the ignition and cooling systems should be checked.
If you have replaced and ground in one valve, take the time to ground in the rest.
You can replace the valve not only at a service station, but also in a garage if you are familiar with the basics of repair.
Thus, the valve is an important part of the engine, so in order to protect yourself from repairs, it is better to carry out routine maintenance on time.
Adjusting valves VAZ 2114 injector 8 valves
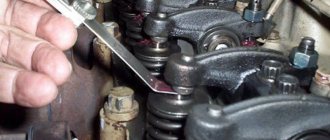
We will show you how to adjust the valve clearances on an 8-valve engine of a VAZ 2115 VAZ 2114 VAZ 2113 with your own hands. Open the hood, unscrew everything that will interfere with us. Jack up the right front wheel. We engage 4th gear, spin the wheel, and set a mark on the camshaft gear:
Here is the adjustment diagram for better understanding:
Let's rotate the gear 2.5 teeth from the set mark:
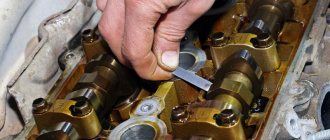
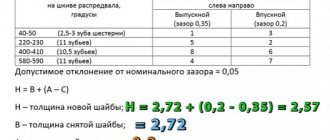
We check the gap on the first exhaust valve, it should be 0.35 plus minus 0.05. In our case, the probe at 0.30 does not pass, which means the valve is clamped, we try the probe at 0.25, it also does not pass, it passes at 0.20. We use a special device for adjusting the valves; you can buy it at any specialized store. If oil interferes, it can be pumped out using a syringe. Using our special tool (or a screwdriver if you don’t have one), press on the valve and fix it with a “hatchet”. Use tweezers to remove the adjusting washer. We look at the size of the washer (ours is 2.72).
Let's calculate the size of the new washer:
We install a new washer with the calculated size 2.57 written down (so that it does not wear off). After installing the washer, measure the gap again. Now let's measure the gap on the third intake valve, it should be 0.20 plus minus 0.05. The probe at 0.20 does not pass, the probe at 0.15 passes freely, which means there is approximately 0.18, which is acceptable. We turn another 11 teeth from the last position of the gear:
We check valves 5 and 2 in the same way. We turn it 10.5 teeth, check the gaps on valves 8 and 6.
Preparation for repair
Before starting work you must:
- Place the car on a level surface and allow the engine to cool to 20 degrees.
- Remove the valve cover and the plastic cover that covers the timing belt. Everything under the lid must be thoroughly wiped clean of oil.
- The camshaft must be carefully examined; if there is excessive wear, scoring, or cavities, it must be replaced.
- To make the crankshaft rotate more easily, you need to unscrew all the spark plugs.
After all these steps, you should align the mark on the camshaft gear with the casting on the cylinder head. In this case, you will set the first cylinder to the position corresponding to the top dead center
Please note that the crankshaft pulley must be rotated clockwise. But it's better to do things a little differently
Raise the left side of the car so that the front wheel hangs down. Engage fifth gear and rotate the wheel until the marks align.
Using chalk or a marker, you need to apply another mark on the camshaft gear. It should be opposite the one that already exists. This will make the work much easier.
Valve clearances VAZ 2114 8 valves
The VAZ 2114 uses a 4-cylinder in-line power plant, the power system is an injector. The location of the gas distribution mechanism is upper, that is, not only the valves of the mechanism are located in the block head, but also the camshaft.
The VAZ 2114 uses an adjustable gas distribution mechanism, that is, the thermal gap is not independently regulated, as is done in a timing belt with hydraulic compensators, but is a strictly fixed value that periodically needs to be checked and adjusted.
On this car, since the timing is adjustable, the thermal gap is fixed; at the intake valve it should be 0.2 mm, and at the exhaust valve - 0.35 mm. A small error of 0.05 mm is also allowed.
The exact value on the VAZ 2114 engine is ensured by the use of adjusting washers of a certain thickness. These washers are placed between the camshaft lobe and the valve lifter.
Measuring valve clearance
As the engine operates, wear occurs due to friction, causing the thermal clearance to change, so periodic inspection and adjustment is required. If this is not done, then changing its value will lead to disruption of the timing and valve timing. In this case, the VAZ 2114 loses power, gasoline consumption increases, and starting the engine on “cold” or “hot” worsens.
Step by step instructions
- The gap on the intake valve should be 0.2 mm - an error of 0.05 mm is allowed.
- The gap at the outlet should be 0.35 mm - an error of 0.05 mm is allowed.
- keys;
- a device that retracts valve pushers - costs about 100 rubles;
- set of probes;
- micrometer;
- adjusting washers - they have a thickness from 3 to 4.5 mm. They come with an interval of 0.05 mm. That is, you can find washers in sizes 3.05 mm, 3.1 mm, etc. up to 4.5 mm. (one puck costs about 20 rubles).
- retract the pushers and fix them in the lowest position;
- remove the adjusting washer and use a micrometer to measure its thickness;
- determine the thickness of the washer that you need so that the gap becomes normal (how to do this is written below);
- take a washer of the required thickness and place it in the pusher with the side on which the thickness of the washer is written;
- Check the gap again.
- 5 (outlet) and 2 (inlet);
- 8 (outlet) and 6 (inlet);
- 4 (outlet) and 7 (inlet).
Where does valve adjustment begin?
The thermal gap is adjusted after measuring it, and if it does not correspond to what is required, by selecting a washer of a certain thickness.
According to the regulations, the thermal clearance on the VAZ 2114 must be checked and adjusted every 60 thousand kilometers, as well as when valve knocking occurs.
Next, we will consider the procedure for adjusting the thermal gap on a VAZ 2114. All work is not very complicated, but requires certain equipment. To complete the work you will need:
- set of open-end wrenches;
- spark plug key;
- set of probes;
- special device for squeezing valves;
- set of adjusting washers;
- rags;
The set includes a set of washers with thicknesses from 3.0 mm to 4.5 mm. The thickness size interval is 0.05 mm, which allows you to select a washer of the required thickness when performing work. This set is not cheap, but purchasing it will allow you to carry out all the work yourself for a long time, without going to a service station.
Also, to complete the work, you will need a valve cover gasket, since it is disposable and must be replaced when the cover is removed.
Necessary tools and spare parts
Adjusting the VAZ 2114 valves (8 valves) with your own hands is only possible if you have a tool. In addition to a set of keys, special plates for accurately measuring the gap and the mechanical device itself for the procedure for setting them will be useful for the work. The complete list of necessary spare parts and accessories is as follows:
- Set of spanners and sockets;
- Jack for raising the front of the car;
- New valve cover gasket;
- Metal plates of different sizes;
- Lever with rod and lock for adjustment;
- Long pliers or large tweezers;
- Micrometer and data recording sheet.
The engine temperature during work should not be high, because there is a risk of severe pinching.