Adjusting engine valves allows you to reduce fuel consumption and optimize the efficiency of the power unit. You can do this work yourself using step-by-step instructions. In the VAZ-2109 model, adjustment is carried out by installing special washers.
- 2 When adjustment is necessary
- 3 Preparatory work
- 4 How to adjust: technology and setting procedure + table
4.1 Video: How to adjust valves on a VAZ 2109 with your own hands
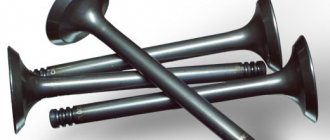
Valve location
In the VAZ-2109 model, the designers changed the previously familiar system with a camshaft chain drive. Despite the simplicity of the old design, it was noisy and required additional adjustments after a short period of time. In the nines, the shape of the upper part of the piston was changed, and special recesses were added for the valves. An important adjustment task is also to align the camshaft and crankshaft on the same axis so that they rotate together.
The intake and exhaust valves are located in a certain order, this should be taken into account when adjusting
Adjusting valves on engines of VAZ 2108, 2109, 21099 cars
The cause of a number of malfunctions in the operation of the engine of VAZ 2108, 2109, 21099 cars, along with a faulty or unadjusted carburetor, may be increased or decreased thermal clearances in the valve mechanism.
Such malfunctions include: - unstable operation of the engine at idle; — inability to adjust idle speed; — loss of power and throttle response (deterioration of vehicle dynamics); — “dips” when pressing the gas pedal; - “shots” into the carburetor.
To identify the true culprit of problems with the engine, let’s listen to how this same engine operates at idle. A sure sign of increased thermal clearances will be a clearly audible rattling sound under the valve cover. With reduced clearances, rattling will not be heard, but constant overheating of the engine, frequent claps in the muffler, and a noticeable decrease in power and throttle response are possible.
In any case, it is worth adjusting the valves. This normalizes the operation of both the gas distribution mechanism in particular and the engine as a whole. It is quite possible that the existing problems in its work will disappear, after such adjustment, by themselves.
Required Tools
— Device for adjusting valves with a lock
Or two screwdrivers if you don't have the tool. One should be long and powerful to push the pusher with the washer down, the second splined with a wide blade (at least 10 mm) to fix the pusher in the pressed position.
Device for adjusting car engine valves
— Set of flat probes
— Tweezers
— Socket wrench 17
— Set of adjusting washers
Not necessary, since the required size washers can be purchased separately after measuring the thermal gaps.
Washers of different sizes for adjusting engine valves
Preparatory work
Valve adjustment is carried out on a cold engine, so if your engine is currently warm, allow it to cool for at least 1 hour. — Remove the air filter housing. — Remove the throttle linkage bracket. — Remove the engine valve cover. — Remove the timing belt protective cover. — We make three more marks on the camshaft pulley. To do this, we count the number of teeth on it and divide it into four parts.
Additional marks on the camshaft pulley
— Align the installation mark on the camshaft pulley with the protrusion on the rear timing cover. The pistons of the first and fourth cylinders reach top dead center (TDC). — In the hatch on the clutch housing, make sure that the long mark (mark) on the flywheel is located opposite the middle of the triangular cutout of the ignition timing scale.
Mark on the flywheel of engine 2108, 21081. 21083
Before adjusting the valves on the engines of VAZ 2108, 2109, 21099 cars, it is necessary to check the thermal clearances in order to find out the general picture of the technical condition of the valve mechanism of this engine.
Measuring the thermal gap using a feeler gauge
Adjusting the thermal clearances of car engine valves
Let's consider, as an example, the adjustment of the third valve.
— Set the pulley to the position where the alignment marks coincide (top dead center)
Turn it 3-4 teeth (40-500) clockwise.
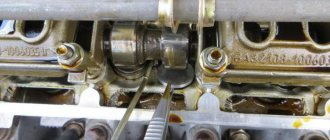
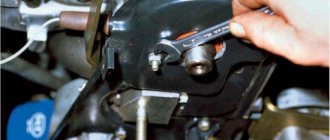
— Install the adjustment device on the block head
If it is not there, take two screwdrivers. We will use the long and powerful one as a lever, the smaller one will be splined to fix the pusher.
— Turn the pusher with the slot towards you (towards the radiator)
— We introduce the “fang” of the device between the cam and the pusher
— Press down the lever of the device and push the pusher down
Instead of a tool, you can use a long screwdriver. Resting it on the cam, we also recess the pusher.
— We install a clamp between the edge of the pusher and the camshaft that holds the pusher in the pressed position
If there is no latch, insert the blade of a slotted screwdriver flat. It is necessary that the latch sits exactly on the edge of the pusher and does not interfere with removing the adjusting washer.
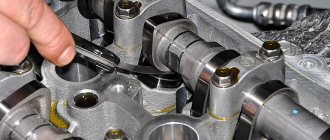
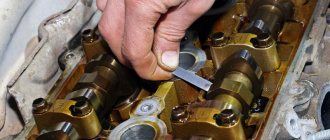
— Using tweezers, remove the adjusting washer through the slot in the pusher
Its surface may be marked with its thickness. If the marking is erased, you will have to measure its thickness with a micrometer, and if there is none, select a new one experimentally.
Adjustment of valves
Device and pusher, diagram
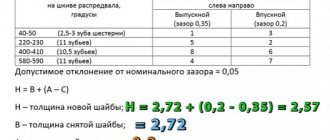
— We calculate the thickness of the new washer using the formula:
— for intake valves Z=Y+X-0.2 mm ;
— for exhaust valves Z=Y+X-0.35 mm ;
Z – design thickness of the new washer;
Y – thickness of the removed washer;
X – gap determined by the feeler gauge.
We select a new washer with a marking close to the design one (±0.05 mm).
— Install a new washer in the pusher, marking down
— Push the pusher down and remove the lock
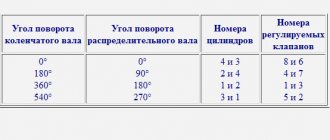
We adjust the remaining valves by turning the crankshaft at the angles indicated below in the notes. We remove the adjustment device, put back the valve cover and other removed parts.
Notes and additions
Adjusting the clearances at the first intake and third exhaust valves
Adjusting the clearances at the fifth (exhaust) and second (intake) valves
We adjust the gaps at the eighth (exhaust) and sixth (intake) valves
We adjust the gaps at the fourth exhaust and seventh (intake) valves
Twokarburators VK - More information on the topic in our VKontakte group, on Facebook Twokarburators FS and on Odnoklassniki - Twokarburators OK
More articles on VAZ 2108, 2109, 21099 cars
— Adjustment of the clutch drive on VAZ 2108, 2109, 21099 cars
— “Bleeding” brakes on VAZ 2108, 2109, 21099 cars
— Replacing the timing belt on VAZ 2108, 2109, 21099 cars
— Engine “troits”, reasons
— Measurement of compression in the cylinders of a carburetor engine
— How to dry out car engine valves?
When adjustment is necessary
Valve adjustment is required when problems occur with the engine or after passing a technical inspection. Experienced car owners can quite accurately determine the cause of a power unit malfunction; the main signs are the following:
- the appearance of a characteristic knocking sound when the engine is running;
- a sharp increase in fuel consumption;
- Unstable operation at idle.
Valve adjustment is also required after every 25-30 thousand kilometers . During this time, some parts wear out and structural gaps increase. Diagnostics can be done at a service center; this service is inexpensive.
Bottom line
As practice shows, there is no need to carry out repairs yourself. In this case, this can lead to the fact that even with savings, there is no likelihood that installing washers will lead to a positive result. A significant amount of effort and time will be spent.
Service center specialists will perform all work promptly. This will save you time and resources, and provide you with ideal conditions for operating the vehicle.
IMPORTANT! Be sure to keep in mind that the equipment is first diagnosed, after which the need to adjust the gaps is determined. Take advantage of this offer, which will guarantee you the best working conditions.
Preparatory work
From the adjustment tool you will need:
- set of wrenches;
- special device for adjustment;
- measuring probe;
- several adjusting washers;
- screwdriver;
- tweezers;
- valve cover gaskets.
Before starting the repair, set the car to the handbrake and engage any gear. One of the front wheels must be suspended so that the crankshaft can turn easily.
The procedure is as follows:
- Raise the hood.
- Disconnect all pipes from the cover.
- Remove the windshield wiper housing.
- We unscrew the spark plugs.
- Remove the front timing belt cover.
Tip: To monitor the current position of the piston, you need to use the viewing window.
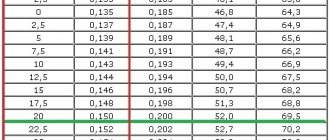
Table of nominal sizes of cylinders and pistons
| Size group | Engine model VAZ 2109 – 21099 | Engine model VAZ 2113 – 2115 | ||
| Cylinder diameter mm | Piston diameter mm | Cylinder diameter mm | Piston diameter mm | |
| A | 76,00 – 76,01 | 75,965 – 75,975 | 82,00 – 82,01 | 81,965 – 81,975 |
| B | 76,01 – 76,02 | 75,975 – 75,985 | 82,01 – 82,02 | 81,975 – 81,980 |
| C | 76,01 – 76,03 | 75,985 – 75,995 | 82,02 – 82,03 | 81,980 – 81,985 |
| D | 76,03 – 76,04 | 75,995 – 76,000 | 82,03 – 82,04 | 81,985 – 81,995 |
| E | 76,04 – 76,05 | 76,000 – 76,005 | 82,04 – 82,05 | 81,995 – 82,000 |
By weight, pistons are sorted into three groups: normal, increased and decreased by 5 g. These groups correspond to markings on the bottom of the piston: “G”, “+” and “-”.
All pistons on the engine must be of the same mass group. Repair size pistons are manufactured with an outer diameter increased by 0.4 and 0.8 mm.
An increase of 0.4 mm corresponds to a marking in the form of a triangle, and an increase of 0.8 mm corresponds to a marking in the form of a square. The arrow on the piston crown shows how to properly orient the piston when installing it into the cylinder. It should be directed towards the camshaft drive.
Which adjustment devices are best to choose?
Conventional tools are not suitable for precise and quick adjustments . Special devices are used with which you can fix the pusher and carry out other work. Today there are special adjustment kits on sale, their cost is low. Purchasing such a kit will be more profitable than trying to make devices from improvised means. Not everyone will be able to find suitable materials and make a dipstick or clamp correctly, and in case of poor-quality repairs, engine performance can become even worse.
Thermal clearance requirements
Functional requirements for thermal clearance include:
- Heat removal from the piston at the moment of ignition of the mixture . Otherwise, the piston will burn out under the temperature of the combustion chamber.
- Piston space sealing function . The resulting pressure should evenly press the rings against the cylinder walls. Achieving such touch requires setting the correct distance.
- Requirements for oil scraper discs responsible for supplying the required amount of lubricant. Compliance with this rule keeps oil and gasoline consumption at the level of factory standards.
Options
Set gaps on rings
The established gap should correspond to 0.6-0.3 mm, and the side gap between the wall should not exceed 0.08-0.04 mm.
The value comes from the fact that exhaust gases act on the rings from the inside of the groove, pressing them against the wall. The coordinated functioning of compression and oil scraper rings allows for complete combustion of the mixture. This depends on how they are placed in the piston groove.
Interaction of gas distribution mechanism parts
The camshaft, rotating, presses the cams onto the adjusting washers, which are located in the pushers mounted on the ends of the valve stem. Thereby pushing the parts whose caps are located in the valve seats. The seats and caps are very precisely ground to each other, this is done so that at the moment when the cap of the part is completely seated, a hermetically sealed connection is formed into the saddle. The channel is completely blocked.
This is why the engine runs stably and produces the required power, saving fuel. As the engine operates, the working surface of the cams wears out, they lose their dimensions, and the gaps increase.
Because of this, the caps do not fully adhere to their saddles, as a result of which the tightness of the saddle-cap connection is lost. In order to restore this tightness, adjustment of the VAZ valve clearances is required. For this purpose, adjusting washers are used. These washers themselves are round in shape and the circumference diameter is the same as that of the pusher (pos. A in the figure above). The photo below shows some examples of these round washers:
Here are eight washers of different thicknesses. The thickness is written on the washer itself in millimeters. Valve clearances are adjusted by selecting washers of the required thickness. Sometimes you have to change these washers several times, each time inserting a washer of a different thickness, until the valve clearance reaches the desired size.
They are usually sold in sets starting from a thickness of 3mm, the next size is 3.05mm. And so on every 0.05mm, up to a size of 5mm.
Adjustment features and dimensions
The main condition in this matter is that the engine must be cold. Those. its temperature should be no more than 20 degrees Celsius.
We will carry out further actions by looking at the figure below. For ease of operation, it is better to unscrew the spark plugs! This will make it easier to operate all the mechanisms and shafts involved in this process, since there will be no compression. Turn the crankshaft so that the mark on the camshaft pulley coincides with the mark on the rear cover of the gear shaft (tendril).
We must immediately examine the remaining marks in the crankshaft area. They should be located exactly as shown in the figure. This means that the piston of the first cylinder is in the TDC position. Next, you need to turn the crankshaft by about forty to fifty degrees, this is necessary so that the camshaft cams turn from the pushers.
On the intake valves the gap is set to 0.20mm (+-0.05mm), and on the exhaust valves 0.35mm (+-0.05mm)…
Using feeler gauges, you need to measure the gaps of the 1st, 2nd, 3rd and 5th valves. The gaps on the 2nd and 3rd valves should be (0.2+-0.05mm.). On the 1st and 5th valves the gap should be (0.35+-0.05mm). If some gaps do not correspond to the standard, then they are brought to the required dimensions by replacing the adjusting washers, selecting them until the goal is achieved.
After this, you need to rotate the crankshaft 360 degrees, i.e. one full turn and check the clearances on the 4th, 6th, 7th and 8th valves. On the 4th and 8th cylinders the gap should be (0.35+-0.05mm). On the 6th and 7th cylinders, the clearance should be (0.2+-0.05mm). Well, accordingly, if there are incorrect gaps, we correct them in the same way as the first time.
EPILOGUE
We did the job right. We install the parts that we removed in reverse order. We start the engine. We listen with pleasure to the whisper of a working engine, get into the car and do a test drive, changing driving modes. Let's make sure that the engine runs smoothly and the adjusted valves of the VAZ 2109 do not knock.