Misregulation and consequences
When the thermal clearance of the valve changes during long-term operation or when individual elements of the system break down, the efficiency of the engine and the service life of the parts are significantly reduced. This is also accompanied by increased fuel consumption and a characteristic knocking noise in the engine compartment. If, for example, the gap is larger than normal, the element cannot open completely, and this contributes to a drop in power characteristics. Burning of the valve and its seat is possible if the gap is very small. In any case, these faults have a bad effect on the engine's response when you press the accelerator pedal.
Different timing belt designs
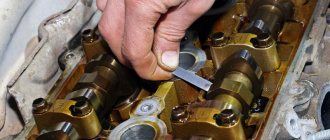
More modern design. When the camshaft lobes press on the tappet cup. And that, in turn, goes to the valve. This design is used on VAZ 2108-10 cars. Valve clearances are adjusted using special calibrated washers. They have different sizes. They are selected depending on the size of the thermal gap between the cup and the camshaft cam.
The most modern system includes the use of hydraulic compensators as pushers. Adjustment of valve clearances is not required with this design. The hydraulic compensator is located between the camshaft cam and the valve. When the engine is running, oil under pressure is supplied to the compensator cavity. The cavity expands under oil pressure. And the gaps are completely removed. When the cam is pressed on the compensator. He starts moving. The oil pressure supply channel is blocked. Oil enters a confined space. And it prevents the internal cavity of the compensator from shrinking. As a result, the force from the cam is transferred to the valve. As you can see, thermal gaps are removed immediately. After the oil pressure expanded the compensator cavity. And the movement of the cams is transmitted to the valve without gaps.
If you hear valve knocking. This means that when the valve is pressed on the compensator, oil comes out of the compensator. Through the outer surface of the compensator and the block head housing. That is, the compensator seat is worn out and allows a breakthrough in oil pressure. Or the piston is jammed in the compensator cavity. And the Expansion does not happen.
In the case when mechanical transmission of pressure from the camshaft cam to the valve is used. Constant adjustment of the thermal clearances of the valves is required.
Gap function
There are at least 2 valves in a car engine cylinder (maybe more depending on the car model). Through the inlet valve the combustible mixture enters the cylinder, and through the outlet valve the gases are removed. The part is driven by a gas distribution mechanism.
During operation, the motor heats up, resulting in expansion of all its elements. Therefore, when the motor is not running (in a cold state), there must be a gap between some parts sufficient for thermal expansion of the metal.
Adjustment with washers
In cases where adjustment should be carried out not with a screw, but with a washer, which is typical for most front-wheel drive cars, the operations are similar to adjusting VAZ valves. Those. the crankshaft is rotated until the marks coincide. The gap is selected using a washer with the appropriate marking.
Depending on the need to increase or decrease the gap, a washer of a certain size is selected. If there is no marking, then a caliper or micrometer is used.
How should the elements work?
The operation of a 4-stroke engine includes 4 cycles.
Each cycle has its own purpose:
- Intake - the intake valve opens and the fuel mixture is supplied to the cylinder.
- Compression - the valves are closed, the fuel mixture is compressed.
- Power stroke - the valves are closed, the burning mixture expands, its energy is directed to move the pistons.
- Exhaust - the exhaust valve opens, exhaust gases are removed.
For the motor to operate efficiently, the clearances must be properly adjusted.
The importance of adjusting engine valve clearances
After the start, the engine and all its parts begin to heat up, and therefore expand. At the same time, we should not forget about the natural wear and tear of rubbing and contacting parts. This necessitates strictly defined gaps between certain components. And the thermal valve clearances (between the camshaft cam and the valve stem) are among the most important.
If the gap is too small, the engine will not be able to fully realize its potential, which will immediately affect the dynamic and speed characteristics of the car. At the same time, the exhaust valves will overheat and their edges will melt.
If the gap is larger than required, the car owner will be alerted to the characteristic “clatter” of the engine, which can sometimes go away as the car warms up. With increased clearance, the camshaft lobe begins to "knock" against the rocker of the valve stem instead of pushing through it.
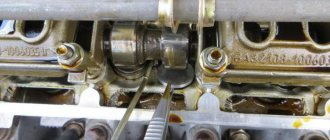
Valve mechanism in section using the example of an engine with two camshafts
The need to adjust the valves is ripe if the following signs are visible:
- there is an extraneous, slightly ringing sound in the area of the cylinder head cover;
- the gas distribution mechanism was repaired;
- the last adjustment of the valve thermal clearances was carried out more than 20 thousand km ago;
- engine output has dropped noticeably;
- As a consequence, high fuel consumption is possible.
Most modern engines use hydraulic compensators to adjust thermal clearances. It is convenient and does not require third-party intervention, although there is an opinion that components still wear out a little faster. The engines of many cars, in particular VAZ classics, require manual adjustment of thermal clearances. Some people consider this a simple matter, others, on the contrary, consider it a responsible and serious job. It all depends on experience, variations of techniques, dexterity and patience. It is recommended to carry out work after approximately 20 thousand km since the last adjustment.
Also, there is not much difference whether you have to deal with a gasoline or diesel engine. There are no significant or fundamental differences in the valve adjustment process.
It’s even better to combine adjusting the valve clearance with changing the engine oil. And exactly in this sequence. This will allow dirt, dust and sand that may get into the engine during adjustment to then leave along with the old oil and oil filter.
Frequency of valve adjustment on VAZ-2115
Many experts recommend adjusting valves at intervals of at least 20 thousand. km at frequent maximum engine load.
But often, for various reasons, they need to be configured much earlier.
This quantity is mainly due to the quality of domestic spare parts, which wear out quite quickly even under ideal operating conditions.
A metallic knocking sound at the top of a running engine, much like the sound of a sewing machine, will indicate increased clearance between the camshaft lobe and the valve lifter. This leads to increased wear on the installed shim or camshaft cam. If this noise occurs, adjust the valves as soon as possible to avoid serious problems.
Much also depends on the quality of the engine oil, which significantly affects the wear of transmission components.
The use of high-quality oil ensures good lubrication of parts, thereby significantly extending the life of the camshaft and other engine components. In this case, the need to adjust the valves appears after driving 30-35 thousand. km and it may be necessary to measure only the valve tappet clearance indicators.
The use of high-quality oil ensures good lubrication of parts, which significantly extends the service life of the camshaft and other engine components. In this case, the need to adjust the valves arises after driving 30-35 thousand kilometers. km, and it may be necessary to measure only the valve clearance parameters of the pushrods.
Why are valve clearances necessary?
Answering the question why engine clearances are needed, it can be noted that for normal operation of the motor, the thermal gap is quite important. Due to it, the closing and opening times of the valves are observed, and the preservation of the optimal level of tightness when closed is ensured.
If the gaps are set in accordance with the rules, after warming up their parameters are reduced to minimum values. This ensures regulation of gas distribution phases and long service life of parts.
During the operation of the car, the gap changes up or down. Depending on such deviations, certain problems appear. In most cases, this leads to a decrease in the service life of the valves, a decrease in the engine power level, the filling of the cylinders with the fuel and air mixture becomes worse, the overall combustion efficiency decreases, and so on. It is for this reason that it is so important to adjust the gaps from time to time.
It is necessary to check and, if necessary, adjust the gaps every 20 - 30 thousand kilometers. You need to rely on the standards prescribed in the repair manual for a car of a particular brand.
Why do you need an engine break-in after a major overhaul?
Engine overhaul violates the established unity of the “used” elements. Boring the cylinder block and installing new elements of the piston group changes the original data of the car. Quite often, the power is reduced by almost half of that specified by the designers.
To return to its original characteristics, the power plant needs to undergo a break-in regime. Such engine running-in at the end of a major overhaul is in most cases carried out for a specified operating time or mileage.
Engine operation after completion of overhaul
On average, engine break-in for modern cars occurs from 2 to 3 thousand kilometers. Complete grinding-in does not occur during this period, but it becomes possible to operate the machine in more aggressive modes, with an increased load.
The car reaches its own operating parameters after 10-15 thousand kilometers.
While the engine is running in at the end of the overhaul, the heating of the rubbing elements increases during the grinding-in process. As a result, force loads on the motor are undesirable, and it is recommended not to raise the speed above 60% of its maximum level during standard operation.
The power plant, after incorrect running-in, can lose up to 70% of the calculated parameter in power.
If the car is used correctly, all parameters will soon return to the planned ones.
The purpose of running a car
The machined surface of the engine cylinders and newly installed repair units has depressions and protrusions, and from time to time sharpened marks from the work of the cutter, which were not removed by honing. The task of running-in is to smooth out such shortcomings. Due to this, friction is significantly reduced and the load on all working components is reduced.
Engine assembly for break-in
The conclusion that running in a new engine due to the installation of new components in the engine does not make sense is erroneous.
Valve clearance adjuster
A more effective and efficient way to adjust the valve mechanisms of the power unit is to adjust them using a device, which is a special rail with an indicator attached to it. This adjustment is much more accurate manually, since when using the device, it detects and takes into account all defects on the surface of the adjustable parts.
For mechanical adjustment, in addition to dismantling the cylinder head cover, you will additionally have to remove the accelerator drive, the protective shield on the ignition distributor, the exhaust hose from the crankcase, and for carburetor cars, the carburetor “pan”.
Using a special wrench, you need to rotate the crankshaft until the marks on the camshaft sprocket align (this is described above). To make this process easier, you can use a bright marker to mark the camshaft sprocket every 90 degrees. After that, we install the device rail on the valve being tested and fix it in a stationary state. We put an indicator on it and place its foot on the edge of the adjustable valve. To correctly perform this procedure, you will need a special grip, with which you need to clamp the cam and pull it up (a simple wrench will do). As a result, the indicator readings should deviate by 52 divisions. If they are slightly too low or too high, the valve needs to be adjusted. And then everything is extremely simple:
- using a 17mm wrench, loosen the locknut on the adjusting screw;
- the gap is adjusted with a key of 13, and all readings are clearly reflected on the indicator scale;
- the adjustment is checked and the locknut is tightened;
- At the end of the stage, it is again necessary to check the correct settings of the valve mechanism.
As you can see, this adjustment is much more accurate and simpler. But we should not forget that a highly qualified specialist will perform it at a high level and using a standard set of probes. In conclusion, it is worth emphasizing that most sets of feeler gauges contain an adjustment diagram that contains data on the angles of rotation of the camshaft and crankshaft, indicating the numbers of cylinders and valves.
Valve adjustment - signs of need and implementation
I propose to discuss all possible issues related to adjusting valve clearances on our engines. Like a considerable number of Sunny drivers, at one time I had (and still have in my homeland) a classic Lada. As relevant as it is to talk about IAC on a sled, the phenomenon of valve adjustment on a classic is as relevant. The procedure itself is quite simple, the result can be heard by anyone: you overtightened it somewhere and at low speeds when you start moving, you can hear a popping sound, but you didn’t tighten it enough - the knocking of the valves is clearly audible. On the car the signature is a little different. When it’s cold, if I start moving and the speed drops below idle (let it be 500), the beeping of one of the cylinders is clearly audible, until it warms up and the ringing of one or a pair of valves is heard. After warming up, the noise at low speeds is no longer heard, and the valve ringing weakens. Mileage 57,000. Anyone who has encountered problems with the valves - I'm looking for advice.
Shall we make an appointment with you for an adjustment? I have some sound, but it is below the HF frequency. Somewhere in the distributor area. Is there any way to remove it?
Even when you start it, you can clearly hear the valve for a second somewhere. The oil filter is original! What could be the reason?
Nissan Primera Wagon 2001 2.0 CVT QR20DE
I saw a conversation somewhere that you can use washers for zhyg. Based on the adjustment procedure, I realized that you need to have a set of washers, but they are not cheap and are sold for each size separately. It will be expensive to take all sizes at once.
Posted by Shuhernoy
I saw a conversation somewhere that you can use washers for zhyg. Based on the adjustment procedure, I realized that you need to have a set of washers, but they are not cheap and are sold for each size separately. It will be expensive to take all sizes at once.
why washers? I always adjusted it on the 5 with a 0.15 feeler gauge. costs like 40 rubles :)))
How to ensure the required clearance
The required clearance can only be obtained through properly carried out adjustment work. When carrying out this process, the main gas distribution mechanism is adjusted, especially the gap located between the camshaft cams and the valve lever.
There are special instructions on how to make the adjustment. It is not enough to ensure that the valves are pressed more tightly, since as the temperature rises, all parts become larger in size. Such an expansion automatically leads to various negative consequences.
The intake and exhaust valves should close the seat tightly, but with a small gap. It is necessary to ensure that the valve stem does not rest rigidly on the top of the device.
In the process of self-regulating gaps, you need to strive for strictly established values. They should not be more than 0.15 mm. The maximum permissible error level is 0.05 mm. These parameters should be checked only with a cold engine.
By ensuring the correct clearances during the adjustment process, the driver will receive stable engine operation, significant fuel savings, and increased service life.
What are the consequences of poor valve adjustment? Adjusting gas valves 402
But there is one nuance in this process, since adjusting washers usually have to be ordered, you should first simply measure the gaps in all valves, and only based on the data obtained, order washers of the required size. They also easily compress when impacted, and also stubbornly continue to strive in all directions equally, obeying Pascal’s law, which means they are not in a hurry to move to where they are asked.
| Manufacturer | vendor code | Name |
| AJUSA | 85000100 | Hydraulic compensator |
| AJUSA | 85000500 | Hydraulic compensator |
| AJUSA | 85001100 | Hydraulic compensator |
| AJUSA | 85001800 | Hydraulic compensator |
| AJUSA | 85002200 | Hydraulic compensator |
| AJUSA | 85003600 | Hydraulic compensator |
| AJUSA | 85004400 | Hydraulic compensator |
| AJUSA | 85008600 | Hydraulic compensator |
| AJUSA | 85009700 | Hydraulic compensator |
| AJUSA | 85014200 | Hydraulic compensator |
When to adjust valves
If your engine does not have devices to maintain the required clearance automatically, then you need to be prepared for the fact that every 30-35 thousand km. the indicated gaps must be checked.
Let us add that many car enthusiasts, especially owners of domestic VAZ models, determine the need for adjustment based on the appearance of noise during operation of the valve mechanism.
On foreign-made cars, the need to adjust the valves may arise after 60-80 or even 100 thousand km. mileage, since the engines have a longer service life and the set gaps on such internal combustion engines remain more stable.
Signs and consequences of improper clearance
After starting the engine, it itself and all its parts begin to heat up significantly and automatically expand. It is also worth taking into account the natural wear and tear of the elements in contact with each other. All this is the basis for ensuring strictly established gaps between certain parts. Deviations from the norm can lead to certain problems. The list of them depends on which direction the gaps have changed - more or less.
Gap too big
If the gap is larger than the required size, the driver will begin to hear the characteristic clatter of the engine, which gradually goes away as the car warms up. With increased clearance, the camshaft fist does not push through the rocker of the valve stem, but simply begins to knock on it.
Such long-term shock load leads to such unpleasant consequences as:
- significant reduction in valve life;
- riveting;
- chipping of the end, which further increases the gap;
- increased noise during engine operation.
At the same time, engine power decreases due to serious disruption of gas distribution processes.
Gap too small
With a very small gap, the car engine will not be able to fully realize its functionality. This will automatically affect the overall speed and dynamic characteristics of the vehicle. At the same time, there will be significant overheating of all exhaust valves with melting of their edges. Among the main consequences of a reduced gap size are the following factors, based on the loss of combustion chamber tightness:
- Reducing compression due to the release of the air-fuel mixture.
- During the working stroke, exhaust and hot gases break through and lead to severe burnout of the valves.
- The plates no longer touch the seats, which disrupts heat transfer.
- The valves are heated to temperatures that significantly increase corrosion and oxidation.
- Increased load on timing belts.
Based on everything said above, we can conclude that adjusting the gaps must be done without fail. The process must be carried out if the following signs are present:
The engines of modern cars are designed in such a way that thermal clearances must be adjusted manually. For some it may seem simple, while others consider this process serious and responsible. It all depends on the driver’s experience, the availability of certain skills and tools. Moreover, there is no difference between diesel and gasoline engines. The adjustment process is carried out here according to the same scheme.
Why is adjustment necessary?
Correctly adjusted clearances decrease after the engine warms up, providing precise adjustment of valve timing, which contributes to a long service life of the parts. As operation progresses, the depth of valve subsidence in the seats increases, the rocker arms and the cams themselves wear out, which means that the valve timing is disrupted and wear increases.
Large gaps lead to the appearance of extraneous noise during operation of the internal combustion engine and, if they are not brought back to normal in time, they will continue to increase, which will negatively affect the condition of the components and parts of the power unit, for example, valves or pushers may be damaged.
The opposite situation is even more dangerous, when there are no gaps or are critically small. In these cases, serious interruptions in the operation of the internal combustion engine occur with the possible occurrence of malfunctions, such as broken parts. If there are no gaps, the valves are not completely closed, the fuel mixture does not burn completely, and hot gases break into the resulting space, damaging the parts. These processes are irreversible. Even if you adjust the gaps after this, sooner or later a major overhaul is inevitable.
All malfunctions that may arise due to incorrect clearances can be summarized in a table.
Table of gaps and faults
Gap size Consequences Large gaps - reduced service life of parts; – riveting; – appearance of chips at the ends; – damage to the pushers. Small gaps or their absence - burnt valves; – depressurization of cylinders; – damage to the plates; – increased loads on the timing belt; – activation of corrosion and oxidation processes.
Operating principle of internal combustion engine timing valves
An ordinary ordinary driver, when it is necessary to adjust the valves, does not do it himself, but goes to a car service center. Because this requires certain skills and time. To teach yourself how to adjust valve clearances, you need to know the principle of their operation. An internal combustion engine has two shafts: the crankshaft (crankshaft) and the camshaft (camshaft). They are connected to each other through pulleys and a belt, through sprockets and a chain. The most common option is a timing belt driven engine. The crankshaft to camshaft transmission ratio is 2:1 (two to one).
The cams have a special irregular smooth shape that closes and opens the valves so that they correspond to the position of the crankshaft and camshaft, the engine stroke and valve timing.
When the internal combustion engine is running, it heats up accordingly, its parts heat up and expand due to high temperature. Because of this, the distance between the camshaft and the valve tappet changes slightly.
Question: why does the engine run differently when cold and when hot? Answer: because when the engine warms up to operating temperature, the valve tappet is pressed tightly against the valve and camshaft. This ensures efficient operation of the internal combustion engine.
And, if the valve end stops above the pusher, then a gap appears between the seat and the plate, and this leads to a decrease in compression in the cylinder.
It’s easy to check the compression: turn off the engine, unscrew the spark plug, screw in a special pressure gauge instead, turn the ignition key, get out and see what pressure the pressure gauge of a given cylinder shows.
And, if the end of a closed valve is located below the pusher, then during a certain valve timing phase, the valve will not open to the full distance it should. And this leads to a loss of power due to the slow removal of exhaust gases.
How often are adjustments made?
If we talk about mileage, then it is 20-30 thousand km. Adjustment of the thermal clearances of the valves should be carried out even if you do not experience a loss of power, increased fuel consumption and black smoke from the muffler (you should not wait for the first symptoms to appear). It is best to carry out the procedure in a car service center, but if you have the appropriate tools, equipment and experience, this can also be done in your garage.
The design of a four-stroke internal combustion engine is, in principle, quite simple and understandable. The air-fuel mixture from the intake manifold enters the combustion chamber through the intake valves. Then, the valves close and the process of compressing the mixture begins, which occurs due to the upward movement of the piston.
Further, at a certain moment, approximately near the top dead center of the cylinder, the mixture is ignited, which is carried out by the spark plug. Obeying the laws of physics, the mixture expands under the influence of temperature and pushes the piston back down, converting thermal energy into mechanical energy. The last stroke of the piston is the release of exhaust gases into the exhaust system through the opened exhaust valves.
In this description, there was twice a mention of valves, inlet and outlet, which require periodic adjustment of the so-called thermal clearances. Let's see together what it is and why it is needed.
So, the thermal gap is a special gap left between the camshaft cam (or rocker arm) and the valve stem. Its necessity is very simple - when the engine heats up, the metal, obeying the same physics, begins to expand, and the valve (more precisely, its stem) lengthens. The gap is designed to level out this expansion.
Everything seems to be simple and clear again. However, over time, approximately every 40,000 km, the valve clearances “go away” and become (as a rule) larger than required. In this case, they need to be adjusted and returned to the original value, because the resulting excessive gap will lead to wear on the rocker arm or camshaft cam, since an impact load will appear on them.
Let me explain. In a normal situation, when the thermal clearance is within normal limits, the rocker arm (or cam) is in constant contact with the valve stem. The stem, with a correctly adjusted gap, adheres to the rocker arm or cam when heated. However, if the gap is increased, there is a loss of contact when the rocker arm (cam) is removed and, conversely, a shock at the moment of contact. This state of affairs will quickly break either the cam or the rocker arm, which will ultimately lead to expensive repairs (although, let's be realistic, few people actually make such repairs). Without it (repair), the engine will rumble when cold and run noisily when warm.
Preparatory work
So, the engine is cooled down, and the car itself is placed on a flat surface and immobilized. You can start working:
- Remove the carburetor air filter cover and remove the filter;
- We unscrew the filter mounting bolts and remove it, having first disconnected the pipes going to it;
- We remove the cable for manual control of the air damper (choke) and disconnect the throttle linkage;
- Unscrew the bolts securing the valve cover and dismantle it;
- Check the chain tension (it must be normal, otherwise you will have to adjust the tension first);
- Remove the distributor cap.
Now you need to set the TDC of the piston in the 4th cylinder and the marks on the knees will help with this. camshaft drive shaft and cover. shaft, as well as on the camshaft gear and its cover.
To do this, you can use a key of appropriate size, which you need to rotate the knees. shaft for the drive pulley bolt. Or use one of the drive wheels. To do this, you need to hang it with a jack, engage 4th gear and slowly turn the raised wheel. In this case, the transmission will ensure rotation of the crankshaft. But with the second method, you will need an assistant, since it will be difficult to check the coincidence of the marks.
What are valve clearances for?
In order for the engine to work at its best and develop all its performance characteristics to the maximum, the valves must move clearly and synchronously. The valves should fit tightly into their seats and open to the maximum.
With correctly set valve clearances, a hot engine works almost the same as a cold one, that is, the loss of power is minimal.
When the car is used a lot, for example, working in a taxi around the clock, the valves quickly lose their settings. Many people have probably heard, they say that the valves are knocking. This is just the time to adjust the valves.
Advice from auto experts: It is necessary to check and adjust the valves every 25 thousand kilometers of actual mileage. Of course, there are many modifications and brands of engines. It would be better to read the operating manual for the specific engine. Maybe there's no need to adjust at all.
What happens if there are small valve clearances? – Adjustment with feeler gauge
More precise adjustment of the VAZ 2107 valves is achieved on a cold engine, but in the summer, as a rule, the engine cools down for a very long time, or if there is not enough time, then this operation can be performed with a feeler gauge at 0. In general terms, the design of the gas distribution mechanism and the procedure for adjusting the valve clearance on diesel engine is the same as on a gasoline engine.
| Manufacturer | Detail number* | Part name |
| CTR | CEKD16L | |
| CTR | CEKD16R | Steering end for CHEVROLET LACCETTI |
| CTR | CEM14 | Steering end for MITSUBISHI SPACE STAR |
| DELPHI | Steering rod for MERCEDES-BENZ 190 | |
| DELPHI | Right steering wheel end for OPEL, VAUXHALL | |
| DELPHI | Tie rod for VW Passat | |
| DELPHI | Steering rod for SEAT, VW | |
| DELPHI | Tie rod end for BMW 3, Z3 | |
| DELPHI | Tie Rod End for PEUGEOT 306 | |
| DELPHI | Steering rod for VOLVO | |
| DELPHI | Tie rod for CITROEN, PEUGEOT | |
| DELPHI | Tie rod for FORD TRANSIT | |
| DELPHI | Tie rod for VOLVO | |
| DELPHI | Tie rod for FORD MONDEO | |
| DELPHI | Tie rod FORD ESCORT, ORION, VERONA | |
| DELPHI | Tie rod FORD COURIER, FIESTA, KA | |
| DELPHI | Front tie rod end for OPEL, SAAB, VAUXHALL | |
| DELPHI | Tie rod VOLVO 440, 460, 480 | |
| DELPHI |
Sequence for adjusting engine valve clearances
Before making adjustments, set the cylinder piston to TDC (top dead center) on the compression stroke. In this position, both valves of the adjustable cylinder must be closed, and the rocker arms of these valves must swing freely within the clearance.
After this, slowly loosen the locknut on the adjusting screw or bolt. Use a feeler gauge and adjusting screw to adjust the required clearance, then tighten the locknut.
“Be careful not to change the set clearance when tightening the locknut.”
After tightening the locknut, the thermal clearance must be checked again. Use a feeler gauge to check the gap. The feeler gauge should fit into it with little effort; if this feeling does not occur, but it passes very easily or very hard, you need to adjust the gap again.
To adjust the thermal clearance in the remaining valves, it is necessary to turn the crankshaft half a turn. During adjustment, the operating order of the engine cylinders (1-3-4-2) should be taken into account. Turn the crankshaft by the bolt securing the generator drive pulley.
Screw adjustment procedure
In order to explain how valves are adjusted, you can turn to the classics and consider adjusting the valves of the VAZ2107.
Typically, the need to regulate valves arises when there is a sharp drop in the power of the internal combustion engine and the appearance of characteristic metallic knocks at low or high speeds. Allow the engine to cool before starting the activity. All work must be carried out on a cold internal combustion engine. The valves in the power unit of this model are opened by transmitting pressure to the lever rod, which is moved by the camshaft's eccentric cam. The gap that is subject to regulation is the gap formed between the cam in the place opposite the eccentric and the lever itself.
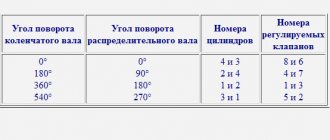
When carrying out work, follow the table.
Direct adjustment begins with setting the piston of the fourth cylinder to TDC. This is a state of compression. At this point both valves are closed. Then the crankshaft is rotated until the mark on the sprocket meets the mark on the body. For control, a 0.15mm probe and two keys are used - 13 and 17.
Work order:
– the probe is inserted into the space between the cam and valve lever No. 6 in turn; – if it is inserted with force, then this is normal; – if it dangles or, on the contrary, gets stuck or it is impossible to push it in at all, then adjustment is required; – decreasing or increasing the size of the gap is carried out by fixing the adjusting bolt, releasing the lock nut and turning the bolt. In this way, valves No. 6 and 8 will be adjusted.
The same manipulations are carried out for each valve by turning the crankshaft each time at an angle of 180° from the previous point, which corresponds to turning the camshaft by 90°. At each such turn, the following valves are measured and, if necessary, adjusted:
– 180° – №№4, 7; – 360° – №№1, 3; – 540° – №№5,2.
The regulation procedure is observed in strict sequence. If it is violated, then all settings of the gas distribution system will be lost. If you have sufficient skills, adjusting the valves yourself does not cause any difficulties. The issue price is 0 rubles.
Adjustment of valves
First of all, on a carburetor car we remove the carburetor and air filter, and on an injection car only the pipes, which will prevent you from removing the valve cover.
Then we unscrew all the nuts around the perimeter by 10 using a socket wrench, be sure to collect the washers in containers so as not to lose them, since they are quite specific. Of course, you can later purchase them in the store, but this can significantly delay the work process.
Now we take a crooked starter or key, then rotate the crankshaft clockwise until the mark on the pulley coincides with the last ebb on the front cover along the way. With this action we set the pistons of the first and fourth cylinders to top dead center. It is at this very moment that the valves in these cylinders should be completely closed; accordingly, it is in this position that the adjustment is carried out.
The VAZ 2106 engine works according to the 1-3-4-2 scheme. That is, when the pistons of the first and fourth cylinders are at top dead centers, the pistons of the third and second are at the bottom.
So, after we have aligned the pistons as needed, we proceed to adjusting the valves. We can determine the ones we need by simply shaking the rocker arms - a light tapping sound will be heard. We need valves 8 and 6, counting from the front of the car.
To adjust, insert a feeler gauge between the camshaft cam and the rocker arm. If the probe enters with tension and comes out the same way, then nothing needs to be adjusted. If it passes easily, then you need to unscrew the locknut and unscrew the adjusting bolt. At this time, while we are unscrewing, we fidget with the feeler gauge to find the optimal position.
Once it is determined, tighten the locknut. It is very important to ensure that the adjusting screw does not turn even a degree. In any case, we need to check. To do this, we fidget with the probe again. If this is not possible, or vice versa, the probe moves without effort, repeat the procedure.
At this moment, if you look at the camshaft gear, the mark on it coincides with the cast on the camshaft housing. So, this is the best guide, because the crankshaft will need to be turned exactly 180 degrees, while the camshaft will turn 90 degrees. We adjust valves 4 and 7. Next, we turn the crankshaft again and adjust the valves in accordance with the table.
There is no point in discussing the assembly. The only thing worth paying attention to is the flatness of the valve cover plate. Over time, it is pushed through by washers, so it requires editing. If indentations are visible in the tightening areas, then it must be corrected on an anvil.
Which engines need valve adjustment and when?
It should be noted that not all internal combustion engines require periodic valve adjustment. The fact is that now in many modern internal combustion engines that are equipped with passenger cars, so-called hydraulic compensators are installed in the systems of their gas distribution mechanisms. These devices independently adjust the gaps in real time, and therefore their value is always optimal.
If the vehicle engine does not have hydraulic compensators, then the valves must be adjusted manually. It’s quite easy to know that it’s time to do this by looking at some of the symptoms. One of them is the characteristic “clicking” of the valves, which was already mentioned above, and the other is that the engine begins to “trouble,” and compression in its cylinders either drops significantly or completely disappears. As soon as at least one of these symptoms appears, it is necessary to check the size of the gaps in the valve mechanism.
This should also be done without waiting for “alarm bells”, as part of routine vehicle maintenance activities. The frequency of checking valve clearances is indicated in the technical documentation for each vehicle, and, as a rule, is once every 25,000 - 30,000 kilometers. It is usually carried out at service stations, but, with certain skills, you can check the valve clearances yourself.
If you set the valve clearances incorrectly
After 5-10 minutes of operation, the motor reaches operating temperature (this is about 90-100 degrees). According to the law of physics, all parts begin to expand. Engine wear will vary depending on whether the valve clearances are too large or too small.
Gap too big
If the gap is larger than the nominal one, the sound of the engine will be different. As the engine gradually warms up, this unusual sound (clunking) will disappear.
If the valve clearance is large, then the camshaft fist does not press on the valve drain rocker, but knocks on it.
If the engine runs in this mode for a long time, then:
- valve service life is reduced;
- the end of the valve stem may break off;
- riveting;
- there will be an increased noise level of the internal combustion engine.
Since the gas distribution phases are disrupted, engine power may drop by half.
Gap too small
In this case, the valve does not open completely, the exhaust gases do not have time to escape completely, hence the loss of engine power. Valve plates will burn out due to increased overheating.
Consequences of low valve clearance:
- Low compression in cylinders.
- The exhaust gases do not have time to escape through the small gap and the edges of the valves burn out.
- The valve plates do not fit tightly into their seats.
- High load on the timing belt or chain drive.
It is necessary to adjust the valve clearances as soon as possible if the following symptoms appear:
- A ringing sound appeared in the upper part of the cylinder head (cylinder head).
- If the timing belt has been repaired.
- If you have driven more than 25,000 km since the last adjustment.
- If the engine does not pull. Neither uphill nor in a straight line.
- If gasoline consumption has increased.
After how many km do you need to adjust the VAZ-2114 valves: photo, video
Before answering the question of what valve adjustment is, you must first find out what the valves of internal combustion engines are, where they are located, and what functions they are assigned to perform.
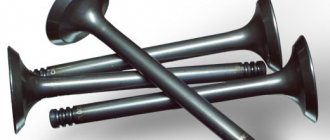
Structurally, these important parts of modern engines are cylindrical “plates” with fairly long rods. They are installed in the cylinder block, and there are at least two for each of them. When the valves are closed, they are adjacent to seats, which are made of steel and pressed into the cylinder head (cylinder head). Since during operation these parts experience significant mechanical and thermal loads, they are made of special steels that are resistant to such influences. Valves are components of automobile gas distribution mechanisms (GRM), which are often called valve parts. They are divided into inlet and outlet. The function of the former is, as you might guess from the name itself, the admission of a combustible mixture into the cylinders, and the latter is the release of exhaust gases from them. During engine operation, the valves expand, their rods lengthen, and accordingly, the size of the gaps that should be between their ends and the pusher cams (in engines of older designs - rocker arms) change. During the operation of the internal combustion engine, the size of these deviations increases, and it is when they begin to exceed the maximum permissible values that the valves should be adjusted. It consists of bringing the gaps back to normal.
If the valves are not periodically adjusted, this can lead to very unhappy consequences. In the case where the gap is too small, “burning” will inevitably occur. This means that a fairly dense layer of combustion products of the fuel mixture will form on the surfaces of the valves. Because of it, the normal operation of the gas distribution system, and, consequently, the engine as a whole is disrupted. In addition, this deposit is quite difficult to remove.
In cases where the gap is excessively large, the valves do not open fully, and therefore engine power drops significantly. In addition, they begin to “knock”, and experienced drivers hear this knock even while in the cabin while driving their car. It goes without saying that increased valve clearances affect the operation of an internal combustion engine no less negatively than excessively small ones.
Adjusting the thermal clearances of the valve mechanism
Let's start with the fact that although different engines may have certain differences, the general principles of gap adjustment are similar for the vast majority of engines.
- The first nuance is that adjustments must be made at the internal combustion engine temperature specified for a specific engine type in the maintenance and repair manual. The average is about 20°C. This requirement must be carefully observed by those who do not have sufficient experience and strive to achieve maximum measurement accuracy. As for a qualified craftsman, it is no secret to a specialist that at a higher temperature of the unit, the gaps will initially increase. For this reason, valve adjustment on a warm engine is possible, but is carried out taking into account a number of amendments. It is worth adding to this that different motors may have parts made of different alloys and materials. As a result, thermal gaps may differ, and the cooling process may proceed faster or slower. For this reason, corrections for each internal combustion engine are individual.
- Now about the gap itself. The indicated gap on many motors is measured under the adjusting screw. You need to measure the gap using a set of special feeler gauges; the main one is the feeler gauge, which has a width of 10 millimeters. A number of nuances should also be taken into account. For example, consider VAZ cars. When making adjustments on classic models, there is a need for a wide feeler gauge. The fact is that the use of standard narrow probes leads to an error. This error is caused by the fact that the valve lever on such units is slightly beveled. Let us add that the optimal gaps on the “classic” are 0.15 mm. This clearance is the same for both intake and exhaust valves. It is quite obvious that it is quite difficult to accurately determine the indicated gap with one simple feeler gauge. The task is even more complicated, since it is not always possible to purchase a complete set of probes. In such cases, the experience of the master plays an important role, who actually tactilely determines the gap. To do this, take a 0.15 mm probe, after which its passage in the gap is assessed. If the indicated probe goes too “tight”, then the valve is clamped. Free passage of the feeler gauge will indicate increased clearance.
- It should be understood that it is not possible to set the gap perfectly right away, since after tightening the locknut it still gets a little off. For this reason, an amendment is made, the gap increases slightly. As for reducing the gap, such manipulation is not recommended. Note that there is a so-called table that contains various corrections in the case of valve adjustments on a hot engine. If you look at such data, then you can see the dependence of the increase in gaps on the degree of heating of the motor. In other words, the gaps should be larger when the engine is warmer. In this case, one should take into account the fact that the gaps are indicated for an idle internal combustion engine. After starting the unit, they will decrease, since the valves themselves will heat up the most and will be increased in length compared to other timing structural elements.
- Many people strive to minimize the noise from the operation of the timing belt. For this reason, there is a misconception that a slight reduction in clearances has a positive effect without harm to the engine. Actually this is not true. Indeed, if the valves are “clamped”, then the engine can run quieter when “cold” and/or “hot”. But reduced noise does not mean minimized wear due to the absence of audible impacts. The fact is that under certain conditions the valve stops closing completely. A loose fit of the plate disrupts heat transfer; the valve does not transfer excess heat to the cylinder head. The result is overheating and burnout of the valve. It turns out that incorrect valve adjustment with a decrease in clearance can lead to engine failure and the need for further repair. A clear sign of “pinched” valves is the condition of the camshaft, as the back of the camshaft cams will have noticeable wear.
Adjustment using a feeler gauge
- Remove the cover and ignition coil. We unscrew the soured bolts without serious effort so as not to strip the threads.
- The adjustment should begin with the least tightened one. Its cam will be in the “away from the rocker” position. Place the head of the key on the bolt holding the crankshaft pulley and turn it 180 away from the rocker arm, if possible. If it is not possible to take such an angle, then we turn to the largest possible.
Remember that the bottom valves (those closest to you) are exhaust valves. The gap in them should be within 0.20-0.25 mm.
- You should loosen the nut, take a 0.20 mm feeler gauge and tighten it by screwing in the rod. Put on the locknut, pull out the dipstick and tighten the nut completely. Check the gap by comparing how the feeler gauge passes 0.20 and 0.25. The latter will not go in completely. We mark the adjusted mechanism with a marker. We alternately adjust all the exhaust valves in the same way.
- Now we’ll find out how to adjust the intake valves on our own. This is done according to the same principle as the bottom row, only the gap size is smaller - from 0.10 to 0.15 mm.
- We check the dimensions of the set gaps with feeler gauges again and tighten the nuts tightly.
- We clean the valve box, armed with a utility knife and No. 0 sandpaper. Perform all movements from the valve to the edge to avoid litter getting into the box. We also first rough clean the lid with a blade, then carefully clean it with sandpaper.
- We change the gasket and, in a strictly defined order, following the manufacturer’s instructions, tighten the cover bolts.
- All that remains is to connect all the wires, hoses and pipes, and reinstall the air filter housing.
Adjustment using rack and indicator
To adjust the automotive thermal gap, a special rail is often used, along with an indicator. These devices allow you to achieve maximum accuracy, which cannot be obtained with the method described above. The order of work here is as follows:
- after carrying out the preparatory work and removing the valve covers, the engine must be turned until the marks on the camshaft gear and the marks on the housing coincide;
- You need to put your icons on the back of the built-in gear with a marker. This must be done every 90 degrees, relative to the mark set by the manufacturer;
- using three bolts you need to fix the rack on the protrusion of the block of installed bearings;
- You need to insert a dial indicator into a special slot on the bar. In this case, the scale should be set to zero;
- Using a special device, take the cam and pull it up a little. In a normal situation, the indicator needle will move by approximately 50 - 52 divisions.
If, as a result of the measures taken, the obtained parameters are slightly different, you will need to make adjustments using the method described above.
At the end of the adjustment process associated with setting the clearances in the valve mechanism, you need to start the engine and listen to how it operates in different modes. If the manipulation was carried out after the head was restored, it is necessary to ensure that the valves are properly ground in.
An example of valve adjustment on a VAZ 2108–2115
How to adjust a 6-cylinder in-line engine: video
conclusions
The valves on the VAZ-2114 should be adjusted no later than after 20,000 km . Untimely adjustment work can lead to unexpected and destructive consequences. Therefore, the car owner must follow the manufacturer’s recommendations.
He means that the 0.15 by 0.5 mm probe goes deep.
_Derby_ He probably meant between the rocker and the camshaft.
| Author: | igorich [Thu Feb 21, 2008 1:38 pm] |
| The headline of the message: | |
| I didn’t see what the question was. should I delete the topic? | |
| Author: | Okhlamon [ Thu Feb 21, 2008 1:44 pm ] |
| The headline of the message: | |
| No need to delete. I understand the question. | |
I answer. The master told you everything correctly. Your valves are overtightened. Adjust again to normal. specialist
| Author: | Spensor [ Thu Feb 21, 2008 10:24 pm ] |
| The headline of the message: | |
| Carbon deposits will develop on the valves if they do not close completely. | |
A friend of mine did it using a rack. It's clearly 0.15. Afterwards I measured it with a feeler gauge, it only goes about a mm somewhere and that’s it. I think the rack shows it more clearly.
How to adjust valve clearances on foreign cars
First of all, using the repair and maintenance instructions for your car, we determine the engine type. The fact is that some foreign cars can have up to ten types of engines on one car model. The tool required for adjusting and installing timing marks is also indicated there. However, in most cases a set of wrenches and feeler gauges is sufficient. Let's look at the features of adjusting clearances on a Mitsubishu ASX 1.6 with a gasoline and diesel engine.
Gas engine
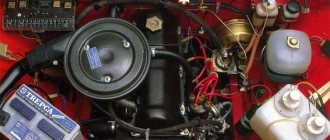
This is what a Mitsubishu ASX 1.6 engine with a gasoline engine looks like
To do this, follow these steps:
- Remove the plastic engine casing (held on by rubber latches).
- We remove the ignition coils and valve cover.
- We set both camshafts according to the marks (the nominal clearances of the intake and exhaust valves are also indicated here).
We set the engine camshaft marks - Using feeler gauges, we measure the gaps “Second and fourth cylinder - intake valves”, “First and third cylinder - exhaust valves”. We record the measurement results.
- Rotate the crankshaft 360 degrees. Then we align the marks on the camshafts and measure the gaps of the other valves.
Checking the size of the engine valve clearances - We remove both camshafts, take out the adjusting cups and use the given formula to calculate the size of the new cups.
Adjusting valve clearances - We install new cups and install the camshafts in the cylinder head.
- Apply sealant to the indicated places and tighten the valve cover.
Apply sealant and tighten the engine valve cover
Diesel engine
Sometimes Mitsubishu ASX 1.6 can be equipped with a diesel engine. In this case, the valves are adjusted using bolts in the pushers.
This is how valve clearances are adjusted on a Mitsubishu ASX 1.6 with a diesel engine
The main signs of incorrect work
If the valve clearances are set correctly, the engine will run quietly and smoothly. With increased intervals, it will make extraneous knocks and noises; with decreased intervals, it will work unevenly. Further operation of such a vehicle is impossible; you must carry out repairs yourself or contact a service center. Otherwise, you may lose your car.
The trouble-free operation of your car is largely determined by regular operations to adjust the valve clearances. The frequency of these operations is set by the manufacturer, and the adjustment technology is quite simple and does not require special knowledge and skills. Good luck on the roads!
Sources
- https://FB.ru/article/226876/zazor-klapana-kakim-on-doljen-byit-instruktsiya-po-pravilnoy-regulirovke-klapanov-vaz-i-inomarok
- https://autochainik.ru/regulirovka-zazorov-klapanov.html
- https://pol-z.ru/regulirovka-teplovyih-zazorov-klapanov-v-pomoshh-avtolyubitelyu/
- https://mtz-80.ru/bez-rubriki/regulirovka-zazorov-klapanov-dvigatelya
- https://scart-avto.ru/remont/kak-otregulirovat-zazory-klapanov-priznaki-i-simptomy/
- https://KrutiMotor.ru/regulirovka-klapanov/
- https://VmyatynNet.ru/avto-rf/nastrojka-klapanov.html
- https://gp-prsmah.ru/tyuning-remont/na-chto-vliyaet-regulirovka-klapanov.html
- https://delis-avto.ru/obzory/proverka-zazorov-klapanov.html
- https://autostuk.ru/regulirovka-zazorov-klapanov-2-varianta.html
- https://4x4privod.ru/regulirovka-klapanov-poryadok-proved/
- https://auto-gl.ru/regulirovka-klapanov-dvigatelya-sovremennogo-avtomobilya/
[collapse]
Valve sagging
Whether I was successful or not became apparent when it came time to re-adjust the valves. So, that time has come. At the time of this adjustment, Grant's mileage was just over 25,000 km. What happened to the valves 10,000 km after the previous adjustment? Let's find out.
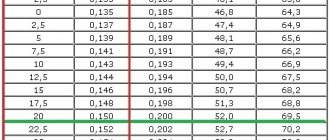
After measuring the valve clearances before adjusting, I recorded them in a small table.
The first column lists the valves in order of priority.
The exhaust valves are highlighted in red, and the intake valves are highlighted in blue. You can observe a similar circuit directly on the engine.
In the second column I entered the nominal size of the gaps or the size recommended by the manufacturer.
Here is the official letter from AVTOVAZ number 44-12, which specifies the clearances for the intake and exhaust valves. It is these gaps that I display on my Grant.
I will add that the above clearances are relevant for engines 21116 and 11186 with a lightweight connecting rod and piston group (OSHPG).
The next column contains the actual gaps that formed over 10,000 km. mileage since the previous adjustment.
Notice what has changed? Only the exhaust valve clearances have changed.
As you can see, over 10,000 km, the valve subsidence amounted to 5 hectares per exhaust valve.