Home » Domestic auto industry
Reading time: 6 minutes. Updated 08/04/2019
The efficiency of the engine and its successful starting, as well as the dynamics of the car when driving and fuel consumption depend on whether the ignition adjustment is carried out correctly. The article provides instructions and recommendations on how to correctly set the electronic ignition on a VAZ 2106 car, as well as a training video on adjusting the ignition.
Detailed guide to setting up the ignition
Motorists have long been convinced of the advantages of electronic (non-contact) ignition, which does not have the disadvantages of contact ignition, for example, there is no need to adjust the gap in the contact group. In this article we will look at how to adjust the ignition on a VAZ 2106 for the 1st cylinder.
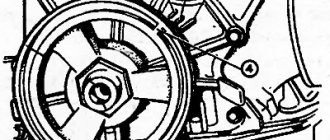
There are marks and castings on the cylinder head cover and crankshaft pulley.
Using the marks you can adjust the ignition timing:
- the first mark, located clockwise, means that the ignition timing is 10°;
- the middle mark is designed to set the lead angle to 5°;
- the shortest, last mark sets the advance angle to 0°: in this case, the mixture will ignite when the piston reaches top dead center.
Marks on the cylinder head cover
The marks are aligned by rotating the crankshaft, either using a ratchet, or using a special wrench on the nut.
Tools and materials
In order to adjust the ignition on a VAZ 2106, you need to prepare the following tools:
- key for unscrewing spark plugs;
- special key for rotating the crankshaft;
- key to "13";
- control device: 12 V indicator light or voltmeter.
You can also expose using a stroboscope.
Stages
The ignition is set step by step:
- We disconnect the car from the power supply by removing the negative terminal from the battery.
- Using a spark plug wrench, unscrew the spark plug of the 1st cylinder. After this, close the hole from the candle with your finger or rubber stopper.
Close the hole with your finger
- Next, using a special key, we turn the crankshaft from left to right until the piston in the 1st cylinder begins its upward movement, that is, the compression stroke begins. At this moment, either the plug will pop out, or the finger closing the hole will feel the air being squeezed out with great force.
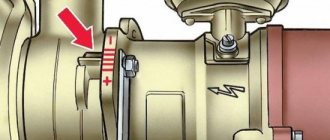
- The crankshaft must be turned until the marks on its pulley and the timing cover align. If you fill your car with 92 or 95 gasoline, then the mark on the pulley must be aligned with the middle notch; if 76 and below, then with a length indicating zero ignition timing.
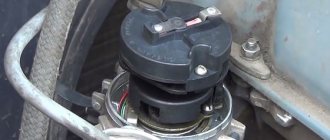
- After unclipping the latches, remove the distributor cap.
- When the crankshaft will no longer turn, the distributor should be turned to the first cylinder with its outer contact.
- After aligning the marks, if everything is done correctly, the line mentally connecting the distributor latches should be parallel to the axis of the power unit. Otherwise, you should slightly unscrew the distributor mounting nut and turn the distributor upward. By rotating the rotor axis, it is necessary to place it parallel to the axis of the power unit.
- Next you need to set the ignition timing. To carry out this procedure, you need to connect the power and connect the negative terminal to the battery.
- Then, using a “13” wrench, loosen the nut that holds the ignition distributor.
- Next, we will use an indicator light, from which there are two wires. One of them should be connected to the ground terminal, the second to the low-voltage output of the coil.
- Turn the key to position “I” and turn on the ignition. Then, slowly, turn the distributor from left to right until the “control” goes out. If the light does not light up immediately, then no action needs to be taken.
- Next, turn the distributor to the left. At the moment when the light comes on, you need to tighten the fastening nut to fix the position in which the distributor is located.
- Now you can turn off the engine and return the distributor cap to its place (video author Nail Poroshin).
External contact position
Setting the ignition and checking
Having completed the preparation stage, you can proceed to the ignition adjustment itself. To do this, you will need to connect the test light at one end to the terminal of the ignition coil, which is connected to the low-voltage wire of the distributor. The second end must be connected to ground.
Next, turn on the ignition, after which you need to turn the distributor clockwise until the control lamp goes out. If the control does not light up, then there is no need to rotate anything.
The next step is to rotate the distributor in the opposite direction (counterclockwise). When the light comes on, fix the distributor and tighten the nut that secures it. The final step will be to turn off the ignition and install the distributor cover.
- After completing all adjustments, you should start the engine and check that the ignition system is operating correctly. First, you need to accelerate the car to 40 km/h, engage 4th gear and sharply press the gas pedal. Normally, after a couple of seconds you can hear engine detonation and the “fingers” will begin to ring, but the phenomenon will disappear as the car accelerates.
In the case when detonation does not disappear during acceleration, there is a high probability that the ignition is earlier. If there is no detonation, then the ignition is later. In the first case, turn the distributor clockwise by half or one division.
We also recommend reading the article on how to adjust the “ignition” of a diesel engine (injection timing). From this article you will learn about the features of adjusting the ignition moment of the fuel mixture in a diesel engine, as well as the subtleties and nuances associated with igniting the working mixture in an internal combustion engine of this type.
In a situation with late ignition, everything is done exactly the same, only you need to turn it counterclockwise. Having set the desired position, you should check again by accelerating the car again and pressing the gas.
After the optimal position has been found, a mark is applied to the distributor body with paint, marking the position of the middle mark of the pot scale in relation to the block. After this, the VAZ ignition process can be considered set.
Recommendations
There are main symptoms by which one can judge that it is necessary to set the ignition on the VAZ 2106:
- Fuel consumption is too high. With late ignition, the dynamics of the car decreases. In order for the car to accelerate as before, it needs more fuel-air mixture.
- Dynamics is lost: with late ignition, the mixture ignites after the piston has already moved down due to the inertia of the flywheel.
- Popping sounds in the muffler. In this case, the explosion follows, and it takes some time for the gases to expand. When the piston reaches bottom dead center, the next stroke will be the exhaust stroke. In this case, part of the fuel explosion will escape into the exhaust pipe, which is the cause of the popping noise.
- Increased engine noise. If the engine noticeably rattles or detonates, you need to turn on the ignition. In this case, the piston only goes up, and the ignition goes towards it. This makes the engine run rough with unpleasant sounds when running.
Why is adjustment needed?
Before describing the adjustment process, you must first decide why it is needed at all. The fact is that for proper engine operation, the combustible mixture in the cylinders must be ignited a little earlier than the piston reaches TDC. This is necessary so that the fuel has time to burn completely, this will ensure full power output. If the fire is a significant distance before TDC (pre-ignition), detonation combustion will occur, which can ultimately lead to significant engine damage.
But if the combustion occurs in a position where the piston has already reached TDC (late ignition), the fuel will not burn completely, the power output will be less, and in addition this will be accompanied by increased fuel consumption and unstable engine operation.
Therefore, it is necessary that the fuel ignite strictly at a certain distance from the piston approach to TDC. If we consider this from the side of the crankshaft, then ignition must occur at a certain angle of rotation before TDC. Therefore, the ignition adjustment of the VAZ-2101 is often also called the ignition timing angle.
Related link:
Description and characteristics of the VAZ 2101
Video “Design and configuration of the electronic ignition system on the VAZ 2106”
In this video, Albert Sroslov talks about contactless (electronic) ignition and demonstrates how to set the ignition on a VAZ 2106.
The condition for quick engine starting and uninterrupted operation is that the ignition is set correctly. Due to its incorrect installation, detonation may occur, and its result will be serious consequences and engine breakdown. Experienced drivers set the ignition by eye, others use a strobe light, and beginners usually turn to a car service center. However, if the result is good, the move itself does not matter.
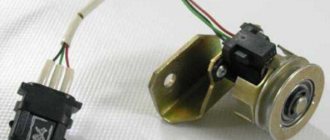
Replacing the starter relay for a VAZ 2107
Another common problem on VAZ 2107s with a carburetor is a malfunction of the starter relay. When you turn the key in the lock, the system makes a click, but the retractor relay does not operate. Replacing the relay is very simple.
First you need to remove the starter from the relay. Unscrew the 2 bolts that secure it. Slide it to the right and take it out, turning it backwards. Unscrew the nuts securing the starter and relay.
Unscrew the terminal.
Turn it to the side.
Remove the 2 bolts securing the relay to the starter.
Remove the relay.
Install the new one in reverse order.
If you follow these simple steps, your VAZ 2107, which has a carburetor system, will serve you for many more years.
Required tools:
You can set the ignition on the first or fourth cylinder. On our website you can see a description of the ignition installation on the first cylinder.
A short, medium and long mark on the timing cover (gas distribution mechanism) shows the ignition moment of the VAZ 2106 .
- Short mark with a leading angle of 10°.
- Average - 5°.
- Long - 0°.
The top dead center is indicated on the pulley rim; opposite TDC there is a special indentation on the pulley hub.
Preparatory stage
To set the ignition on a VAZ 2107 car, no special conditions are required; the operation can be done both in the garage and on the street, including in winter. For work, prepare the following set of tools:
- flat screwdriver;
- metal probe 0.35 mm thick;
- open-end wrench size 13 mm;
- a car light bulb designed for a voltage of 12 V with wires soldered to it;
- a wrench with a long handle designed to turn the crankshaft;
- key for unscrewing spark plugs.
Ignition tuning tool
Note. Instead of a special key to rotate the crankshaft, you can use a regular open-end wrench measuring 36 mm. If you don’t have such a key, then you will have to set the marks in the old proven way: by engaging 4th gear and raising the rear wheel, turn it manually, thereby turning the crankshaft.
Ideally, it is better to have in your arsenal a device for setting the ignition on a running engine - a strobe light. It is equipped with a lamp that flashes simultaneously with the moment of spark formation in the cylinder, which allows you to see the position of the notch on the crankshaft pulley at idle speed and clearly adjust the advance angle.
This is what a strobe looks like, which is convenient for adjusting ignition timing
Important point. The ignition is set in order to ensure that the spark appears in a timely manner and the engine starts, after which additional adjustments will be required. But the latter will not bring you the desired result when there is no compression in the cylinders or problems with the carburetor make themselves felt. If these faults are not eliminated, the engine operation will remain unstable, no matter how you configure the spark generation system.
Hence the conclusion: you can set the ignition correctly at any time, but to set it well - only on a working engine and carburetor.
Recommendations for displaying the VAZ 2106 ignition at home
- Unscrew the spark plug of the first cylinder, cover the spark plug hole with your finger or rubber plug.
- Using a special wrench, turn the crankshaft until compression occurs in the 1st cylinder (the piston rises up). The plug will fly out or you will feel pressure on your finger.
- Turn until the mark on the crankshaft pulley coincides with the mark on the timing cover. When using “92” or “95” grade of gasoline, you need to align the mark with the middle arrow, if the grade is lower, then with the long one (corresponding to zero advance angle).
- Unfasten the latches and remove the cover from the ignition distributor.
- After the crankshaft has been turned, the distributor rotor should be in a position in which its outer contact is directed towards cylinder 1 on the distributor cap.
Methodology in practice
And then follow our instructions. Set the parameters for the two outer pistons. To do this, use the marks on the front timing cover next to the disc for belt rotation of the pump, radiator fan and generator.
There are three divisions: the largest is the TDC of the combustion chambers mentioned above, the other two are different, the shorter one is a five-degree offset of spark formation, and the very small one indicates a ten-degree advance (in the site picture). Another dead point is indicated on the protruding “knee” disc. Using these marks you will return the engine to normal.
Next, remove the spark plug from the front combustion chamber and clamp the hole with your finger or an elastic plug. Using an unusual 38mm wrench, which is always necessary when repairing internal combustion engines, put on the crankshaft nut, turn it until you feel movement in the cylinder as air presses against the plug. Rotate to align the pulley mark with the large line on the timing belt.
So you get zero advance. It is suitable for using 76 and 80 gasoline. If you drive 92, then bring it to the middle indicator.
The next operation is with the distributor. Remove its cover. In it you will see the rotor turning towards the front combustion chamber. Dock the pointers. Place the conditional axis along the locks of the distributor and parallel to the cylinder block.
If this fails, then make this adjustment. Unscrew the distributor clamp, pull it, and install the rotor along the axis indicated above.
Only partially secure the device. Next, you can set the VAZ ignition according to the light bulb. Close the central short-circuit contact to ground through it.
Apply current throughout the entire network, and slowly turn the distributor until the lamp stops shining. When the light did not appear at all, then adjustment is not needed.
Then turn in the opposite direction, and as soon as the light appears on the lamp, secure the device completely.
How to understand that you need to set the ignition
There are several indirect signs that are worth looking at. Of course, if the engine does not start, then turning the ignition on is the first thing that comes to mind, unless of course the spark plugs are wet. Let's look at the main symptoms that indicate the need to install the ignition.
Signs that an ignition installation is required:
- Increased fuel consumption. Of course, this may be a consequence of improper carburetor adjustment, but it also happens. For example, when ignition is delayed, the car’s dynamics decrease; in order to achieve the same acceleration, a larger amount of combustible mixture is required.
Loss of dynamics. With late ignition, the explosion follows the piston, which has already gone down under the influence of the inertia of the flywheel.
Silencer shots. When the explosion occurs afterward, the expansion of the gases takes some time. If the piston has already reached bottom dead center, then the exhaust stroke comes next. This means that part of the fuel explosion will be transferred to the exhaust system, hence the popping noise.
Types of systems
For decades, while the VAZ 2107 model was produced (from 1982 to 2012), it was equipped with three types of ignition systems:
Contact ignition circuit installed in the first VAZ 2107 models
Note. The first 2 varieties were installed on the “seven” with a carburetor, the latter was introduced together with an injector.
In the mechanical version, the contacts opened by the cam of the distributor shaft break the low voltage circuit, initiating the formation of a powerful pulse in the secondary winding of the coil. This discharge is directed to the electrodes of the spark plug, which ignites the fuel in the cylinder where the piston has risen to top dead center (TDC) and the compression stroke is completed.
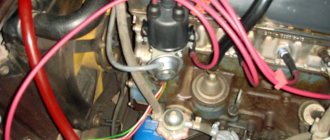
Scheme of non-contact ignition of the seven with a carburetor
The contactless circuit operates on the same principle, only the signal to break the circuit is supplied by the Hall sensor, and it is implemented by the switch. Therefore, setting the ignition on carburetor “sevens” is done almost identically. Another thing is cars with an injector, where a new system has been introduced that does not have not only contacts, but also a distributor and any moving parts. Here, the moment of spark formation is determined by the ECU controller, which is guided by the signals of various sensors.
Ignition system VAZ 2107 with injector
How to set the ignition on a VAZ 2106 - procedure
First, you will need to install the ignition mark. The crankshaft can be rotated either using a ratchet or using a special wrench using the nut. On the front cover of the engine and on the crankshaft pulley there are ebbs and notches, the combination of which corresponds to different ignition timing:
The first mark in the direction of travel is an advance of the ignition angle by 10 degrees. Angle advance is an adjustment to the fuel burning rate. So, 10 degrees is the mark for 72 gasoline.
Next comes the middle mark - 5 degrees ahead. It is for 80 gasoline.
After the installation of the ignition mark is completed, you must immediately set the required gap in the contacts, naturally, where they exist. To do this, remove the distributor slider and unscrew the breaker fixing screw.
Before setting the gap, it is advisable to clean the contacts with sandpaper (600-800)
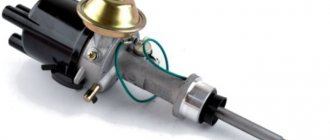
Well, now we go directly to the ignition installation of the VAZ 2106. We unscrew the distributor mount (nut 13), and then pull it out of the housing.
Now you need to insert the distributor into place, taking into account several mandatory points:
- We set the top dead compression stroke mark in the first cylinder; accordingly, at this moment the spark should appear in it. In order to catch this moment, we put the cover on the distributor and mark the place where the armored wire from the spark plug of the first cylinder enters. Now you need to remove the cover and align the outer contact of the slider exactly opposite the mark. That is, at the moment when the piston is at top dead center, a spark is supplied from the central wire of the distributor through the contacts of the runner to the armored line from the first cylinder.
Contact ignition
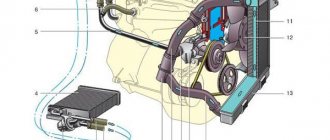
The system consists of: high voltage coil, contact group, distributor, distributor cover, vacuum and centrifugal regulators, resistance, spark plugs and wires.
- The system works as follows. When the piston is at TDC, the coil windings open.
- At this time, high voltage is directed from the distributor cover through the wires to the spark plugs, with the help of which a spark appears in the combustion chamber and, accordingly, the working mixture ignites.
As the engine speed increases, the advance angle undergoes changes, and the centrifugal regulator changes it to the required level.
In turn, the vacuum regulator changes the angle in proportion to the vacuum in the intake manifold. Thanks to this, the engine operates with the required power at any crankshaft speed.