Fans of classic “sixes” periodically have a question: “How to set the ignition on a VAZ 2106?” Of course, in those days they had never heard of automatic adjustment of angle and torque, so everything had to be done by hand. Today you will learn how to set up the ignition on a VAZ 2106 and not make mistakes.
The design and principle of operation of the ignition on a VAZ
The engines produced for these VAZ models differ only in volume, but have no structural differences. They are equipped with both contact and non-contact ignition systems.
The first case is when the contacts are opened mechanically, and in the second case a Hall sensor is used, with the help of which the moment a spark is supplied to the combustion chamber is determined.
Frequent malfunctions
In addition to the fact that when the timing chain breaks, the piston bends the valve, the classic engine circuit has characteristic malfunctions:
| Defect | Cause | Elimination |
| Knock | 1) the main bearings knock dully, the frequency coincides with the crankshaft speed |
2) the sound of connecting rod bearings is sharper, present at XX
3) the sound of the pistons is dull, observed at low speeds
4) the valves knock less intensely, the shaft rotation is half as frequent
1) adjusting the ignition, checking the oil level, replacing bearings, tightening the flywheel bolts2) replacing bearings, checking lubricant pressure
3) replacement of rings, pistons, cylinder boring
4) replacing springs, adjusting gaps
Low oil pressure on a warm engine1) wear of oil pump gears2) increased clearances of liners and bearings
1) unit repair2) replacement of bearing shells or housings
Increased lubricant consumption1) leakage of seals2) clogging of the ventilation system
3) wear of cylinders/rings
1) replacement of consumables2) cleaning channels
3) installation of repair kit
Increased gasoline consumption1) the throttle opening angle is off2) high resistance to movement
3) ignition timing is off
4) breakdown of the vacuum distributor
1) damper adjustment3) ignition adjustment
4) replacing the regulator
Reduced throttle response and power1) pump failure2) ignition fault
3) the fuel filter is clogged
4) the damper is not fully open
1) pump repair2) ignition check
3) filter replacement
4) damper adjustment
Engine overhaul includes boring cylinders, replacing shafts, piston and crank groups in any combination.
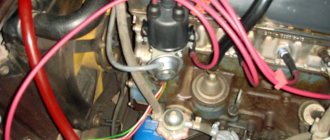
Contact ignition
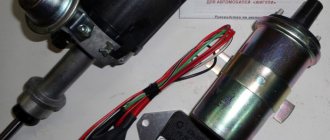
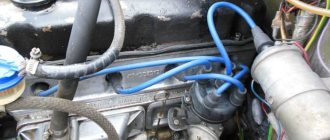
The system consists of: high voltage coil, contact group, distributor, distributor cover, vacuum and centrifugal regulators, resistance, spark plugs and wires.
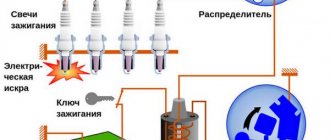
- The system works as follows. When the piston is at TDC, the coil windings open.
- At this time, high voltage is directed from the distributor cover through the wires to the spark plugs, with the help of which a spark appears in the combustion chamber and, accordingly, the working mixture ignites.
As the engine speed increases, the advance angle undergoes changes, and the centrifugal regulator changes it to the required level.
In turn, the vacuum regulator changes the angle in proportion to the vacuum in the intake manifold. Thanks to this, the engine operates with the required power at any crankshaft speed.
Maintenance Procedure
The classic design of the internal combustion engine allows you to get by with simple steps when servicing the engine:
| Maintenance object | Time or mileage (whichever comes first) |
| Timing belt | replacement after 100,000 km |
| Battery | 1 year/20000 |
| Valve clearance | 2 years/20000 |
| Crankcase ventilation | 2 years/20000 |
| Belts that drive attachments | 2 years/20000 |
| Fuel line and tank cap | 2 years/40000 |
| Engine oil | 1 year/10000 |
| Oil filter | 1 year/10000 |
| Air filter | 1 – 2 years/40000 |
| Fuel filter | 4 years/40000 |
| Heating/Cooling Fittings and Hoses | 2 years/40000 |
| Coolant | 2 years/40000 |
| Oxygen sensor | 100000 |
| Spark plug | 1 – 2 years/20000 |
| Exhaust manifold | 1 year |
As the actual life of the internal combustion engine increases, consumables may be replaced more frequently than specified, or operations for cleaning the carburetor, engine, jets, and other attachments may be added.
Signs of incorrect ignition on VAZ cars
Setting the ignition timing on a vehicle is necessary if the internal combustion engine is being repaired or the distributor is being dismantled. Also, during operation, it undergoes wear and tear, like any other engine systems, and accordingly the following signs of malfunction may appear:
- The motor does not start or has interruptions in operation. Provided that the combustible mixture is supplied correctly, the malfunction may be an incorrect setting of the advance angle, slipping or stretching of the timing chain.
- Poor acceleration and inelasticity of the engine. This means that the combustible mixture is not ignited at the required piston stroke position, which leads to a deterioration in the efficiency of the internal combustion engine.
- High gas consumption. This effect occurs under conditions of late ignition. Part of the combustible mixture does not have time to burn and flies out into the exhaust manifold. In such cases, you can hear characteristic popping noises in the exhaust while the engine is running.
Hard work of the internal combustion engine. This occurs under conditions of early ignition, when the working mixture ignites when the piston position has not reached top dead center.
In such cases, you can hear a characteristic ringing sound in the engine. Such symptoms can lead to burnt out exhaust valves.
How to choose a chain length
When purchasing a new spare part, you need to take into account one parameter - the length, determined by the number of links. The indicated value depends on the type of engine installed on a particular car. For engines with a working volume of 1.5 and 1.6 liters (modifications VAZ 21061 and 2106) the piston stroke is 80 mm, and in 1.3 liter power units (VAZ 21063) this figure is 66 mm. Accordingly, the 1.5 and 1.6 liter engine blocks are taller and the chain is longer:
- versions VAZ 21061 and 2106 - 116 sections;
- VAZ 21063 - 114 units.
Conscientious manufacturers indicate the number of chain links on the packaging
The number of sections of a new spare part can be found out without a grueling recalculation. Lay the chain on a flat surface so that adjacent links touch. If the outer sections look the same, there are 116 links in the chain. The 114-piece part reveals one last link, turned at an angle.
When replacing the drive chain, it is strongly recommended to install new sprockets - driving, driven and intermediate. Otherwise, the mechanism will not last long - the links will stretch again. Gears are sold in sets of 3 pieces.
Video: choosing a new chain for the Zhiguli
Instructions
There are several popular methods for setting the ignition angle on VAZ cars.
Installation with strobe
In this option, you do not need to remove the distributor and valve cover, and the installation time will not exceed five minutes.
- Loosen the distributor nut, noting its initial placement in advance.
- We connect the negative wire of the strobe to the ground of the car, and the “plus” wire to the coil and a special clamp to the wire of the first cylinder.
- The light beam, strictly directed at the pulley, will accurately show the optimal location of the distributor.
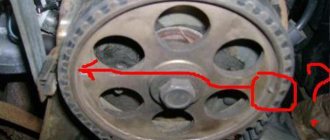
By gradually turning the distributor, it is necessary to correctly align the marks on the crankshaft pulley and the marks on the front timing cover. We fix the distributor nut.
Installation by marks
The mark on the pulley number 4 is combined with the mark on the front cover. The values of the marks are as follows: 1-100 degrees, 2-50, 3-00. When installing the ignition. when the engine is running on 92 gasoline, the mark for 0 degrees is selected.
We set the ignition to the light bulb
Before starting the installation, you need to take a 12-volt light bulb and solder two wires to it. Then, using a wrench, turn the crankshaft to the TDC position of the piston of the 1st cylinder.
- We place the marks opposite each other on the crankshaft pulley and the front cover.
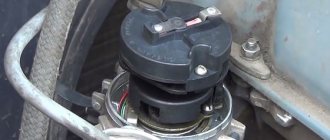
- Remove the distributor cover so that the distributor is in the position of the first cylinder.
- We attach one of the wires from the light bulb to the ground of the car, and the second to the low-voltage wire inside the distributor.
- Turn on the ignition. If the ignition is installed correctly, the light will not light up.
- Otherwise, we install the distributor in such a position that the light does not light (i.e., the contacts are open).
When using this installation method, the light bulb can be replaced with a multimeter.
Installation by ear
Warm up the engine to operating temperature. Then loosen the nut securing the distributor. Slowly turn the distributor to the right and left until the engine operates optimally at idle without unnecessary knocking or detonation. Tighten the distributor fastening nut.
Technical characteristics of the motor 2106
After a failure with the timing belt in the internal combustion engine 2105, the manufacturer AvtoVAZ returned to the chain drive. The standard for the 2106 engine was version 2103; the cylinder diameter was increased to the original 79 mm, as in modification 21011.
Therefore, the technical characteristics of the internal combustion engine are important:
| Manufacturer | VAZ |
| Engine brand | VAZ-2106 |
| Years of production | 1976 – 2006 |
| Volume | 1569 cm 3 (1.5 l) |
| Power | 64-75 hp |
| Torque | 87.3 Nm (3400 rpm) |
| Weight | 121 kg |
| Compression ratio | 8,5 |
| Nutrition | carburetor Solex 1107010-01, then 1107010, since 1980 Ozone 1107010-20 |
| Motor type | in-line |
| Number of cylinders | 4 |
| Location of the first cylinder | near the timing chain |
| Number of valves on each cylinder | 2 |
| Cylinder head material | aluminum alloy |
| Allowable warpage | manifold gaskets (intake/exhaust) 0.08 mm |
cylinder head gasket 0.05 mm
Valve seat width 2 mm, angle 45° Camshaft single upper inside the cylinder head, phase width 232°, exhaust valve advance 42°, intake valve lag 40° Camshaft oil seal diameters - 40 mm, 56 mm, width 7 mm Cylinder block material cast iron Cylinder diameter class A - 79 - 79, 01 mmContactless ignition system for VAZ
When installing such an ignition, the engine starts better when cold, there is no need to adjust the gap on the contacts, the spark will be more powerful, the service life of the spark plugs will increase and, moreover, it is more reliable in contrast to the contact one.
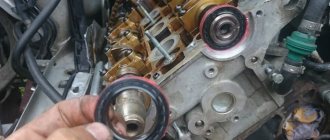
- As in the case of contact ignition, we align the marks and the piston of the first cylinder to the TDC position.
- We remove the old contact distributor, having first removed the negative terminal of the battery. We install contactless.
- Next, using a strobe light, we set the required ignition timing.
What is the price
A complete set for a VAZ 2106 costs from 3,000 to 4,000 rubles, depending on the manufacturer. Typically this includes:
- switch;
- distributor;
- coil;
- Hall controller;
- wiring.
Some kits also contain a set of spark plugs and high-voltage wires.
If the driver does not understand auto electrics, additional assistance from specialists will be required. Services at a service station will cost another 1000-2000 rubles. The specific cost of installation in each city can vary significantly.
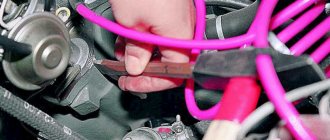
Photo instructions on how to set the ignition on a VAZ
Injection modification
The first in the line of internal combustion engines of the AvtoVAZ manufacturer, the 2106 engine received tuning in the form of distributed injection. At the same time, the owners received a headache:
- intense heating, since the mixture is lean, the manufacturer’s cooling system cannot cope with temperature loads;
- increased fuel consumption up to 13 l/100 km in winter.
A positive feature is the low budget for major repairs within 10,000 rubles.
General information about the brand
Domestic cars of the 2106 brand were manufactured for the purpose of operating on roads equipped with improved surfaces, regardless of weather conditions. The cars are equipped with a four-door all-metal sedan body.
Cars are equipped with carburetor gasoline engines, four-speed or five-speed gearboxes. There is an independent spring front suspension; The rear suspension is dependent spring. The car's braking system is dual-circuit; there are disc brakes on the front wheels.
The rear ones are equipped with drums. Cars of the VAZ 2106 family were equipped with radial tubeless tires. The steering column has an anti-theft device that is built into the ignition switch.
The modification range of the VAZ 2106 family includes:
- VAZ 2106, 21065-00 - equipped with a model 2106 engine;
- 21061, 21065-01 – equipped with a model 2103 motor;
- 21063 – there was an engine from 21011.
- Car brand 21065 is the luxury version of this family. It has the following differences from the 2106 model: it is equipped with a five-speed gearbox and a final drive with a gear ratio of 3.9. Some cars were equipped with a Solex-type carburetor and a contactless ignition system. The car's electrical equipment is complemented by an electrically heated rear window, halogen headlights and a rear fog lamp. The body has been modified: the upholstery and seat headrests have been updated; The car is supplemented with bumpers of the 2105 model. Spare parts for the presented vehicles are available everywhere. In addition, the electric power steering is a kind of “novelty”, so to speak, the trends of the 21st century are making themselves felt. Thanks to this, car maintenance and repairs are not a big problem.
Examination
Having finished setting the ignition, proceed to check the functionality of this unit:
- get behind the wheel;
- start the engine;
- get out onto a straight section of the road;
- accelerate to 40 kilometers per hour;
- shift the car to fourth gear;
- quickly release the gas.
When everything is done correctly, detonation will occur, causing the fingers to rattle. The noise will disappear as you gain speed.
If the sound does not go away, then the adjustment was made incorrectly and the ignition started early. In this situation, the distributor rotor is turned by half or one division (clockwise). Delayed detonation indicates late ignition timing. Here you will have to turn the distributor in the opposite direction.
After setting the settings, repeat the test described above.
When the ignition is adjusted perfectly, mark the optimal position of the distributor relative to the cylinder block with a line (scratch it or use oil paint). This completes the ignition setting.
2sh.jpg
The VAZ 2106 electrical circuit diagram is a detailed “plan” on the basis of which the entire system of electrical connections of the vehicle operates. It consists of:
1 — front lights; 2 — side direction indicators; 3 - battery; 4 - relay from the battery charge warning lamp; 5 – relay with which the low beam headlights are turned on; 6 — relay for high beam headlights; 7 – car starter; 8 - generator; 9 – high beam lighting devices (headlights); 10 — low beam devices; 11 – sensor with which the fan motor is turned on; 12 — electric motor of the SOD fan (engine cooling system); 13 – horn (sound signal); 14 — ignition coil; 15 – ignition distributor; 16 — spark plugs; 17 – carburetor solenoid valve; 18 – sensor that shows the coolant temperature; 19 — engine compartment lamp; 20 – car reverse light switch; 21 – sensor indicating the oil pressure level; 22 — oil pressure sensor; 23 - sensor from the warning lamp, indicating the brake fluid level; 24 – electric motor, which is used by the windshield wiper; 25 — switch (equipped if a non-contact ignition system is used); 26 – electric motor from the windshield washer; 27 — fan motor relay; 28 – machine voltage regulator; 29 – special relay-breaker for the windshield wiper; 30 – special additional fuse block; 31 — main fuse block; 32 — relay-breaker for car alarms and corresponding direction indicators; 33 – relay with which the rear window heater is turned on; 34 — brake light switch; 35 – special plug socket for a personal transport lamp (not installed since 2000); 36 – special additional resistor of the automobile electric heater motor; 37 – electric motor, without which the heater cannot operate; 38 – mandatory switch for the heater electric motor; 39 – machine clock; 40 – lamp that illuminates the glove box; 41 — car cigarette lighter; 42 — alarm switch; 43 – special regulator for lighting transport devices; 44 - warning lamp, which symbolizes insufficient brake fluid level; 45 – light switch for headlights, sound signals and direction indicators; 46 — car ignition switch; 47 — rear window heater switch; 48 — car rear fog lamp switch; 49 — external lighting switch VAZ 2106; 50 — door lamp switches (A-pillars); 51 — electric window motor (some of the manufactured vehicles are equipped with it); 52 — door lamp switches (rear pillars); 53 — switch for the warning lamp of the car parking brake; 54 – lampshades that provide interior lighting; 55 - fuel level indicator in the car, which has a reserve warning lamp; 56 — coolant temperature indicator; 57 - oil pressure indicator, equipped with a warning lamp for insufficient pressure; 58 – car tachometer; 59 — control lamp (CL) of the parking brake; 60 – battery charge CL; 61 — CL carburetor air damper; 62 — side light CL; 63 — CL turn indicators; 64 — CL main beam headlights; 65 — auto speedometer; 66 — carburetor choke switch CL; 67 – “left-door” switch for the electric window motor; 68 – automotive power window relay; 69 – “true” switch for the electric window motor; 70 — rear transport lights; 71 – lights that illuminate license plates; 72 – sensor showing fuel level and reserve; 73 — rear window heater; 74 – lamp used to illuminate the trunk; 75 — rear traffic fog lamp.