Setting the ignition timing with advance
This setup is completely easy to do. Even a beginner can cope with this task. To do this, prepare a 13 mm wrench and a special 38 mm crankshaft wrench in advance.
If your car is started, be sure to turn off the engine, since you can only turn on the ignition when the engine is turned off. First, the piston of the first cylinder is installed at the top dead center of the compression stroke, that is, in the ignition position. Before doing this, remove the candles and plug the hole from them with cotton.
You need to align the mark on the crankshaft and the front engine cover. To do this, use a wrench to start turning the crankshaft clockwise. During this action, the air compressed there should push out the cotton wool, thereby indicating the compression stroke. Continue turning the shaft slowly until the marks on the timing belt pulley and cover line up.
Please note that there are 3 marks on the cover:
- The first indicates ignition advance by 10º;
- the second – by 5 º;
- the third is equal to zero.
Since a VAZ 2107 engine with a carburetor runs on 92 or 95 gasoline, we need to set the ignition for these types of fuel. That is why you should select the second mark, which will indicate an ignition advance of 5º.
Once the required parameters match, put the spark plugs in place and remove the wires. The system is ready for use.
Electronic Ignition on MT Topic author Dharendra
Guys, tell me how to connect the electric ignition to the MT
Alexey (Nibal) what kind of ignition is that? old shard? or Sarumanka? or your own development? there are a lot of them) it’s better to take photos in the studio. I’ll draw what goes where directly on the photo
Alexander (Roman) Alexey, Zhelezyaka Kyiv, I’ve already figured it out, changed the camshaft seal, installed a new ignition and started washing the tank, washing the carbs, installing repair kits on them, but didn’t have time to adjust)
Sanya (Vinay) how much is a rim kit for a K62t carb?
Sergey (Qayyim) I redesigned my own cason for 12V and installed an electronic lighter https://sovek.com.ua/bis11353734k750.html here I ordered it, it works perfectly and the consumption has decreased by 5l
Vladislav (Gautami) how much did he take from you before? how much money did you give for the century?
Alexey (Nibal) Vladislav, Saruman is definitely better, but Sovek is also not a bad option, unlike the old Oskol.
Vladislav (Gautami) Alexey, excellent. What, then, is the beauty of Saruman before his coeval age? what is the difference in cost? Is it really possible to get Saruman in Ukraine?
Alexey (Nibal) Vladislav, I think it’s really possible to get it. The advance angle corrector on the Sovek works poorly, or it’s not there at all, I didn’t like it. Also, the Saruman is remote, unlike the Sovek, and is not demagnetized. There are also additional functions and angle control buttons advances. decide for you, my many friends are in ecstasy. Here is the link where you can watch Saruman https://vk.com/fuoz_saruman
Adjusting the ignition timing
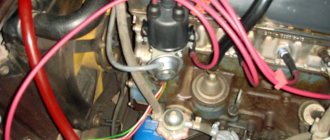
For subsequent actions, use a 13 key to loosen the fastening nut of the distributor (ignition distributor). Connect one wire from the light bulb (it will act as a voltmeter, that is, indicate the presence of voltage) to the low-voltage terminal that the coil has, the second to ground.
Now turn on the ignition. Slowly and carefully rotate the distributor body clockwise, stopping immediately when the light goes out. The sparks that appear will indicate the moment of ignition. Move the distributor counterclockwise until the contacts are disconnected and the lamp lights up again. Everything is in order, you can safely tighten the distributor, the setup is complete.
Adjustment features
As for how to set the installed ignition unit on the “seven”, then, of course, this procedure is best carried out using special equipment. But since such installations can only be found in car repair shops, the adjustment procedure can be done by ear. Before you begin the process, you need to make sure that both the carburetor and the pump are operating normally. The process itself is performed as follows:
- First the engine warms up.
- Then the distributor fixing nut is unscrewed.
- The distributor itself should be slowly turned in different directions, while the motor should be running. The mechanism is turned until the operation of the internal combustion engine is smooth and the speed increases.
- After this, the fixing nut needs to be tightened.
- As for checking, to do this, you need to accelerate the car at third speed to about 50 km/h, then engage fourth gear and press the gas pedal. In this case, the sound of “fingers” or detonation should be heard from under the hood, which will last until the car’s speed increases by 5 km/h. If the sound continues longer, the distributor should be released and turned clockwise by about one degree. If you are unable to adjust the ignition yourself in this way, it is better to seek help from specialists - this procedure is inexpensive, but you will be sure that the engine will work normally.
Sorry, there are no surveys available at this time.
Installation of electronic ignition
Electronic ignition makes engine operation smoother and softer, makes it easier to start in the winter, and reduces fuel consumption. If you, having a carburetor engine, decide to switch to contactless (electronic) ignition, we will tell you how to correctly install it on a VAZ 2107 car.
An electronic system for a car with a carburetor should not be too expensive or cheap. It is best to opt for a product in the mid-price category, so that later you don’t have to change anything after a while.
Before work, prepare a drill and a set of keys.
For an overview, first read the included instructions carefully and open the carburetor type engine kit. It includes:
- ignition coil;
- distributor;
- switch;
- 4 candles;
- connecting and high-voltage wires.
The system is easy to install. First of all, remove the negative terminal from the battery and turn the crankshaft until marks numbered 3 and 4 align, that is, the highest dead center.
Now you can begin the main steps. The coil should be disconnected from all wires, remove it and install a new one. The coil can now be connected to the central high voltage wire. Connect 2 brown wires to contact “K”, and 2 blue wires to contact “B”.
Now remove the distributor cover. Please note that the slider must be set exactly as shown in the picture. Mark this place with a marker on the block to correctly install the new distributor. Now you can unscrew this part and put it to the side.
After opening the cover of the new distributor, place the slider perpendicular to the engine and insert it into the hole in the cylinder block. Align it with the mark on the block. Next, put on the cover and connect the wires.
Decide where the switch will be located, since there is no space for it in the VAZ 2107 car. We recommend installing it next to the washer reservoir. Secure it with self-tapping screws and install the connector.
Don't forget the candles. To replace them on a VAZ 2107 car, you will need a spark plug wrench, which you should use to unscrew the old spark plugs from the cylinders and put new ones in place.
Instructions for installing a contactless system
The procedure for replacing a mechanical ignition with an electronic one is divided into the following stages:
- selection and purchase of BSZ;
- preparation of tools;
- removing the old system and installing a new one;
- ignition setting.
If you have not previously had to deal with sparking problems in classic Zhiguli models on your own, then you will have to allocate about 3-4 hours for all the work.
Recommendations for selection
The BSZ factory kit for the VAZ 2107, available for sale, includes the following parts:
- switch with catalog number 36.3734 (also available 3620.3734);
- main ignition distributor, marking - 38.37061;
- high-voltage coil, catalog number - 27.3705;
- wiring harnesses with connectors.
BSZ parts from SOATE company
Note : The marking of the distributor is indicated for cars with engines of 1.5 and 1.6 liters. In modifications of the “Seven” with a 1.3 liter engine, the cylinder block is smaller in height and the ignition distributor shaft is shorter. Its catalog number is 38.3706–01.
There is a similar contactless kit on sale, designed for the Russian SUV VAZ 2121 Niva. In it, the distributor is marked as follows: 3810.3706 or 38.3706–10. You should not buy it for the “classics”, since the element differs in technical parameters, although it looks the same in appearance.
Among the manufacturers producing ready-made electronic ignition kits for older VAZ models, the one that has proven itself to be the best is VAZ, whose production is located in Stary Oskol, Russian Federation. Feedback from owners of “classics” about the company’s products is purely positive.
It is recommended to change the spark plugs and wires along with the ignition.
Advice . When planning to set the BSZ to "seven", at the same time replace the spark plugs (brand - A17DVR) and the high-voltage wires to them. They are not included in the delivery package, but they are very useful for stable and economical operation of the engine with the new spark generation system.
What tools will you need?
To install the electronic unit and other elements of the UPS, you will need simple tools available in the garage of any skilled motorist:
- flathead and Phillips head screwdrivers;
- open-end wrenches sizes 8, 10 and 13 mm;
- ordinary pliers;
- a spark plug wrench equipped with a cardan for convenience;
- hand or electric drill with a drill with a diameter of 3-3.5 mm.
From this set you will need keys, screwdrivers and pliers
Note. Using keys, you unscrew the terminals, distributor fastenings and coils. A drill will be needed to make 2 holes for mounting the switch. In some cars you can find ready-made holes designed for mounting electronics; they are located on the left side member (in the direction of travel of the car).
With a 30 mm wrench you can easily turn the crankshaft
It’s good if you manage to find and borrow a special wrench designed to turn the crankshaft of a VAZ 2107 by grabbing the ratchet nut. Another option is to rotate the crankshaft with a regular 30 mm open-end wrench or by turning the suspended rear wheel with 4th gear engaged.
Work on installing and configuring contactless ignition can be carried out in any convenient place, as long as weather conditions permit. Since you don’t need an inspection hole, a flat and well-lit area will do.
Installation of BSZ on a car
Before installing the electronic ignition, you need to remove the old system from the car, proceeding in this order:
- Lift the hood cover of the "Seven", disconnect the battery from the on-board network and remove the high voltage wires from the spark plugs.
- Remove the spark plugs and turn the crankshaft to bring the piston of cylinder 1 to top dead center (TDC). A long screwdriver inserted into the spark plug well will help you with this. Make sure that the notch on the crankshaft pulley is opposite the first mark on the cylinder block (it is the longest of the three).
- Unlock the metal latches of the ignition distributor cover and remove it along with the wires. To be sure, place a mark on the engine valve cover opposite the moving contact of the slider.
- Disconnect all wires from the distributor and the thin tube that connects it to the fitting on the carburetor. Loosen the nut holding the distributor skirt to the cylinder block and unscrew it. Remove the old distributor, making sure that the gasket is not lost (it is located between it and the block).
- Disconnect the wires from the contacts of the high-voltage coil and remember where they were connected. Unscrew the coil bracket and remove it from the body.
Disconnecting the negative terminal of the battery
Start installing the BSZ by installing an electronic unit equipped with an aluminum mounting plate with holes (it serves as a cooling element for the device). If there are ready-made holes on the left side member, screw the commutator to them with two self-tapping screws. Otherwise, find a free space near the coil, drill holes and secure the control unit.
Spark plug placement
Advice . Do not place the switch under the windshield washer fluid reservoir. If it leaks, it will flood the delicate electronics and the ignition will stop functioning.
To replace the coil, you need to disconnect the wires and remember their pinout
Install the elements of the contactless system in the following sequence:
- Take a new distributor, remove the cover from it and put on the gasket. Install it into the socket on the cylinder block so that the movable contact is opposite the chalk mark drawn on the engine valve cover. Lightly press the distributor skirt with the mounting nut to prevent it from accidentally turning.
- Screw the high voltage coil into the old place (the fastenings are the same). Connect the wires from the ignition switch relay, tachometer and switch to its terminals. The wire coming from contact “1” of the electronic unit is connected to the terminal marked “K” of the coil, and the wire from contact “4” is connected to terminal “B”.
- Having established a gap of 0.8-0.9 mm between the electrodes of the spark plugs, screw them into the holes of the cylinders. Place the cap on the distributor and connect all the high voltage wires, including the central one leading to the coil. Connect the vacuum tube, after which you can start starting the engine and adjusting the timely spark formation.
The notch is placed opposite the long score
Advice . When installing a high-voltage coil, the terminals are swapped, which causes some inconvenience. The issue is solved by loosening the nut of the mounting clamp and turning the coil body 180°, after which it can be put in place.
Stages of ignition installation in photographs
Position of the slider when the marks are aligned
The switch is attached to the spar with 2 self-tapping screws
Before setting the marks, you need to remove the distributor cap
Replacing the starter relay
Another common problem on VAZ 2107s with a carburetor is a malfunction of the starter relay. When you turn the key in the lock, the system makes a click, but the retractor relay does not operate. Replacing the relay is very simple.
First you need to remove the starter from the relay. Unscrew the 2 bolts that secure it. Slide it to the right and take it out, turning it backwards. Unscrew the nuts securing the starter and relay.
Turn it to the side.
Remove the 2 bolts securing the relay to the starter.
Install the new one in reverse order.
If you follow these simple steps, your VAZ 2107, which has a carburetor system, will serve you for many more years.
Vehicle dynamics, fuel consumption, exhaust toxicity and starting reliability on a carburetor “seven” depend on the correct setting of the ignition timing. The outdated “contact” system requires periodic maintenance and adjustment. Ignition adjustment on a VAZ 2107 with an injection engine equipped with a contactless ignition system is not required. But owners of outdated modifications of the VAZ 2107 have to go to a service station for adjustments or perform the operation themselves. This is not difficult to do.
What is BSZ and how does it work?
To successfully install and configure contactless ignition, it is advisable to understand the operating principle of the system, which consists of the following elements:
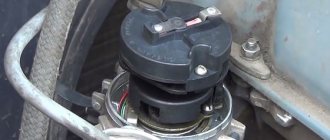
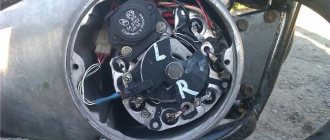
- Main ignition distributor (otherwise known as distributor). Inside it is installed a photoelectric Hall sensor, a vacuum drive for adjusting the advance angle and a so-called slider with a moving contact.
- A coil that produces a high voltage pulse. It has 2 windings: a primary winding, consisting of a small number of turns of thick wire, and a secondary winding, wound with a thin wire with a large number of turns.
- The electronic unit is a switch equipped with an aluminum cooling radiator. The latter plays the role of a fastening element.
- Spark plugs connected by high-voltage wires to the distributor.
- Wires for connecting elements to each other.
This is what the ignition system of a classic Zhiguli looks like
For reference. In the standard outdated VAZ 2106 systems, there was a contact group inside the distributor instead of a Hall sensor, and there was no switch at all.
BSZ operation scheme
The first contact of the coil is connected through the ignition switch relay to the generator, and the second to the control unit. Also, a high-voltage wire with a large cross-section goes from it to the distributor. There are 2 bundles of wires coming out of the distributor, connecting it to the switch and spark plugs. The system operates according to the following algorithm:
- After turning on the ignition by turning the key in the lock, a voltage of 12 V is applied to the primary winding of the coil, which creates an electromagnetic field.
- When the crankshaft rotates and one of the pistons reaches top dead center (TDC), the photoelectric sensor sends a signal to the switch, which briefly breaks the connection between the coil and the voltage source - the generator or battery.
- During a circuit break, a voltage pulse of 20 to 24 kV is generated in the secondary winding of the coil, transmitted through a large cross-section wire to the distributor slider.
- The movable contact of the slider directs the impulse to the spark plug where the piston reached TDC. A powerful spark jumps between its contacts, igniting the mixture of fuel and air in the combustion chamber.
- The distributor shaft is driven by a gear transmission connected to the crankshaft. When the next piston moves to TDC, the shaft rotates and the moving contact connects to another spark plug, and the Hall sensor sends the next signal and the sparking cycle is repeated.
Reference. In older systems, the circuit was broken mechanically using a cam on the distributor shaft, pressing on the contact group.
What is “ignition timing”
Ignition advance means the air-fuel mixture ignites before the piston reaches top dead center (TDC) during the compression stroke. This factor has a great influence on engine performance. A certain amount of time passes between the moment the spark occurs and the moment when the gas pressure in the cylinder reaches its apogee. Although this period of time is extremely short, due to the high speed of the crankshaft, during the time the mixture is ignited, the piston can travel a long way from the moment of sparking to the explosion of the mixture. When the advance angle is correctly set, the mixture explodes at the moment when the piston is at TDC and ready to move down. If the mixture ignites earlier (“pre-ignition”), it explodes during the lifting phase of the piston and interferes with the movement of the piston (the engine detonates). This leads to premature wear of parts and deterioration of engine performance. If ignition is done late (“late ignition”), the mixture explodes after the piston has left TDC, which leads to fuel burning out already in the exhaust manifold, a decrease in gas pressure in the cylinder and, therefore, loss of power and reduced efficiency. Therefore, installing the ignition on a VAZ 2107 is an important and necessary procedure. Sparking should occur at the most appropriate moment, which depends on the position of the gas pedal and crankshaft speed.
Why is it worth installing on “Seven”?
There are several reasons why you should install electronic ignition on a VAZ 2107.
Of course, it is important whether the engine is equipped with a carburetor or an injector, because the injection system does not have a distributor:
- If you install such an SZ, the car owner will no longer need to periodically service the contact group. That is, you can forget about oxidation and cleaning of contacts, as well as adjusting the gap.
- This VAZ 2107 ignition system is more reliable, since the contact group, which is most susceptible to breakdowns and wear, is simply absent.
- In this case, the spark will be distributed more evenly and stably throughout the engine cylinders, and this will not be affected by the performance of the power unit.
- The service life of the distributor as a whole increases as a result of the disappearance of vibration and shock of the axle in the case of the action of the so-called cams on the contacts.
- If the VAZ ignition timing is set and the system is configured correctly, and the engine operates in normal mode, there is a chance of saving gasoline. During normal operation of the internal combustion engine, its power can also be increased, especially since as a result of complete combustion of the mixture in the engine cylinders, there will be fewer harmful emissions.
- It will be easier to start the engine in cold weather, since the voltage level at the spark plugs will always be stable:
What causes an incorrectly set ignition on a VAZ 2107
An incorrect lead angle causes the following problems:
Engine overheating. Early ignition causes detonation, which changes the temperature regime of the engine. At the same time, the load on the crank mechanism increases, reducing their service life.
Reduced vehicle dynamics. Early and late ignition of the VAZ 2107 leads to the fact that fuel energy is not optimally consumed. The explosion of the mixture must occur exactly when the piston is at TDC.
Burnout of valves. With late ignition, the mixture continues to burn throughout the exhaust phase, causing the valves to overheat and “popping” to occur in the exhaust manifold.
Purpose and advantages of electronic design
The important role of the automotive ignition system is easy to understand if we list the basic requirements for its operation:
- Creating a spark in the cylinder to burn the gas-air mixture at the end of the compression stroke.
- Ensuring timely ignition taking into account the cylinder layout in the engine and the advance of ignition angles.
- Providing the spark with the necessary supply of energy sufficient to initiate the combustion process. This parameter depends on the composition of the mixture, density and temperature.
- Maintaining a high level of reliability regarding engine life.
The operating diagram of a possible system design depends on the type of engine and is called as follows:
- contact-transistor ignition system;
- contactless system;
- microprocessor ignition system.
Features of different types of systems
In the first case, a current pulse is sent in the desired direction by connecting any two contacts. This system is unreliable due to rotating elements. In addition, after the next repair it is necessary to make fine adjustments with your own hands.
The so-called besh is the next generation of possible types of systems. The advantage of this solution is the ability to transmit higher energy pulses without losing heat. It is also worth considering that contactless ignition practically does not require periodic adjustment.
The project includes specific components:
- ignition switch device;
- power supply;
- conversion coil;
- wires and balloon spark plugs.
Electronic type device
In order for the electronic ignition system to work smoothly, it is controlled by an electronic unit. Its job is to receive and analyze various data and issue commands to create the current ignition timing. Numerous sensors installed in various vehicle systems continuously collect the following information:
- Parameters of the crank mechanism. The crankshaft position and rotation speed are monitored.
- Clock mechanism parameters. The camshaft position is controlled.
- Operation of the engine cooling system. The operating temperature is given and the engine load is estimated.
- Exhaust system. The composition of exhaust gases is controlled.
In addition, manufacturers are introducing other sensors to monitor various parameters. For example, detonation processes are often detected, which is associated with poor fuel quality or indicates a change in the octane number of gasoline.
Further development of technology leads to the emergence of such sensors:
- electronic accelerator pedal position;
- mass air flow;
- pressure in the fuel line.
Such comprehensive information allows not only to ensure a high-quality spark formation process, but also to significantly increase the fuel efficiency of the engine. In this case, the question of which ignition is better disappears by itself.
The only downside to the ideal multi-sensor electronic ignition is that the engine is difficult to modify to use the electronic controller.
Arranging sensors and teaching them to work harmoniously is not easy. Therefore, it is worth considering a more affordable scheme - a contactless ignition switch.
Electronic ignition operation
Incoming sensor signals are processed by an electronic unit according to a developed algorithm. As a result, the ignition system sends an electronic signal to the igniter. This device turns on the transistor and allows current to flow into the primary winding of the ignition coil. At the right moment, the primary current circuit is interrupted, and the voltage of the current accumulated in the primary coil increases. The pulse goes to the selected spark plug.
In this process, the engine speed and load are analyzed. Thus, if necessary, you can adjust the ignition timing, increasing engine power.
Ignition marks VAZ 2107
When adjusting the advance angle, you must focus on the marks marked on the crankshaft pulley and on the front engine cover.
There is a notch on the engine pulley that should align with one of three marks on the cover, depending on the fuel used.
The marks on the lid are of different lengths - short, medium and long. The first corresponds to an advance angle of 10 degrees, the second - 5 degrees, the third - 0 degrees (the mixture is ignited at TDC).
High octane fuel burns faster than low octane fuel. The VAZ 2107 is designed for gasoline with an octane number of 92-95, so the optimal advance for it is 5 degrees.
What is electronic or contactless ignition?
The electronic or contactless ignition system is a more advanced version of the SZ for cars. The block of such a device is assembled from electronic elements. Contactless ignition on a VAZ is called that way, because in this case the circuit is closed and opened thanks to an electronic switch. The latter, in turn, operates from a transistor, and not from a distributor contact, as was before.
The electronic ignition circuit on a VAZ has minor differences depending on the type of engine - injector or carburetor. In any case, this option is in practice more modern, as a result of which its popularity among our compatriots is growing. Due to differences in the connection diagram and some differences for the injector and carburetor, some car owners believe that the BSZ and the electronic system are different components, but this is not so.
BSZ scheme for the domestic “seven”
How to set the ignition on a VAZ 2107
There is no need to adjust the ignition even in a garage. If you have the tools, you can set the lead angle literally on the street. The procedure is as follows:
- Allow the engine to cool (if it is hot). This will avoid burns during operation.
- Remove the high-voltage wires from the spark plugs.
- Unscrew the spark plugs (you can limit yourself to just the spark plug of the first cylinder, but with all the spark plugs unscrewed, there is no compression in the cylinders and it is much easier to rotate the crankshaft).
- Close the spark plug hole on the first cylinder with your finger (this will help determine the beginning of the compression stroke in the cylinder).
- Using a special key, rotate the crankshaft until the compression stroke begins (your finger should feel the air pressure).
- Continuing to rotate the crankshaft, align the mark on the pulley with the second mark on the front engine cover.
Scheme
The standard contactless ignition system on the VAZ classic consists of several modules. Typically, the installation kit includes hardware.
- Ignition coil for electronic module. Some motorists leave the old block.
- Distributor, also known as distributor. This is where the main difference lies. The two devices are similar only in appearance. The internal contents of the contactless and classic modules are completely different.
- Controller. This detail is not present on the standard system at all. The electronic unit is installed on the car body and connected to the distributor with wires.
- Hall controller. This part is extremely important for the normal operation of the system. A small sensor is responsible for reading the rotation of the engine crankshaft. If a part fails, the entire system stops working.
More complete kits include spark plugs and armored wires. For the electronic system, the gaps on the spark plugs are set differently, or the elements are replaced.
Installation
It’s easy to install the BSZ on a VAZ with your own hands. You will need to perform a certain sequence of actions.
- Disconnect battery power.
- Remove the distributor cover and turn the crankshaft. Set the first cylinder to TDC so that at this moment the ignition slider aligns with contact 1 of the working chamber.
- Remove the standard ignition coil and replace it with a new one. Here the position of terminals B and K must be observed. This is necessary because the contacts on the modules can be turned out.
- Now we remove the high-voltage wires from the spark plugs and remove the distributor cover from the car.
- Disconnect the distributor itself and remove it from its seat.
- Now we place the switch in a suitable place. It is desirable that the back wall of the device is completely adjacent to the metal surface. This will help cool the device better. Typically, drivers place the part on the inside of the wing or the interior bulkhead. Experts also advise treating the panel to bare metal.
- Next, a new distributor is installed. Here you need to set the marks to the zero position. Align the slider to the ignition firing position on cylinder 1.
- Add high-voltage wires to the cover according to the engine strokes.
Connecting electronic ignition to a VAZ 2106
Installing the device is half the trouble. Now you need to configure it correctly. The wiring of the new module is included in the kit and is wound into one bundle. The figure above shows a diagram of connecting the device to the on-board network.
The first contact of the switch and the tachometer wire, both brown, are connected to terminal “K”. Two wires are also placed at the output of coil “B”, from terminal 15 of the ignition coil and block 4 from the control unit. The second wire from the block is routed to body ground.
How to set electronic ignition
Adding a new distributor using the marks is much easier than performing a similar procedure on a classic. The ignition timing is set using the marks. The sequence of actions looks like this.
- Set the distributor according to the marks to advance “0”.
- Try to start the engine.
- Next, you need to turn the distributor body to catch the moment of optimal advance. In this mode, the engine runs smoothly, responds quickly to the gas, and there are no dips.
If you have no experience in such repairs, it is recommended to contact a specialist. Beginners rarely catch the right moment correctly.
Adjusting contactless ignition 2106
Once set, no procedure is required. The module does not have a large number of moving parts. It is enough to set it up correctly initially and use it for a long time.
The adjustment procedure may be necessary after repairing the internal combustion engine, when the valves or carburetor were adjusted. The technician's actions may cause the device to go astray, and its position will need to be corrected.
Checking the ignition timing
First of all, you need to start the engine. If it started before, but after adjustment it doesn’t, it’s worth checking again that the advance angle is set correctly. If the engine is running, it is necessary to check the advance angle while driving:
- Accelerate the car to 45 km/h.
- Turn on 4th speed.
- Squeeze the gas pedal sharply.
- Detonation should occur for 2-3 seconds, and then, after accelerating the car, it should disappear.
If the detonation does not disappear after accelerating, the ignition is “early”. If detonation does not occur at all, ignition is “later”. To reduce the advance, you should unscrew the distributor fixing nut and turn it clockwise a little less than a scale mark. You can increase the advance by turning the distributor counterclockwise.
Tip: when the ignition is perfectly set, you should paint a mark on the scale. This will make subsequent ignition adjustments easier.
How to check the Hall sensor on Lada 2106: electronic ignition
This controller is the biggest problem on BSZ systems. Its verification will be carried out like this.
- Elimination method. The failed sensor is replaced with a known good one. To do this, you will need to purchase it or ask your neighbor for a whole sensor. If after installation the engine operation is leveled out, the part is replaced.
- The second method involves the following steps. To check, remove the terminal from the distributor and turn on the ignition. Next, you need to close contacts 3 and 6. If the sensor is damaged, a small spark will appear.
There are other testing methods that involve the use of a multimeter and other tests. We will not write about them here, since this will require special equipment and deep knowledge of auto electrics.
Adjusting the gap of the VAZ 2107 distributor breaker
The quality of the spark depends on the gap between the breaker contacts and the condition of the contacts themselves. To adjust the VAZ 2107 distributor, you must perform the following operations:
- unclip the fastening brackets and remove the distributor cover;
- unscrew the screws securing the slider;
- remove the slider;
- Clean the breaker contacts with sandpaper (to avoid damaging the contacts, you must use sandpaper with a grain size no larger than 600).
- loosen the screw securing the breaker contacts;
- turn the adjusting screw to set the gap to 0.4 mm, using the appropriate feeler gauge;
- tighten the fixing screw;
- install and secure the slider;
- fix the distributor cover.
In addition to adjustment, repair of the VAZ 2107 distributor may be required. This consists of cleaning the contacts on the distributor cover or replacing the cover itself, replacing the slider, resistor or contact group.
The ignition system is one of the components of any gasoline engine. Incorrect ignition adjustment of the VAZ 2107 becomes a problem: the spark plugs flood, and the engine completely loses power. Let's look at what the advance angle is, what it affects, and how the ignition of a VAZ 2107 carburetor is installed.
Adjusting the ignition of a VAZ 2107 carburetor
Malfunctions
Typical breakdowns for the BSZ system are:
- Hall element failure. The engine suddenly stalls or does not start.
- Burning of the contact of the high-voltage wire. A common malfunction for all ignition systems. The engine stalls or starts poorly.
- Damage to the contact groups of the device. Here, a common cause is banal oxidation of the terminals.
- Controller failure. This can happen due to overheating, water ingress or mechanical impact.
No spark on electronic ignition
The reasons for the loss of spark on a contactless module are usually not very different from similar problems with classical elements.
- Damage to the spark plug or high-voltage wire. These parts are most susceptible to vibration and other negative factors.
- If the ignition periodically fails, check the contact groups and wiring for oxides and damage.
- The control equipment is damaged. There may be a controller or a Hall sensor here.
Lada 2106 won't start
If the car does not start, an experienced motorist can immediately identify the circuit that is failing. If the problem is the ignition, you will need to check the circuit for faults. Usually they start with candles and end with a coil.
If a damaged part is found, it is replaced with a known good one.
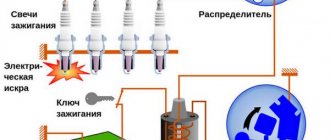
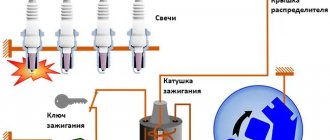
How does the ignition system work?
The standard ignition system consists of the following components:
- High voltage coil;
- Cables;
- Candles;
- Breaker;
- Switch and Hall sensor (if it is contactless);
- Distributor;
During operation, a low voltage current is applied to the primary winding of the coil and creates a magnetic field, through which it creates a high voltage current on the secondary winding. By means of a distributor and a breaker, the impulse is distributed to the desired spark plug.
BSZ uses the operation of a commutator and a Hall sensor, which transmit energy taking into account the number of revolutions of the distributor. The electronic ignition switch distributes currents more efficiently. Its advantages are that there is no need to clean the contacts and it makes it easier to start the engine in the cold season.
Unlike a carburetor, an injection system uses an ignition module to distribute energy, the operation of which is adjusted by the ECU, which fixes the position of the crankshaft at top dead center. This is why there is no need for adjustment.
Pros and cons of contactless ignition
At the moment, 100% of manufactured cars using gasoline or liquefied gas as fuel are equipped with an electronically controlled spark generation system. Mechanical ignition is outdated and a thing of the past. The reason is its unreliability during operation, frequent malfunctions and low spark power. Compared to the BSZ contact system, it has the following advantages:
- There are no contacts whose surfaces constantly burn from high voltage, causing the sparking power to drop sharply.
- The distributor of the electronic system has no wearing parts, which had to be changed every 15-20 thousand kilometers.
- Thanks to the contactless circuit and the new coil design, the voltage supplied to the electrodes of the spark plugs was raised from 18 to 24 kV. This had a beneficial effect on the ignition and combustion of the air-fuel mixture in the cylinders.
- Reliable operation and durability.
Powerful spark from contactless ignition
Reference . In past times, the owners of the VAZ “classic” quite often had to remove a protrusion that had burned on the surface of one of the contacts, which required a flat needle file. But a depression formed on the second contact, which was quite difficult to clean out, so manufacturers began to make contact groups with through holes.
Among the significant disadvantages of the BSZ, one can be noted - the non-repairability of the Hall sensor. If the mechanical contacts are cleaned, then the faulty sensor only needs to be replaced, so it is advisable to carry it with you. On the other hand, this device is very reliable in operation and lasts 40-50 thousand km without problems.
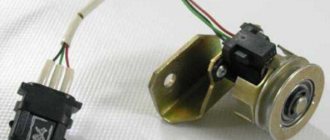
This is what a Hall sensor looks like, replacing the contacts
Reference . Owners of VAZ 2107 cars equipped with the first BSZ sets, in addition to the Hall sensor, also had to carry a spare switch. But after 2 years, its design underwent modernization, which is why the electronic units no longer fail.
What is ignition timing?
For the ignition to work correctly, the following condition must be met: sparking must occur at the moment when the piston is at TDC. This should be a compression stroke. This moment should be the flash point.
| Options | Units | Classical | Contactless |
| Spark energy | mJ | 20 | 60 |
| Secondary voltage rise time from 2 to 15 kV | mks | 30 | 20 |
| Secondary voltage max | kV | 26 | 29,5 |
| Spark duration | ms | 1,5 | 2 |
However, that's not all. The time it takes for the fuel mixture to completely burn must also be taken into account. Therefore, the spark plugs must create an impulse with some advance, which is called the advance angle. As a result, the mixture reaches the peak of combustion, and the cylinder begins to move downward.
If sparking occurs earlier, then such ignition is called earlier, and if late, then later. Early leads to detonation. This is why the engine quickly overheats and becomes inefficient, although fuel consumption can sometimes be greatly reduced. This can be determined by the spark plug electrodes, which are covered with a white coating. With late ignition, power is noticeably lost, and black smoke comes out of the exhaust pipe, which indicates that gasoline, without having time to burn in the cylinder, burns out in the exhaust system.
Contact-transistor
This design is a little better. Of course, the contactless ignition of the VAZ-2106 is built somewhat differently. The system uses the same breaker, driven by the eccentric axis of the distributor. But there is a small nuance - low voltage switching occurs. For comparison: in the previous design 12 volts are switched, but in this one no more than two. The system is not widely used, although it is more advanced. It is possible to get rid of burning of the contact group.
How to set the ignition on a VAZ 2107 carburetor with your own hands?
There are many ways to set up the ignition on a VAZ 2107, so let's start with the simplest one, which will not require any costs. The posting process doesn't change much. To do this, the car is placed on level ground, wheel chocks are placed under the front wheels, and neutral gear is installed at the gearbox. Prepare your instrument. If you don't have a ratchet wrench, lift the rear wheel and engage 4th gear. The car must be insured to avoid injury.
First of all, it is necessary to install the piston in the 4th cylinder at TDC and this must be a compression stroke. To make it easier to set up contactless ignition, remove the spark plugs and install a paper plug in the 4th cylinder in place of the spark plug holes. Rotate the crankshaft using a ratchet or spin the wheel as it rotates. As soon as the plug flies out, this will be TDC. It is exhibited there. After this, loosen the nut 13 holding the distributor and pull it out. It must be installed so that the slider faces the contact of the fourth cable. To do this, you need to look at the distributor cover, where all the cables are marked with numbers. The housing is located next to the engine.
Now tighten the distributor nut slightly so that the breaker can move. Ask an assistant to start the engine after installing the spark plugs. While the starter is rotating, you need to position the distributor so as to catch the starting moment and tighten the nut. You need to adjust slowly. When the engine starts, you also need to install the distributor so that the speed becomes stable. This ignition setting for the VAZ 2107 carburetor is optimal.
If you have any questions, I recommend watching this video on installing the ignition on a classic VAZ:
Preparing to replace the BSZ
The work of removing the old ignition and installing a new one does not require any special tools, devices or devices. An inspection ditch is not needed, and the entire operation can be carried out outdoors in good daylight. It is enough to have the following tools:
- a 13 mm open-end wrench for unscrewing the distributor fastening nut;
- using 10 and 8 mm wrenches, remove the coil;
- flat and Phillips screwdriver;
- pliers;
- electric or hand drill with a drill to match the diameters of the switch mounting screws.
Advice. To make the work easier, rent or from a friend a socket wrench with a long handle, which fits onto the ratchet nut and is used to rotate the crankshaft manually.
It is much more convenient to turn the crankshaft with this key
To get started, perform several preliminary disassembly steps:
- Open the hood and disconnect the negative battery terminal.
- Remove the high-voltage wires from the spark plugs and distributor cap.
- Unscrew the spark plugs.
- Place a screwdriver into the spark plug hole of cylinder 1 and turn the crankshaft until the piston reaches TDC. In this case, the mark on the shaft pulley will be opposite the longest mark marked on the cylinder block.
First thing you need to do is disconnect the battery
Advice. If you do not have a wrench for the ratchet nut, the crankshaft can be turned by rotating the suspended rear wheel of the car. Don't forget to secure the car with wheel chocks, release the handbrake and engage 4th or 5th gear.
When the 1st piston is at TDC, the marks on the pulley and block must match
Having matched the marks and prepared new parts, you can proceed to the main stage of work.
Details of setting up the ignition system on the VAZ 2107 are presented here:
How to set up contactless ignition using tags?
This method is not much different from the previous one, but this time the first cylinder is used. There are marks on the large crankshaft oil seal cover, and on the pulley itself there are marks. You need to turn the mechanism so that the mark on the crankshaft coincides with the middle mark and does not move to the side.
The further procedure is similar to the previous one: install the distributor and collect the elements.
After complete assembly, it is necessary to check the operation of the system. Otherwise, the installation will not work properly.
Video about setting up contactless ignition
If you removed the distributor and high-voltage wires with the cover without aligning the marks, then the following video material will help you correctly set the ignition again:
Operating a car with an electronic system is very different from driving with an old ignition. The engine runs much smoother and more stable, and cleaning the contact group is a thing of the past. But it wouldn’t hurt the owner of a VAZ 2106 to carry a Hall sensor in reserve in case the standard one breaks down. This part cannot be repaired, although it breaks quite rarely.
- Author: Sergey Sergeev
Rate this article:
- 5
- 4
- 3
- 2
- 1
(9 votes, average: 4.2 out of 5)
Share with your friends!
How to check early/late ignition?
To check the correct setting of early or late ignition, you need to do this while driving. To do this, you need to accelerate at 4th speed to 60 kilometers per hour and reset it to 40. Now sharply press the gas pedal and listen to the engine. If the angles are set correctly, a chirping sound will appear and disappear after a few seconds. The car should begin to pick up speed. With early ignition, detonation will not disappear for a long time, and with late ignition, it will not appear at all.
That is why you need to adjust the position of the distributor by loosening the nut to 13. If you cannot achieve the desired adjustment, proceed to the next step.
Symptoms of a problem
Adjusting the ignition on a car is required after repairing the engine or removing the distributor. Like any mechanical system, it tends to wear out, and characteristic symptoms appear:
- The engine does not start or runs intermittently. If gasoline enters the carburetor, the reason lies in incorrect setting of the ignition angle or misalignment of the marks on the timing chain.
- Reduced acceleration dynamics and deterioration of motor elasticity. The mixture does not ignite at the optimal time, so efficiency decreases.
- Increased fuel consumption. This happens with late ignition, when in order to obtain the same dynamics you have to press the gas pedal more actively. Some of the gasoline does not have time to burn and flies out into the exhaust pipe.
- Late ignition causes a popping sound in the muffler when the unburnt fuel mixture ignites when the exhaust valve opens.
- Rough operation of the engine is possible with early ignition of gasoline in the cylinders. An explosion at the moment the piston does not reach TDC is the cause of the characteristic rattling sound and ringing.
An interesting article about biofuel produced from ordinary sawdust, read more here.
Having discovered a malfunction, you should check whether the ignition is installed correctly on the VAZ 2106, and if necessary, adjust it. To work, you will need a spark plug wrench, a “13” wrench, a light bulb or strobe light, and a plate probe.
How to adjust the contactless ignition of a VAZ 2107 using a light bulb
All previous methods are primitive and allow you to set the desired angle only approximately. To achieve the most accurate adjustment, you must continue the adjustment using a regular 12-volt test light. This will allow you to set the most optimal lead angle.
Adjusting contactless ignition
One of the wires of the light bulb needs to be connected to the positive contact of the ignition coil, and the second one should simply be shorted to ground. Loosen the nut by 13 and, holding the octane corrector, slowly turn the distributor until the light goes out. Next, rotate the breaker clockwise until the light comes on. The moment when this happens and there will be the most optimal ignition timing angle on the VAZ 2107. Now the nut can be tightened. If the spark plugs are still flooded, then you need to check the engine power supply system - the carburetor. It needs to be adjusted. There may be reasons in other systems.
Instructions for setting the ignition
If you strictly followed the instructions, connected all the wires according to the diagram and did not misalign the marks, then the motor will start without problems. To adjust the ignition, you need to ensure stable engine operation, so first warm it up for a few minutes, without letting it stall by pressing the gas pedal.
Advice . If the engine does not start successfully, and when you turn on the starter there is not even a popping sound, then you probably made a mistake with the wiring. Check everything again according to the diagram included with the factory set of electronic ignition parts.
Adjustments can be made on a warm engine using two methods:
- without the use of special devices - “by ear”;
- fine adjustment using a strobe light.
A strobe is a device with a light bulb that flashes simultaneously with the transmission of a pulse by the Hall sensor. When the switched on strobe is brought to the crankshaft flywheel with the engine running, the position of the notch becomes visible. Hence the possibility of precise adjustment.
This is what a strobe looks like for fine-tuning the ignition
To set up, connect the strobe power supply to the battery, and the thick wire to the high-voltage wire of the spark plug of the 1st cylinder. Loosen the distributor fastening nut and bring the flashing lamp to the pulley. Slowly turn the distributor body until the notch on the pulley aligns with the short notch, then tighten the nut.
Tuning in the traditional way “by ear” is done like this:
- Start the engine and loosen the nut holding the ignition distributor.
- Rotate the distributor smoothly and slowly within 15°. Find the position at which the motor operates most stably.
- Tighten the fastening nut.
When adjusting, turn the distributor by the membrane body
Advice . When you turn the ignition distributor by hand, try not to touch the high voltage wires so that you do not get an electric shock. The best option is to grab the body of the membrane mechanism, where the tube from the carburetor is attached.
It is quite natural that after installing a contactless ignition system, the engine idle speed will increase to 1100-1200 rpm due to the increased spark power. Set the rate to 850-900 rpm by tightening the idle screw on the carburetor and using the tachometer as a guide. On VAZ 2105-2107 carburetors of the “Ozone” type, this screw is located in the lower section of the unit on the right side and is large in size. The VAZ 2108 carburetors of the Solex type (these were also installed on the “seven”) have a long plastic handle protruding from the right (in the direction of travel). The second screw, which regulates the composition of the air-fuel mixture, cannot be turned.
The arrow shows the idle speed adjustment screw.
Advice . If, when you sharply press the accelerator, a loud knock is heard from the engine, then you have set the ignition timing too high and the mixture flares up earlier than necessary. Loosen the distributor nut and turn the housing a couple of degrees clockwise.
The best indicator of successful installation and configuration of a contactless ignition system is checking the VAZ 2107 while driving. It’s worth driving the car for several kilometers to check it in different modes - acceleration, driving in a straight line and coasting with the gear engaged. You will probably like the behavior of the car, and the annoying cleaning of contacts will be forgotten forever.
Is there a difference between contact and electronic ignition?
On carburetor VAZ 2107, both an electronic and a contact device were installed. The adjustment process is no different. The only difference may be that before setting the marks, it is necessary to clean the contacts on the contact breaker and check the gap so that the system can be adjusted more accurately.
By the way, many people mistakenly call the switch the ignition relay. This relay is only a way to reduce the inrush current and is designed to preserve the life of the contacts. This relay is located in the engine compartment. The ignition setting does not apply to it.
This is how you can adjust the ignition on a carburetor VAZ 2107. Good luck on the roads!
Installation of the system on VAZ 2106-2107
And now a few words about how to switch from contact ignition to BSZ. In fact, there is nothing simpler, you just need to buy a new distributor, switch and connecting cables from the store. All these elements are sold as a set. They are accompanied by a small sheet that shows a diagram of the connection of all components. You just need to read the short instructions and complete the installation.
Attach the switch to the case with two self-tapping screws. If desired, you can weld two studs to make replacement faster in the future. Replace the old manifold with a new one. Also replace the coil. Connect the valve lines to the cover. The switch must be connected to the ignition switch. More precisely, to the terminal where voltage appears when the key is turned. You connect the Hall sensor to the switch and the other wire to the primary coil terminal.
What is the price
A complete set for a VAZ 2106 costs from 3,000 to 4,000 rubles, depending on the manufacturer. Typically this includes:
- switch;
- distributor;
- coil;
- Hall controller;
- wiring.
Some kits also contain a set of spark plugs and high-voltage wires.
If the driver does not understand auto electrics, additional assistance from specialists will be required. Services at a service station will cost another 1000-2000 rubles. The specific cost of installation in each city can vary significantly.
Installing electronic ignition on the 2106 is carried out according to a similar principle as on other classics. If you have direct hands and a little knowledge of auto electrics, you can install the system yourself.
Source