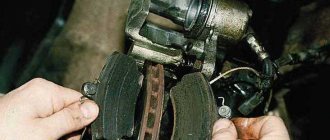
When do you need to replace rear pads?
According to the technical documentation and recommendations of the manufacturer, the rear brake pads of the Lada Kalina should be changed every 25,000 km.
The mileage of these pads is more than regulated
An important factor is driving style . Frequent and sharp pressing of the brake pedal greatly wears out the pads, and replacement may be required after 7,000-10,000 km.
Experts recommend changing the rear brake pads on the Lada Kalina in the following cases:
- Once a year, after the winter riding season.
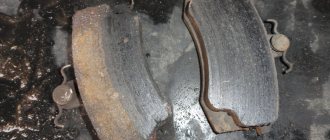
- When the pads are worn out, when the thickness of the friction pad has reached 1.5.
- When the brakes apply unevenly when braking.
- When a squeaking sound appears in the rear of the wheels when braking.
- When a car is purchased on the secondary market.
All these factors contribute to the fact that it’s time to replace the rear pads on Kalina with new ones. Under no circumstances should you install supported pads, since uneven braking and material depletion can lead to an accident with unpredictable consequences.
Replacement algorithm
The process of replacing brake pads on cars with and without ABS has only one difference . In cars with ABS, you should disconnect the wires from the sensors before starting work to avoid damaging them.
The replacement process is carried out in several stages:
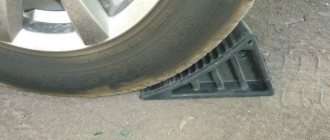
- We install wedges under the front wheels.
- We lower the handbrake as much as possible, which will reduce the tension of the cable.
- Additionally, we loosen the handbrake cable by turning the adjusting bolt, accessible from the bottom of the car.
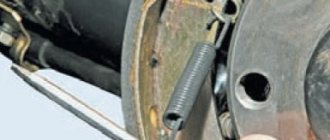
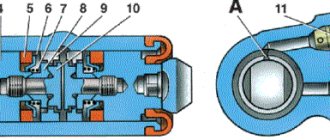
Pins on the diagram.
Tap the end evenly with a rubber hammer (or a regular one through a piece of wood).
After removing the drum, inspect the brake mechanism. Make sure there are no leaks from the brake cylinder.
We press on the pads with spatulas.
Remove the end of the spring from the block.
Remove the spring by hand.
Remove the lower spring in the same way as the upper one.
To remove the pad, you need to move the pressure spring aside.
We remove the pads from the grooves on the cylinder pistons and remove the spacer bar.
Remove the rear shoe and remove the parking brake tip.
We perform the steps to assemble the unit in reverse order.
It is convenient to tighten the pressure spring using a hook or a piece of wire.
Differences between ABS pads
Differences between brake pads with and without ABS. For the version with ABS, a recess for the sensor is required.
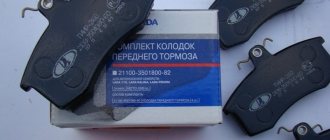
WITHOUT ABS
- LADA 21080-3502090-55
- ADR 010821
- TRIALLI GF 231
- PILENGA ITALY BS-T 1002
- FORTECH FB-2102R
- FINWHALE VR318
- LUCAS/TRW GS8210
- BREMBO S 41 503
- VALEO 562067
- SANGSIN SA183
LADA 21080-3502090-55 - without ABS. Original pads.
With ABS
- LADA 21703502090
- ADR 010921
- PILENGA ITALY BS-P 1005 N
- BM-MOTORSPORT BS 1005
- Pilenga - BS-P 1005
- Finwhale - VR317
- DAFMI - DA770
- LYNXauto - BS4603
- Fenox - BP50003C3
- Allied Nippon - ABS1703
- Sangsin Brake - SA183
Tuning and improving the brake system on Lada Kalina
Some car enthusiasts remodel the brake system in order to improve the quality of braking and facilitate replacement, or, in short, they carry out tuning. There are two ways to make your brakes better and more reliable.
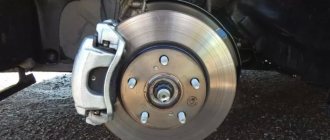
Option 1. Replacing the rear drum brakes with disc brakes from the Lada Kalina SPORT version.
Standard brakes on Lada Kalina in SPORT configuration
To do this, you will have to spend 9,500 rubles and buy parts, namely: rear wheel hubs, brake discs and pads. At the same time, braking during movement will improve, the brakes will respond faster and better. The holding of the vehicle on the parking brake will increase.
Option 2. Installing rear sports drums from or TRW. In this case, you will have to replace the brake pads from the same companies. This will improve braking performance and increase safety.
Continuation of step-by-step instructions
Now let's get back to replacing the brake pads, continuing from the point where we removed the brake drum (Step 8).
Step 9: Remove the perforated disc called the anti-lock braking system (ABS) rotor.
Now, to remove the brake pads, you need to disconnect the springs that hold them in four places. A simple device in the form of a hook was made from a piece of wire, which is very convenient for disconnecting and putting back on the brake springs.
If someone is used to using pliers or a screwdriver, please do so. This tutorial will use a crochet hook.
Step 10: disconnect one side spring.
Step 11: disconnect the lower spring.
Step 12: disconnect the upper spring.
Step 13: Carefully remove the released brake pad without damaging the ABS sensor.
Step 14: remove the top spring and spacer bar.
And we still have one more spring holding the brake pad, located on the left.
Step 15: disconnect the side spring and move the free block down.
Step 16: disengage the lever from the handbrake cable.
This completes the removal of the old brake pads.
Washing removed parts
If desired, everything you removed can be washed with gasoline or brake cleaner. To do this, it is convenient to use a small paint brush.
We wash the springs, the spacer bar and the lever for the manual drive of the pads; we will need it later.
Step 17: disconnect the brake pad manual drive lever from the old pad. To do this, you need to pull out this cotter pin.
Step 18: press on your finger and disconnect the lever.
Now we do the same with the new block, only in the reverse order.
Step 19: Insert the finger, put on the washer, insert the cotter pin and spread the antennae apart.
Ready! The new block can be installed in place.
Step 20: You can immediately put the lower tension spring on the pad, and then thread the manual brake lever into the parking brake cable.
Step 21: fix the block using a side spring. For these purposes, it is more convenient to use an awl.
We start the spring. The main thing here is to get into the hole. When the tip of the spring hits the hole, you will hear a characteristic click.
From this moment on, the development of events can take the most unexpected turn. Please be careful, because now we will look at the most common mistakes due to which the brake drum does not fit on the pads.
Which ones to choose
Today in auto shops and at the car market you can find pads for Kalina from dozens of manufacturers, some of which are either uncertified products or even fakes made in the nearest gateway.
It is better to buy brake pads in specialized stores, requiring a quality certificate for the purchased product. As for the manufacturer, it is better to give preference to original spare parts.
Front VAZ brake pads for Lada Kalina have catalog number 2110-3501080, and cost between 320-400 rubles. A good alternative for them are analogues from foreign companies such as Pilenga, ABS, Bosch, Ferodo, Master-Sport, Hella, Delphi and others.
The original rear pads for Kalina are numbered 11180-3502090-55. Their cost is 500-650 rubles.
Replacing brake drums Lada Kalina
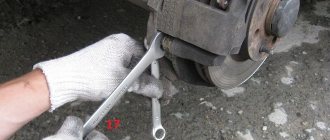
You will need : remove the rear wheel and prepare a high hex head “7”, a hammer, a wooden block, mounting blades.
To remove the Kalina brake drum :
- Unscrew the two wheel guide pins using a 7mm hex socket.
- Try to remove the drum with your own hands.
- If that doesn't work, try knocking it off with a hammer through a wooden spacer.
After removing the drum, do not press the brake pedal, otherwise the pistons may come out of the cylinder completely.
To install the brake drums, you must first recess the pistons into the working cylinder. To do this, we press on the pads with two mounting blades, leaning against the shoulder of the brake shield.
For Kalina's brakes to start functioning, with the car standing, press the brake pedal 2-3 times to bring the pads to the drum.
THE BETTER DISC BRAKES VS. DRUM MODIFICATIONS
The effectiveness of disc brakes versus drum brakes has been proven many times when installed on sports car models. They are installed on “foreign cars” not only because of effective braking. They are able to ensure simultaneous activation of the brake mechanisms on all wheels, and this allows improving the vehicle's handling in any road conditions.
The advantages of rear disc brakes include the following:
- Reducing the braking distance of the car several times;
- Reducing the time for brake mechanisms to operate;
- The time required to replace brake pads is reduced. the ease of their replacement is noted;
- Increases the safety of driving a vehicle;
- Uniformity is observed when the brake mechanisms of all wheels are activated;
- Reduced unsprung masses of the rear axle;
- Good removal of excess heat under extreme driving conditions;
- There is no need to periodically tighten the handbrake cable;
- The problems of pads freezing to discs in the cold season disappear.
Disc or drum brakes?
The list shows an impressive list of advantages, but there are also specific disadvantages to installing them. When manufacturing the car, the Volzhsky plant does not install the ZDT on the Priora; it’s hard to say why this is, probably to reduce production costs. By installing rear disc brakes on the Priora, technical changes are made to the design of the vehicle. This may cause problems during technical inspection.
Any design receives a comprehensive assessment during test trips at the test site. The vehicle is equipped with well-balanced and properly adjusted brake systems.
If suddenly a car gets into an accident, even if the accident was completely innocent, the owner will have problems due to unauthorized changes in the design features of the car.
Installing rear disc brakes on a Priora with your own hands is quite possible. But after its installation is completed, careful fine-tuning and configuration of the system is necessary. Doing it yourself is difficult, but possible.
Article number and price of recommended front brake pads for Kalina from third-party manufacturers
The brake pads installed from the factory have satisfactory quality and performance characteristics, so for replacement it is better to choose analogues from third-party manufacturers. The recommended non-original consumables listed below will ensure smooth and intense braking without any extraneous sounds.
Table - The best analogs of pads 21100-3501080-00 and 21100-3501080-01
| Manufacturer | vendor code | Estimated cost, ruble |
| Bosch | 986491700 | 1000-1200 |
| Remsa | 22100 | 450-700 |
| Road House | 222100 | 500-600 |
| Ferodo | FDB527 | 850-1000 |
| Delphi | LP551 | 660-800 |
Table - Good analogues 11180-3501080-00
| Manufacturer | Catalog number | Approximate cost, ruble |
| Profit | 50001325 | 540-650 |
| Road House | 222102 | 680-850 |
| TRW | GDB1446 | 1100-1300 |
| Ferodo | TAR527 | 540-620 |
| ATE | 13046029652 | 950-1100 |
Three preparatory steps
The standard equipment is equipped with: front disc brakes, and at the rear, a drum mechanism familiar to domestic car enthusiasts.
DOT fluid reservoir It must match o. Excess liquid is drawn out of the tank using a syringe or bulb. First, of course, you need to unscrew the cap (see figure below).
The marks on the tank are on the side
After replacing the pads, the fluid must be added back.
The body can be secured using a jack and a safety net. All actions are similar to changing a wheel. The jack is installed in front of the arch, and then, having shifted the body to a sufficient height, a safety part is placed under it. The wheel itself needs to be removed too.
Procedure:
- Loosen the fastening screws on the disk;
- Carry out actions with a jack;
- Remove the wheel.
The last step is to release the handbrake. Don't forget this.
For vehicles with ABS
Before replacing, disconnect the ABS system sensor. It is installed behind the hub on the outside of the shield.
Find the connector Remove the sensor
All the steps look simple: disconnect the connector and use a TORX E-8 wrench to unscrew the fastening screw. The sensor housing can then be brought out.
Entry three. Brakes.
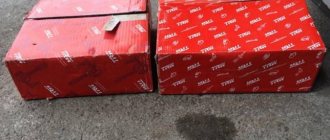
In this post we will talk about rear brakes. Not long ago I began to notice that the rear brakes began to over-braking and make rustling sounds when braking. Over-braking the rear axle in icy conditions does not cause any positive emotions, and even more so if your wife is driving. Therefore, it was decided to quickly look for the cause. When I bought the car, I promised myself and everyone around me that in the near future I would only drive, and do only the most necessary things, without fanaticism. Yeah... Figurines. The poet’s soul couldn’t stand it... A plan was immediately born in my head about what needed to be changed. Absolutely everything was replaced except the hub itself and the handbrake cables. As they say, change is change :) On the first trip after buying the car, I had a strong feeling that it was time for the rear wheel bearings to retire. As a result, the list of necessary things included: 1. Rear wheel bearings 2. Rear brake pads (preferably ATE) 3. Rear brake cylinders (preferably ATE) 4. Brake drums (only factory and nothing else)
After going to the store, I was a little puzzled by the fact that the choice of brake pads for Viburnum with ABS is very small. To be more precise, only two companies. Either the factory or NIPPON. I came home and started smoking viburnum forum. And in fact, there is no choice. And the culprit is the ABS sensor, which is visible through the brake pad. Well, in the end I decided to buy NIPPON. I went to the store and bought: 1. Rear wheel bearings SS-20 At first impressions, the bearings left positive emotions. Beautifully packaged, nut as a gift, detailed installation instructions.
2. NIPPON rear brake pads. At first I thought the company was so-so. It turned out to be a Japanese company (well, of course I don’t know if it’s Japan, but something like that). I also liked how everything was packaged, everything was beautiful, napkin, instructions, etc.
3. Rear brake cylinders ATE.
4. Brake drums factory.
On the weekend I went to the garage and got to work. The process is the simplest, so there is no point in describing it.
During the analysis, it turned out that everything feels very good, nothing is leaking anywhere, nothing is rubbing, and everything is in its place, the pads are not even worn out. The only thing was that the cylinders were a little sour, but they worked fine. What was I doing for nothing? Everything can be replaced, without any dispute about who is to blame and who is not.
I quickly changed everything and put it in place
Next I took up the bearings. I pressed it out and pressed it in without much effort or difficulty. As usual, it couldn't be done without a sledgehammer. As my uncle said, “H... what can you do without a Russian sledgehammer”
I read a lot about bleeding ABS brakes. On the Kalina forum, opinions are very divided. I'll tell you from my own experience. I pumped it the old fashioned way. WITHOUT TURNING ON THE IGNITION AND ANY OTHER MANIPULATIONS! The only thing is that I pumped it not crosswise, but counterclockwise. Starting from rear right - front right - front left - rear left. Everything has been pumped up perfectly and is working. What can I say. The brakes have become wonderful. Brakes excellent, ABS works well, no extraneous noise or excessive braking. I achieved what I wanted, and I’m very pleased with the result. Oh yes, and now I don't hear the humming bearings, which is good :)