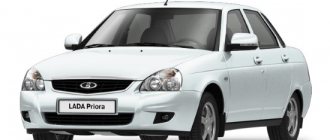
When to change the rear pads of LADA Kalina
The peculiarity of the LADA Kalina braking system is that when braking, the load is distributed unevenly and most of the kinetic energy is absorbed by the front brakes. Therefore, replacing the rear Kalina pads is done 2-3 times less often than the front ones. To find out when it’s time to change the pads, it’s useless to rely on the Kalina’s odometer readings. The number of kilometers a car travels between pad replacements can vary by half. The rate of their wear is influenced by many factors, some of which cannot be controlled and taken into account:
- driving style (during aggressive driving with frequent sharp acceleration and braking, the pads can wear out several times faster than during calm, smooth driving);
- quality of friction linings (counterfeits or pads from cheap brands last much less); the condition of the rear brake drums (if they have uneven wear or ellipticity, the wear rate of the pads increases greatly);
- exposure to external factors (chemicals that are sprinkled on the road surface in winter, other active substances that get on the friction linings).
Under normal conditions, the Kalina rear pads are replaced after 50-60 thousand kilometers. But you need to focus not on mileage, but on the thickness of the friction linings. If they are chipped, peeling, or become thinner than one and a half millimeters, they must be immediately replaced with new ones. Otherwise, damage to the brake drum or leakage of brake fluid may occur (if the linings are thin, the pistons may completely come out of the brake cylinders, which will cause depressurization of the circuit).
Installation
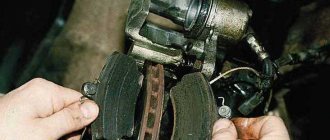
Before installing new brake pads, remove dirt and wipe the rear brake parts. Assembly is carried out in reverse order. To install the pressure spring with the block, use the lower tension spring, hooking its end to the hook of the pressure spring. We tighten the spring with a screwdriver and insert the hook of the spring into the hole in the block.
Move the pistons to the center of the cylinder, bringing the pads together with two mounting blades. After completing the work, press the brake pedal 2-3 times to bring the pads to the drum. For clarity, the entire process is also shown in the video:
Let us remind you that periodically monitor the serviceability of the brake system and change the front brake discs on time.
Replacement of brake pads for rear wheels of Lada Kalina VAZ 11173-11183-11193
Replacing brake discs
The brake pads of the rear wheels must be replaced only as a set - all four pads. Replacing the pads of only one brake mechanism can lead to the car pulling to the side when braking. If the fluid level in the brake hydraulic reservoir is at about 0, then before installing new pads, use a syringe or a rubber bulb to pump out some of the liquid from the reservoir so that when the pistons are recessed into the working cylinder of the brake mechanism, the liquid does not flow out from under the reservoir cap. The parking brake lever must be lowered all the way (the car is released). Remove the rear wheel and securely fix the car on a factory-made support stand
Using a socket wrench (preferably a high hex head) “7” we unscrew the two guide pins of the wheel.
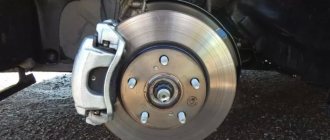
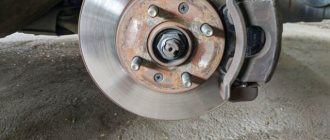
Remove the brake drum. If the drum cannot be removed, then, turning it evenly, use a hammer with a plastic tip (or an ordinary hammer through a wooden block) to strike the end of the drum.
Do not press the brake pedal after removing the drum, as the pistons may come out of the cylinder completely.
Using a screwdriver, we remove the hook of the upper tension spring from engagement with the block...
...and remove the spring.
We remove the upper stops of the pads from the slots of the cylinder pistons and remove the spacer bar.
Using a screwdriver, pry the hook of the lower tension spring out of engagement with the block... ...and remove the spring.
Using a screwdriver, disengage the guide spring from engagement with the block.
Remove the front pad. Having disconnected the guide spring from the rear block, lower the block...
...and remove the manual brake pad drive lever from the hole in the parking brake cable end. Straightening the cotter pin...
...and remove it from the hole in the finger of the hand-operated parking brake lever. Remove the washer from your finger.
Remove the lever and remove the finger. Install the manual shoe drive lever onto the new shoe in the reverse order. Install new pads in reverse order. To make it easier to assemble the spring guide with the block, we hook a wire or cord approximately 0.5 m long to the hook of the spring.
While tensioning the spring, insert its hook into the hole in the block... ...and then pull out the wire. Before installing the drum, it is necessary to recess the pistons inside the working cylinder. For this…
...press the pads with two mounting blades, leaning against the shoulder of the brake shield. After installing the drum, press the brake pedal several times to set the pistons to the working position. Adjusting the parking brake.
..
211 ..
What is needed for a successful replacement?
The Lada Kalina owner who dares to replace him will need to stock up on the following auxiliary “work equipment”:
- wheel wrench;
- wire brush and pliers;
- a screwdriver with a slotted tip;
- keys whose dimensions are “7” and “12”;
- jack;
- two M8 bolts, which allow you to compress the drum;
- new fluid intended for brake components;
- a syringe for collecting liquid from the system tank;
- suitable container for collecting liquid;
- a hammer with a rubber working part and two pry bars;
- penetrating agent (“WD-40” or equivalent);
- of course, new pads.
All this will be required when replacing the rear brake pads with your own hands.
Important! We replace the pads only as a set and on both sides.
Which brake pads are better for Lada Kalina photo, video
Chevrolet Lacetti CDIX Logbook Replacing rear brake discs and pads
Replacing the front brake pads on a Lada Kalina is a fairly simple process, but motorists are often short-changed when choosing parts. It is worth understanding that the operation of the unit, as well as its wear, depends on the correct choice of spare part.
Video about choosing front brake pads:
https://youtube.com/watch?v=o6PqQJOk3dg
This video will tell you how to choose the right front brake pads, and also contains tips from professionals.
Choosing front pads for Kalina
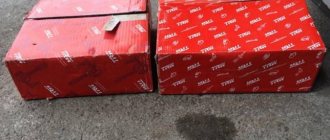
The choice of front brake pads should be treated carefully, since the spare parts market is saturated with low-quality and counterfeit goods. Thus, it is necessary to check the presence of holograms and branded packaging. Inside the box there is always an instruction manual that states who made it and the composition of the friction part.
So, let's look at what front pads are best to use on the Lada Kalina.
Original spare parts
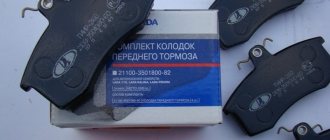
Factory set of brake pads for Lada Kalina
Let's start with the original part from AvtoVAZ. The catalog number of the part by which the search is performed looks like this - 2110-3501080. These are the same pads that are installed on the VAZ 2110 and Priora. The factory decided not to change the structure of the front brakes. Their cost is 400 rubles per set.
Analogs
ABS brake pads close up
Now, let's look at possible analogues that can be installed instead of the original brake pads on the Lada Kalina.
Table of analogues, as well as their catalog numbers and prices:
| DAfmi | D140IE | 390-450 |
| Master-Sport | 13-046D-2965-2-E-SET/4/-MS | 590-630 |
| Tomex | 10-361 | 600 |
| Mapco | 6502 | 620 |
| Pilenga | FD-P2003 | 850 |
| Trialli | PF965 | 850 |
| Fenox | BP40006O7 | 865 |
| Finwhale | V210 | 910 |
| Hola | BD811 | 950 |
| Optimal | 12075 | 978 |
| ABS | 37079 | 1070 |
| EGT | 322107EGT | 1150 |
| Denckermann | B111048 | 1165 |
| LRP | 05P988 | 1165 |
| Samko | 5SP988 | 1185 |
| LINXauto | BD-4601 | 1200 |
| FiT | FP0289 | 1320 |
| TRW | GDB1446 | 1350 |
| Road House | 2221.02 | 1350 |
| Icer | 181308 | 1360 |
| Brembo | P41003 | 1700 |
| Delphi | LP551 | 1765 |
| Girling | 6114461 | 2400 |
| Feredo "Premium" | FDB1325 | 3000 |
Ferodo brake pads for Lada Kalina
So, it is best to install products from the following manufacturers on Kalina: Fenox, Finwhale, Hola, TRW, Ferodo and Road House.
Tuning kits
It is worth considering an alternative option for choosing pads - tuning. Only a few manufacturers produce spare parts for Kalina, which do not require alteration of the chassis. The most famous are: Brembo, Delphi and Feredo. The pads are mounted on standard seats.
TRW front brake pads recommended for installation on Lada Kalina
For lovers of complete tuning, it offers a complete set of brake systems, which includes: brake discs, calipers and pads. Of course, for full efficiency, it is worth installing everything in one set.
Set of sports brake pads for Kalina from AvtoVAZ
Causes of brake pad failure
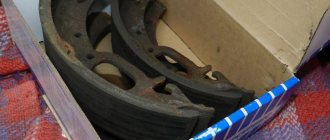
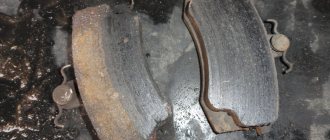
For comparison, new and “erased” front brake pads
Everyone knows that a car's brake pads are the first line of safety, but not everyone understands why they fail. Thus, a malfunction of this element can lead to fatal consequences, since untimely replacement can lead to an accident, even fatal.
Let's consider the main reasons for the failure of front brake pads:
- Wear of the friction part is the most common reason.
If the thickness is less than 1.5 mm, then the pads need to be replaced. Critical wear of the friction part of the pad - If liquid gets on the working fraction, it also causes the pads to fail.
- Cracks, scratches and other damage indicate that the pads need to be replaced.
The main reasons have been discussed, and we can move on to the results of our article.
When choosing front brake pads for the Lada Kalina, you should take into account the opinion of the majority of motorists, experience and recommendations of experts. Thus, pads from Fenox, Finwhale, TRW, Brembo and Feredo are made from higher quality material than the original ones, and therefore last much longer.
When to replace
Removing the instrument panel assembly with heater Lada Kalina
As in all other cars, replacing the rear brake pads on the Lada Kalina must be done after passing a certain number of km. The required mileage is indicated in the documents for the car, but in fact it varies.
Almost everything depends on the operation of the car, and if on some cars difficulties with the rear brakes arise after 50,000 km, then other car owners enjoy the ideal work of the iron stallion even after 70,000 km. Replacement of rear brake pads. Priora, Kalina. Replacement of rear brake pads with abs. Below we list signs that may indicate the need to replace the rear brake pads on your Kalina:
- deterioration of braking properties;
- when you press the brake pedal, a corresponding grinding noise may appear due to the friction of the iron part of the shoe on the brake drum (after the lining is abraded);
- severe thinning of the lining on the brake pad (as we said above, the acceptable thickness is 1.5 mm).
So, if you noticed one of the 2 signs listed above, or when disassembling the brakes, a third one was found - immediately buy new rear brake pads for yourself! Their cost is even lower than the cost of healing or repairing a car as a result of a tragedy, which can be caused by weak brakes. Detailed article about replacing rear brake pads on Lada Largus, pad part numbers
Next we will talk about how to replace this element on a Lada Kalina car.
Priora Replacing rear brake pads with ABS Priora. Replacing rear brake pads with (ABS). Replacing rear brake pads on Lada Kalina:
When purchasing rear brake pads, pay attention.
Replacement of rear brake pads. Priora, Kalina. Replacement of rear brake pads with abs.
Removal
You will need : new rear brake pads, a set of keys and remove the car from the handbrake.
Check the brake fluid level, if it is near the “MAX” mark, then pump out some of the fluid. Jack up the car and remove the wheel. Further:
- Unscrew the guide pins.
- remove the drum from the hub, knocking it with a hammer through a wooden spacer.
Next in order:
- disengage with the spring block.
- and remove the upper spring first.
- then the bottom one.
- disengage the pressure spring from the block.
- remove the front pad.
- remove the spacer bar.
- Having disconnected the pressure spring from the rear block, lower the block.
- remove the rear shoe lever from the hole in the handbrake cable end.
- pull the cotter pin out of the hole.
- remove the washer.
- pull out your finger.
We change the pads correctly!
So, to replace these components on Kalina we will need:
- Balloon key.
- Head for 7 with a knob.
- Pliers (it is advisable to have long-nose pliers on hand, they are more convenient).
- Flathead screwdriver.
- 30mm socket with a wrench (can be useful if you have to remove the brake drum with bearing by twisting the hub).
Step-by-step instructions for replacing rear brake pads on a Lada Kalina car look like this:
- First of all, you need to put the car in gear, install the stops and lift the car with a jack. Then tighten the bolts and remove the wheel.
- After the wheel is removed, the drum studs should be unscrewed. Replacing front brake pads on Lada Largus. For this we need a 7 head with a knob.
- Remove the brake drum. Replacing brake pads yourself. Video step-by-step instructions from the Auto Club b2motor.ru. On the site you can always find other videos on car repair. Underneath it, you need to find the cotter pin at the top and carefully remove it. Long nose pliers may come in handy here as the cotter pin is positioned awkwardly.
- Remove the lower spring. Self-replacement of brake pads on the rear wheels of Lada Largus. To do this, you need to pick up the fastener with pliers and pull it to the right.
- Remove the central retaining spring in the same way.
- After this, you can remove the right block. This can be done without even touching the upper spring; you just need to firmly grasp the block and pull it back, lifting it up until the fixing plate falls off.
- When the spring falls off, the pads are removed by hand. By disconnecting the central spring, you can also remove the left block with the handbrake lever.
- We replace the pads and reassemble in the reverse order.
In terms of time, replacing pads on one wheel takes about 1-1.5 hours, if you have all the necessary tools at hand. Replacing rear brake pads on Kalina with video. In order for the replacement of rear brake pads on a Lada Largus car to be successful, you need a clear understanding of the structure of the brake unit, both as a whole and its individual components. The procedure is quite simple, the main thing is to follow the step-by-step instructions, and then the replacement will be done quickly and easily.
If some points remain unclear to you, you can watch the video instructions for replacing these components. Remember, brake pads must be replaced on both wheels at once, then you will be able to achieve excellent braking in any situation.
How to replace front pads
It is known that the disc mechanism consists of a brake disc and a caliper, and pads resembling flat plates in shape are attached to the latter. To replace the pads, the body is hung on a jack, the wheel is removed, and then the caliper fasteners are dismantled. This mount itself consists of two screws “1”, but only one of them (the top one) is unscrewed.
The sequence of replacement actions is “recorded” in the photo. Each photo corresponds to one of the steps.
Replacing front pads VAZ-2192/2194
The total of these steps is five:
- We remove the wheel as if we are going to change it;
- Find the locking plate “2”, which will be bent, and unbend it (use pliers);
- Holding part “3” with a 17mm wrench, unscrew screw “1” with a 13mm wrench (a socket head fits well here);
- Remove the brake hose from the groove;
- Fold the caliper up to gain access to the pads.
It is easy to select front brake pads for a Lada Kalina car.
But if a tuning kit is used, most likely the wheels also need to be changed. After replacing the pads, the caliper must be replaced. To do this, you will need to press on the piston of the brake cylinder (it needs to be pushed inward).
Action before installing the caliper, VAZ-2192/2194
We used a makeshift lever from a flathead screwdriver. Nobody forbids, however, pressing the piston with a sliding clamp. Happy replacement!
After replacing any part related to the brake system, it must be allowed to “break in”. You need to press the brake pedal 3-5 times, and only then you can drive out onto the road. Still, installing new pads is not the same as replacing a light bulb. At first, the brakes feel like they are ineffective, but this feeling will go away after 10-20 braking sessions.
General Characteristics of Pad Problems
The most common problem with brake pads (see photo) is squeaking, and this sound can be produced even by a newly purchased car. This sound will continue for several days while the grinding process takes place. After this, the pads on the Lada Kalina car will work silently.
A layer of material can be erased much faster by braking sharply several times while driving. Therefore, accelerate the car to 90 km/h or more if you have a Lada Kalina Sport, and press the brake hard. The procedure must be repeated until the front or rear pads heat up to the required temperature and their excess parts burn out.
However, this does not happen all the time. If even after prolonged use they do not stop squeaking, you will have to replace them. Keep in mind that the brake does not always start to work poorly; in some cases it only causes negative sensations for the driver. You must immediately try to determine the cause of the sound.
Squeaking in the brakes can be caused by foreign moisture that gets inside when driving at high speeds, which happens quite often if you have a Lada Kalina Sport. In this case, clean the brakes and wait a few days before using the brakes again. In addition, the front and rear pads begin to squeak when the ambient temperature drops below zero.
The work of replacing the front brake pads of Lada Kalina takes place in several stages
We remove the wheel. We tear off the mounting bolts while the car is on the ground, then tighten the handbrake and put the gear shift knob in the first gear position. On the side where the pads will be replaced, the wheel must be hung
Other wheels are strengthened using wheel chocks (in extreme cases, bricks), which will eliminate the risk of spontaneous movement during work. It is important to install the jack correctly - if you make a mistake at this stage, you can simply overturn the car during the work or, in any case, damage its body. To make work easier, turn the steering wheel as far as possible, opening up free space for work.
Remove the brake fluid. This is best done using a special syringe. This must be done to prevent it from spilling directly onto you and the surrounding reality during the work.
Removing old brake pads.
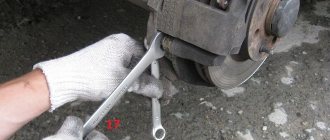
Using a 13mm wrench, unscrew the bolt holding the caliper
Pliers and a screwdriver will help in bending the locking plate: in this case, you need to make sure that the nut does not turn (a 17mm wrench will help to hold the nut). We recess the brake piston a little (since old brake pads take up less space, the latter needs to be freed up for new pads). A clamp or, in its absence, an adjustable wrench will help here; After all, hand force may not be enough to press the piston.
You can do it a little differently: leave the pad on the inside, after which a screwdriver resting on the unused part of the disk (closer to the axis) can be used as a lever. By pulling the handle towards you, you can move the caliper (in relation to the brake disc), while simultaneously pressing the piston deeper.
Installation of new brake pads. We install the pads, lower the caliper, and use a bolt to secure the safety plate, which protects the bolt from loosening and unauthorized unscrewing. Align the steering wheel so that the wheels are aligned strictly in the direction of travel. We put the wheel in place and attach it to the mounting bolts. We tighten the bolts after the jack is lowered. Upon completion of the work, it is important not to forget to top up the brake fluid to the maximum level.
It should be remembered that replacing brake pads on only one side (for example, only on the left or only on the right) is not productive. Moreover, such a replacement can play a cruel joke on a motorist (especially an inexperienced one, but even a professional one), when the braking force is distributed unevenly across the wheels, and as a result, one side slows down more than the other, and the car skids.
Another important tip. Immediately after replacing the brake pads, you need to plan the operation of the car in such a way as to drive at least 200 kilometers in a brake-friendly mode. It is better to cover this distance without sharply pressing the brake pedal, and it is better to reduce the speed in advance, and use the capabilities of the car’s engine to do this.
Also read with this article:
Replacing the thermostat Lada Kalina
How to replace a bumper on a Lada Kalina with your own hands
Replacing the oil filter and oil in the Lada Kalina engine
Adjusting the speed sensor on Lada Kalina. Fast and easy
Necessary tool
The key is 17/14. Will need another 13.
To carry out dismantling, you will need 2 keys (13 and 17). If ABS is available - TORX (1/4″; E8).
Replacement algorithm
- Raise the car on a jack, having first removed the bolts from the wheel.
- Remove the wheels themselves and use a pry bar and a screwdriver to press out the brake cylinder. To make the process easier, it is recommended to immediately turn the steering wheel to the left or right, depending on the side.
- On the other side of the caliper, remove or press out the locking plate.
- Use a 17 wrench to hold the nut and unscrew the guide bolt with a 13 horn.
- Open the brake caliper to remove the old pads.
- Bring the cylinder to the very end and insert new parts, then close it and assemble everything in the reverse order, go to the other side of the car.
If you have an ABS system, you need to take this feature into account. Before starting work, you should unscrew the sensor so that it remains intact during dismantling. It is secured with 1 screw, which is unscrewed with an E8 star-head. If the bolts do not unscrew, you must first spray them with WD-40 lubricant, and after 15 minutes try to unscrew the parts. It can also be used for a new pad to make it easier to insert them.
Car with ABS.
Immediately after installation, you need to bleed the brakes by pressing the pedal several times. Over the course of 500-700 km, the plates will grind in, so braking will be worse.
It is recommended to remove the brake fluid to a minimum before starting work. This is necessary so that it does not leak out during replacement, since new parts are always thicker than old elements. In this case, when replacing, you will need to “bring the caliper together.”
If the brake fluid is under the cap, pump out a small amount with a syringe so that the fluid does not flow when the brake cylinder is compressed.
When is it necessary to change brake pads on a viburnum?
Of course, you don't have to change your pads every year. The manufacturer clearly establishes the mileage that factory products must run. Another thing is that each car enthusiast has a different driving style. Some people like active driving with frequent braking, while others prefer a quiet ride.
In the first case, replacing brake pads may be necessary much faster, for example, after 5-7 thousand kilometers. While with a quiet ride they can last twice as long. But that's not all.
It is advisable to change the pads in the following cases:
- When buying a car on the secondary market;
- when a strong, unremovable squeak appears during braking;
- with a friction pad thickness of less than one and a half millimeters.
To perform the replacement, prepare a group of necessary tools.
You will need:
- A jack to lift the car, remove the wheels and support the vehicle during the entire repair period;
- wheel wrench;
- a flat-head screwdriver, with which you can perform most operations;
- pliers;
- wrenches (socket and open-end). As for sizes, prepare products for “thirteen” and “seventeen”;
- wheel chocks or bricks that can be used to secure the car;
- a knob with a “thirtieth” and “seventh” head;
- clamp.