The need to replace the generator on a VAZ car may occur when its windings burn out, an interturn short circuit occurs, the case breaks, and other reasons. But today, I would like to talk about replacing the VAZ generator in the case when its power is no longer sufficient...
Imagine the situation - you are the owner of a VAZ 2101 - 2106, you bought and installed a powerful amplifier, installed fog lights of 50 W each. A standard generator that produces a maximum current of 42A cannot cope with such a load.
And if all additional equipment is turned on, then there will be nothing left to charge the battery. After all, judge for yourself, the high beam in the VAZ 2106 has become “heavier” by 100 W, while with a standard generator and on a penny it does not shine with its parameters. It’s these types of cases of replacing a VAZ generator that I want to talk about. Let's consider which generators can replace our long-suffering G-221.
Tuning the “classic” series VAZ 2101 – VAZ 2106 – replacement of the standard generator
In general, it would be unfair to accuse the generator of the G-221 model, previously installed on VAZ 2101 - 2106, of low reliability or of the fact that it cannot cope with providing energy to the car in its basic configuration.
At the same time, it should be recognized that the maximum 42A produced by this generator cannot be considered too impressive and already on the VAZ 2106 model, in which the high beam, compared to previous versions, is “heavier” by 100W, the characteristics of the G-221 are at the limit . If we talk about even minimal tuning of classic VAZ cars, such as installing additional electricity consumers in the form of powerful fog lights, a modern sound system, heated mirrors, etc., then you can practically forget about regular battery recharging using the G-221. The optimal solution in this situation is to replace the G-221 generator with its more powerful analogue. Time does not stand still, and choosing a sufficiently powerful new energy source for the VAZ 2101 - 2106 is not so difficult. The first simple and affordable way to solve this problem is to install a generator from a VAZ 2105, which is capable of delivering a maximum current reaching 55A. In general, this is not so much, but to provide power for a small amount of additional equipment, such indicators may be quite enough. When installing such a generator, you do not need to perform any modifications to the mounting. Certain changes will only have to be made to the option of connecting the generator to the on-board electrical network. This need is associated with different placement of the regulator relay (on the “five” generator it is combined with the brush assembly, and on the G-221 it is placed separately).
A generator from a VAZ 2108 or VAZ 2109, which also produces 55A and is capable of successfully providing a number of additional devices, is also quite suitable for this role.
As a third option, we can propose replacing the standard VAZ 2101-2106 generator with a VAZ 21074 generator with the nomenclature 372.3701-03. This source of electricity is capable of delivering up to 73A and such power indicators should be enough to realize almost any tuning fantasies. As in previous options, installing a generator with your own hands does not require much effort or special skills.
An even greater power reserve is provided by installing a generator taken from an injection Niva. This unit already produces 80A, which makes it possible to ensure the operation of a large number of different devices even at idle engine speed.
Finally, the fifth and last option for replacing the G-221 generator is to install a modern unit from a VAZ 2110, capable of generating 105 - 110A (depending on the modification).
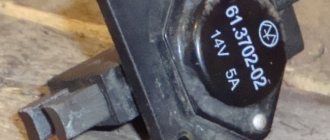
As for the practical implementation of such a replacement of the generator on a VAZ 2101-2106, as an example, consider the installation of a generator from a VAZ 21074, or rather its most successful modification - model 2107-3701010, for which, moreover, it is quite easy to find spare parts. Let's make a reservation right away - the standard relay-regulator K1216EN1 is far from perfect (in particular, it has very poorly implemented thermal compensation), so it is recommended to replace it with something more reliable, for example, with the 67.3702-01 regulator, which has useful seasonal settings.
Again, as far as the physical installation is concerned, standard fasteners are used, but the electrical connections deserve more detailed mention, although there are no special problems in their implementation and this procedure is performed in the following sequence:
- First of all, we disconnect and isolate the wires coming from the standard relay-regulator (traditionally it is located on the left wing in the area of the brake and clutch reservoirs).
- Next, we connect the new generator, while almost everything corresponds to the previous diagram: wires with a ring circuit, traditionally thrown onto the bolt. We do not connect the gray wire anywhere, but simply isolate it, and connect the yellow wire to the terminal.
- As for the control lamp (3W power), we use double wires (orange and yellow) to connect it.
By completing these simple operations, you can forget for a long time about all past problems associated with a lack of power in your car’s energy system.
Source
Recommendations
Comments 31
Thank you, I found an old normally closed relay in my place today and it seems that through it it turns out...you can even use a separate wire after starting the current through it from the genes directly to the starter.
ok...however...catch it==oops==thank you == but it’s not clear how to connect what...maybe you can share it with us...
In the end, I didn’t connect the control lamp. I use a voltmeter to guide me. The circuit according to which the gene was connected.
This generator has only 40A output plus a rather unsuccessful brush assembly in terms of protection from dirt (there is no protection at all). There are no additional terminals for connecting a light bulb or a relay to control a light bulb. I had one like this, the relay was somehow modified so that it simply measured the on-board voltage and lit the light bulb if the voltage dropped below 13.0 V, which was quite annoying a couple of times. After lying around, the light did not go out for a long time, despite everything being in good working order - the battery just ran out and was charging.
Let it be for now. Before installing the winch, there is still a lot of work to be done and it is not a fact that this engine will remain... 40A is enough for current needs, I think. But I feel uncomfortable driving without warning lights. I thought there was a proven solution, but no, it turns out it’s not that simple (((
There are a lot of solutions - the question is which one will be easier for you to implement. The simplest thing is a voltmeter. The cigarette lighter is digital. Here's a video and there are links to Aliexpress
When you change the generator to a more powerful one - it will have additional diodes in the rectifier bridge and connect the relay-regulator through them - you will use the light bulb there.
This is the first thing I did)
Look at him and that will be enough.
This generator has only 40A output plus a rather unsuccessful brush assembly in terms of protection from dirt (there is no protection at all). There are no additional terminals for connecting a light bulb or a relay to control a light bulb. I had one like this, the relay was somehow modified so that it simply measured the on-board voltage and lit the light bulb if the voltage dropped below 13.0 V, which was quite annoying a couple of times. After lying around, the light did not go out for a long time, despite everything being in good working order - the battery just ran out and was charging.
maybe stop masturbating?
I read somewhere that the life of a conventional generator is limited by the life of the brushes and copper rings on the rotor. And the resource of the brushless gene is limited by the resource of the bearings, and this (I don’t remember the numbers) is an order of magnitude greater. Examples of installations WITHOUT BRUSH generators on UAZ engines. The idea is clear, moving the bracket into place will not be difficult.
I would agree, if not for one significant BUT - the maximum speed of these tractor generators is often less than the maximum speed of a gasoline engine. We add here the gear ratio from the crankshaft pulley to the generator pulley and we get a broken generator. Just because it serves someone well and for a long time does not mean that it will work that way for everyone.
READ How to connect the Internet to a second computer through the first
Well, I don’t know, people put it on and don’t know grief
there is nothing to fall apart in the rotor! it has no windings
This is called the “survivor’s mistake” - like, since everything is OK for them, then it’s the same for everyone. However, let’s look at the technical data: Nominal rotation speed, min-1 5,000 Maximum rotation speed, min-1 6,000 I.e. It will produce the declared 110A at 5000 rpm, and at 6000 it has the right to break down. I’m licking my lips in the direction of these generators... But I don’t want to take any risks.
Well then you need to install a bus they have there and 200 amperes each
Installation of generator VAZ 2101, 2106, 2107 classic
So, for a long time there was an idea to replace the old G221 generator (42A) with something more powerful and modern. I decided not to reinvent the wheel and install a generator 37.3701 (55A) from 2108 (it was also installed on sevens, fives, etc.). The replacement itself should not cause any problems, because... This is the simplest process of unscrewing a couple of nuts, but only if you don’t have a double stabilizer, then sadness. Personally, I had to unscrew the right engine mount, lift the engine, and only then was I able to remove the lower bolt of the generator, because it rested directly on the upper stabilizer. Well, okay, we won.
Fortunately, I had a similar contraption to help me, otherwise I would have had to lift the engine with my hands, and that’s hard.
Old - new, 42 vs 55
Now we fix the charging circuit: here is the original circuit, we trace where the wires go from the generator - tidy - regulator relay.
Here is a diagram from Five with the same generator:
Classic charging circuit with 37.3701 generator
Now we take wire cutters, remove the regulator (put it in a box - it won’t be useful anymore), the orange and gray wires (from terminals 67 and 15) can be removed completely or insulated. We remove the charge lamp relay and throw it away - it’s definitely old. We bite off the terminals from the yellow and black wires going to the charge lamp relay and solder them and insulate them. Next, the yellow wire is connected to the generator chip. We screw the power wires “+” onto the generator stud.
Soldered wires from the charge lamp relay: connect black to yellow.
Next, we climb into the cabin and take out the tidy. We cut the track from the charge lamp, which goes to ground, and throw a jumper from this contact onto the track of the adjacent oil pressure lamp, on which +12V appears when the ignition is turned on.
This is how the diagram turned out, the wires marked with a dotted line - remove or insulate, cut the track on the dashboard and throw a jumper from the wire onto the oil pressure light.
I'm lucky! This device is from OKI, and everything has already been done in it to install this generator, I just moved the jumper (wire in the cambric) from minus to plus.
As a result, we get a significantly simplified charging circuit and a more powerful generator (which can be easily replaced with an even more powerful one up to 120A from Priora). I didn’t install 80A because... I didn’t want to remake the pulleys for a wide belt, this is work for a new engine.
And a little more theory: with the new scheme, the generator is excited through a light bulb on the dashboard, when the generator “spins up” it goes out. But if the light bulb burns out, there will be no charging at all!
so always make sure that when you turn on the ignition it lights up along with the oil pressure. Personally, everything worked right away and well for me. Charging 14.3V, removed the terminal from the battery - the car works
Wiring diagrams and fuses VAZ 2101, 2106, 2107 classic
VAZ 2101 fuse diagram
Wiring diagram VAZ 2101 Just like
Source
How to connect a generator from a VAZ 2109 to a VAZ 2101
Generator selection | Topic author: Clifton
Is the generator from the Niva suitable for the seven?
Oleg (Aabharika) same question! I read that there are a lot of spare parts for 2110, 2112, brackets and much more need to be purchased
Kamal (Merril) I don’t see the point in putting Nivovsky
Alexey (Fujitaka) I have a 63 ampere per hour battery.
Vadim (Theresa) will do. the fastenings are the same
Sergey (Abiam) put a bomb on 83a
Alexey (Fujitaka) Changed my place today! I have a generator from Niva, I spent a long time looking for one like this! It turns out it fits! I took the 80 amp price 4150 to the vanguard of the car! If anyone wants to install it, they still need to buy two generator brackets and that’s it!
Alexey (Fujitaka) Any generator can be installed on the 2107. And also on any classic VAZ model. Preferably, of course, more powerful than the standard one (55A carb, 73A eng). The main thing is to have normal hands for this and in your head not brake fluid, but brains. Of course you need a diagram.
Alexey (Fujitaka) Generator 9402.3701 - 80A Installation of generator 9402.3701- https://www.drive2.ru/l/288230376153110720/
Timofey (Karenza) Install a Starvolt generator, really high-quality generators, but expensive to maintain, don’t be surprised at the price for brushes of 500 rubles. The generator can be installed from Niva 21214, you only need a couple of brackets, namely 21214 Niva, the generator can be safely adjusted to 100A, unless of course you REALLY need it .Minimal alterations with great effect.
Alexander (Pierre) Timofey, it is also better to change the pulleys for a poly V-belt or two regular ones. Otherwise, if you use 100a, sometimes you will have to change it too often
Alexey (Fujitaka) Generator VAZ-2104-2107 with an engineered engine 14V 73A ZiT https://www.avtoall.ru/generator_vaz_2104_2107_s_inj_d.. 3,490 rub. 372.3701000-03/05 differs from 372.3701 in at least a diode bridge.
Alexey (Fujitaka) Andrey, you can. I have 73A from an engineer. TRN and pulley of smaller diameter. I'm happy as an elephant, I don't want anything else.))
Alexey (Fujitaka) Andrey, TRN (Three-level RN) is purchased separately. The pulley is ordered from a turner. The entire Internet is covered about this.
Alexey (Fujitaka) kit for installing generator 21214 on classics https://www.youtube.com/watch? v=xHoe4MJn5ms
Alexey (Fujitaka) Full selection of what Avtopasker offers - https://avtopasker.ru/catalog/index.php? search=? 4?? 4?? ..
Alexey (Fujitaka) Generator 2123 Chevy Niva KZATE 9402.3701-01/04 https://avtopasker.ru/goods/27986.htm
Alexey (Fujitaka) On the issue of the volt-turn characteristics of generators. True, there is an ampere-turnover here, but it’s better than nothing)) -
Connoisseurs (Jonelle) Replacing a VAZ 2106 generator with a VAZ 2108 generator https://vaz-master.ru/tyuning-vaz/zamena-generatora-va..
Alexey (Fujitaka) Can anyone publish a photo and complete set of kits sold for installing generators of other types?
Tags: How to connect a generator from a VAZ 2109 to a VAZ 2101
Installation of the VAZ 21214 115A (eldix) generator on a classic. Full description of the process. If you have any question.
generator connection diagram from VAZ 2101 to 2109 | Topic author: Diana
diagram for connecting a generator from a VAZ 2101 to 2109, or details on how to get it all together, that is, a new generator costs a penny and dies on nines, help me out with advice, thank you in advance
Anatoly The main difference between generator 2101 and 2108 is that 2108 has a built-in relay-voltage regulator Elizaveta. According to the fit - 1 in 1, for connection - pin 30 of Evgeniy and the excitation winding is connected 1 in 1, + you need to buy a relay-regulator and connect it to the generator in accordance with the electrical diagram of the VAZ-2101. I’m warning you right away - generator 2101 is noticeably weaker, Irina. I would advise selling the 2101 and buying a used 2108 in perfect condition, but here the owner is a gentleman.
Tuning the “classic” series VAZ 2101 – VAZ 2106 – replacement of the standard generator
In general, it would be unfair to accuse the generator of the G-221 model, previously installed on VAZ 2101 - 2106, of low reliability or of the fact that it cannot cope with providing energy to the car in its basic configuration. At the same time, it should be recognized that the maximum 42A produced by this generator cannot be considered too impressive and already on the VAZ 2106 model, in which the high beam, compared to previous versions, is “heavier” by 100W, the characteristics of the G-221 are at the limit . If we talk about even minimal tuning of classic VAZ cars, such as installing additional electricity consumers in the form of powerful fog lights, a modern sound system, heated mirrors, etc., then you can practically forget about regular battery recharging using the G-221. The optimal solution in this situation is to replace the G-221 generator with its more powerful analogue.
What are brushes and what are they for?
It usually happens that when driving speed increases, the intensity of the low or high beam headlights, as well as the dashboard illumination, suddenly decreases, the radio and cigarette lighter do not work. Inexperienced drivers begin to look for the cause either in the electrical wiring, fuses, or associate this behavior of the devices with a short to ground. You can spend a whole day troubleshooting, but what a surprise it will be when it turns out that the whole thing is just two small black pieces of metal in the form of bricks with wires, which are called generator brushes.
Generator brushes
It is known from a school physics course that any generator basically has a stator (fixed part) and a rotor (moving part), each with its own windings, usually made of copper wire. Due to the force of the magnets, the rotor rotates, electricity to which is supplied through the armature and touching metal parts called brushes. Since the friction force on the ground acts on all objects, as a result of the constant rotation of the rotor, the parts we are considering are gradually erased, even though the material from which the brushes are made is quite strong.
How does the generator 2106 2107 work?
Correct operation of the generator 2106 2107 ensures the proper functioning of all vehicle devices. According to the attached operating instructions, the technical condition of the VAZ 2106 generator is checked at least once every 4 months. Failure to pay attention to this requirement leads to wear and tear of the device. As a result, the question of which generator is better to install on the VAZ 2106 becomes relevant.
If the car is involved in an accident or major repairs, it is imperative to ensure that the device is in working order. Otherwise, the voltage drop will cause serious damage to all electricity consumers in the car. In most cases, a VAZ generator malfunction can be repaired in a garage.
Interchangeability of autogenerators
Interchangeability of generators for Lada cars is achieved if the following requirements are met:
- the main technical characteristics of the installed generator are not lower than those of the device being replaced;
- the gear ratio from the internal combustion engine to the generator is the same;
- the devices have similar electrical circuits;
- The new generator is suitable in terms of weight and dimensions and type of fasteners.
Most Russian-made automobile generators have a 2-leg mount. These fasteners are found on both covers. For equipment of foreign brands, installation is carried out using 1 paw, the fasteners are located on the front cover.
In order to correctly install and securely fasten a foreign generator in a car from AvtoVAZ, it is necessary to replace the bracket.
Possible causes of malfunctions
There are several common reasons that require the driver to look under the hood of the “iron horse”:
- partial or complete combustion of the VAZ 2107 winding;
- cases of interturn short circuit;
- physical wear of parts;
- external physical influence;
- mechanical damage.
Inexperienced drivers of the VAZ 2108 or earlier modifications need to remember one nuance. When choosing lighting fixtures, you need to take into account their power. For example, if you decide to install fog lights, the power of which is 40-50 W each, you should look at the technical description of the VAZ 2106 or 07. Their installation is allowed only if the vehicle’s generator produces more than 55 A of current.
Failure to comply with this rule leads to dire consequences. The increased load of the VAZ generator leads to its rapid wear. The power of the unit gradually decreases, which is mistakenly perceived as a minor breakdown. That is why the total power of all voltage consumers should not exceed the maximum current level of VAZ 2107, 08 or 06.
The problem described above leads to another one - improper charging. The 2107 passenger car is designed in such a way that the generator is charged while driving. All electricity consumers are selected taking into account the power of the device. If individual elements are replaced without taking into account their power, the VAZ generator receives less energy than necessary.
Forced “starvation” leads to accelerated wear and failure. A great danger is posed by gadgets that significantly exceed the maximum level of current generated by the VAZ 2108. In this case, the “iron horse” risks stopping along the way. It will not be possible to revive a VAZ generator on site or even within the walls of a service station.
Design and repair of a generator, do-it-yourself generator repair
The purpose of a car generator is to convert mechanical energy into electrical current and supply electrical energy to the systems and components of the car while driving. The generator is responsible for charging the battery and transmitting power to the vehicle's engine systems.
Alternator malfunctions can take a serious toll on your wallet, but it's better to do a DIY generator repair than to resort to alternator replacement. After all, replacing a generator is not a cheap pleasure.
If you are unlucky enough to encounter a generator failure, let's try to find out what kind of generator failure we are facing.
Generator faults
- The generator generates current at a very low voltage.
- The generator has stopped producing electricity.
- The dashboard lamp indicates a generator breakdown.
- The generator generates current above the optimal rate.
- Extraneous noise arose when the generator was operating.
Before you begin repairing the generator, check the condition of the generator drive belt for wear and belt tension (the check is carried out by pressing on it, the belt should not bend more than 2 mm). If the belt is not very worn, the tension can be corrected by tightening it a little. Check the tension roller of the generator; it should turn easily and not make unnecessary sounds (if the roller does not scroll well and makes unnecessary sounds, it should be replaced). Then you should remove and disassemble the generator to check the technical condition of the generator.
Generator diagnostics
In the future, you will need the following measuring instruments to check the technical condition of the generator :
- ammeter;
- voltmeter;
- rheostat.
The rotation speed of the generator rotor can tell us a lot, which we can check using the tachometer on the instrument panel. Normal tachometer readings with a working generator should be in the range from 2000 to 5000 rpm.
Options for replacing a broken unit
The main thing to remember is that to replace a broken generator, it is forbidden to take the first one you come across. Failure to comply with this rule will lead to lengthy and expensive repairs of the VAZ 2107 or other modifications. The most common modification is G-221. To carry out a technically correct replacement, it is necessary to study the following manufacturer’s recommendations:
- Replacing a VAZ generator is possible using a unit from modification 2105. The maximum current level is 55 A, which is suitable for cars with a small number of consumers. Replacement does not imply modifications or modifications.
After the car owner decides on the power, it is necessary to install the device correctly. Car mechanics recommend exercising extreme caution. Poor installation of the generator leads to many problems during subsequent operation.
Generating Device Replacement Procedure
Before starting work, check the serviceability of the regulator relay. It is advisable to choose a model with the highest possible temperature compensation. This characteristic allows models 2106-2107 to operate at high speeds without failure. This indicator should be studied especially carefully if the VAZ 2106 or later modifications are used in areas with a hot climate.
Removing a broken device and installing a new one does not cause problems, thanks to the clear mounting method.
Difficulties arise at the stage when you need to connect a new VAZ generator. To begin with, the wires coming from the relay regulator are disconnected and subsequently insulated. Further connection of the VAZ 2108 generator is carried out as follows.
The wires, formed in the form of a ring terminal, are connected to the old place in the VAZ 2108. It is imperative to insulate the gray wire, which is not connected anywhere. Completes the installation procedure by connecting the yellow wire to the terminal. If the car owner was unable to find a device with the required power, then a model from a VAZ 2108 to a VAZ 2106 can be installed, provided that the total power of consumers is taken into account.
Careful attitude and regular preventive inspections will ensure long-term reliable operation of the machine. Even with a slight drop in speed or problems when starting the engine, there is a reason to look under the hood. The faster this is done, the less likely it is that the problem will spread further.
Design, principle of operation of the VAZ 2110 generator
Initially, vehicles were equipped with DC generator equipment. Growing energy consumption has forced the abandonment of low-power generator devices and the use of more powerful alternating current devices. A method of energy generation is used, based on inducing an electromagnetic field on static windings by a rotating electromagnet.
The rotor, supplied with a constant excitation voltage by graphite brushes, rotates inside a metal housing equipped with series-connected coils. The electromagnetic field created by the rotating closed loop produces an induced electric current in the stationary windings. A three-phase rectifier bridge makes it possible to obtain a constant voltage.
Structurally, the device is made in the form of a cylindrical unit, closed on both sides with lids.
The front cover includes a bearing that supports the rotor. The axle has a pulley connected through a belt drive to the car engine. Under the back cover there are electronic elements - rectifier diodes, a relay-voltage regulator.
Initially, when starting the engine, the excitation circuit is powered by the battery, then it switches to supply itself - it receives voltage from the rectifier.
There are holes for natural airflow. The cooling radiator for the rectifier bridge is a metal holder.
Installation of a generator from Niva on a VAZ 2101, 2102, 2103, 2104, 2105, 2106, 2107 (+30 Amperes)
We install a generator from an injection Niva (engine 21214) on a classic VAZ. The article, of course, is already floating around the Internet, but I think it would be useful to publish it again since the topic about the problem discussed in the forums, increasing the current of the on-board network, is relevant. The installed generator has slightly different fasteners, and the current it produces is 80 (eighty) amperes.
1. What you need to have for installation. 1.1 Generator mounting bracket 21214-3701650.
1.2 Compensation bushing for mounting the generator 2110 (rubber silent block, I did not find the number in the catalog). complete with counter-shaped washer 2110-3701638 (at least in Kemp it is this that is sold under this number, and not the bushing assembly).
1.3. Generator mounting bolt 2110-3701376 with nut 2110-3701686 (a grower doesn’t seem to be needed, but there’s enough space to put it). (see photo of the tension bar, paragraph 1.5)
1.4. Additionally, a bolt M10x1.25x20 (15970521) - my old bracket was fastened with 2 bolts.
1.5. Tension bar 21214-3701635.
1.6. Bolt M8×25 with nut 2110-3701686 (like the lower mount of the generator).
1.7. Generator from Chevrolet Niva.
Step-by-step procedure for replacing the generator. Option one is not complete
2.1. Pull out the split steel bushing installed in it from bracket 21214 and install a silent instead (with the metal side inward).
2.3. Remove the contact extension 61 (excitation winding) from it under the protection cover - however, you can do it yourself :).
2.4. Unscrew the old bracket from below (head with 17, 2 or 3 bolts).
2.5. Unscrew the old strip from above (17 head, one nut).
2.6. Hang a new bar - but do not fix it completely, let it dangle.
2.7. Secure the new bracket with the silent insert inserted into it (metal ring inside).
2.8. Hang the generator 214, having first placed the excitation winding contact extension on it (so as not to do it by touch). Insert the bolt, put on the shaped washer (with the ribs inward, of course) and tighten with the nut (not too much).
2.9. Putting on the belt - by the way, is noticeably easier than on 213, insert the bolt into the bar and the upper ear of the generator, tighten it (not all the way, again).
2.10. Finally tighten the fastening of the bar to the engine.
2.11. Pull the belt, fix the ear fastening to the bar, fix the lower fastening.
2.13. After drinking beer first, start up and enjoy life.
Belt replacement
To make it more convenient to work, you will have to remove the battery.
- Unscrew the fastening nut. Using a mounting spatula, we move the device closer to the cylinders. If this is difficult to do, then unscrew the lower mounting bolt.
- Now that the generator has been moved to the engine, you can easily remove the old belt and put on a new one instead.
- We move the generator away from the engine, monitoring the belt tension. Having achieved the required tension, tighten the fastening nut to the adjustment bar.
- We adjust the belt tension more accurately. To do this, we measure the deflection in the place between the pulleys and the pump with a force of 10 kgf. It should be from 10 to 15 millimeters. And between the pump and the crankshaft it should be equal to 12 to 17 millimeters.
- Once the correct adjustment has been achieved, tighten the fastening nuts and put the engine mudguard in place.
Step-by-step procedure for replacing the generator. Option two is not complete
3.1. Remove the old generator, mounting bracket (pictured) and generator tension bar.
3.2. Pull out the split steel bushing installed in it from bracket 21214.
3.3. Install bracket 21214 in place of the old bracket.
3.4. Install a new tension bar.
3.5. Remove the silent ring with two rings from this bolt.
3.6. Install it in a bracket that is already attached to the block.
3.7. Then everything is simple. As usual, we install the generator, tighten the bolt on the bracket from the bottom, put on the belt, tighten it, tighten the generator with a tension bar using an M8x25 bolt with a nut and a groover.
3.8. Now connection. On the driver's side, under the hood, a voltage regulator is attached to the fender; 2 wires are connected to it; we disconnect them from the regulator and isolate them.
3.9. On the new generator there are only two places for connection, a bolt and a terminal. We place a terminal on the bolt, just like on the old generator; tighten it with a nut and put the rubber casing on the bolt. As for the remaining two wires going to the generator, we place the yellow wire on the remaining terminal of the generator, and the gray one (it was attached to the brushes of the old generator) is also insulated and left dangling.
3.10. And one last thing. There is a RS-702 relay under the hood on the passenger side; it needs to be replaced with the purchased RS-527. We connect in the same way as the old one was connected, i.e. contact 85 to 85, 86 to 86, etc.
3.11. It’s probably worth replacing the battery))) and running to start the engine! Everything works for me, it’s one of the few things that works after my hands.
Thanks Tretyakov Oleg “STALKER”, VAZ-2106 Auto Club
More information about connection diagrams The issue of connection is discussed on the forums. Opinions and advice vary: from replacing relay 702 with 527 and connecting PP 380 wires to soldering in diodes, etc. Therefore, share your experience which path is correct. And if possible, describe the connection step by step, because in diodes, field windings, etc. I’m not cutting much yet. Changing one relay is the simplest solution. In the instrument panel, you can solder not “-” to the light bulb (as it is there by default), but “+ from the ignition” with a parallel resistor - and then you will connect this wire (which goes from the relay to the light bulb) directly to the generator. This is how you need to connect. In principle, you can not use resistors, but then if the light bulb burns out, charging will disappear. 9 - resistors 2W (mlt-2, omlt-2) 100 Ohm
We take the “+” wire from the ignition switch “15” (a “+” appears when the ignition is turned on) and connect it to one of the contacts of the light bulb. From the other contact of the light bulb we pull a wire to the generator and connect it to terminal 61. EVERYTHING! It will work until the light bulb burns out.
You can connect 2 100 Ohm resistors with a power of 2 W or 1 50 Ohm resistor with a power of 2 W in parallel to the light bulb (actually you need 4 W). Then, when the light bulb burns out, charging will not be lost.
By simple combinations you can use the original wiring and the original light bulb on the dash
The operating principle of the 2110 generator is identical to Niv's. The resistor there is also 50 ohms. Any diode can be used for a direct current of 5A.
Features of the generator device
Unit diagram
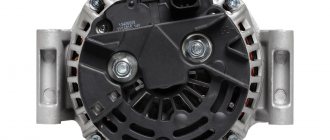
The generator housing consists of two covers made of aluminum alloy, tightened with four bolts and nuts, between which a round stator core is clamped. Rotor bearings are installed in the covers: the front one is in a through bearing, the rear one is in a blind seat of the cover. The rotor rotates inside the stator and housing on two bearings. The front end has a slot for a key and a thread for the fan nut. An adjusting washer is installed between the front rotor and the front bearing, which is often forgotten to be installed when repairing the generator. At the rear end of the rotor shaft, in front of the rear bearing, two copper slip rings are pressed in, insulated from the shaft and connected to the ends of the field winding.
A BPV6-50 rectifier is installed to the inside of the back cover. It consists of two horseshoe-shaped aluminum buses insulated from each other, into which three silicon diodes (valves) of the BA-20 type are pressed. The internal bus is isolated from the housing, but is connected to the generator terminal bolt “30”, while the other has contact with ground. The legs of the diodes in pairs from each bus are bolted to the ends of the phase windings of the stator, and their other ends are connected together - a star connection. In the G 222 generator, a wire goes from this point to a terminal on the back cover, from which a wire goes to terminal “85” of the RS-702 type charge indicator relay. There are no wires at 37.3701 from the common point of the phase windings.
Brushes are pressed to the contact rings of the rotor by springs, one of which is connected to terminal “B”, and the second to terminal W of the voltage regulator installed on the brush assembly in the upper rear part of the generator. In 37.3701 there are three diodes connected at one end to the phase windings, and the second are connected to one point, the wire from which goes to the regulator relay terminal Sh and terminal “61” on the rear surface of the generator. The diodes are connected in such a way that they pass positive half-cycles to pin “61”.
The electronic voltage regulator is non-separable and since 1996 has been installed in a metal case riveted to the brush holder. A capacitor is mounted between the housing and terminal “30”.
Generator connection diagram
To control the battery charge level in a VAZ 2105 car, it is necessary to monitor the output rectified voltage, which is maintained within 13, June 14.2 V. The regulator relay compares the voltage in the vehicle's on-board network with the reference one and, if this level is exceeded, reduces the voltage on the exciting winding , increasing the resistance between one of the rotor brushes and the “ground”. When the voltage in the vehicle network decreases, the regulator lowers the resistance, increasing the current in the field winding and, accordingly, the voltage at terminal “30”. Such cyclic processes occur at a frequency of 50-250 times per second.
The generator ground is connected to the vehicle ground through a housing attached to the engine cylinder block. Terminal “30” of the generator is connected to the “+” terminal of the battery and the on-board network of the machine through the fuse block. The wire coming out to the terminal on the back cover of the G 222 generator from the “zero” of the stator winding is connected to terminal “85” of the RS-702 relay of the charge control lamp. The wire from terminal “87” of this relay through connector Ш10 and Ш5 of the mounting block goes to the charge control lamp through connector “2” of the instrument cluster.
In generator 37.3701, pin “61” is connected with a brown wire with a white stripe to connector Ш10 of the mounting block and through connector Ш5 of this block and connector “2” of the instrument cluster is connected to the charge control lamp.
Replacing the VAZ 2101 – 2106 generator
The need to replace the generator on a VAZ car may occur when its windings burn out, an interturn short circuit occurs, the case breaks, and other reasons. But today, I would like to talk about replacing the VAZ generator in the case when its power is no longer sufficient...
Imagine the situation - you are the owner of a VAZ 2101 - 2106, you bought and installed a powerful amplifier, installed fog lights of 50 W each. A standard generator that produces a maximum current of 42A cannot cope with such a load.
And if all additional equipment is turned on, then there will be nothing left to charge the battery. After all, judge for yourself, the high beam in the VAZ 2106 has become “heavier” by 100 W, while with a standard generator and on a penny it does not shine with its parameters. It’s these types of cases of replacing a VAZ generator that I want to talk about. Let's consider which generators can replace our long-suffering G-221.
Which generator should you choose?
Before we get to the story about which VAZ 2114 generator is better, it’s worth saying - why shouldn’t you buy a battery native to the 14th model? The fact is that it is designed for a fairly low current - only 80 A.
Considering that while the car is running, the generator has to not only charge the battery, but also power electronic devices, this current is simply not enough to fully charge the battery (we should also add, albeit small, current losses in the circuit). That is why it is advisable to install a more powerful generator.
So, what devices can be installed on the VAZ 2114?
Firstly, without any modifications you can install 37.3701 from the 15th model. It is completely interchangeable with the original 14th generator, but the problem is that its amperage is even less - only 55 A. Therefore, it should be installed only as a last resort.
New generator VAZ 2114
The second acceptable option is a generator from Priora or Kalina - it creates a current of 115 A, which is enough to charge the battery and operate all on-board electronics. True, you will have to replace the device pulley with a more suitable one.
The third option is a generator from PRAMO, which has an amperage of 120 A. This is the most optimal option of all for 2114.
Generator from PRAMO
And finally, generators from Eldix with a current of 80 or 115 A - they are completely identical to the 14th model generator in terms of external dimensions and pulley parameters. The only thing worth remembering is that they are practically not repairable. Even if there is a minor breakdown, the entire device will have to be replaced.
Generators that replace G - 221
What models of generators are suitable for replacement in a VAZ 2101 - 2106 car?
- The first option is a generator from a VAZ 2105; it produces a maximum current of 55A. Not much, but if you don’t use a lot of additional equipment, then this is an ideal option. This generator replaces the G-221 generator without any modifications to the mounting. There are only minor changes in the connection to the electrical wiring; they are due to the fact that in the connection diagram of the G-221 generator the relay-regulator is placed separately, while in the five-wheel generator the relay regulator is combined with the design of the brushes.
- The next option for installing a chisel generator on a VAZ 2101 - 2106. It produces 55A, which is quite acceptable for a small amount of additional equipment.
- The third option for replacing a standard VAZ generator is a generator from a VAZ 21074, its marking is 372.3701-03. It is capable of delivering about 73A of current, which will be sufficient for the average motorist. The installation is practically no different from the previous one.
- The fourth option is to install a generator from an injection Niva. It produces about 80A, which will satisfy the requirements even if a large number of additional light bulbs and amplifiers are installed. It will not let the light go out at idle. But the installation does not require very big changes.
- The fifth and final option is to replace the standard G - 221 with a generator from a VAZ 2110, which produces 105 - 110A (depending on the specific model).
- There are other options (foreign cars, Chinese, our semi-underground companies), but you can consider them here endlessly.
Generator device
The main structural elements of a car generator are:
- rotor;
- stator;
- frame;
- bearings;
- pulley;
- brushes;
- voltage regulator.
Design of the VAZ 2105 generator: a - voltage regulator and brush assembly for generators manufactured since 1996;
1 — generator cover from the slip ring side; 2 — bolt for fastening the rectifier unit; 3 - slip rings; 4 — ball bearing of the rotor shaft on the side of the slip rings; 5 - capacitor 2.2 μF ± 20% to suppress radio interference; 6 — rotor shaft; 7 - common terminal wire for additional diodes; 8 — terminal “30” of the generator for connecting consumers; 9 — plug “61” of the generator (common output of additional diodes); 10 — output wire “B” of the voltage regulator; 11 - brush connected to terminal “B” of the voltage regulator; 12 — voltage regulator VAZ 2105; 13 - brush connected to terminal “Ш” of the voltage regulator; 14 — pin for attaching the generator to the tensioner; 15 — generator cover from the drive side; 16 — fan impeller with generator drive pulley; 17-pole rotor tip; 18 — bearing mounting washers; 19 — spacer ring; 20 — ball bearing of the rotor shaft on the drive side; 21 — steel bushing; 22 — rotor winding (excitation winding); 23 - stator core; 24 - stator winding; 25 - rectifier block; 26 — generator coupling bolt; 27 — buffer sleeve; 28 — bushing; 29 — clamping sleeve; 30 - negative diode; 31 — insulating plate; 32 - phase output of the stator winding; 33 - positive diode; 34 - additional diode; 35 — positive diode holder; 36 — insulating bushings; 37 — holder of negative diodes; 38 — terminal “B” of the voltage regulator; 39 — brush holder To know how the generator functions, you need to understand the purpose of each element in more detail.
Rotor
The rotor, also known as the armature, is designed to create a magnetic field. On the shaft of this part there is an excitation winding and copper contact rings, to which the coil leads are soldered. The bearing unit, installed in the generator housing and through which the armature rotates, is made of two ball bearings. An impeller and a pulley are also attached to the rotor axis, through which the mechanism is driven by a belt drive.
The generator rotor is designed to create a magnetic field and consists of rotating coils
Stator
The stator windings create an alternating electric current and are combined through a metal core made in the form of plates. To avoid overheating and short circuits between the turns of the coils, the wires are coated with several layers of special varnish.
Using the stator windings, an alternating current is created, which is supplied to the rectifier block
Frame
The generator housing consists of two parts and is made of duralumin, which is made to facilitate the design. To ensure better heat dissipation, holes are provided in the housing. By means of an impeller, warm air is expelled from the device to the outside.
Generator brushes
The operation of a generator set is impossible without elements such as brushes. With their help, voltage is supplied to the rotor slip rings. The embers are enclosed in a special plastic brush holder and installed in the corresponding hole in the generator.
Voltage regulator
The relay-regulator controls the voltage at the output of the unit in question, preventing it from rising above 14.2–14.6 V. The VAZ 2105 generator uses a voltage regulator combined with brushes and fixed with screws on the back of the power source housing.
The voltage regulator is a single element with brushes
Diode bridge
The purpose of the diode bridge is quite simple - to convert (rectify) alternating current into direct current. The part is made in the shape of a horseshoe, consists of six silicon diodes and is attached to the back of the case. If at least one of the diodes fails, the normal functioning of the power source becomes impossible.
The diode bridge is designed to rectify alternating current into direct current from the stator windings for the on-board network
Installation of a generator from a VAZ 21074i to a VAZ 2106 (2101)
Information found on the six forum. First, it’s worth noting (as far as I understand), there are different models that fit these parameters, they recommend taking 2107-3701010.
If you chose 2107-3701010, then now I will quote the installation on the VAZ 2106. It is also much easier to find spare parts for the first generator.
A little about the relay regulator. I have already read more than one negative review about the K1216EN1 relay regulator. In particular, thermal compensation is poorly implemented in it, that is, the charge voltage does not change depending on the ambient temperature.
So the author almost immediately replaced the standard RR with a 67.3702-01 regulator.
Installing a new generator instead of an old one is not difficult; everything fits into a standard mount. Now let's look at the connection.
The very first thing you need to do is disconnect and insulate the wires from the relay regulator. As for the connection on the generator itself, everything is almost the same as in the old one. Wires with a terminal in the form of a ring - in the old place, a bolt that was also on the old generator. The gray wire is isolated and not connected anywhere, the yellow wire is connected to the terminal.
In the form of a control lamp, a lamp from a repeater with a power of 3 W is used. To connect it, two wires are used - double orange and yellow.
The author is delighted with the new generator. Charging is maintained reliably even at 1500 rpm. And all those shortcomings that were there are gone...
Malfunctions
The main malfunctions of the VAZ 2107 generator include:
- brush wear;
- failure of the diode bridge (rectifier unit);
- failure of rotor bearings;
- short circuit in the excitation winding;
- break or short circuit in the stator winding.
Signs of a faulty generator are:
- no indicator light on the dashboard comes on;
- the voltmeter needle is in the red zone;
- sparking inside the generator;
- noise during operation (hum or howl);
- smoke and burning smell coming from the generator.
Do I need to change the generator?
The hum or howl of the generator indicates bearing failure, which can also be repaired. But if suddenly a short circuit occurs in one of the windings, you will have to either negotiate with home-grown specialists about winding a new winding, which is quite risky, or replace the generator with a new one. The last option would be most appropriate here, especially if it also comes with a guarantee.
A new generator, depending on the model and manufacturer, can cost from 2800 to 5000 rubles. Replacing it at a service station will cost about 500 rubles.
The catalog number of the standard VAZ generator for the “seven” is 21083701010.
The following mechanical and electrical failures can occur in the generator:
- Bearing wear is diagnosed by a characteristic whistle or grinding noise from the device. The lubricant inside the bearings evaporates over time, causing increased friction.
- The brushes of the VAZ-2101 generator must be replaced in a timely manner to ensure normal operation of the car. If they wear out, a warning light with a picture of the battery lights up on the dashboard.
- An insufficient or excessive battery charge is a clear sign of a failed voltage regulator. The test can be performed with a conventional multimeter. Start the engine, turn on the low beam. Idle speed should be around 800 rpm. It is necessary that the voltage at the battery terminals be ~13.2 V.
- Blinking lights and pulsations are a sign of failure of one or two semiconductor diodes in the rectifier assembly. On the VAZ-2101, the generator is built according to the classical scheme - it produces three phases, then converts it to direct current using a rectifier.
- If the generator does not charge, but the rectifier and voltage regulator are working properly, we can talk about the destruction of one of the windings. In this case, either the generator is replaced or a new rotor or stator is installed (depending on which of the windings is destroyed). Diagnostics is carried out using a tester.
Where is the generator located on the VAZ 2107
The generator on the VAZ 2107 functions in close connection with the battery. As with any other car, this device generates electricity to power all elements of the car. In this case, the generator performs its function only when the engine is running.
On the VAZ 2107 this mechanism is located directly on the surface of the power unit on its right side. This position is due to the fact that the generator is started by the movement of the crankshaft through the V-belt.
Connecting devices
The generator is connected in parallel to the battery. The relay regulator monitors the voltage level and controls the excitation current of the generator. Figure 1 shows a connection diagram for a 37.3701 generator with a built-in relay regulator.
Let's list the elements of the scheme:
- Battery.
- Diode "-".
- Additional diode.
- Generator.
- Diode "+".
- Stator winding.
- Regulator.
- Excitation winding.
- Capacitor.
- Mounting block.
- Charge indicator lamp.
- Voltmeter (not available on VAZ-2105).
- Ignition relay.
- Ignition switch.
Figure 1. Connection diagram for generator 37.3701 with built-in relay regulator.
Note that several electrical circuits have been developed for the “sevens”. They may vary. For example, the VAZ-2107 circuit with fuel injection is not suitable for Zhiguli cars that have a carburetor.
Voltage measurements are carried out with the engine idle and running. The tester switch is set opposite the 20 V mark. We measure the battery voltage before starting the engine. The numerical value will be 12-13 V.
After startup, the voltmeter readings will rise to 14.2-14.5 V.
Such indicators indicate the serviceability of the generator unit and charging circuit.
How to replace the generator on a VAZ 2107
Replacing a generator set is required in cases where the device no longer produces the required amount of current for consumer systems. The most common reasons for replacing an installation are the following malfunctions and breakdowns:
- burnt winding;
- interturn short circuit;
- deformation of the generator housing;
- resource development.
It is almost always easier and more profitable to replace the generator with a new one than to repair it.
Tool preparation
To dismantle and subsequently install the generator on a VAZ 2107, you will need a standard set of tools, which every driver usually has in his garage:
- wrench 10;
- wrench 17;
- wrench 19;
- a pry bar or a special shovel for installation work.
No other devices or devices are required.
Dismantling works
It is recommended to remove the generator from the “seven” after the engine has cooled down. It is not recommended to work with vehicle components immediately after driving due to high temperatures and the risk of injury.
Immediately before removing the generator, you will need to remove the right front wheel, since the installation can only be reached from under the bottom of the car through the right fender.
It is imperative to securely fix the position of the car with a jack and auxiliary devices (hemp, stands) in order to eliminate the risk of the car falling during operation.
The progress of work comes down to the sequential implementation of the following actions:
- Find the generator housing in the mechanical structure of the car, feel for the bar that secures it to the engine.
- Using a wrench, unscrew the fastening nut halfway.
- Unscrew the nut on the bracket, but do not remove it from the stud.
- The generator housing can be pulled and moved in any direction - this will become possible due to the loose fastening.
- Remove the belt from the landing pulleys and remove it from the work area.
- Disconnect all incoming wires to the generator housing.
- Unscrew the fastening nuts completely.
- Pull the generator towards you and remove it from under the body.
Photo gallery: main stages of work
Immediately after dismantling work, you should inspect the generator landing site. All joints and fastenings must be cleaned of dirt and, if necessary, treated with acetone.
Accordingly, installation of the new generator will need to be carried out in the reverse order, paying special attention to tensioning the new belt.
Video: instructions for replacing the generator on a VAZ 2107
Generator brushes - easy replacement + Video
Alternator brushes are an important element of the automotive system for supplying and discharging electrical current. Without their participation, the car's generator will not be able to generate voltage.
Generator brushes - element information
The brushes we are interested in are made of graphite, which is why they are often called carbon. They are used not only on cars with an internal combustion engine, but also on a wide variety of mechanisms and machines equipped with an electric motor (machine tools, lifting devices, urban public transport, and so on). The most common are EG-4 brushes.
This brand is suitable for installation on many cars of different years of production, as it has standard operating parameters. Less commonly used are other products (for example, EG-61), which are characterized by a high margin of safety due to their impregnation with special compositions.
On domestic cars, the generator and brushes for it are located under the right front headlight of your “iron horse”. They are not difficult to find. It is enough to open the hood to see the generator - its winding and two lids, which look like tin cans, come to the surface.
When do you need to change generator brushes?
During scheduled maintenance, no one pays attention to the small elements of the generator, of course. It is for this reason that the breakdown of its brushes always comes as a surprise to the driver. Experts advise that after 50 thousand kilometers (or once every four years) you must check their serviceability and functionality, and then no problems will arise with the operation of the generator.
It is noteworthy that you can check the brushes (and, if necessary, change them) without dismantling the rather bulky generator. In addition, the following symptoms may indicate the need to look under the hood of your car and check the graphite brushes:
- unpredictable shutdown of electronic devices in a vehicle, occurring for unknown reasons;
- reducing illumination of the car interior and external light sources;
- voltage reduction;
- a car battery that discharges unreasonably quickly, which, moreover, is then very difficult (and sometimes impossible) to charge.
Any of these symptoms tells the motorist that he most likely needs to remove the old brushes and install new ones instead. You can check old products for functionality very simply. We should remove the negative from the battery, remove the voltage regulator and visually evaluate to what height the graphite parts we are interested in protrude from their “shelter”. Brushes need to be changed urgently if their height is less than five millimeters.
Replacing generator brushes - from A to Z
Let’s say right away that this operation is very simple and does not require any special skills from the driver. First, as already mentioned, you need to remove the negative from the battery, then remove the regulator (it is located on the opposite side of the generator), and then perform the following steps:
- Thoroughly clean the holder seat, as well as the pressure springs and slip ring, from soot and dust. This operation is performed using a soft bristle brush. Sometimes it may be necessary to grind the graphite brushes into the commutator using fine glass sandpaper (its grain size should be about 100).
- Install new products and make sure that they move freely in the brush holder.
- Reassemble the assembly in reverse order, and then connect the previously connected wire to the battery.
If you bought a prefabricated structure (regulator plus brushes), its installation also does not cause any problems.
Turn off the “minus” wire, remove the cap made of rubber from the “positive” wire, and then dismantle the block by unscrewing the fastening nut. Then you will need to remove the plastic casing and remove the three spring clips located around the perimeter of the block. Using a Phillips screwdriver, unscrew the brushes along with the voltage regulator, and disconnect all the wires leading to it. Mount the purchased prefabricated structure in the vacant space. Operation completed!
carnovato.ru
Alternator belt for VAZ 2107
"Seven" came off the assembly line of the Volzhsky Automobile Plant in the period from 1982 to 2012. Initially, the model was equipped with a drive belt of a currently outdated model, which had a smooth surface without any roughness. However, later VAZ 2107 began to be re-equipped to meet the requirements of the time, which led to the emergence of a new type of belt with teeth.
It should be emphasized that the most popular manufacturer of belt products for the domestic automotive industry is Bosch. For many years, the German manufacturer has been producing high-quality products that, both in size and service life, completely satisfy VAZ 2107 owners.
Alternator belt sizes
All parts used in the design of the car must have markings and manufacturer numbers. Design numbers and sizes of belts for the VAZ 2107 are specified in the operational documents for this model:
- 2101–1308020 (smooth surface), dimensions - 10.0x8.0x944.0 mm;
- 2107–1308020 (toothed surface), dimensions - 10.7x8.0x944.0 m.