Replacing generator brushes on a VAZ 2107
If the battery icon lights up on the dashboard of a VAZ 2107, this indicates that the car needs to replace the alternator brushes, relay, fuse or belt. The first component on the list wears out quite quickly, so experts recommend changing it every 50 thousand kilometers. Regular failure of brushes is due to the fact that during operation they constantly come into contact with the rotor shaft. Signs of wear on the mechanism are:
- rapid battery discharge;
- dim and flickering headlights;
- interruptions in the operation of electronics, stove, cigarette lighter.
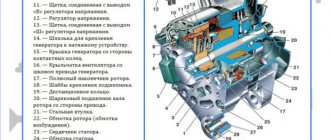
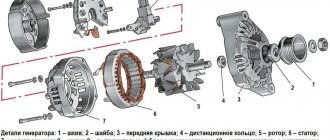
Replacing the entire assembly and brushes is not difficult; do-it-yourself repairs are quite possible here. But first you need to familiarize yourself with the mechanism and its contact diagram.
What are brushes and what are they for?
It usually happens that when driving speed increases, the intensity of the low or high beam headlights, as well as the dashboard illumination, suddenly decreases, the radio and cigarette lighter do not work. Inexperienced drivers begin to look for the cause either in the electrical wiring, fuses, or associate this behavior of the devices with a short to ground. You can spend a whole day troubleshooting, but what a surprise it will be when it turns out that the whole thing is just two small black pieces of metal in the form of bricks with wires, which are called generator brushes.
It is known from a school physics course that any generator basically has a stator (fixed part) and a rotor (moving part), each with its own windings, usually made of copper wire. Due to the force of the magnets, the rotor rotates, electricity to which is supplied through the armature and touching metal parts called brushes. Since the friction force on the ground acts on all objects, as a result of the constant rotation of the rotor, the parts we are considering are gradually erased, even though the material from which the brushes are made is quite strong.
Replacing brushes on VAZ-2107, 2110, 2114 - is there a difference?
Brushes are the part that most often requires replacement, and therefore all car manufacturers design generators in such a way that no difficulties arise in such a process. If you purchased the car not so long ago, there will be no problems with replacing brushes. Their abrasion is a long process, depending on the intensity and service life of the machine. When purchasing a vehicle with a fairly high mileage, it is better not to wait for these parts to become unusable, but to replace them immediately. Fortunately, brushes are not in short supply, and their price is quite reasonable.
Replacing old parts
Drivers, who rarely go into the details of the structure of their cars, think that in the case of cars from the same plant there is no difference in the process of replacing brushes on generators, for example, in the popular models VAZ-2107, 2110, 2114. This is a correct guess, moreover, such an operation is the same on almost all brands of cars with an internal combustion engine. There’s even a little secret: alternator brushes from VAZ are perfect for BMW and Audi units of some modifications! The processing, however, is somewhat rougher than that of the Germans, but they work! And this is the main point.
Replacement result
After replacement, errors may appear about a low battery charge or a malfunction of the generator; there is no need to immediately try to find the cause of the failure. This phenomenon is not uncommon, since new brushes have just begun to break in. What are the causes of Chevrolet Niva generator breakdowns? Chevrolet Niva replacement brushes are soldered to. After some time, everything will return to normal, and you can safely continue to operate the car.
Hello everyone)) Finally I finished) Today turned out to be a fairly warm day, only -2 degrees. Let's start in the morning. In the morning (at about 7:45) I left the house with my warm battery) I installed it and started the engine. Charging was almost completely at maximum. The car warmed up and I went to school. In the afternoon (at about 13:30) I left the school to warm up the car and leave. After getting into the car and turning on the ignition, I saw the following: There is almost no charge. The arrow lies in the red zone. Without hesitation, I gathered all my classmates and let’s push. After 2 unsuccessful attempts, it started, and on the dashboard...
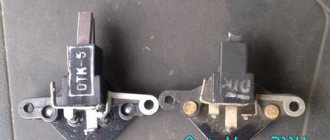
it burned brighter as the revs increased. At 2000 it burned as if the network was not 12 volts but 20, it was already blinding. Arriving at the garage, I took the gene from the VAZ 2101 and began to look at it. For comparison:
There is no such thing in the VAZ 2101 generator. Since the regulator is located directly outside the brushes. For comparison:
Replacing the VAZ 2107 generator brushes yourself
The brush repair itself usually boils down to replacing them, but first you need to remove the brush assembly from the generator housing and assess the degree of wear, inspect for chips and cracks.
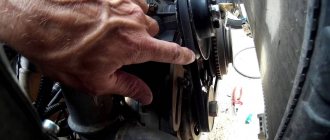
Replacing the brushes of a VAZ 2107 generator is a simple procedure and usually takes a few minutes; replacing the brushes does not require removing the generator, just disconnect the power wire, unscrew the two screws securing the brush holder housing and carefully remove this unit, do not forget to disconnect the negative terminal of the battery first.
Attention! The battery should be disconnected during any work related to the electrical equipment of the car!
Check the dismantled assembly for freezing, jamming of the brushes and their protruding working part, which should be at least 12 millimeters. In case of discrepancy, the part must be replaced; brushes for the VAZ 2107 generator can be purchased at almost any auto parts store.
After eliminating the malfunction, or purchasing new ones (it’s better to buy small parts with a sample of old ones, so that you don’t have to change them later), you need to install them in the reverse order.
Why change brushes?
If signs of brush breakage are detected, they should be replaced. VAZ 2104 - 2107; replacing generator brushes on VAZ-2113, 2114, 2115. Without removing the generator. Repair of generator brushes on VAZ 2105-2107 models. Replacing the windshield of a VAZ 2107 with your own hands | auto-gid. If repairs are not carried out in a timely manner, there is a possibility that you will soon need to purchase a new generator, and this is a completely different expense. Replacing the brushes of the VAZ 2107 generator. Photo, instructions on how to do it. The battery can only hold the ignition without brushes for a few minutes, which means it will have to be constantly charged. Replacement of slip rings and bearings of the VAZ 2110 generator. And soon they will be replaced.
You can check the condition of the brushes by the size of their protrusion from the seat. Replacing the brushes of a VAZ 2107 generator is a simple procedure and usually takes a few minutes; replacing the brushes does not require removing the generator, just turn it off. If the protrusion size does not reach five millimeters , then they should be replaced immediately to avoid possible problems.
It is recommended to replace it every 50,000 km or every season, which is the key to safe operation of the vehicle. Replacing generator brushes in a Chevrolet Aveo. It is better to have a spare set of spare parts so as not to get into an unpleasant situation on the road and then call a tow truck.
Replacing the VAZ 2107 Generator Brushes Without Removal
VAZ, brush replacement, tips and tricks 2107
Congratulations, friends, on our car repair website. Despite the large volume of foreign cars, VAZ cars are still in demand and are professionally used by motorists who know a lot about technology and appreciate the advantages of the domestic automobile industry.
As we know, operation and repair are inseparable concepts, and for which the design of a particular unit is intended, you can perform troubleshooting yourself. Let's look at a simple example of repairing a VAZ car generator. 2107
.
Malfunctions and principle of operation of generator brushes
The electrical system of your iron horse indicates a malfunction when the VAZ 2107 generator
, The red indicator light with the battery symbol lights up on the instrument panel.
Quite often the cause is wear and tear or cold hands. Those who are familiar with the principle of operation of the generator know that excitation voltage is supplied to the armature through the brushes, which not only starts the electric machine ( generator
) to work, but also regulates its power output.
Basic problems
There are several main problems specific to a generator. If you study them, it will be quite possible to carry out repairs even on your own.
We will list them and also tell you about the necessary additional actions to eliminate them.
Breaking
Your actions
To fix this problem, simply replace the old fuse with a new one. But be sure to determine the reason why the problem arose
The circuit supplying the devices has broken
In this situation, be sure to make sure that the neutral wire is connected securely to the other contacts
Having problems with the ignition switch
Check if the ignition switch board is working
The control lamp has failed
Just change the device to a new one if the lamp just burns out
The brushes are out of order
You will have to change the brushes themselves, as well as their holders. Check the contacts for oxidation. They can be treated with WD40 or cleaned with gasoline
Voltage regulator does not work
This unit must be replaced. It is impossible to repair it
The alternator belt is damaged or faulty
You can try to adjust the belt tension if this is the problem. If the unit is damaged, it must be completely replaced.
The bearing has failed
Only its complete replacement will help here.
Such breakdowns occur quite often, so they cannot be ignored at the first sign. Having understood the structure of the generator, solving problems with its malfunction becomes much easier.
Where is he located
Before removing the generator, you need to at least figure out where this device is located.
This is exactly where the desired element is located.
Location
Functionality check
If the generator does not work correctly, the consequences can be unpredictable. If the charge coming from the device is low, the battery will quickly run out and your VAZ 2114 will simply stall. High voltage is even more dangerous because it damages the entire electrical circuit of the car.
The power indicators of the generator can be measured using a tester.
- Turn the ignition on and make sure all the lights on the dashboard come on. After this, start the power unit.
- If the battery icon lights up on the panel or blinks dimly, there is damage to the alternator circuit.
- Warm up the engine to approximately 90 degrees, then turn on all volatile devices.
- Connect the tester directly to the battery. The second person at this moment will press the gas pedal and keep the speed in the region of 3.2-2.5 thousand revolutions.
- When the tester reads 13V, the generator is working properly.
- Now turn off all power consumers and take measurements again. The revolutions are kept the same. If the generator is working properly, the tester readings will be 14.7V.
- At the same time, we recommend paying attention to the sounds that come from the generator. If there is a hum, there is a high probability of bearing wear, which should be replaced.
Low voltage can be caused by one of several reasons:
- The timing belt tension is not strong enough;
- The generator circuit is damaged;
- The voltage regulator is faulty;
- The brushes are worn out;
- The generator is worn out and needs to be replaced.
What causes the battery sign to light up on the dashboard?
When you turn the ignition key, the system turns on all the lights on the dashboard, allowing you to check that the systems are working properly. After this, the engine starts and all these lamps go out. But only if the car is in good working order.
If one of the lamps remains on, there is a problem with the car.
As for the battery icon, its glow when the engine is running indicates that the voltage generated by the generator is too weak or completely absent.
Replacing brushes
Replacing generator brushes is not difficult if the need arises. Such work is carried out if natural depreciation occurs.
How to remove alternator brushes on a VAZ 2107 - step-by-step instructions
You can remove the generator brushes on a VAZ 2107 car as follows:
- The first thing you need to do is disconnect the negative terminal of the battery.
- Then we pull out the brush holder output connector.
- The brush holder is located on the end surface
(the opposite side from the pulley on which the generator belt fits) on the right side. It consists of two parallel metal pins and plastic holders. - Next, you need to find the screw securing the brush assembly and unscrew it. The assembly should now easily detach from the main part.
We check the protrusion of the brushes and their uniform wear. The working surface (length) of the brushes must be at least 12 mm; if less, then the VAZ 2107 generator brushes must be replaced. In addition, you should check the ease of movement of the metal structures in the holder; they should not rub or jam. If free movement does not occur, then it is recommended to also blow the generator rotor with compressed air.
Alternator brushes for the VAZ 2107 are not expensive; in specialized Lada spare parts stores they can be purchased for only 50 rubles.
What brushes to buy for the VAZ 2107 injector generator
It is noteworthy, but motorists who are far from the design of the vehicle are sure that the brushes that are installed on generators of models from the same manufacturer correspond to each other, so it does not matter which models they are intended for. And this is absolutely correct, especially for the VAZ-2107, 2110, 2114 models. Therefore, do not worry if you managed to find brushes that are not for your model - they will definitely fit. Moreover, generator brushes for VAZ cars can be easily installed on BMW or Audi cars - they are a perfect fit. Therefore, if you need to purchase brushes for your VAZ, don’t worry, finding and replacing them will be very easy.
Restoring an electric motor at a VAZ
Let's first look at how to replace the brushes of a VAZ 2107 generator. For work, we will be equipped with the following tools:
- set of spanners;
- screwdrivers - set;
- rubber hammer.
So, we begin work on changing the generator brushes on the VAZ 2107.
- We disconnect the terminals of the battery, and also unscrew the cables from the terminals of the electric motor, dismantle it by unscrewing the fasteners. Loosen the belt and remove the electric motor.
- Unscrew the pulley mount while holding the rotor with a tool.
- Disconnect the traction relay.
- After unscrewing the nuts, remove the front cover of the assembly unit using a rubber hammer.
- We also use a rubber hammer to push the rotor out.
- We detach the back cover from the stator.
- We remove the brush holder from the stator and reinstall the worn parts.
- The electric motor is assembled in the reverse order.
This process, if something is not clear, you can also visually study the video called “replacing VAZ 2107 brushes.” Replacing brushes in a VAZ 2106 generator is done in exactly the same way.
If we turn to VAZ models with front-wheel drive, then there are not so many differences in the procedure. For example, let’s first consider how to replace brushes on a VAZ 2110, for which we first take this:
- spanners;
- Screwdriver Set;
- hammer, block, or rubber-tipped mallet.
- Having loosened the belt, disconnected the wires and unscrewed the three bolts, we dismantle the electric motor.
- Having taken the unit out of the car, remove the pulley, holding the rotor with a screwdriver. In principle, the traction relay and rotor do not need to be dismantled; for the “seven” we did this for ease of work.
- Next, unclip the latches on the back of the electric motor, and then remove the plastic casing.
- We immediately see the voltage regulator assembly along with the brush holder.
- Unscrew the two screws and remove the brush holder.
- We renew worn parts.
- We do the assembly in reverse.
By the way, changing brushes on the VAZ 2112 is carried out one by one according to the same instructions.
Now let’s figure out how to replace an element on a VAZ 2109.
We will need to prepare:
- set of spanners;
- Phillips and slotted screwdrivers;
- rubber hammer.
Here's what we do (this is an option without removing the traction relay).
- After loosening the belt and removing the tensioner bar, we dismantle the entire unit.
- On the dismantled unit, unscrew the pulley.
- After unscrewing the nuts, remove the front cover of the electric motor.
- Push the rotor out with a rubber hammer.
- We detach the stator from the back of the electric motor.
- We unfasten the diode bridge, take out our failed graphite tips and install new ones.
- Assembly is done on the way back.
It must be said that the work of replacing brushes on a VAZ 2114 takes place in exactly the same sequence. The same applies to work on the VAZ 2115.
In general, all VAZ electric motors for generating current have almost the same design. We have only discussed different methods of how to get to the treasured details.
There is even a way without dismantling the unit. Let's say, to replace the alternator brushes on a Priora, without removing the alternator, you need to do this: take a screwdriver and wrenches and open the hood.
- Disconnect the battery.
- Unfasten the wires from the electric motor.
- Remove the field circuit terminal.
- Remove the rear plastic casing of the electric motor by unscrewing the screws.
- Unfasten the voltage regulator, and then remove it complete with the brush assembly.
- Now we can reinstall our parts.
- Then you need to assemble everything in reverse order.
So, changing the alternator brushes on a Priora can be done directly on the car by opening the hood.
At the same time, it is better to change the Lada Kalina by removing the electric motor from the car. After all, it is compact and is attached to the bracket with just two bolts. Taking the same tools as in the previous case, you need to reproduce the following steps.
- Disconnect the battery and electric motor wires.
- Loosen the belt and unscrew the two fasteners and remove the electric motor.
- Remove the rear casing.
- After unscrewing the screws, remove the brush holder with the regulator and reinstall the parts.
- Put everything back together.
These are the simple steps you need to perform to change the generator brushes on the Lada Kalina.
Repairing an electric motor at Renault
And now, in order to get a complete picture of such an important operation, let’s consider its production on a foreign car.
To replace an element on a Renault Megane 2 car, we will need:
We start by dismantling the electric motor.
- Having loosened the belt drive, unscrew the three fastenings of the unit.
- On the removed assembly unit, remove the connector and unscrew the cable.
- Remove the plastic cover.
- After unscrewing the two bolts, remove the relay with the brush holder.
- We update defective parts.
- We do the assembly, moving back point by point.
In essence, this technology resembles those previously described, since, we repeat, all electric motors are designed the same.
Therefore, for example, if you change the generator brushes on a Ford Focus 2, you will have to perform manipulations that are also similar to those just outlined.
Price for simple work
We have determined the cost of the described work in car repair shops, taking into account the removal of the entire unit from the car, in major cities of Russia, although only approximately. All data is collected in this table.
| City | Price |
| Moscow | 1100 rub. |
| St. Petersburg | 1000 rub. |
| Ekaterinburg | 950 – 850 rub. |
The price is indicated for an average foreign car without dismantling additional components. On Lada the cost of the operation is twenty percent less.
The result is obvious: all the described technologies for replacing brushes in alternators of cars of various brands are simple and accessible to any car enthusiast who has at least a little understanding of technology, as well as the structure of the electric motor.
Replacing Generator Brushes VAZ 2107 Injector
Replacing brush
VAZ
2107
Welcome friends to the car repair site. Detailed instructions on how to replace the generator on a VAZ 2101, 2102, 2103, 2104, 2105, 2106, 2107 with your own hands (video). Replacing brake pads on a VAZ 2107 (rear and VAZ 2107, VAZ 2107) Replacing brushes Repairing a VAZ 2107. Duration: 21:40. Despite the huge number of foreign cars, cars of the VAZ family are still needed and used by motorists who know a lot about mechanical engineering and appreciate the advantages of the Russian automobile industry.
Of course, operation and repair are indivisible concepts, and in the event of a failure of a particular unit, fault identification and troubleshooting can be carried out completely independently. Replacement of VAZ 2107 Brush (WITHOUT REPLACEMENT). YouTube This article contains a detailed description of how to remove a VAZ 2107 generator. A step-by-step guide to removing a VAZ 2107 generator with your own hands. Replacing VAZ 2107 Engine Locks Easy and simple. Let's look at a simple example of generator
VAZ car
2107.
Malfunctions and principle of operation of generator brushes
The electrical system of your iron horse indicates a malfunction when the VAZ generator is turned off 2107. A red indicator with a battery symbol lights up on the instrument panel.
Quite often the cause is wear or freezing of the brush. Those who are familiar with the principle of operation of the generator . It is known that because of the brushes, the excitation voltage enters the valve, which not only starts the electric machine (generator) into operation, but also regulates its output power.
Direct control is carried out thanks to a special device, a relay controller, which can be built directly into the brush holders or installed separately (on earlier models).
As a rule, such a malfunction appears gradually, which is initially accompanied by short interruptions in operation. generator , this gradually leads to its complete failure, but there are other options, such as sudden failure.
Vas 2107 Brush replacement (WITHOUT REPLACEMENT)
VAZ 2107
, No downtime. parking while shifting gears.
How to remove the brush generator and check the VAZ 2107 VAZ 2106 Mutual subscription to your channel
How to remove brushes
and check
the VAZ 2107 generator
VAZ 2106.
replacing VAZ 2107 generator brushes at home
Repair brushes
Usually it all comes down to replacing them, but first you need to remove the brush from the body.
alternator
and assess the degree of wear, look for cracks and cracks.
replacing a brush VAZ 2107 generator the procedure is simple and usually takes a few minutes to replace the brushes
You do not need to remove the generator, simply unplug the power cord, remove the two screws that secure the brush holder housing and carefully remove this assembly, remembering to disconnect the negative battery terminal first.
Warning! The battery(s) must be disconnected when performing any electrical work on the vehicle!
Check the dismantled unit for freezing or brush
and their protruding working part, which must be at least 12 millimeters.
How to check the generator. The VAZ 2107 generator is checked without removing it from the car. How to replace a VAZ 2107 generator with a VAZ car. Replacement of brushes, etc. In case of discrepancy, the product must be replaced with a brush on the VAZ generator. 2107
Available from almost any auto parts store.
Recommendations
Comments 16
My brain explodes at the end of the article! Maybe I didn’t understand correctly, but from what I read I concluded that from the generator, namely, from the brushes, we throw the wire to the relay on pin 67, and from pin 15 we throw the wire again on the generator, namely on the M8 threaded stud, where 2 thick wires. So? Did I understand everything correctly?
So, here it would be necessary to be more precise. if you have a wire from the brushes going to the diode bridge, then you need 67 from the brushes and 15 to the wire that was inserted into the brushes. if not, then the wire comes from the brushes at 67 and 15 goes to that pin. But in this and in the case that the wire is a pin, this is the + output.
In general, I have an Oda and it has a VAZ2105 type generator with a tablet in the generator on the brushes, I bought myself a generator from a VAZ 2101 and now I’m looking for information on how to connect it. I have only 2 wires coming from my original generator, one double, on the M8 stud, the other to the terminal on the generator, and now a terminal has formed from the brushes, that’s the question, that’s why I’m asking how to properly connect with an external relay. I myself am not an electrician, for me these are murky miracles))) That is, as I understand it, we loop the relay on the generator from brushes 67 and from 15 to the M8 pin, leaving everything else unchanged? I looked at the diagram in the article, where the wire from the gene goes to 67 in the relay, and from 15 to the fuse block, here I am in a stupor... firstly, where to connect in the block, and secondly, the option with a loop confused me, because . It turns out 2 different connection options.
Yes that's right. you do this. But in the diagram it says it's a fuse. M8 is the output + for the fuse and for the battery)) the tablet is the same thing, just a shorter version.
Ok, I'll try it today.
Yes that's right. you do this. But in the diagram it says it's a fuse. M8 is the output + for the fuse and for the battery)) the tablet is the same thing, just a shorter version.
I did it and it didn’t work. Charging 18.5 sucks!
umm... from a brush to 67 from 15 to a hairpin?
Weird. maybe a relay?
No, the relay is new, everything is fine with it. This connection diagram is not correct for this car model.
Either the skis don’t work or I’m an idiot, but: a) from the pre we have a wire going to the excitation winding of the generator, although no, that’s not the case, the pre is f10, responsible for the tidy (including the devices inside it and the first start of the genes), turn signal relay , the carb valve and the excitation winding, yes, yes on 222 generators, the fashion has become that through the tidy light bulb and the 12-volt diode from the tidy goes to the excitation winding for the first time. For 221 genes, aka a penny light bulb is purely an indicator. On modern cars, the light bulb is also an indicator; it is placed in parallel with resistors. b) RN is also a tablet, it takes the voltage from the additional diodes and checks it (a simple test method, if the voltage is more than 14 volts, we extinguish the generator, start it less, yes, we have a pulse 3-phase generator), made by AvtoVAZ to decouple the tablet from the on-board network. It was the same white wire that you had fallen out. c) In order for the gene to charge the battery, after starting the car (the biggest thing here is the starter, it eats decently), you need to drive a decent distance at rpm d) in principle, we can’t kill the generator on a vase, and can be treated by replacing any part. So, in general, it’s great, with repairing a car with improvised means, but the 221 generator (a cheap one) is, in principle, weaker than its 222 brother, EMNIP, 42A, versus 55A (the gene produces complete nonsense at 3000-3500 engine speeds)
You need to look at what the voltage is, and if the arrow lies completely, it may not be so good, since when the arrow lies completely, this is an overcharge. Because the light on the device from the generator was shining brightly, there was a lot of recharging - it was lucky that the battery didn’t boil. So check the voltage.
did you install an external relay from 2101 to 2107?
yes, with alteration of brushes from VAZ 2107
is the other wire not connected?
The relay simply turns off, there is one wire going to the M6 pin and the other to the brushes, these 2 wires are not needed afterwards
Where are the generator brushes located?
Changing generator brushes is not difficult. They are located in the rear half of the device and are held in place by a single bolt. The brush assembly itself is located next to the slip rings and is connected to the voltage regulator. The brushes are held in place by springs next to the rings. Knowing the circuit diagram of the generator, it is not difficult to find the brushes. To replace, you will need a standard set of tools:
- Several wrenches;
- A pair of screwdrivers;
- New brushes;
- Liquid WD-40 (in order not to strip the threads of the bolts).
The brushes can be replaced in two ways, by removing the generator or without removing it. The design of the car, or rather the location in the engine compartment, will tell you which method is best to use. If there is free space, it is not difficult to repair the generator brushes without removing the unit, and if the engine occupies the entire engine compartment, it is impossible to do without removing the generator.
