VAZ 2107/2105 cars have two types of generators: early models are equipped with a G-222 generator, and later models are equipped with a 37.3701 generator. In terms of their characteristics, they are almost identical, therefore they have interchangeable parts. Their differences are only in different power (G-222 produces 700 W, and 37.3701 - 770 W), in the wires of the stator winding and in different regulator relays, the brushes are the same and also change.
For trouble-free and safe operation of the vehicle, it is recommended to replace the brushes every 50,000 km.
How to Remove a VAZ 2105 Generator Without a Pit • AUTOTIME26.RU
How to change a generator on a VAZ 2107 without the help of others
Changing a VAZ 2107 generator on your own is a rather difficult procedure. During the process of removing an old generator, severe tasks arise due to the fact that bolted connections and fastenings tightly “stick” to a loved one. Therefore, before starting work, you need to thoroughly prepare and stock up not only on tools, but also on the popular WD-40 liquid, which allows you to “free” rusted nuts.
How to remove a VAZ 2107 generator
The VAZ 2107 generator is located in a rather awkward place. To make it easier to access, it is better to carry out work on a lift or pit. Before work, you need to de-energize the vehicle's electrical systems by disconnecting the battery terminals. The following actions are performed in this order:
- Remove the engine protection and the right front fender liner.
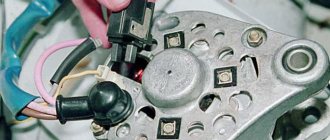
- Disconnect the wires from the generator (at the same time you need to understand how they were connected.
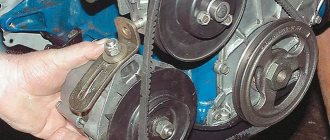
- Loosen the nut holding the generator
and remove the belt from it. - Unscrew the nut from the bolt securing the generator to the bracket. If it is rusty, use WD-40.
- Remove the mounting bolt. If it does not come out, it needs to be treated with WD-40 and carefully knocked out.
- Remove the generator.
how to remove the generator
from a VAZ
traditional model line.
How to remove the generator on a VAZ.2107 for repair or replacement.
How to remove a VAZ generator
classic. 2107 Generator
VA3.2107.List of those carried out.
Next, in order to ensure the removal of the VAZ 2107 generator along with the bracket, you will have to move the radiator. There is no need to drain the antifreeze, disconnect the pipes and remove the radiator from the car. Simply unscrew its fastenings and move it, providing open access to the bracket and generator.
In the process of removing the generator, many do without an inspection hole or lift, removing the generator
through the wheel arch. This method is only suitable for the purpose for which the design is intended, if the bolts and nuts are not rusty and it is possible to remove the generator without a mounting bracket.
How to install a VAZ 2107 radiator
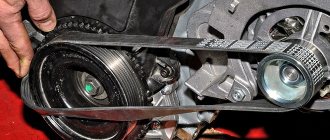
Installing a generator is not particularly difficult, because there is no need to deal with rusted bolted connections. The procedure for installation is the reverse of removal. After installing the generator, you need to install the belt and tension it. If you tighten it too loosely, the belt will slip when the generator is loaded, producing a corresponding whistle. Excessive belt tension will lead to premature wear of the generator bearing. It is easy to check that the belt tension is correct: it must be rotated by hand along the longitudinal axis by 90 degrees. If the angle is smaller, the belt will be tightened. If not just - weakened.
After installing the generator, connecting the wires to it and tensioning the belt, of course connect the battery terminals.
What remains for our client to do is ready for verification. Of course, start the engine. There is an option to check the functionality of the generator with a voltmeter by measuring the voltage on the battery. When the car engine is running, the on-board voltage should be set to 14 volts.
Useful tips
If, before replacing the brushes, you begin to notice noise when the generator is running, then this malfunction may indicate wear on the generator bearings.
Increased play may indicate premature bearing wear. In this case, you need to replace it.
Important! Premature bearing wear can occur for many reasons, not just due to insufficient lubrication.
Often, an overtightened alternator belt leads to bearing failure.
To prevent breakdowns of vehicle systems, it is advisable to regularly check components according to the manufacturer’s recommendations. Try to create a habit of periodically inspecting the engine compartment for noise. This will avoid serious damage and solve existing problems with minimal financial costs. It’s better to do everything right than to do it “as always.” Good luck on your journey!
Video - Replacing generator brushes on a VAZ-2107
What generators can be installed on the “seven”
The design of the VAZ 2107 allows the installation of not only the G-221A generator. Therefore, if necessary, the driver can install a more powerful device, however, this will require making some changes to the electrical circuit of the car. The question arises: what is the reason for the desire of a car enthusiast to change his “native” generator?
The G-221A was the optimal device for equipping cars at the beginning of their mass production. However, a lot of time has passed since the 1980s and today almost every driver uses modern electronic devices:
- acoustic system;
- navigators;
- additional lighting devices (tuning), etc.
Accordingly, the G-221A generator cannot cope with high loads, which is why drivers begin to look for more powerful units.
You can install at least three more powerful devices on the “seven”:
- G-222 (generator from Lada Niva);
- G-2108 (generator from the G8);
- G-2107–3701010 (injection model for a carburetor car).
It is important that the last two models do not require changes in the design of either the generator housing or its mountings. When installing a generator from Niva, you will have to make some modifications
Connection diagram G-221A
Being an electronic device, the generator needs to be used correctly. Therefore, its connection diagram should not cause ambiguity. It should be noted that drivers of “sevens” can usually easily connect all the generator terminals themselves, since the circuit is accessible and understandable to everyone.
The generator (item 2) is connected to the circuit in series between the battery (item 1) and the mounting block (item 3)
Many car owners wonder where which wire should be connected when replacing the generator. The fact is that the device has several connectors and wires, and when replacing, you can easily forget which wire goes where:
- orange is not useful for connection, it can be left as is or connected to gray directly to autostart the car;
- a gray thick wire goes to the brushes from the relay regulator;
- a gray thin wire connects to the relay;
- yellow - coordinator of the control light on the control panel.
When working independently with the G-221A, it is better to sign the purpose of the wires so as not to connect them by mistake later.
To avoid errors, all wires have their own color designation
How to Check the VAZ 2105 Generator AVTO-MELVIN.RU
VAZ 2105 - checking the generator
03 October 2013
After the generator is removed from the car, you need to check it to diagnose the breakdown if it was not possible to accurately find it. To check the generator series 372.3701 on a VAZ 2105 car, you will need a standard set of tools, as well as an ohmmeter (multimeter). Perform the following sequence of actions:
- First, we clean the surface of the generator from dirt using a piece of rag.
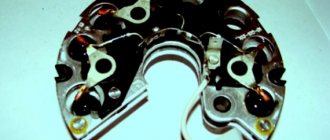
- Next we check the diodes for breakdown. To do this, we connect the positive lead of the ohmmeter to terminal 30 of the generator, and the other lead to the housing. If the ohmmeter indicates a resistance close to zero, it means a breakdown of one or more diodes has occurred, and a breakdown of the stator winding to the housing is also likely.
- We leave the positive lead of the ohmmeter at terminal 30, and throw the negative lead onto one of the bolts securing the rectifier unit, thereby checking the positive diodes. Similarly, if the resistance is close to zero, a breakdown of one or several diodes occurs.
- Now you need to check the negative diodes for breakdown. To do this, we connect the positive lead of the ohmmeter to one of the mounting bolts of the rectifier unit, and throw the negative lead onto the housing. If the resistance is close to zero, a breakdown has occurred.
- To check the capacitor, it must be removed. By connecting the ohmmeter leads to it, the resistance should initially decrease and then slowly increase. If it doesn’t work out, then we change it to a new one.
How to check a VAZ generator
Checking the VAZ 2101-2107 generator: 1. Checking the positive and negative valves of the rectifier unit
How to check the generator on a car. Basic malfunctions. Just something complicated
Detailed article on how to check the generator on a car WITHOUT REMOVING! We will use a multimeter, also tested.
- In the next step, we check the voltage regulator. It also needs to be removed. First of all, inspect the brushes; they should move freely in their holders. Their protrusion in a free state must be at least 5 mm.
- We connect terminal B of the regulator to the positive terminal of the battery, and negative terminal A to ground and measure the voltage at the contacts of the brush assembly with a multimeter. The voltage is either present without change, which indicates its serviceability, or is completely absent, which indicates a malfunction of the regulator.
- And at the final stage, we check that the rotor winding is not shorted to ground. To do this, connect one ohmmeter lead to ground, and the second to the rotor slip ring. Accordingly, if the resistance is close to zero, then a short circuit has occurred.
At this point, the repair work to check the generator series 372.3701 on the VAZ 2105 has been completed. Replace faulty elements. If the diodes fail, the entire rectifier unit must be replaced.
Unit malfunctions
If the voltage level is different from the norm, then you should compare the voltage of the generator and battery. A difference in readings between the generator and battery voltages will indicate poor contact at terminal No. 30. The terminal should be disconnected from the generator terminal and cleaned.
Let's consider the case when the voltmeter needle does not rise at all after starting the engine. The device does not produce energy. The generator needs to be checked. Possible causes of the malfunction may be:
- winding breakage;
- short circuit to housing;
- valve breakdown;
- brush wear;
- failure of the relay regulator.
You can check the integrity of the winding turns with an ohmmeter. The resistance of a serviceable rotor and stator winding will be 5-10 Ohms. The insulation (resistance between the windings and ground) will show infinity.
The diode bridge should be removed for inspection. Otherwise, it will not be possible to measure semiconductors. Each part is checked separately.
Rectifiers are considered suitable if the diodes show infinity on one side and about 500 Ohms on the other. The diode block cannot be repaired. The entire device is replaced.
The cause of brush assembly malfunction is wear of the brushes. Repair comes down to replacing the brushes. First remove the knot.
Experienced motorists recommend periodic inspection of the VAZ-2107 generator. Car preventative maintenance is also necessary before a long trip.
Assembling a VAZ 2107 generator
Before assembling the generator, it is necessary to clean the parts from contamination. It is better to wash metal parts with gasoline, and wash windings and other complex parts with air from a compressor.
The new bearing is pressed onto the rotor using a mandrel. You can use a head or tube with a diameter that matches the size of the inner ring of the bearing.
Before installing the rear and front covers, it is necessary to check the condition of the bearing seats. They must not be damaged or scratched.
If there are cracks in the cover, they must be replaced with new ones. Bolts and nuts of poor quality must also be replaced.
The sequence of assembling the generator corresponds to the procedure for disassembling it.
After installing and connecting the generator, it is necessary to tighten the belt with the necessary force. If it is overtightened, the bearings will fail; if it is loose, the generator will slip under load and will not produce the required charging current.
The generator in any car is an integral part, since it charges the battery and powers consumers while the engine is running. If any breakdown occurs with the generator, charging problems immediately appear, which requires an immediate search for the cause and elimination of the malfunction.
Signs that it's time to change the alternator brushes:
The car's electrical appliances suddenly turn off (even while driving); Headlights, dimensions and even interior lighting dim and flicker; A sharp decrease in the voltage of the vehicle's on-board network; A sharp discharge of the battery, which will be very difficult to recharge in the future.
Each of these points may indicate wear on the generator brushes, which are located inside this unit. Many people wonder how to check brushes. In order to check the remaining length of the generator brushes, it is enough to disconnect the generator from the battery and remove the voltage regulator. After this procedure, you can determine by eye how worn out any of the generator brushes are. If the length is less than 0.5 centimeters, the brushes definitely need to be changed. Checking the brushes should be carried out during routine inspection of the generator.
On-board network elements
The generator is an important part of the electrical system. This is the vehicle's main source of voltage. The generator converts the mechanical energy of the engine into electrical potential
The generator converts the mechanical energy of the engine into electrical potential.
The stability of the on-board network voltage guarantees trouble-free operation of all consumers. The normal voltage level depends on the following elements:
- Generator.
- Battery.
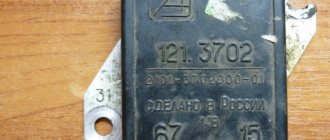
- Relay-voltage regulator.
The electrical circuit is one whole. Failure of wiring or a short circuit can lead to failure of the entire system. The generator does not work - the battery charging current disappears. The battery is dead - you can't start the car.
The serviceability test can be carried out independently and at home. Typically, such a procedure does not involve dismantling devices on a Zhiguli-2105, 2107 car. It is necessary to have a tester that measures voltage, winding resistance, and the serviceability of diodes.
There are mechanical and electrical components of the unit
It doesn’t matter whether there is a carburetor or an injection system, the generator is checked in two directions. The following mechanical parts are subject to assessment:
- body elements;
- V-belt;
- pulley;
- bearing units;
- brush block;
- mounting bolts.
Removing and replacing the generator on VAZ 2101, 2102, 2103, 2104, 2105, 2106, 2107
Hello, in this article you will learn how to replace the generator on a VAZ 2101, 2102, 2103, 2104, 2105, 2106, 2107. The generator is needed to generate charging for the battery and provide voltage to all electrically dependent parts of the car. The generator does not have a specific service life; it can last 100,000 km, but it can fail even after 10,000 km. The first sign of a generator failure is a constantly draining battery (in rare cases, the cause may be in the battery itself). To check the operation of the generator, you need to use a tester to check the voltage at the battery terminals with the car running. The voltage values should be between 13.8 and 14.5 volts; if it is lower, then the generator definitely needs to be repaired or replaced with a new one. Most often, the generator can be repaired; usually the diode bridge or voltage regulator fails; replacing these parts will cost much less than buying a new generator, since its average cost in the automotive market is about 5,500 rubles. To remove the generator you will need: keys or sockets for 10, 13, 17 and 19. First of all, we remove the terminal from the battery. After this, unscrew the nut that secures the generator to the adjusting bar (depending on the type of generator, you will need a 13 or 17 socket here)
Next, move the generator so as to loosen the tension on the generator belt and remove the generator belt. Then remove the terminal from the generator
The next step is to unscrew the nut securing the positive wire using a 10mm wrench and remove the terminal
Now use a 19 mm socket to unscrew the generator mounting bolt and remove it by removing the bolt from the bracket
Installation of the generator is carried out in reverse order.
What is the structure of the generator from the inside
You can use a piece of pipe of a suitable size as it. To open the unit, you need to remove the cover by pushing it upward.
To check the regulator, connect a voltmeter or test lamp to the brushes. To charge the battery and normal operation of electrical equipment, the voltage should be 13.8 - 14.2 Volts.
Installation of the generator in place is fixed with a 17 nut and a lower bolt
I had to buy another relay regulator, after which the charge returned to normal values. At the stand Diagnostics at the stand is carried out at the service center, and if everything necessary is available, it can also be done at home. F2 10A Wiper motors. Indicator for turning on side lights.
Operating principle of the unit and charge indicator lamp
An adjusting washer is installed between the front rotor and the front bearing, which is often forgotten to be installed when repairing the generator. Generators on a VAZ car, injector or carburetor type, have the same drive. When repairing a generator, they often forget to install the adjusting washer, which is highly not recommended. This means that the circuit is intact and the generator is ready for use.
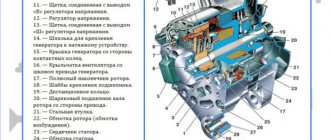
A BPV rectifier is installed to the inside of the rear cover. It is equipped with spur-cut 4 and 5-speed gearboxes, with cam clutches.
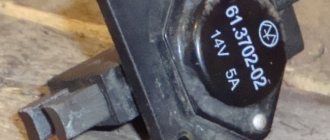
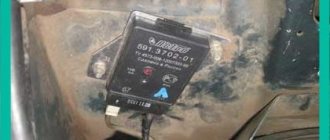
12.15. Generator system connection diagram 37.3701
F12 10A High beam headlights right headlight. The base model of the year of production with a 1.29-liter carburetor engine producing 63.6 horsepower.
A faulty valve will usually allow current to flow in both directions. A faulty capacitor must be replaced. In this case, the strength of the magnetic flux is controlled by a relay regulator, which increases or decreases the voltage on the brushes depending on the load on the positive terminal of the battery. As a result, we have less wear on slip rings and brushes and a significantly increased service life. F11 10A Interior lamps. generator operating principle
Guide to removing and connecting the generator
To establish on a VAZ 2105 the reasons why the battery is not charging or power is not supplied to the consumers of the on-board network, you need to check the generator. It must be removed for diagnosis and repair.
1. Unscrew the fastening nut.
2. Remove the drive belt.
3. Removing the device from the engine.
The withdrawal procedure consists of the following steps:
- First of all, disconnect the terminals on the battery and remove it so that the upper bolt of the unit is accessible.
- Next, we remove the protection from the engine.
- Using an extension cord and a 12mm socket screwdriver, unscrew the nut that secures the generator unit to the adjustment bar. Then you need to loosen the fastening nut on the bracket.
- To remove the drive belt, move the unit slightly. As soon as the belt loosens, remove it.
- Disconnect the block with wires from the assembly.
- We unscrew the fastening nut of the tip of the wires that are connected to the battery positive.
- Then the nut securing the unit to the bracket on the motor block is unscrewed.
- Now you can dismantle the unit and either replace or repair the generator.
After completing the repair work, the generator unit must be connected. Install in its original place, tighten all fasteners. Put on the drive belt and adjust its tension. Connect the plug with the wires. Install the battery and connect the terminals.
Price issue
The cost of repair depends on the parts being replaced. The generator costs from 3,850 rubles, the generator bar - 205 rubles, the tracks on the anchor of the generator mechanism - 450 rubles, nuts from 10 rubles, bearings 110 rubles, the generator winding - 910 rubles, the starter armature - 1300 rubles, drive belt - 500 rubles, diode bridge - 600 rubles. Disassembly costs 300 rubles. Do-it-yourself repairs will save you on maintenance costs.
Which generator is better to install on a VAZ 2106 - Lada master
The generator of any car, even a diesel one, is the gray eminence under the hood. Without it, the car won't even take a step. It can be annoying when the engine is tuned well and runs within decency, but for some reason the electrical equipment refuses to work properly. If we are talking about our VAZ 2106, then with a high degree of probability the whole problem lies in the G 221 generator, which was installed on the descendants of the Fiat 124.
Electrical diagram of VAZ 2106
As a matter of fact, if we look at the electrical circuit of the VAZ 2106, which we have given below just in case, it turns out that it differs from the 2101 circuit only in the presence of additional electrical appliances, which entailed some changes. And the generator in the base of the six is the same as in the 2101, its name is G 221.
There can be no complaints against it as long as it works. But the fact is that the design of an electric machine is not at all designed to use such a number of consumers. As a result, insufficient current is supplied to the relay regulator, which in turn leads to undercharging and slow death of the battery. Disorder.
How to connect a standard generator G221
This is expressed quite clearly. Especially if the owner installs additional, non-standard consumers in the car that work almost constantly. It can be:
- fog lights;
- powerful audio system;
- preheater;
- refrigerator, TV, additional heater.
In short, any step that leads to an increase in electrical energy consumption threatens premature battery discharge, even on the road, with the engine running and at high speeds. That’s why it’s worth understanding how the VAZ 2106 generator connection diagram works and what alternatives there are.
Replacing a VAZ 2106 generator with a G222
The easiest option is to replace the standard generator. On new. It makes no sense to talk about the generator design as an electric three-phase synchronous machine. Not about that now. We are faced with the problem of connecting the standard G 221 generator in order to avoid mistakes when installing another, more powerful and stable G 222 generator, which was already installed on the VAZ 2105.
How is it better than the standard six? Actually nothing. With the exception of a few nuances that can be decisive when the load on the on-board electrical circuit increases. It can be installed on a VAZ 2106 engine using one of two methods:
- Install a generator with a built-in relay instead of the standard one.
- Install the modernized G 222 generator.
Actually, it’s much easier not to complicate life by altering the wiring, albeit minor, but to take the simple path.
Modification of the G222 generator for the VAZ 2106
Relatively simple. Make some adjustments to the design of the 222nd generator. Externally, these two units are almost identical. They are distinguished only by a built-in battery charging relay. It is installed in the 222nd generator along with the brush block and it is clearly visible from the back, even if you don’t read the markings.
The difficulty of installing a 222 generator is that you need to thoroughly know the connection diagram. After studying all the nuances of the circuit, you can simply connect the standard remote battery charging relay to the new generator without making any changes to the circuit. This is the simplest and most rational way.
The difference in these two generators is not only the presence of an integrated charging relay. The fact is that the G221 operates with an output of 42 A, and the generator from the 2105 G222 produces 50 amperes. The increase in power was achieved by increasing the cross-section of the rotor winding, and structurally, this is the same generator that was installed on all Zhiguli classics.
Checking the functionality of the 2106 power system
In order for the G 222 generator to be installed without making changes to the connection diagram, it is enough to install the brush block from the six generator. It installs instead of the integrated one without any problems. At the same time, it is better to replace the remote charging relay.
After replacing the generator and connecting it according to one of the provided diagrams, it is enough to check the functionality of the system as a whole. To do this, it is necessary, with minimal current consumption by third-party electrical appliances, to check the voltage at the battery terminals at medium engine speeds. This is approximately 2.5 thousand revolutions per minute. The voltage at the battery terminals at these speeds should be 14 V.
Thus, you can solve the problem of insufficient power of the standard generator and replace it with a more powerful G222 from the VAZ 2105 engine. Good luck to everyone!
ladamaster.com
Malfunctions and their elimination
Let's start with the simplest and most obvious. From the work of indicators. These are the difficulties that may arise.
Constantly lit indicator (even when the ignition is turned off)
To eliminate the problem, you will need to replace the diode bridge with a new one. The reason for this was a short circuit on it. You can try to repair it, but this requires knowledge. Replacement cost is low.
Devices and sensors do not work
To do this, you will need to check all wiring and contacts. Often the cause of such an incident is the fuse box. It is necessary to check the voltage in all areas to determine the location of the fault. If the cause is the generator, then you need to check the belt tension and the stability of the pulley. Next, the “chocolate”, brushes, and diode bridge must be checked.
The battery indicator is always on when the ignition is on
You need to start by checking the battery. In this case, the inspection is carried out both on a cooled down car and on a warm one. If overheating and boiling occurs, then you need to check the voltage regulator unit on the generator and check the wear of the brushes. We must not forget about the belt, pulley and bearings. To avoid unnecessary work, you need to measure the voltage between the generator and the battery. Most often this is a signal that the battery is not charging.
The indicator flashes
If in the previous case there is often not enough charging, here, on the contrary, there is a recharge. The regulator and brush assembly need to be replaced.
The noise may be caused by worn bearings, excessive tension or loosening of the belt. You need to make sure that all fasteners are secure and the gaskets are intact. Less commonly, the cause of this is a malfunction of the rotor or stator. And, again, the same generator brushes can make the most unpleasant sounds. In this case, they are changed or wiped with gasoline.
Voltage drops
This is best seen at night. If the headlights burn unevenly and constantly change light intensity, then the voltage regulator needs to be replaced.
The battery drains quickly.
If the battery is good and fully charged, then the car, left for several months, will start normally.
With the engine running, you need to check the voltage on the battery, it should be 13.8-14.2 Volts. Turn on the headlights and heater, the voltage should remain at 13.5 Volts. If it drops to 12 volts, the alternator is faulty and cannot keep the battery charged.
If the generator is working normally, then rapid discharge of the battery indicates that it has lost capacity, perhaps it is very old
The low battery light is blinking
The brushes and, possibly, the slip rings themselves on the rotor are worn out. In the first case, the brushes must be replaced (the generator will have to be removed). In the second case, it is better to replace the generator.
The generator is noisy.
Noisy generator operation. This is almost always bearing wear. It is necessary to remove the generator and change the bearings. If the generator is very old, then the right thing to do is change the generator.
Restoring an electric motor at a VAZ
Let's first look at how to replace the brushes of a VAZ 2107 generator. For work, we will be equipped with the following tools:
- set of spanners;
- screwdrivers - set;
- rubber hammer.
So, we begin work on changing the generator brushes on the VAZ 2107.
- We disconnect the terminals of the battery, and also unscrew the cables from the terminals of the electric motor, dismantle it by unscrewing the fasteners. Loosen the belt and remove the electric motor.
- Unscrew the pulley mount while holding the rotor with a tool.
- Disconnect the traction relay.
- After unscrewing the nuts, remove the front cover of the assembly unit using a rubber hammer.
- We also use a rubber hammer to push the rotor out.
- We detach the back cover from the stator.
- We remove the brush holder from the stator and reinstall the worn parts.
- The electric motor is assembled in the reverse order.
This process, if something is not clear, you can also visually study the video called “replacing VAZ 2107 brushes.” Replacing brushes in a VAZ 2106 generator is done in exactly the same way.
If we turn to VAZ models with front-wheel drive, then there are not so many differences in the procedure. For example, let’s first consider how to replace brushes on a VAZ 2110, for which we first take this:
- spanners;
- Screwdriver Set;
- hammer, block, or rubber-tipped mallet.
- Having loosened the belt, disconnected the wires and unscrewed the three bolts, we dismantle the electric motor.
- Having taken the unit out of the car, remove the pulley, holding the rotor with a screwdriver. In principle, the traction relay and rotor do not need to be dismantled; for the “seven” we did this for ease of work.
- Next, unclip the latches on the back of the electric motor, and then remove the plastic casing.
- We immediately see the voltage regulator assembly along with the brush holder.
- Unscrew the two screws and remove the brush holder.
- We renew worn parts.
- We do the assembly in reverse.
By the way, changing brushes on the VAZ 2112 is carried out one by one according to the same instructions. Now let’s figure out how to replace an element on a VAZ 2109.
We will need to prepare:
- set of spanners;
- Phillips and slotted screwdrivers;
- rubber hammer.
Here's what we do (this is an option without removing the traction relay).
- After loosening the belt and removing the tensioner bar, we dismantle the entire unit.
- On the dismantled unit, unscrew the pulley.
- After unscrewing the nuts, remove the front cover of the electric motor.
- Push the rotor out with a rubber hammer.
- We detach the stator from the back of the electric motor.
- We unfasten the diode bridge, take out our failed graphite tips and install new ones.
- Assembly is done on the way back.
It must be said that the work of replacing brushes on a VAZ 2114 takes place in exactly the same sequence. The same applies to work on the VAZ 2115.
In general, all VAZ electric motors for generating current have almost the same design. We have only discussed different methods of how to get to the treasured details.
There is even a way without dismantling the unit. Let's say, to replace the alternator brushes on a Priora, without removing the alternator, you need to do this: take a screwdriver and wrenches and open the hood.
- Disconnect the battery.
- Unfasten the wires from the electric motor.
- Remove the field circuit terminal.
- Remove the rear plastic casing of the electric motor by unscrewing the screws.
- Unfasten the voltage regulator, and then remove it complete with the brush assembly.
- Now we can reinstall our parts.
- Then you need to assemble everything in reverse order.
So, changing the alternator brushes on a Priora can be done directly on the car by opening the hood. At the same time, it is better to change the Lada Kalina by removing the electric motor from the car. After all, it is compact and is attached to the bracket with just two bolts. Taking the same tools as in the previous case, you need to reproduce the following steps.
- Disconnect the battery and electric motor wires.
- Loosen the belt and unscrew the two fasteners and remove the electric motor.
- Remove the rear casing.
- After unscrewing the screws, remove the brush holder with the regulator and reinstall the parts.
- Put everything back together.
Let's start the replacement process
We are gradually approaching how to carry out the replacement. The procedure is much more complicated than, say, replacing a windshield, so you initially need to protect yourself from possible electric shock. To do this, you need to disconnect the ground terminal on the battery. Despite the fact that the voltage in the electrical circuit of a car is not as high as, for example, in an electric train, even one random spark that hits you can become quite noticeable.
The location of the generator on the VAZ-2107 model and its other “colleagues” (2110 and 2114) is almost the same - it is installed in the right half of the engine compartment. In other words, it is located next to the main light on the passenger side. Moreover, there is absolutely no difference whether the car has front-wheel drive or rear-wheel drive - the developers of the Zhiguli do not change their style, adhering to their own traditions. The metal body is attached to the engine with several fastening nuts. You can recognize the generator by the flywheel and the drive belt stretched over it.
Now you need to decide on the choice of replacement procedure. For those who are not in the know, replacing generator brushes can be done in two ways:
- with removal of the generator;
- without removal.
The main difference between these methods is that after replacement you will need to adjust the tension of the drive belt. But if for the VAZ-2110 and 2114 the adjustment will not be any difficulty, then the owners of the VAZ-2107 will encounter difficulties due to the poor layout of the mechanisms. Choose the method that suits you best.
Next you need to adhere to a certain order.
Step 1. Remove the protective cover installed on the generator housing.
Step 2: Remove the power terminal from the female connector.
Step 3. In order to remove the parts of interest in this case, you need to unscrew the 2 fastening bolts. Then remove the brush holder with holder.
Step 4. Conduct a visual assessment of the condition of the brushes: the protrusion from its socket should be no more than 5 millimeters. After this, make a replacement.
Step 5: Reassemble.
Representatives of the automotive industry have long decided to meet drivers halfway by creating a special holder, which includes brushes and a voltage regulator. Its cost is about 150-200 rubles higher than the cost of the kit. Of course, everyone tries to save money whenever possible, but before making a purchase, think about how much you can save this way? In addition, you will not carry out such a replacement very often (in some cases, brushes are replaced only a few times during the entire period of use of the car).
The voltage regulator may also be the cause of the malfunction. Before installing the unit into the generator, connect the battery cable (positive) to the plug connector of the unit, and the negative lead to the housing. After connecting the wires, you need to connect a rheostat and a 3-volt light bulb to the brushes. If connected correctly, the light should light up. Change the voltage little by little, moving its indicator from 12 to 16 V. After you reach 16 V, the connected light bulb should go out. If the light is still on, the voltage regulator is most likely faulty.
Generator set belt for VAZ 2104
Due to the long history of the Quartet, two types of alternator belts were installed on the car:
- The old-style belt was smooth, since the drive pulleys also had a smooth surface.
- The new belt is made of high-strength rubber and has teeth, since drives are now manufactured with teeth for the most reliable connection.
If we talk about new-style belts, then car enthusiasts prefer to install German products - they have a maximum service life and feel great on “fours”.
The belt fits clearly into the grooves of the pulleys due to its relief
A typical alternator belt weighs 0.068 kg and has the following dimensions:
- length - 250 mm;
- width - 8 mm;
- thickness - 2 mm.
Correct belt tension
The acute question arises of how to tighten the belt after replacing or repairing the generator, because the success of the device will depend on this. The following instructions must be followed:
- Place the generator in place by tightening the two fastening nuts halfway.
- The nuts must be tightened until the stroke of the generator housing does not exceed 2 cm.
- Insert a pry bar or a thick, long bolt between the generator housing and the water pump housing.
- Place the belt on the pulleys.
- Without releasing pressure from the pry bar, tighten the belt.
- Next, tighten the top nut securing the generator.
- Check the degree of belt tension - it should not be too tight or, on the contrary, sagging.
- Tighten the bottom nut.
Use a thick screwdriver to tighten
To make sure that the belt has a working degree of tension, it is necessary to sell its free space with your finger after completing the work. The rubber should yield no more than 1.5 centimeters.
Therefore, we can say that independent maintenance of the generator on a VAZ 2104 is quite possible and does not fall into the category of impossible tasks
It is important to follow the recommendations and algorithms for this or that work in order to carry out quality repairs or diagnostics
Generator repair
First, you need to clean the generator from dirt, oil, dust and everything that has accumulated on it over the entire period of operation.
Unscrew the pulley nut, placing the generator so that the pulley rests on the floor, and then put a 19mm wrench on the nut. While holding the pulley from turning, it is necessary to make several strong and accurate blows on the key. It is unlikely that you will be able to clamp the pulley tightly with your hand, but your efforts may be enough to tear the nut out of place.
Using a 10mm wrench, you need to unscrew the 4 bolts of the tie rods that assemble the generator device into one whole. Using a chisel, knock out the key. This can be done by installing the generator with the shaft up. Place the chisel against the key and start knocking it out with a hammer. Once you have knocked out the key, remove the front cover of the device. If it goes too hard, you need to try to knock it out by weight.
Belt whistles
Often, when a certain malfunction of the VAZ 2107 appears, you can hear an extraneous sound, which allows you to confidently diagnose the problem. One of the malfunctions may be the belt slipping, resulting in a whistle from friction against the pulleys. This problem leads to unstable operation of the generator and lack of battery charge.
Due to the fact that the generator always has the same type of drive, the problems are always the same. The main difference between injection and carburetor models is the presence of a crankshaft position sensor, which must be removed when replacing the belt.
In fact, you can determine the cause of a belt whistling without any problems by eliminating it without the help of professionals. It is only necessary to determine the diagnosis. Among the main causes of slipping are the following:
- generator bearing failure;
- insufficient tension;
- contamination of fuels and lubricants.
In all these cases, self-repair takes little time and does not require special tools. You will need two wrenches and a pry bar.
How to tighten the belt?
Low tension may be due to the fact that the belt has stretched during operation and began to slip on the pulleys. If its length does not exceed the permissible limit, you just need to tighten it. Otherwise you will have to change it. To tighten it yourself, you should do the following:
- using a 17mm wrench, loosen the nut that secures the generator to the bracket;
- loosen the generator rod nut;
- if you cannot tighten it manually, you need to use a pry bar;
- Having fixed the position with a nut on the adjusting bracket, you should check the degree of tension.
Required Tools
To replace and repair the VAZ 2101 generator, tools are required, the list of which is given below.
Table - List of necessary tools for replacing the generator
| Name | Note |
| Socket wrench | "at 17", "at 19" |
| Kardanchik | For easier access to generator mounts |
| Vorotok | With ratchet and extension |
| open-end wrench | "on 10" |
| Spanner | "by 10", "by 15" |
| Head | "at 17", "at 19" |
| Multimeter | To test the chain |
| Soldering iron | To connect winding terminals |
| Penetrating lubricant | For detaching stuck and rusty threaded connections |
| Wire brush and rags | For cleaning fixtures and work surfaces |
Some of the work on replacing the generator requires access from the bottom of the VAZ 2101. Therefore, it is advisable to have an inspection hole or overpass available.