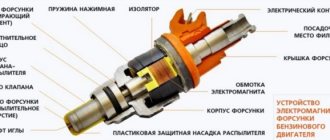
The injector nozzle operates on the principle of a spray, dispensing the mixture into the working chamber of the engine. The duration of the injection cycle and the amount of fuel supplied are set in the program of the internal combustion engine control unit. For each of the injectors these parameters are the same. The fuel injector is located inside the intake manifold. The air flow passes through the manifold and carries the fuel particles ejected by the injector into the combustion chamber. The diagram of the “Seven” fuel system is shown in the picture below.
How to clean the injector nozzle on a VAZ 2107 yourself
As you know, the injector functions like a sprayer, that is, it transfers the mixture in portions into the working chamber of the engine.
The length of the injection cycle and the amount of transferred fuel are included in the structure of the control unit of the internal combustion engine. The injection system is located inside the intake manifold. Moving through the manifold, the air flow carries fuel particles that were ejected by the injector into the combustion chamber.
If the injectors on a VAZ 2107 are dirty, you need to clean the injector yourself or at a car service center.
Injectors - what are they?
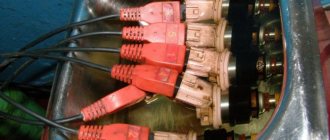
Let's figure out what injectors are and what they are needed for. Injectors are an electromagnetic mechanism designed to spray fuel into the cylinder. Their number depends on the number of cylinders in the car. The VAZ car has 4 cylinders, therefore there are also 4 injectors.
A serviceable and clean injector sprays fuel evenly without any delays or jerks.
A clogged injector may not spray fuel at all or, on the contrary, pour it in drops. As a result, the engine cannot operate normally and correctly.
Injector malfunctions - causes and characteristics
During operation, injectors more often than other components of the fuel supply system have to come into contact with aggressive environments. If the injectors on the “seven” are faulty, this can be determined by the following signs:
The deterioration in the functional state of the "Seven" injectors is primarily due to their contamination. Due to low-quality fuel, deposits appear on the walls of the injectors, reducing the throughput of the injection holes.
troits at idle (injector) | Thread Posted by Josue
Today for the first time the light did not go out, the injector is not working at idle, I changed the spark plugs, there is no change - what could be the reason?
Nikolay (Klarusia) Removed the brand, waited 30 minutes, started it for 10 seconds, did not light up and then caught fire
Alexander (Pefilia) For diagnostics only.
Sergey (Morfran) Spark plugs or ignition module.
Alexander (Pefilia) I had this happen when the fuel pump went bad.
Alexander (Pefilia) There could be a lot of reasons, including water in the fuel. There is no point in guessing here.
Evgeny (Crispus) If it dies at idle, then the problem is with the spark. Most likely your coil is faulty. You can remove the wires from the spark plugs one by one, this way you will find out which cylinder the spark is not going to.
How to clean injectors
There are many different methods for cleaning injectors. The use of a specific option will depend on the degree of contamination of the holes. For preventive cleaning or removing light blockages, special chemicals can be used, the use of which does not require removing the injectors.
Cleaning injectors with additives
This method makes it possible to clean not only the injectors, but also the fuel system in general. However, this method is effective only with the systematic use of cleaning chemicals.
It is worth noting that additives must be used every 17,000-20,000 kilometers. To clean, the fuel injection line must be connected to a reservoir through which the cleaning agent is transferred under pressure, and the standard fuel pump must be turned off.
The engine must be started and should be idling for the next fifteen minutes. Then you need to turn off the engine and wait about fifteen minutes.
After this, the engine should be started again, but this time the speed should be increased to the maximum speed to remove sludge fragments. In this mode, the internal combustion engine should run for about thirty minutes.
Manual cleaning
If we are talking about an advanced case, when cleaning with additives is virtually meaningless, it is necessary to dismantle and subsequently replace the injectors.
To clean the injectors manually you will need:
In order for the event to be a success, you must adhere to the following algorithm:
Cleaning should be carried out according to the instructions on the packaging of the chemical product.
Let's start cleaning
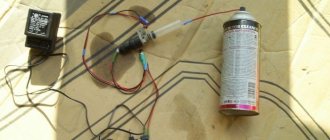
After preparation, you can begin cleaning. We supply voltage from the battery to the injector connector and begin to blow it out using carburetor cleaner. To avoid damage to the injector, it is recommended to supply power from the battery in short pulses and during their supply try to ventilate the injector as thoroughly as possible. The average cleaning time is no more than 10 minutes.
After cleaning is completed, a re-check is carried out using a tester. If any injector exhibits significantly changed resistance, it is better to replace it. Before installing injectors on a car, be sure to replace all rubber seals on the fuel rail and intake manifold. New rubber seals will completely eliminate fuel leakage and the entry of foreign air.
How to clean the injector nozzle on a VAZ 2107 yourself
As you know, the injector functions like a sprayer, that is, it transfers the mixture in portions into the working chamber of the engine. The length of the injection cycle and the amount of transferred fuel are included in the structure of the control unit of the internal combustion engine.
The injection system is located inside the intake manifold. Moving through the manifold, the air flow carries fuel particles that were ejected by the injector into the combustion chamber.
If the injectors on a VAZ 2107 are dirty, you need to clean the injector yourself or at a car service center.
Injector malfunctions - causes and characteristics
During operation, injectors more often than other components of the fuel supply system have to come into contact with aggressive environments. If the injectors on the “seven” are faulty, this can be determined by the following signs:
The deterioration in the functional state of the "Seven" injectors is primarily due to their contamination. Due to low-quality fuel, deposits appear on the walls of the injectors, reducing the throughput of the injection holes.
Troubleshooting
Obviously, before removing the injectors, you should make sure that they are actually clogged. The following options exist for this:
How to clean injectors
There are many different methods for cleaning injectors. The use of a specific option will depend on the degree of contamination of the holes. For preventive cleaning or removing light blockages, special chemicals can be used, the use of which does not require removing the injectors.
Cleaning injectors with additives
This method makes it possible to clean not only the injectors, but also the fuel system in general. However, this method is effective only with the systematic use of cleaning chemicals.
It is worth noting that additives must be used every 17,000-20,000 kilometers. To clean, the fuel injection line must be connected to a reservoir through which the cleaning agent is transferred under pressure, and the standard fuel pump must be turned off.
The engine must be started and should be idling for the next fifteen minutes. Then you need to turn off the engine and wait about fifteen minutes.
After this, the engine should be started again, but this time the speed should be increased to the maximum speed to remove sludge fragments. In this mode, the internal combustion engine should run for about thirty minutes.
Manual cleaning
If we are talking about an advanced case, when cleaning with additives is virtually meaningless, it is necessary to dismantle and subsequently replace the injectors.
To clean the injectors manually you will need:
In order for the event to be a success, you must adhere to the following algorithm:
Cleaning should be carried out according to the instructions on the packaging of the chemical product.
Video
If you find an error, please select a piece of text and press Ctrl+Enter.
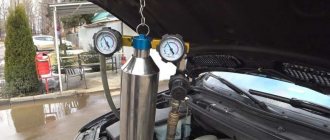
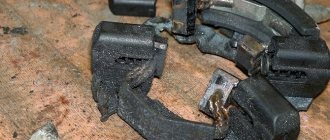
Cleaning by removing injectors
Heavy contamination of the injection system is removed in a way that involves removing the injectors and cleaning them separately. This method allows you to achieve the best results. The main advantage of cleaning injection nozzles with liquid is the restoration of the performance of such injectors, which structurally have a complex configuration of their internal channels.
The injector is dismantled and each nozzle is individually cleaned on a special stand. This approach allows you to compare productivity, torch shape, spray direction and quality before and after cleaning. Additionally, you can compare and analyze the performance of the entire group of injectors together.
The principle of operation of the cleaning stand is that its control system simulates the operation of the injectors on the engine. Instead of gasoline, liquid is passed through them to flush the injectors. The stand operator controls the frequency of electrical oscillations of the nozzle valve. The main task is the occurrence of cavitation in the fuel supply channel. Cavitation refers to the formation of air bubbles in a liquid.
Hydrodynamic cavitation ensures the movement of the nozzle needle in the flow of cleaning liquid at high speed. A vacuum is created behind the various convex parts. Under the pressure of the surrounding liquid, the vacuum instantly divides into a large number of microscopic bubbles that “pop.” The effect of micro-explosions is obtained, and the energy from them affects the varnish and dirt deposits that have formed inside the fuel channel of the injector and on the needle itself.
The result of this operation is the effective destruction and removal of deposits and dirt in the nozzle channels, as well as the washing of the injector strainer. The operator determines the cavitation that has arisen visually. The stream of light liquid coming out of the nozzle turns brown. The color of the liquid at the outlet changes due to exfoliating slag.
The stand allows you to additionally identify changes in the operating parameters of the electrical and mechanical elements of the injectors. Thanks to this, you can make a decision in advance about the need to clean the injectors, the advisability of their continued use without flushing, or a complete replacement.
The injector performance indicator is determined both before and after cleaning. In cases where cleaned injectors show different performance indicators with a variation of more than 5%, then they need to be replaced. Faulty injectors are replaced either one at a time or in groups.
Flushing reveals that the solenoid valve is worn out and does not close completely. This means that such a nozzle flows at a time when no electrical impulse is applied to it. This malfunction leads to excessive fuel consumption, increasing carbon deposits on valves, pistons, etc. It is better to replace injectors with a similar problem immediately.
Cleaning the injector with ultrasound
One common way to clean injectors is to use a unit that cleans previously removed injectors in a special ultrasonic bath. This method provides good results, although some experts consider the best way to clean injectors using hydrodynamic cavitation.
An ultrasonic bath is an open container that is filled with cleaning liquid. From the outside, a device is mounted into the bottom of such a bath, which is an emitter of ultrasonic vibrations. The cleaning nozzle is lowered into the bath. While passing through the cleaning liquid, the ultrasonic wave starts the cavitation process. During cavitation, bubbles are formed, which burst and form shock waves. These waves have a destructive effect on the dirt and deposits that accumulate on the surface of the injector nozzle and in the channels.
Logbook VAZ 21074 (2006)
Do-it-yourself: Cleaning VAZ-2107i injectors with Laurel ML101
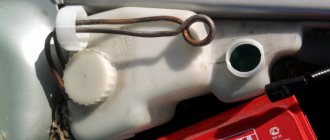
Hello everyone, this fall I decided to replace the fuel filter during off-season maintenance, and at the same time wash the injectors, which I have never cleaned since the purchase, fortunately an acquaintance brought me a bottle of Lavra from work, the same brand had previously decoked the rings when changing the oil.
So, there were no special comments on the operation of the injectors, only the tachometer needle moved a little at idle, I filled up with gasoline at a proven network of gas stations, but I decided to clean it as a preventive measure. The previous owner also cleaned them regularly, using an old pump that was connected under the hood to a pipeline; I don’t have one, so I decided to make do with the standard one from the gas tank. Since the wash cannot be diluted, I had to disassemble the tank and pull out the pump, dip it in the product and let the motor run on it.
It looks like a greenish liquid with ammonia odor. The smoke from the exhaust was a little smoky, but the engine ran smoothly as usual.
Everything was done according to the instructions.
The remainder of the product was then poured into the gas tank.
At the same time, I checked the mesh on the pump - it was as clean as it was when I cleaned the gas tank a year earlier.
Then I put everything back together and replaced the fuel filter with a new one, since all the crap from the fuel lines should have accumulated in it.
I also replaced the air filter - I change it once a year before winter. Old and new.
So, after washing, the oscillation of the needle did not change much, it also “walks” a little + -50 rpm.
But the low-end thrust and engine response have noticeably increased, acceleration has become more dynamic, in 4-5 gears this is no longer so noticeable. Perhaps this was also influenced by the replacement of filters, or the catalyst was also cleaned), I don’t know. But there is an effect from this procedure.
Also, apparently, the float was bent a little during assembly and disassembly - the fuel level light began to light up only when there were already 2-3 liters left in the tank, because of this, then it almost stopped on the road.
Troubleshooting
To quickly check the injectors without removing them, you will need an indicator screwdriver. It consists of a metal rod and handle on which a switch and a contact are located to create a conductive circuit, clamped by one of the fingers. When moving the switch forward towards the rod, the device becomes less sensitive; when moving to the upper position, its sensitivity increases. In the first case, the red indicator lamp will light up or flicker, in the second case, the green lamp will light up.
Before carrying out the test, the screwdriver switch must be moved forward, towards the working part (rod) until it stops, and your finger must be pressed against the open contact located on the handle of the indicator screwdriver. The hand must remain in this position during the entire test, closing the electrical circuit, otherwise there will be no indication.
The working rod of the screwdriver must be positioned so that it touches the metal bracket on the block holding the nozzle. There is an opinion that it is enough to simply bring the rod to the block for an indication to occur, but this is not so. The metal clamp catches the electromagnetic pulse generated during the operation of the injectors; a potential difference and alternating currents arise in it, which the device records.
This test checks the injector while the engine is running, so it must be started and left at idle. When the rod of the indicator screwdriver comes into contact with the metal bracket on the screwdriver, the red indicator should light up. This checks performance on all cylinders. If the injector of one of the cylinders is not working, the indicator will not light or blink.
Using the indicator does not necessarily indicate that the injector is faulty, it signals that it is not working. The problem may be there, or in the voltage supply system, poor contact, failure in the electronic control unit, etc.
Some models do not have metal pad clamps in which currents are generated; in this case, is it possible to determine the faulty injector without removing it from the engine? Yes, this can be done using the same indicator screwdriver. To do this, you need to set the switch in the uppermost position (this is the highest level of sensitivity of the device) and perform additional manipulations.
After starting the engine, the screwdriver rod is brought to the injector block, and no indication will appear, even if it is working. Therefore, you need to attach a metal bracket to the screwdriver shaft, which will serve as an antenna where electromagnetic oscillations will occur. A paper clip carefully pressed around the rod with pliers is suitable for this.
During the fuel injector test, the switch remains in the highest sensitivity up position. With the engine running at idle speed, you need to bring the bracket as close to the block as possible, it should cover it. A blinking indication should appear on the device due to currents excited by the electromagnetic field that occurs during operation of the nozzle. If there is a non-working injector under the column, there will be no indication. This technique is also suitable for pads equipped with a metal bracket.
Do-it-yourself injector washing - various methods
Welcome, friends, to the DIY auto repair website. Against the backdrop of poor fuel quality, clogging of the injection system is a matter of time.
In this case, the most sensitive elements of an injection engine, the injectors, most often suffer.
Their task is high-quality atomization and supply of the mixture to the cylinders of the power unit, where, in fact, ignition occurs.
If the injector malfunctions, many problems can occur, including problems with starting the engine.
To save the situation, you may need to wash the injector yourself. But more about everything.
Main causes of injector contamination
As we have already mentioned, in modern operating conditions the injector has a very hard time.
The cause of its malfunction may be a violation of fuel storage standards, low quality gasoline, the presence of sediment in it, fuel overload and other problems.
It is difficult to control this, so at one moment you come face to face with a breakdown. What to do?
Work principles
To better understand the principles of cleaning, let's look at how the injector works.
Here the algorithm is as follows:
The latter adjusts the position of the needle. As soon as tension appears, the needle opens a hole. As soon as the voltage is removed from the coil, the needle closes the output.
Symptoms of malfunction
Any contamination of the injector leads to a decrease in the quality of atomization of the fuel mixture. In this case, gasoline is supplied in a narrow stream, which is difficult to ignite. As a result, the entire operating cycle of the engine is disrupted.
It's easy to recognize the problem:
But that's not all. During operation you may notice:
Any of these symptoms may indicate the need to flush the injectors.
In addition, this work must be done every 30 thousand kilometers, regardless of the occurrence of the problems described above.
Methods for flushing the injector
Today, there are several main options for flushing the injector.
Let's look at the most effective of them:
1. Chemical flushing of the injector. To perform such work, you must have a special composition on hand for washing injectors.
This method is one of the simplest and most reliable. But! Only “young” dirt can be cleaned using this method.
If the injector has been clogged for a long time, then chemical flushing may not give the expected results.
Another disadvantage is that injector cleaning fluid often softens the dirt, but does not remove it completely.
As a result, the problem may return within a few months. To avoid relapses, specialized cleaning stations use special cleaning systems.
The principle is simple - the device is connected to the fuel receiver. After 30-50 minutes the injector is clean.
To avoid engine overheating, technicians first discard the gas tank and fuel pump.
In a garage, dry cleaning follows a different principle. To work, you will need a special injector cleaning agent (additive), which is added directly to the gas tank.
The advantage of this method is that not only the injectors are cleaned, but also the entire fuel supply system as a whole. The sequence of actions should be as follows:
2) Remove all fuel hoses from the fuel pump and turn it off;
3) Replace them with other hoses that are intended for flushing;
4) Clamp the joints with clamps and tighten them securely;
6) Place the supply pipe onto the fuel pump;
7) Throw the terminals to the device and lower it into a container with flushing liquid;
 Start the car and let the engine run the special agent through the system for a bit. Work at XX is desirable;
9) After 20 minutes, turn off the engine, and after another 20 minutes, start it again. Now you need to change the speed.
That's all. The remaining flushing fluid will come out of the system on its own, so there is no need to worry about it.
2. Easy cleaning method. If you do not have special equipment at hand, you can use another technique. Its essence is as follows:
2) Pull out the fuse that powers the fuel pump. Do this while the engine is running and wait until the car stalls on its own;
3) Unscrew the bolts and remove the wires from the injectors;
4) Pull the ramp towards you with a little force until the injectors come out of their sockets.
5) Close the opened holes (for example, you can use clean napkins).
6) Rotate the ramp 180 degrees to avoid fuel leakage;
7) Using a screwdriver, remove the injector mounting clips and remove the latter. Again, plug the resulting holes with napkins. Just in case, make marks so that during assembly you can accurately return everything to its place.
Now use the syringe. Remove the piston from it and increase the diameter of the hole.
9) Pull the hose that comes with the cleaner can into the syringe with one side, and insert the other into the can itself.
10) Connect the nozzle to the output of the syringe and apply voltage to it from an external charger. At the same time, release the composition from the can. The created pressure should be sufficient to clean the nozzle of existing contaminants.
11) During the check, look at the device and evaluate the quality of the spray. As soon as the expected uniformity of emission appears, work can be stopped.
12) Put everything back together and be sure to install new O-rings.
13) Reconnect all disconnected mechanisms, replace the fuse and check the quality of engine operation.
3. Ultrasonic injector cleaning is another popular and more effective cleaning method. The principle here is the following.
The injector nozzles are lowered into a special bath with a special composition. A special stand is used to generate cleansing ultrasound.
The cleaning itself occurs thanks to small bubbles that penetrate into all the holes of the nozzle and burst in them.
The advantage of this method is that the power of the ultrasonic stand can be adjusted depending on the degree of contamination.
Therefore, ultrasonic cleaning can be effective even in the case of old deposits. Another advantage of such stands is their careful handling of ceramic nozzles.
After all measures have been carried out, it is necessary to replace all sealing wheels and filters.
This will allow you to restore the normal functionality of the injector 100% and forget about the problem for at least 10-20 thousand kilometers.
Ultrasonic cleaning is more effective than the methods we discussed above. With its help you can get rid of even the most difficult contaminants, anywhere in the nozzle.
But, unfortunately, it is unlikely that such work will be done in a garage - you need to contact a specialized service.
The main reason is the mandatory use of an ultrasonic stand, which is considered a very expensive device.
Flushing injector nozzles can hardly be called a simple procedure, because we are talking about the need to intervene in the engine fuel system.
But if you have special cleaning products on hand and the necessary tools, you can easily do the job yourself.
Believe me, it's worth it. Cleaning injectors at a service station will cost 2,000 rubles and more. Why not keep this money to yourself? All that is required of you is to strictly follow the instructions. Good luck on the roads and of course no breakdowns.
Troubleshooting
Before removing the injectors on the VAZ 2107, you need to make sure that they are really clogged. There are several ways:
- Hearing test: the old-fashioned method of diagnosis. Applicable only when the holes are significantly dirty. “Experienced” people recommend listening to the audio coming from the cylinder block. If muffled ringing sounds are clearly audible in the sound of the engine, then the fuel nozzles need to be cleaned;
- Assessing the condition of injectors using a multimeter: a much more objective method of analysis compared to the previous one. First you need to know what type of sprayers is installed on the car. As a rule, the “seven” was equipped with high-resistance injectors. For correct diagnostics, it is necessary to disconnect the “high voltage” going to the injector. Now you need to connect the diagnostic wires of the device to the injector terminals. If the voltmeter readings give values in the range of 12-17 Ohms, then everything is in order with the injectors;
- Diagnostics of the mechanical parameters of the sprayer. This diagnostic operation is only available with professional equipment; it is performed only at specialized service stations. The point is that the injectors are dismantled and attached to a stand. Large quantities of fuel are continuously passed through the part. The technician evaluates the parameters of the torch that is formed when fuel passes through the nozzle. If the fuel flows unevenly, then the device is clogged.
Cleaning the injector nozzles. Kazan
Phone 8-917-925-67-84
Washing and cleaning of injector nozzles on a stand. With removal from the car.
The injectors are washed on an ultrasonic stand. If you wish and it is more difficult to remove the injectors, we can wash the injector using Winn's technology without removing it from the car.
Prices for washing a set of 3-4 nozzles on a stand with control of performance and spray pattern:
VAZ 8-valve 1.6 (ramp without return) - 1200 rubles!
VAZ 8-valve 1.5 (ramp with return) - 1500 rubles
VAZ 8 E-Gas valves - 1500 rubles
VAZ 2112, Priora 16 valves - 1500 rubles
VAZ 2112, Priora 16 valves with power steering and (or) air conditioning - 1,700 rubles
VAZ Kalina 16 valves - 2000 rubles
VAZ 2114 16 valves - 2500 rubles
VAZ classic and Niva - 1500 rubles
Gazelle - 1500 rubles
When to clean injectors
Cleaning of injectors on Lada cars is carried out according to the condition of the car. If there are no problems with your car, then there is no need to clean them. Also, to find out for sure whether the injectors need to be cleaned, you first need to diagnose the fuel system. You can learn more about how to diagnose the fuel system in our article.
The manufacturer recommends cleaning the injectors every 50,000 km. Since the fuel at our gas stations leaves much to be desired, just before this mileage they begin to become clogged and flushing them will be useful. You can wash it at a service station, or you can do it yourself. Next, we will look in detail at how to wash the injectors on a VAZ car at home.
Do-it-yourself cleaning of injectors on VAZ-2113, 2114, 2115
An important element in the entire engine system are injectors.
They are responsible for fuel injection, which means the operation of the entire engine depends on their lifespan. Injectors can become unusable due to many factors. The VAZ 2114 injectors themselves last approximately 100-120 thousand kilometers.
However, this is provided that gasoline complies with European standards, but in Russia the standards are often not met, which is why the injectors fail after 60-80 thousand kilometers, or even earlier.
Failure of injectors can adversely affect many vehicle systems. However, the life of the injectors can be increased if they are cleaned in a timely manner.
Why do you need to clean injectors:
In other words, cleaning the injectors will help the car drive smoother.
Injector malfunctions
You can understand that the nozzle requires cleaning by the following signs:
Remember that with these signs the nozzle may no longer be working, so you need to check its functionality before cleaning. This is checked this way: with the engine running but cold, you just need to touch the injectors - they should pulsate.
There is also another way - the car is added to idle speed, after which the cap nuts on the injectors are loosened - the result of this should be a decrease in speed, if this does not happen, then the injector needs to be cleaned.
However, it is much wiser to clean the injectors ahead of time before problems arise. Timely prevention is much more profitable than cleaning when problems arise. Therefore, let's talk about the process of replacing injectors.
Replacing injectors
Of course, a car service center can replace the injectors for you. The price for this service starts from 1500 rubles. However, to save time and money, it makes sense to change the injectors yourself.
Removing injectors yourself
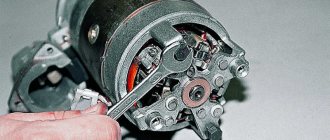
Here is a simple algorithm for removing injectors that all car owners can perform.
1.Disconnect the negative terminal from the battery
2.Take two 17mm wrenches and relieve the fuel pressure by unscrewing the fuel pipe fittings.
3. Separate the electrical connector from the fuel rail.
4.Take a Phillips screwdriver, unscrew the screw on the bracket on which the fuel pipes are attached, and remove it.
5.Use a 5mm hexagon to unscrew the two screws on the fuel rail mounting
6. Move the ramp in the direction of the injector axis, remove all 4 injectors from the engine and remove the ramp towards the left side of the vase.
7.Press the spring clip (1) located on the injectors, move it aside, and disconnect the electrical connector (2)
8.Using a screwdriver, move the injector clamp along the ramp and remove it (on new ramps, the bracket is simply removed).
9.Remove the nozzle from the hole on the ramp, slightly rocking it from side to side.
10.Remove the O-rings that are located on the nozzle body and sprayer using a thin screwdriver
That's all, now the injectors are ready for cleaning.
Do-it-yourself injector cleaning
For cleaning you will need electrical tape (wire) to secure the joints, a carburetor cleaner in a can, a syringe and a thin tube. The cleaning algorithm is as follows.
1.Insert the tube into the cap (nozzle) of the can 2.Insert the end of the tube into the hole of the syringe (without a needle) 3.Attach the end of the syringe to the nozzle 4.Start injecting the product through the tube, simulating fuel injection.
You need to inject until the coming out stream becomes smooth and clean. Then this will mean that the injector is clean.
Another way, if you have a battery nearby, you can try applying voltage to the injector with ordinary wires (polarity does not matter) simulating their operation and at the same time spraying liquid to clean the carburetor.
After this, you need to put on new O-rings and you can begin assembly, having first checked the resistance, which should be in the range of 11-15 Ohms. Reassemble the injectors in the reverse order of disassembly.
Result of cleaning
You now have a clean injector. Its service life, which means the normal operation of the engine, is increased.
Dismantling
Before replacing or cleaning the injectors, they will need to be removed from the fuel rail. To achieve this, the following activities are carried out:
- Make sure the engine has cooled down properly. It is not safe to work on a hot engine;
- Disconnect the power wires from the fuel pump to de-energize the device;
- Try to reduce the pressure in the engine power system as much as possible. To do this, the engine starts, and then you need to wait until it stalls at idle speed;
- Repeat this procedure several times until the car simply stops responding to turns of the ignition key;
- That's it, now our goal is the fuel rail. To remove it, you must first remove the terminals from the battery, turn off the power to the ramp itself, disconnect the fuel supply hoses, and also disconnect all electrical appliances going to it. These are pressure, idle, throttle position sensors;
- If you have an 8-valve engine, then you do not need to remove the receiver. This step is relevant for engines with 16 valves;
- Experts do not recommend removing the intake manifold without dismantling the throttle valve and the hose going to it. It is better to unscrew and disconnect everything at once, which will allow you to continue working more conveniently;
- Cover the exhaust manifold openings with something to protect them from foreign objects;
- Using a hex wrench, you can unscrew a couple of bolts and remove the fuel rail along with the injectors;
- Make sure that there are no distortions when removing the ramp, otherwise problems may arise with the dismantling processes;
- We remove the injectors. To do this, remove the mounting brackets that hold the electrical connector. You also need to remove the bracket that holds the injector in its seat.
After dismantling the elements, be sure to close the seats to prevent debris and other objects from getting in, and place the nozzles themselves on a table or floor, after laying down a dry rag.
Here you can decide whether to change or clean the elements of the fuel system. If replacement is required, install new injectors in place of the old ones and follow the assembly procedure.
Cleaning
Here proceed as follows.
- Remove the rubber rings from the injectors, and when cleaning is finished, replace them with new seals.
- The cleaning process should begin with the nozzles, on which various deposits form as the car is used.
- Be sure to thoroughly clean the funnel-shaped surfaces where tar deposits accumulate.
- The next step is the fuel mixture supply channels.
- To open the solenoid valve to supply fuel, you will have to trick the device with a 5-7 V power supply.
- Some use stabilized voltage sources, phone chargers, or even a car battery. If using a battery, the voltage should be supplied through the light bulb. It will play the role of a current damper. Otherwise you risk burning the winding.
- Electricity is supplied through two wires, in the gap of one of which a button is installed. It will close and open the network. This creates an imitation of the operation of an injector in an engine due to the influence of a pulsed electric charge.
- You can supply the cleaning liquid to clean the injectors through a can of carburetor cleaner. Inexpensive and effective, even better than specialized chemicals.
- Be sure to tightly connect the cylinder and nozzle with a rubber tube, clamps and any other means.
- All is ready? You can then apply electricity to open the injector. At the same time, press the button on the cleaning agent canister.
- Soon the torch of the liquid jet, which will exit through the fuel atomizer of the injector, will change its “clumsy” direction and will begin to uniformly exit the nozzle. This indicates that you have removed all carbon deposits.
Homemade cleaning device
Before putting the cleaned nozzle back in place, check its actual condition.
Examination
To check you need:
- Measure the injector resistance using a multimeter. If the readings are within 10-15 ohms, the injector is working;
- If you deviate from these limits, cleaning is pointless. You only need to change the injectors;
- Check devices for leaks;
- To do this, when cleaning, do not turn on the electrical pulse so that the nozzle does not open;
- Under pressure, a device with a broken seal will begin to show signs of leakage. Therefore, the element must be replaced.
Self-cleaning of VAZ 2110 injectors. How to wash the injectors with your own hands
Cleaning injectors is one of those types of work that needs to be done only in case of emergency, that is, according to the principle “don’t touch it while it’s quiet.” This is not surprising, given the fact that the ramp in which the injectors are located and, in principle, the injectors themselves can be called the heart of a car engine. Therefore, it is recommended to clean injectors only as a last resort, for example, when problems occur with starting the engine, increased fuel consumption, tripping or a sharp drop in power.
Symptoms of clogged injectors
Loss of dynamics is one of the main signs of clogged injectors. If they are contaminated, the car simply will not accelerate properly.
- Unstable idling, the engine at idle will operate unstably and intermittently.
- Starting difficulties can occur when there is contamination or when the injectors stop holding pressure. Fuel begins to drip into the cylinder, which can cause popping sounds in the exhaust pipe.
- Ringing fingers are inevitable when the spray nozzle is clogged; this is due to the fact that the fuel entering the cylinder is mixed with air and the concentration of fuel in this mixture is quite small, so the engine experiences detonation.
Driving with dirty injectors will not provide any driving pleasure. And driving with such a problem is highly not recommended.
5 Cleaning the injector at home - preparation
Since you have decided to wash the injectors yourself, let’s figure out what the essence of the liquid method is and try to implement it. Conditions must be ensured so that it is possible to open and close the solenoid valve and simultaneously pump liquid into the injector when it is open. In the closed position, it should be absolutely unable to miss it. Therefore, we collect everything necessary to carry out the washing ourselves.
It is necessary to purchase a carburetor cleaner and a device that could be used to blow this liquid through the nozzles. For this purpose, a bottle is suitable, which is connected to the hole of the part and the container (tank) into which the product used is pumped. To control the solenoid valve, connect the injector terminals to the battery, and if you have a pass-through switch, connect it to this circuit in series.