To carry out a full diagnosis and repair of the starter, it will be necessary to dismantle it; it will not be possible to carry out such work on site. The mounting scheme for this device differs in different cars, but knowing the layout features of the engine compartment of your car, you can easily remove the starter with your own hands in literally 30-40 minutes. It is worth noting that solving this problem has its own nuances and difficulties.
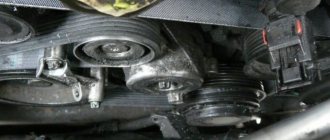
For most cars, the standard location of the starter is the clutch housing on the outside of the engine. It is usually mounted on 2-3 bolts or studs; in addition, you will need to unscrew the connected control and power wires. The main problem is related to the high density of equipment in the engine compartment. For this reason, it is difficult to even get to the fasteners, especially if the only tool you have is a set of ordinary open-end wrenches.
To remove the starter yourself, you will need a set of 10-16 sockets depending on the car, extensions, cardan adapters, a ratchet, a flat-head and Phillips screwdriver. To provide access to the fasteners, you will also have to perform a number of additional reinforcement works, that is, remove individual devices in the engine compartment.
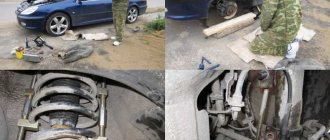
Note that for some cars, dismantling the starter is possible only if there is an inspection hole or a lift, since it is not possible to get to the starter from the hood side. If a breakdown occurs on the road, then you will have to jack it up and install it on reliable supports.
Assessing the scale of the problem
If, when you turn the key in the ignition switch, the starter does not turn, no clicks or sounds are heard, then the reason may be this:
- the battery is discharged or faulty;
- battery contacts are oxidized;
- problem with the contacts of the starter itself;
- a break in the windings of the device or the electrical circuit of the car.
When the starter turns slowly, clicks of the traction relay are heard, the reason may be this:
- there is a charge in the battery, but it is not enough to properly spin the moving parts of the starter;
- carbon deposits have formed on the contacts or they have oxidized;
- worn brushes or burnt commutator;
- short circuits in windings or brush holders.
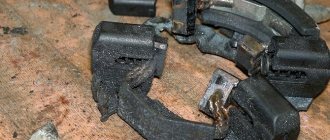
Starter brush wear
Repeated operation of the relay and its spontaneous shutdown can be caused by a voltage drop in the network due to oxidized contacts or a malfunction of the traction relay. When the starter turns, but the flywheel does not rotate, there may be several reasons:
- problem with the freewheel (Bendix);
- drive or flywheel teeth are damaged;
- The bearings or springs of the traction relay are worn out.
These are perhaps the main malfunctions and their most common explanations. They are equally valid for carburetor models and injectors.
VAZ 2110 trigger mechanism
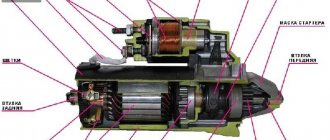
The device for starting the VAZ 2110 engine has an electric motor with a planetary gearbox, as well as a starting solenoid relay. The gears of the planetary gearbox rotate on needle bearings, transmitting torque to the drive shaft. The traction relay switches a large amount of current and transfers it to the electric motor when the ignition key is turned.
The traction relay is returned to its original position using a powerful return spring. The interior of the assembly is a standard electric motor powered by DC battery power. An electric motor consists of a rotor, a magnetic stator and a brush assembly.
This is how the VAZ 2110 starter works. The photo (see below) shows in detail the structure of the unit.
Various external factors, including driver actions, can contribute to malfunctions. To troubleshoot the problem, it is important to understand how to disassemble the VAZ 2110 starter.
[custom_ads_shortcode2]
What is a VAZ 2107 starter and how to change it?
A faulty VAZ 2107 starter causes the engine to simply stop starting.
When the key is turned in the ignition switch, the electrical circuit is closed, but the starter itself does not fire, so no force is transmitted to the crankshaft and it simply does not turn.
There can be many reasons why this happens, ranging from a banal short circuit in the car’s electrical system, to failure of the starter rotor winding or mechanical wear of the brushes. How to properly disassemble and repair a VAZ 2107 starter?
Starter device for a VAZ 2107 car
The design of the VAZ 2107 starter is to some extent reminiscent of an ordinary electric motor. The basis of the design is the so-called shoe, which is driven by the rotor.
t, in turn, begins to rotate when a voltage of 12 V is applied to it. This is the so-called gear starter. An ordinary electromagnet, which consists of an insulated copper winding, a metal core and brushes, is responsible for generating the magnetic field.
On the VAZ 21074 car, a similar scheme is used, but a slightly different fastening is used - 3 bolts each. The brushes transmit voltage to the rotor. They wear out not only due to friction, but also due to the high current generated by the coil.
The starter switching relay, located with it in a single housing, is responsible for the supply of electricity and timely shutdown of the shoe.
The operating principle of the classic starter on the VAZ 2107 is extremely simple: the device is connected to the crankshaft. When voltage is applied to the rotor, it spins and turns the fists.
As a result, the engine starts, after which power is supplied to the spark plugs from the generator, and not from the battery.
During an emergency engine start, a similar scheme is used - artificial cranking of the crankshaft.
It is not always the case that the engine does not start due to a faulty starter. It is possible that the problem lies in the wiring. Therefore, the first step is to study the starter connection diagram and all underwater wiring for a break. If one is found, the area will have to be replaced. At the same time, it is advisable to check the operation of the fuse (it is located on the left side of the hood).
It should also be mentioned that in some starter models protection is installed - this is an additional relay that automatically turns off the traction and prevents the supply of electricity from the battery even when the engine is running. These were not included in the factory configuration, but many install them after a certain period of operation.
Replacing the starter yourself
The starter is an important element of the electrical equipment of a car. Failure of this unit leads to the inability to start the engine, as well as to breakdowns of other components of the electrical circuit. Therefore, the repair or replacement of this car part must be approached responsibly. In the event of a breakdown, the ideal option is to replace the starter with a new one that matches the quality of the original. This will guarantee that the part will last a long time in the absence of other electrical problems in the car.
Work order
- We place the car on a viewing hole or overpass and secure it with the parking brake.
- Open the hood and disconnect the ground wire from the battery.
- Using a 10mm socket, unscrew the bolt of the lower fastening of the starter heat shield.
- We dismantle the air filter housing and the warm air supply hose (for injection units, remove the fastenings of the intake pipeline).
- Using a socket wrench with a 13 mm extension, unscrew the 3 bolts securing the starter housing. It is better to unscrew the bottom bolt from the inspection hole.
- Using a 13mm wrench, unscrew the nut (on the injection engine there are two nuts) securing the starter shield. Let's take it out.
- Using a socket wrench with a 13 mm extension, unscrew the 3 bolts securing the starter housing. It is better to unscrew the bottom bolt from the inspection hole.
- Using the same tool, unscrew the nut securing the tip of the wire going to the “+” battery.
- Disconnect the start relay wire.
- We remove the starter from the rear wall of the engine compartment.
- We install a new starter in its place.
- We carry out installation work in reverse order.
What to do first?
Disassembling the mechanism is not a priority task, since the starter’s power supply is connected to the battery, so you need to start with it. If the car is not too old, it is unlikely that the problems will lie in the design of the starter itself. It is enough to clean the contacts of the battery or the device itself for everything to work again in the desired mode.
Difficulties begin when the machine has worked for a long time and its operation has not been delicate. If, after a complete check of the electrical equipment of your VAZ 2107, the starter still does not start or continues to work intermittently, then the reason is inside the device and it is necessary to remove and disassemble the starter. On this model, both in carburetor and injection versions, it is installed rather inconveniently. To get to it normally, you will have to drive the car onto an overpass or inspection hole.
Disassembling the VAZ 2107 starter
After the ignition is turned off, you can begin the “operation”. It must be done in the following order:
- remove the ground terminal from the battery;
- if there is a protective mud casing at the bottom, then it must be dismantled;
- remove the electrical wires from the solenoid relay;
- unscrew the three mounting bolts (two upper, one lower);
- remove the starter.
As you can see, nothing complicated. The only thing is that in the case of an injection model, mechanics advise removing the inlet pipe extensions as well. Now we have to disassemble the device itself.
Removing the starter from the engine compartment
For old domestic classics, VAZs 8-15 models, some foreign cars, the option of removing the starter from above is quite suitable. This greatly simplifies self-replacement on the go or in garages unsuitable for repairs. The list of equipment that will need to be removed may differ for different cars, but the general scheme of work and the principle of dismantling are similar.
To get a clear idea of the stages of dismantling without disassembling and removing the crankcase protection, let’s consider the process using the example of a VAZ 2115 starter with step-by-step photos:
- Like any other work on electrical equipment, it is necessary to begin by completely de-energizing the vehicle’s on-board network, for which the negative wire is disconnected from the battery.
- To gain access to the mounting studs or bolts, you must remove the air filter. To do this, unscrew the 2 mounting bolts, loosen the air duct clamp, disconnect the mass air flow sensor connector, and remove the rubber fasteners. After disconnecting the air duct, the filter can be removed quite easily, exposing the starter mounting.
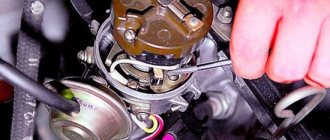
- Disconnect the starter from the on-board electrical network by unscrewing the terminal with the power wire and the control conductor connected to the solenoid relay.
- Typically the starter is mounted on 3 studs, one of which is located at the bottom. It will be the most difficult to get to. The upper nuts are tightened using a ratchet with an extension and a head of the appropriate size or a socket wrench. It is easier to access the lower mount using cardan adapters.
The starter is pulled towards itself, removing it from the studs. To remove it completely, you will need to twist it, choosing a position in which it passes without touching other equipment.
Detailed installation process
In order to correctly install the starter, you must adhere to the following points:
1. Conduct a visual inspection of the device. 2. Installation of the device in its original place. First fasten with a long bolt, and then with two short ones. 3. Install the wire terminals and tighten the nuts. 4. Replace the battery. 5. Connect the terminals on the battery. 6. Install the braces coming from the intake pipe or air duct and air filter. 7. Replace the mudguard (if equipped).
After everything is done, you should start the engine. If everything works as expected, then the starter connection is made correctly. If the engine does not start, you should look for where the error was made.
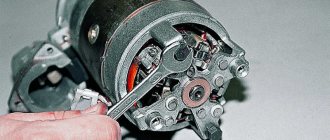
Starter performance check and repair
First of all, you should clean the starter housing from dirt, which inevitably accumulates on it during the operation of the car. Then connect the mechanism to the battery: the “negative” wire to the starter housing, the “positive” wire to the contact of the traction relay. A characteristic click should follow, and a drive gear will appear in the front “cutout” of the casing. Now use an ohmmeter and check the armature windings for opens and shorts. To do this, you need to open the cover at the back of the starter and remove the brush holders with brushes.
Then connect the ohmmeter with one end to the armature body, and the other - alternately to the sectors of the winding. If there are no short circuits or breaks, the instrument needle will fluctuate from a minimum value of 10 kOhm and above.
Now comes the integrity check of the stator winding (in other words, located inside the housing, along the walls of the cylinder). Here you simply connect the ohmmeter contacts to the copper wire terminals. The arrow of the measuring device should “lie” in the area of the highest value if there are no problems. If there are breaks or short circuits in the windings of the starter or solenoid relay, there is no point in bothering with repairs if you have never dealt with electromechanics and have not encountered the technology of manufacturing electric coils. It is best (and easier) to purchase a complete starter and install a new starter.
Checking the integrity of the stator winding
An operation that can really be called a repair is replacing brushes. You can easily find out that they are erased during diagnostics. It is enough to turn the starter on its side when it is connected to the battery and turns properly. If the unit immediately stalls, brush wear is to blame. Replacing parts is simple and accessible even to a beginner. It was already mentioned above that it is enough to remove the cover at the rear of the starter. When the brush holder is removed, the springs in it will themselves push out the brushes, which will hang on the wires. Replacement is a matter of minutes.
The main thing is to never allow oil or fuel to come into contact with brushes or wire windings. Electrics do not tolerate moisture or grease. Therefore, during any operations with starter parts, especially when assembling it, act carefully and, if possible, stay away from liquids and fuels and lubricants.
There is one rare malfunction when the starter turns on, but nothing turns. In this case, the bendix is to blame - a device that prevents the teeth of the drive gear from sharply hitting the flywheel. Its main malfunctions are wear of the rollers, the gear itself, weakening of the pressure spring or unsuitability of the lubricant. This part is inexpensive, changes quickly, and therefore there is no point in bothering with repairs. It is better to purchase it in a store; replacement is done on the “return” when the starter is being assembled.
Sometimes the armature bushings need to be replaced, but this is extremely rare because they are made of very reliable material and wear only appears after a really long period of use. There are only two of them - in the toe and back cover. The process of knocking the bushings out of their seats is usually confusing, but by choosing the right attachment, you won’t ruin anything. Next, a part of the required diameter is lubricated and pushed into the hole. If things get tight, don’t use more force; it’s better to sand the bushing body and try again, otherwise the socket may simply burst.
- “They moved my car onto the lawn, and it turned out to be my fault” - the story of a motorist who suffered because of utility workers
- 6 Mercedes that were officially imported to the USSR
- 4 ways to deceive drivers in tire shops
- 4 mistakes when transporting cargo on the roof of a car that can lead to serious damage
- Advice from psychologists: how not to look at a traffic police inspector to avoid problems
- Celebrities who collect cars
- I found out why people buy used oil - you need to be careful
- “I was charged money for an accident in Volgograd, although I did not have an accident and had never been to this city,” is the story of our subscriber
Diagnosing starter problems
After removal, it is necessary to very carefully clean the starter from any dirt adhering to it to prevent it from penetrating inside the housing. Then we begin diagnostic work. First you need to make sure that the traction relay is working properly, for which we carry out the following actions:
- connect the positive terminal of the battery to the starter output, and the negative terminal to its housing;
- apply a voltage of 50 volts;
- If at the same time the gear of the part (the Bendix, designed to engage with the flywheel and spin it to the required speed) moves out of the housing with a characteristic click, we continue the diagnosis. Otherwise, replace the traction relay.
Preparation for repair and dismantling of the device
It is more convenient to carry out work in a specially equipped room - a garage box. The VAZ 2107 is installed above the inspection hole; for repair and restoration operations, a set of wrenches, a set of heads with a wrench and a device for pressing out the bearing are required. In the event of a malfunction of several other components in addition to the bendix, it makes sense to replace the starter assembly. On a car where there is an injector in the power supply system, repair work is best carried out from below.
The procedure for dismantling the starter on a VAZ 2107 car is as follows:
- Disconnect the battery and remove it from the engine compartment.
- We unscrew the terminal and disconnect the terminal and the wire that supplies power to the starter.
- We unscrew the bolts securing the device that ensures engine starting.
- We remove the unit complete with the bendix feed mechanism from the hole in the housing.
On a VAZ 2107 car, an engine with an injector installed will require a number of additional operations. In this case, replacing the faulty unit is only possible from below. To gain access to the assembly, you need to remove the steel protection and boots covering the engine compartment from below. The remaining operations carried out on the starter are carried out similarly to those described.
14.11. Starter
On all models, the starter is bolted to the clutch housing on the left rear of the engine. The starter can be accessed from under the vehicle. On models with diesel engines with an engine oil heat exchanger, the process of removing the starter is much more complicated and requires lifting the engine.
ALL MODELS WITH PETROL ENGINES AND MODELS WITH DIESEL ENGINES WITHOUT ENGINE OIL HEAT EXCHANGER
Removing the starter from the socket in the clutch housing
| EXECUTION ORDER |
| MODELS WITH DIESEL ENGINES WITH OIL HEAT EXCHANGER Source |
Mechanism repair and installation
After removing the starter from the car, we disassemble it and inspect the components. Particular attention is paid to the condition of the bendix and sliding bearing bushings; the housing must be disassembled for inspection. Carefully remove the brushes from their sockets and clean the commutator of dirt. We assemble the device and check its functionality using the battery.
Installation of the VAZ 2107 engine starting mechanism is carried out in the reverse order of removal. If during testing it is revealed that the starter cannot be restored, it is replaced with a new one. If an injector is installed on the car, after connecting the battery, it will take some time to create the necessary pressure in the gas line. The engine should be started only after the pump has stopped running.
Step by step recommendation
To accurately determine the location of the damage, you will need to remove the 1ZZ starter from the car. Next, we will consider in detail the procedure for dismantling the device and the process of replacing individual elements.
Dismantling the starter
Replacing the 1ZZ starter begins with disconnecting the negative terminal from the battery. In the future, you will need to follow the following sequence of actions:
We disassemble and change parts
To inspect or replace individual components of the 1ZZ-FE starter, you will need to disassemble the device. To do this, you should adhere to the following steps:
How to replace the starter on a VAZ 2101-VAZ 2107?
Note! Before you start replacing this unit, be sure to make sure that its performance is not due to other reasons, for example, the battery is discharged, or its terminals are oxidized, or the wiring that goes to the starter is not working properly!
And also take into account the fact that the starter must be replaced in an inspection ditch, otherwise it will be inconvenient and very problematic to remove from the car!
Removal: 1) First, loosen the clamp that secures the warm air supply hose to the air filter housing.
2) Then loosen the clamp that secures the hose to the air intake itself.
3) And then remove this hose from the car engine.
4) Next, loosen the lower nut that secures the air intake.
5) Next, unscrew the top nut that secures the same air intake.
6) And then remove this air intake from the car engine.
7) Now remove both nuts that secure the heat shield to the engine.
 And then, using an extension joint with the socket head, unscrew the remaining bolt that secures the heat-insulating shield to the right engine mount bracket. (For information on how to unscrew the remaining bolt that secures the heat-insulating shield to the bracket, see the very bottom of the article in the “For Beginners!” section)
9) After unscrewing the bolt, remove the heat insulation shield from the engine.
10) Next, unscrew the bottom bolt that secures the starter.
11) Then unscrew the remaining two upper bolts, which also secure the starter.
12) Moving the starter a little forward... (Continued in point 13)
13) Disconnect the wire block from the starter traction relay terminal on the starter.
14) Then unscrew the nut that secures the wire to the upper contact of the traction relay.
15) And then disconnect the wire from the upper contact, and also remove the bolt and nut that held this contact.
16) Next, remove the starter from the car engine.
Installation: 1) Installation of a new starter is carried out in the reverse order of removal.
Important! 1) Before starting work, disconnect the negative terminal from the battery! (For information on how to disconnect this terminal, see the article: “About the battery”)
For newbies! Question: How to unscrew the bolt securing the heat-insulating shield to the bracket of the right engine mount. Answer: Using an extension joint with the socket head “2”, unscrew the bolt “1” securing the heat-insulating shield to the bracket of the right engine mount.
Additional video: To understand in more detail how to replace the starter, watch an interesting video in which the replacement process will be described in detail:
Replacing the battery on all VAZ cars
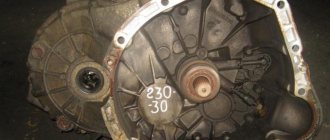
Replacing the gearbox on a VAZ 2101-VAZ 2107
Popular questions
How to remove the rear door trim
Posted: 07/20/2015 Good afternoon. In this article I will share with you how you can remove the rear door trim with your own hands. Do everything slowly and carefully. For this we need a screwdriver. We remove the socket, the lining...
More details
Replace engine oil seal
Posted: 07/05/2014 The difficulties of replacing the front crankshaft oil seal are legendary, but this can be done without removing the engine. The procedure for replacing this part is not considered difficult, but will require persistence from the owner...
More details
Heater radiator repair
Posted: 12/23/2014send a video on how to change the heater radiator on a Nissan March
More details
How to replace a fog light bulb
Posted: 11/09/2015 in Kia Rio it’s easy to change the fog light, especially on the left side, but how to change it in a Cherry Tiggo on the right? after all, maybe someone from the bottom of the windshield washer reservoir can tell the former SD aircraft technician himself to tear it apart...
More details
Spark plug repair
Posted: 12/07/2015 so how do you replace spark plugs on a 2006 Outlander?
More details
Replacing the cabin filter
Posted: 06/01/2014 Every 10 thousand mileage or once a year. But as practice shows, over time an unpleasant odor appears in the cabin, which indicates the need to change the filter element. P…
More details
Replacing the steering rack
Posted: 12/05/2014 I encountered the same problem. Fortunately, this replacement is not difficult to implement. To begin with, I would like to say that this breakdown is not one that you can turn a blind eye to. If such a problem happened...
More details
Gearbox seal repair
Posted: 12/03/2014 Good night, friends. I want to tell you how to change the gearbox seal. This is a rather complicated procedure. If you are not confident in yourself, then it’s better to take your swallow to the service. The front wheel drives are…
More details
Remove the steering wheel
Posted: 07/19/2015 Good afternoon. Many guys want to change the design of their car. Or if something goes wrong, a spare part gets damaged and has to be replaced. Don't panic and go to a car service center. The problem can be...
More details
Installing the seat belt
Posted: 11/25/2014 The seat belt in a car plays perhaps the most important role in ensuring safety during a trip; it can save lives. Therefore, if he is already old, very stretched out, or whatever...
More details
Reasons for starter failure on a VAZ 2101 and ways to solve problems
- Reasons for starter failure on a VAZ 2101 and ways to solve problems1
- Original parts and their analogues: which is better2
- Procedure for replacing and installing starter3
If one day you got behind the wheel of your car and could not start it, most likely the problem is that the starter does not turn. There can be many reasons for this “behavior”. The problem does not always lie in the device itself:
- low battery charge;
- poor contact at the junction of power wires.
It is important to note that in order for the starter bendix to rotate, a voltage of at least 11.0 V is required. If the battery cannot maintain this value at the moment of starting, then the car simply will not start. As a result, it’s simply not possible to go anywhere. If the engine does not start, then first of all you need to check the presence of voltage at the battery terminals.
If it is normal, you need to make sure that it is present on the incoming wires. This can be done using a multimeter. If there is voltage and there is no break, the problem may be in the electrical part of the starter:
- the solenoid relay does not work;
- The carbon brushes have failed.
You can check the relay without removing the starter itself. It will be enough just to close the contacts directly. This can be done using a screwdriver or insulated wiring with exposed contacts. After closing the contacts, the relay must click - this indicates its operation. If there are no such sounds, then the relay has simply failed. There is no point in repairing it; you just need to replace it.
Another common problem is that the carbon brushes have failed and the stator winding has short circuited. But these faults can only be determined after removing the starter from the car. As well as mechanical failures:
- Bendix failed;
- bearings are worn out;
- The starter fork is broken.
The main working mechanism of the starter is the bendix. It connects the engine flywheel and the starter shaft - which allows torque to be transmitted. The bendix itself is a shaft with a gear at the end. It is its splines that engage. Over time they wear out. The situation can only be resolved by replacing the Bendix.
Bearing wear is also a common problem. You can check their condition without removing them. It is enough to try to rotate the shaft with the starter removed. If it rotates with force or is completely jammed, then the bearings definitely need to be changed. The starter shaft must rotate freely, without applying any force.
During prolonged intensive use of the car, the fork often fails. Figuring out where this component is located is not difficult. You need to remove the starter and disassemble it. This will allow you to determine all the problems that exist in it, what problems there are. In some cases, you will even need a special sdend.
How to repair a motor cultivator starter yourself
Let's look at how to repair a walk-behind tractor starter with your own hands. Before you start repairing a recoil starter, you need to find instructions for its operation, which contains a diagram of the device. Then you need to prepare a wrench to unscrew the mechanism.
Before dismantling the device, you need to photograph it so that you can then correctly assemble all the parts and components.
After this, unscrew the washer, which is located in the middle of the body. Having opened the lid, you need to carefully inspect all the parts that are located inside the drum and determine which of them are damaged. It is necessary to inspect small parts very carefully and carefully so as not to accidentally damage or lose them.
In most cases, repairing a kickstarter on a walk-behind tractor involves updating components that have failed. For example, the starter cord is replaced if it is torn or frayed.
If a large spring fails, you need to remove it from the drum. There are usually hooks at the spring attachment points. If the design does not have them, then you need to heat the ends of the spring and bend them in the desired direction. If the spring is completely out of order and there is severe metal fatigue, then there is no need to try to restore functionality to such a spring. In this case, it is best to replace it with another one. After this, we install the device in its place.
In addition to the manual starter, there are also spring and electric starters for walk-behind tractors. The spring mechanism has a simple design and starts easily. The device starts up after moving the handle of the cultivator. Acceleration of the motor occurs through semi-automatic operation of the spring. You can replace a manual starter with a mechanical one yourself.
The electric starter of the walk-behind tractor is connected to the battery, from which it receives power. Electric start of the device is carried out using the start button. The battery determines the power of the electric starter and the operating time of the device. Installation of the electric starter is carried out according to the electrical diagram of this design. A walk-behind tractor with an electric starter is durable, reliable, and has a long service life.
Unfortunately, not all designs of motor cultivators with a manual mechanism can be converted into a spring or electric one. Therefore, before starting work on replacing the manual mechanism, you need to study the instructions and capabilities of the walk-behind tractor and find out whether such a modification is possible.
Farmers should know that all motor cultivators are working properly when starting out. Gradually, various components of the assembled unit fail. In order to extend the life of the walk-behind tractor and all its parts and components, regular inspection of the mechanism and proper care of it are necessary. All units and components must be periodically lubricated with machine oil and checked for their functionality. To increase the productivity of the cultivator and extend its service life, constant proper care of this equipment is necessary.