This article is dedicated to such a useful device as the on-board computer of the Lada Kalina car. Why is it needed and what functions does it perform? This element of the on-board electronic system has become an indispensable attribute of a modern car, because it has been able to replace many obsolete sensors and recording devices. The on-board computer has genuine practicality and enviable functionality, which made it popular among car enthusiasts. All these statements are true for the domestic Kalina model. Many car owners are interested in which controller to install in their car, as well as how to use it later?
About replacing the device and the list of required tools
Which computer should I install? There are models of trip computers on sale that are specially adapted for the LADA Kalina electronic control system and have more advanced functionality. Manufacturers include instructions with the controller, which are an indispensable assistant during installation.
To quickly and efficiently install (replace) a new device in the LADA Kalina panel, you will need to acquire the following set of traditional tools:
- keys
- pliers;
- screwdrivers;
- soldering iron
The instructions provide detailed information regarding the functionality of the new device and techniques for its correct installation. A detailed diagram of all electrical connections is also provided. We recommend that you carefully follow the manual while performing the entire list of installation procedures. After installation, the owner of a LADA Kalina car receives more detailed information about the state of important systems that are included in the overall electronic complex of the car. The instructions also describe in detail how to use the device.
Advantages of using an on-board computer
In addition to a wide range of measuring functions, most on-board computers also have diagnostic tools for vehicle systems that allow you to read fault codes without connecting any additional equipment. As a rule, the decoding of these codes is contained in the accompanying documentation for the on-board computer.
This functionality, in addition to purely economic benefits in the form of savings on engine diagnostics in a service center, allows the driver to decide to fix problems at their initial stage, avoiding more serious breakdowns of the car.
Also, the advantages of on-board computers include the presence of light and sound alarms, informing about problems in the on-board network or, for example, overheating of the car engine.
Device options
Artificial intelligence of the Kalina car
The modern and reliable on-board computer “Stat Kalina X-5 M” is equipped with the following options.
- Fast and Furious. This is a useful function that has a second name - “ECU reset”. If the reset is activated, all parameters of the controller on the Lada are reset to factory settings. This will reset all on-board computer errors stored in its memory.
- Plasmer. It will make it easier to start your car's engine on frosty days due to the flow of additional impulses to the electrodes of the spark plugs and will reduce the number of computer errors to a minimum.
- View ECM (Electronic Data Management System) error codes. Here you can see the error codes and try to fix them.
- Controlling the quality of fuel, the prices of which are increasingly increasing. This function allows the car owner, using the on-board computer for Kalina, to always be aware of what fuel he is refueling. The “plus” or “minus” sign shows the level of fuel quality as a percentage.
- Engine parameters. The driver can see everything from engine heating and fuel consumption to battery charge level and voltage on sensors.
- Possibility of setting up a multi-display. Several indicators can be displayed on one screen at once.
- Adjusting contrast, color and brightness. The on-board computer has six colors.
- Possibility of diagnosing the fuel pump. The power and pressure in the system are checked. If there is any malfunction, the on-board computer issues a warning to the owner of the Lada Kalina. It is possible to determine the status of each injector nozzle.
These are some of the most important functions of the on-board computer. The rest can be found on the official website of the manufacturer. A computer diagram and instructions for it can also help you.
Fast and Furious/Plasma mode
Let's dwell on some of the subtleties and functions of the updated on-board computer that were not found in previous versions. The “Afterburner/Plasma” button has been added, which allows the plasma to start working.
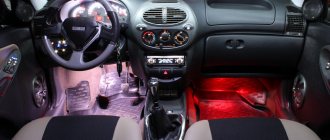
The computer fits perfectly into the interior of the cabin
This function is intended for plasma heating of the spark plugs of your Lada. This effect occurs due to the supply of special pulses with an energy of 0.04 J and a frequency of 150 Hz to the spark plugs. At this moment, air ionization occurs in the cylinders, and then the heating of the electrodes of the spark plugs begins.
Thanks to this function, you can be sure that your Lada will start even in the most severe frost and in conditions of high humidity. The on-board computer on the Lada will help you cope with bad weather. It will also eliminate the possibility of filling the spark plugs with gasoline. A special button will help the driver to easily find this item in the menu. This option becomes especially relevant for the Lada owner at sub-zero temperatures, when the visibility of the display and its response are significantly reduced.
With the help of the on-board computer for Kalina, you will always be aware of how your car operates and will be able to track its main technical characteristics.
Generator Chevrolet Niva
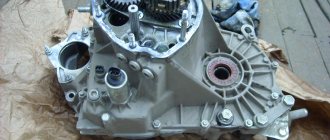
A generator is an important part of any car, which is responsible for its power supply. With the help of this unit, it is possible to provide a continuous supply of electricity to all components, various systems and sensors, making its operation possible.
On the car, a unit with article number 9412.3701 is used as a standard generator. Such a generator can also be found on the injector of the VAZ-21214, VAZ-2131, VAZ-2123.
https://www.youtube.com/watch?v=9UEaAp2zdd0
If the generator on a Chevrolet Niva fails, you can replace it with analogues, the most popular of which are presented in the table.
| Generator | vendor code | Cost, in rubles |
| VAZ-2123 (produced after 2003) | 5112.3771-30 T | 5370 |
| VAZ-2123 (produced after 2003) injector 14V 80A PRAMO | 5112.3771 | 4460 |
| VAZ-2123 (produced after 2003) | 9402.3701-04 | 4380 |
A generator for a Chevrolet Niva costs between 5,000 and 7,000 rubles. The price of the original unit depends on the region of purchase. Many owners prefer to use Start Volt at 120 amperes when the factory generator fails.
NOTE Chevrolet Niva, produced before the fall of 2003, was equipped with a generator type 9412.3701, which was also installed on the injection VAZ 21214, VAZ 2131, VAZ 2123 until the fall of 2003.
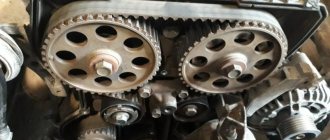
NOTE: The generator installed on the vehicle used for photography is driven by a V-belt. Repair work is shown using the example of a generator with a multi-belt pulley. All elements of both generators, except for the pulleys, are absolutely identical.
The generator armature is driven into rotation from the crankshaft pulley by a V-belt or (depending on the version) by a poly-V-belt.
Rice. 9.3. Generator 9402.3701-01: 1 - rectifier unit; 2 — bearing sleeve; 3 — rear bearing of the rotor shaft; 4 — slip rings; 5 — protective sleeve; 6 — terminal “B” of the generator; 7 — gasket; 8 — casing; 9 — voltage regulator with brush holder; 10 - coupling screw; 11 — back cover; 12 - stator; 13 — front cover; 14 — spacer ring; 15 — front bearing; 16 - pulley; 17 — washer; 18 - rotor.
The three-phase alternating current induced in the stator winding is converted into direct current by a rectifier unit 1 attached to the cover 11. The electronic voltage regulator 9 is combined into one unit with a brush holder and is also attached to the cover 11.
Rice. 9.4. Generator system connection diagram: 1 - battery; 2 - generator; 3 - battery charge indicator lamp located in the instrument cluster; 4 — mounting block; 5 - ignition switch.
The generator connection diagram is shown in Fig. 9.4. The voltage to excite the generator when the ignition is turned on is supplied to terminal “D” of the regulator (terminal “D” of the generator) through indicator lamp 3 located in the instrument cluster. After starting the engine, the excitation winding is powered by three additional diodes installed on the generator rectifier block.
Diagnostic parameters and auto diagnostic videos
For M74 Controller 11183–1411020-51/52, 11183–1411020-01/02.
| Parameter | Decoding | units change | Idling | 3000 rpm |
| TANS | Air temperature | °C | 15° – 45° | 15° – 45° |
| TMOT | Cooling temperature liquids | °C | 90° – 101° | 90° – 101° |
| UBSQ | Onboard voltage | IN | 13.0 – 14.5 | 13.0 – 14.5 |
| WPED | Pedal position | % | 11 – 15 | |
| WDKBA | Throttle position | % | 2 – 5 | 7 – 11 |
| NSOL | Desired speed | RPM | 840 | 3000 |
| NMOT | Engine speed | RPM | 840 ±40 | 3000 ±100 |
| MI | Air flow | Kg/h | 7 – 12 | 27 – 35 |
| ZWOUT | UOZ | Grd. P.K.V | 9 ±5 | 32 – 35 |
| RL_W | Load | % | 16 – 26 | 12 – 17 |
| FHO | Barocorrection factor | 0.8 – 1.02 | 0.8 – 1.02 | |
| TIEFF | Injection time | msec | 3.0 – 5.0 | 2.8 – 3.5 |
| DMVAD | Adaptation of XX adjustment | % | ±5 | – |
| USVKL | Signal from DC1 | IN | 0.01 – 0.89 | 0.01 – 0.89 |
| USHKL | Signal from DC2 | IN | 0.01 – 0.89 | 0.01 – 0.89 |
| FR_W | Lambda correction factor | 1.00 ±0.02 | 1.00 ±0.02 | |
| FRA_W | Lambda adaptation factor | 1.00 ±0.15 | 1.00 ±0.15 | |
| TATEOUT | Purge the adsorber | % | 0 – 8.2 | 0 – 18 |
| MSLEAK | Coeff. adaptation of fuel at XX | kg | ±2.5 | – |
| MSNDKO | Leaks at XX | kg/h | 2 – 8 | – |
| DTPPSVKMF | Period of the 1st DC | sec | < 1.8 | < 1.8 |
| FZABGZYL 1–4 | Misfires | |||
| FZKATS | Misfire influencing workers neutralizer | |||
| DMLLRI | Tech. correction XX | % | ±8 | |
| DMLLR | Tech. correction XX | % | ±8 | |
| AHKAT | Neutralizer aging factor | < 0.45 | < 0.45 | |
| B_LL | Bit XX | Yes | No | |
| B_LR | Closed Loop Adjustment Bit | Yes | Yes | |
| B_LRA | Resolution bit fuel adaptation | Not really | Not really | |
| B_SBBVK | DK ready bit 1 | Yes | Yes | |
| B_SBBHK | DK 2 ready bit | Not really | Not really | |
| B_TE | Canister purge bit | No Yes | No Yes | |
| B_KUPPL | Clutch pedal sensor bit | No Yes | No Yes | |
| B_BREMS | Brake Pedal Sensor Bit | No Yes | No Yes | |
| DFES | Fault codes | |||
| Rail fuel pressure | kPa | 380 ±20 | 380 ±20 |
https://www.youtube.com/watch?v=z3A5CPPC0DA
* All parameters are given for positive ambient temperature. Parameter values are advisory in nature.
What is an on-board computer
An on-board computer is an electronic device with a microprocessor, similar to a home PC. This device allows you to combine different equipment that can be used in a car. This list includes a navigation system, a multimedia complex, a parking sensor, a main computer, etc.
Today there is a wide variety of such elements, but they will work according to the same principle. In addition to managing comfort and safety systems, modern onboarders even allow you to monitor the condition of the vehicle. All sensors located in the systems and components of the machine transmit their data to the control unit, and the on-board vehicle reads some of these parameters. The onboarder itself does not participate in changing the operating modes of the engine or certain car systems. The ECU is responsible for this function. But if these devices are compatible, the driver can independently reconfigure some parameters of his car.
The electronic control unit is flashed at the manufacturer. Software is a set of algorithms and all sorts of variables that allow it to send the correct commands to the actuators. The computer connects to the computer via a service connector and allows you not only to monitor transport systems, but also in more expensive cars to control the modes of the internal combustion engine, suspension and transmission.
Technical condition of the Kalina engine • First generation
| Instrument panel Kalina 1 - AutoPortal You can ask for help in carrying out diagnostics at a service station, where you will pay a certain amount for this service, or you can do everything yourself. The importance of this component of the on-board engine management system or ECU for any car, including the Lada Kalina with an 8-valve engine, cannot be overestimated. |
| Repair of instrument cluster Viburnum If the manipulation is performed correctly, the instrument panel arrows, tachometer, speedometer, and other indicators will move in a circle, shifting from beginning to end. There was also a choice of transmission options; as before, it was possible to purchase a car with a manual 5-speed gearbox or with a 4-speed automatic. |
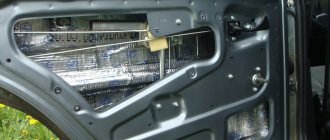
- dismantle the power window control unit;
- remove the door trim;
- to disconnect the window regulator from the glass, the latter must be raised all the way up;
- unscrew the four bolts that secure the glass to the ESP (two in the front and two in the back). The glass is held on by seals, but it can also be secured so that it does not fall down;
- unscrew the black metal strip (three screws);
- unscrew the eleven window regulator fasteners (10 bolts), disconnect the power plug from the electric motor;
- We begin to remove the power window from the rear, first removing one half of it;
- then we take out the front part along with the motor from the door cavity;
Spare parts for Lada Kalina, Granta, Kalina 2 • this can lead to damage to the fuel pump;.
On-board computer functions
Using the on-board computer you can obtain the following information with high accuracy:
- vehicle speed,
- outside air temperature,
- coolant temperature,
- crankshaft rotation speed,
- voltage in the car on-board network, etc.
It is no secret that the accuracy of standard car instruments is far from the truth, and some scales are not digitized at all. Thus, they can only be used to approximately determine whether certain parameters are within acceptable limits, and it is almost impossible to find out, for example, the exact response temperature of the fan sensor in the engine cooling system.
Experience shows that the discrepancy between the readings of the car’s standard instruments and the on-board computer data can reach a huge figure - 30%. Moreover, the functions of the on-board computer are much broader. For example, the on-board computer is capable of measuring not only total fuel consumption, but also instantaneous consumption, both while driving and idling (tips on how to reduce fuel consumption). Also, along the route, you can calculate travel time, distance and average speed.
In on-board computers, for example, the universal Multitronics TC 750 or Multitronics RC-700 (see video installation instructions below), suitable for almost all modern VAZ cars of the Lada family (Kalina, Priora, Granta), in addition to the basic set of functions, there is also a clock with an alarm clock and calendar. In addition, they have alarms that warn of a critical fuel level, or, for example, of exceeding a speed threshold pre-set by the driver.
Basic mistakes
The table below summarizes the main error codes for Kalina category “P” without taking into account the letter prefix.
| Number | Decoding |
| 0030, 0031, 0032 | The heating of the lambda probe installed upstream of the converter is faulty (burnout of the spiral or short circuit) |
| 0036, 0037, 0038 | The heating of the lambda probe installed after the converter is faulty (burnout of the spiral or short circuit) |
| 0101 | Operating parameters of the engine air supply sensor are outside the tolerance range |
| 0102 | The signal level from the engine air supply sensor drops below the permissible level |
| 0103 | Increase in signal level from the air supply sensor to the engine above the permissible level |
| 0112 | The signal level from the air temperature sensor at the engine inlet drops below the permissible level |
| 0113 | Increase in signal level from the air temperature sensor at the engine inlet above the permissible level |
| 0115 or 0116 | Incorrect data from the engine temperature sensor |
| 0117 | The signal level from the engine temperature sensor drops below the permissible level |
| 0118 | Increase in signal level from the engine temperature sensor above the permissible level |
| 0122 | The signal level from the throttle angle sensor drops below the permissible level |
| 0123 | Increase in signal level from the throttle angle sensor above the permissible level |
| 0130, 0131 and 0133, 0134 | Missing or low signal from the first lambda probe |
| 0132 | Crankshaft Position Sensor Error |
| 0135 | Incorrect operation of the heating system of the first lambda probe |
| 0136 | Short circuit of the second lambda probe |
| 0137, 0138 | Missing or low signal from the second lambda probe |
| 0140, 0141 | Incorrect operation of the second lambda probe heating system |
| 0171, 0172 | Excessively lean or rich mixture |
| 0201-0204 | Gap in the injector control wiring (from 1 to 4 cylinders) |
| 0217 | Engine temperature goes beyond the upper limit |
| 0230 | Broken fuel pump drive relay |
| 0261, 0262 | Breakdown to "minus" or "plus" of the wiring for controlling the injector of the first cylinder |
| 0264, 0265 | Likewise for the second cylinder |
| 0267, 0268 | Same for the third cylinder |
| 0270, 0271 | Same for the fourth cylinder |
| 0300 | Numerous misfires on all cylinders |
| 0301-0304 | Problems with ignition in a specific cylinder (from 1 to 4 cylinders) |
| 0326-0328 | Failure of the knock sensor |
| 0335-0338 | Damage to the signal circuit from the crankshaft sensor |
| 0340 | Camshaft position sensor does not work (only for 16 valves) |
| 0342, 0343 and 0346 | Phase sensor (only for 16 valves) |
| 0351-0354 | Coil failure (16 valves only) |
| 0363 | Restriction of fuel supply due to ignition misfires |
| 0422 | Low efficiency of the neutralizer |
| 0441, 0444 and 0445 | Absorber malfunctions |
| 0480, 0481 | Radiator fans do not work |
| 0500 | Speed sensor faulty |
| 0506, 0507 | Failure of the idle control system |
| 0511 | No signal from IAC |
| 0560, 0562 and 0563 | Problems with voltage in the on-board network |
| 0601 | ECM memory error |
| 0615-0617 | Problems with the starter relay |
| 0627-0629 | You need to check the fuel pump relay |
| 0645-0647 | Problems with power supply through the relay to the compressor clutch |
| 0650 | Malfunction warning lamp does not work |
| 0654 | Failure of the tachometer circuit |
| 0685-0687 | Closing the main relay circuits |
| 0691, 0692 | Fan relay shorted |
| 1102, 1115 | Drop in resistance of the lambda probe heating coil |
| 1123, 1124 | Violation of mixture parameters at idle |
| 1127, 1128 | The same, but at medium load |
| 1135 | Short circuit of the first lambda probe heater circuit |
| 1136, 1137 | Violation of mixture parameters at low load |
| 1171, 1172 | Incorrect operating parameters of the CO sensor |
| 1335, 1336 | Throttle Position Error |
| 1386 | Errors in the data transmission circuit from the knock sensor |
| 1410, 1425 and 1426 | Absorber purge failure |
| 1500, 1501 and 1502 | Open or short circuit in the fuel pump relay circuit |
| 1509, 1513 and 1514 | Damage to the idle speed control circuit |
| 1606, 1616 | Rough Road Sensor Errors |
| 1620-1622 | Errors in ECU memory blocks |
| 2070, 2071 | Malfunction of the valve for changing the length of the intake channels |
| 2100, 2101 | Open circuit of the electric throttle valve |
| 2102, 2103 | Electric throttle actuator short circuit |
| 2122, 2123, 2127 and 2128 | Damage to the gas pedal position sensor |
| 2187, 2188 | Violation of the mixture composition at idle |
| 2135, 2138 | Asynchronous operation of throttle position sensors |
| 2176, 2178 | It is necessary to set the throttle valve to zero position |
| 2187, 2188 | Violation of the mixture composition at idle |
| 2301, 2304, 2307 and 2310 | Closing the control circuits of the ignition coils |
| 2500, 2501 | Exit of the operating parameters of the generator excitation circuit beyond the tolerance range |
| 0720 | Automatic transmission output shaft sensor faulty |
| 0717 | Failure of the automatic transmission turbine speed sensor |
| 0706, 0705 | Contacts in the automatic transmission selector are faulty |
| 0962, 0963 | Failure of the pressure regulation solenoid in the automatic transmission |
| 0973, 0974 | Failure of the gear shift solenoid in the automatic transmission |
| 0731-0734 | Transmission errors in automatic transmission |
| 0744, 1744 | Automatic transmission clutch malfunctions |
| 0711-0713 | Failure of the automatic transmission oil temperature sensor |
| 0863 | Automatic transmission unit communication error via CAN bus |
| 1735-1738 | Gear selection lock |
| 062F | Resetting the memory of the automatic transmission control unit |
| 230 | No signal from fuel pump relay |
| 263, 266, 269 and 272 | Failure of the control unit (driver) of the injector nozzles |
| 650 | Burnout of the check indicator or its wiring |
New Lada: for LADA VESTA cars
Lada Kalina Station wagon Vasya-Vasilyok › Logbook › BC STATE "Kalina" XD
The toad was strangling me, strangling me... but in the end I strangled it and bought myself an on-board computer STATE XD. A parcel arrived from Yegoryevsk in a Russian Post box:
Before installation, go to websites/forums and read how to update the on-board computer software, because I had the firmware in BC from the beginning of 12, so I downloaded the latest firmware from here shtat.ru/obnovlenie_po/118XD/ I had to specifically dance with a tambourine, because BC did not want to flash it. It turned out that the USB - K-line adapter also has its own firmware, which can also be updated, and for this you need to close the capacitor contacts on the adapter and much more. In the end, all information and software and firmware components were found and the BC firmware was successfully updated to the latest July one. Now we could start installation, BUT it didn’t work out the first time due to the tricky design of the connectors in the emergency gang block, but more on that later. It went better the second time
We cooperate with:
PEC
You can find the nearest representative office, track the cargo and calculate the cost of delivery on the website: pecom.ru
Business Line
You can find the nearest representative office, track the cargo and calculate the cost of delivery on the website: dellin.ru
Priora standard on-board computer instructions
Baikal Service
You can find the nearest representative office, track the cargo and calculate the cost of delivery on the website: baikalsr.ru
Energy
You can find the nearest representative office, track the cargo and calculate the cost of delivery on the website: nrg-tk.ru
WHALE
You can find the nearest representative office, track the cargo and calculate the cost of delivery on the website: tk-kit.ru
Zheldor expedition
You can find the nearest representative office, track the cargo and calculate the cost of delivery on the website: jde.ru
Vozovoz
You can find the nearest representative office, track the cargo and calculate the cost of delivery on the website: vozovoz.ru
SDEK
You can find the nearest representative office, track the cargo and calculate the cost of delivery on the website: cdek.ru
Delivery is carried out throughout Russia and the CIS.
Deadline for order delivery to T.K. from 1 to 4 business days from the date of receipt of funds. (orders are not processed on Saturday and Sunday).
Lead time for orders that include painting services: 5-10 business days.
The lead time for placing orders and “made to order” items is from 14 days; you can check with the manager for more detailed information.
ATTENTION! All fragile goods (headlights, plastic products, glass, etc.), by default, are sent in additional paid packaging from TK. If you take responsibility for the integrity, we can ship without it. To do this, you need to make a note in the comments when placing your order. For more information, please contact the managers.
For additional information, please contact the managers.
How the on-board computer deceives us
And should he be trusted?
Today, almost every modern car has a simple on-board computer that shows fuel consumption - average and instantaneous, as well as the number of liters or kilometers remaining until the tank is empty. In general, this data is enough for the driver to control the consumption of gasoline or diesel fuel and determine the frequency of visits to gas stations. In addition, visualization of fuel consumption involuntarily encourages owners to save money. Because it’s always nice to know that as soon as you change your driving style to a calmer and more even one, fuel consumption noticeably decreases. Moreover, in the literal sense of the word, before your eyes.
However, the extensive driving experience of your humble servant has revealed some oddities in the readings of the on-board computers - all of them, to one degree or another, lie, and not in our favor. For example, you filled the tank full, and the dashboard showed the figure 775 km to an empty tank with an average consumption of 6.8 l/100 km. As the car drove some distance, the readings changed to, say, 430 km, and the average consumption became 6.5. That is, the mileage traveled according to the on-board computer was 345 km.
This is where the fun begins, because according to the standard car odometer, the car has traveled noticeably less - only 250 km. It is clear that the given BC data are conditional and depend on the average consumption and amount of fuel. However, why then mislead the driver? Moreover, as the tank empties, the difference in the odometer and on-board computer readings increases.
Another example. Knowing the average consumption, you can easily calculate the distance when the fuel runs out. By the way, your on-board vehicle shows a consumption of 6.5 l/100 km. Using simple mathematical calculations, we find that with the remaining 20 liters of gasoline you can travel a little over 300 km. Go. So, with uniform movement and, naturally, with constant consumption, the low fuel level light came on already at 154 km. To be fair, let’s add another 70 km to this figure, which BC indicated to an empty tank, and we get 224 km. But these are in no way the numbers that our computer initially drew, and note that at the time the reserve was depleted, the average gasoline consumption dropped to 6.3 l/100 km. This is how the arithmetic turns out. And there’s nothing terrible here, in general. After all, the BC readings, however, reflect more or less real consumption, which clearly changes with changes in driving style. In order to get the most realistic figures for the efficiency of your car, fill the tank full while simultaneously resetting the odometer readings. After all the fuel has been used up, based on the number of kilometers traveled, you can calculate the average consumption of the car. Believe me, this old, ancient method is still relevant.
Source
DIY installation instructions
Now we suggest that you familiarize yourself with the manual for installing the BC in Kalina with your own hands.
To complete this task you will need:
- two screwdrivers - with a flat and a Phillips tip;
- stationery knife;
- electrical tape (the author of the video is the Auto World channel).
Stages
Let's look at an installation example with the State X-5 M device. This device is equipped with a 9-pin output, but there is no point in connecting all of them. For normal operation of the device, you can connect only 6 contacts out of 9, this is enough.
How to install the device in Kalina:
- First you need to disconnect the car battery and remove the audio systems from the center console, since it will interfere with the installation. Disconnect the connectors connected to it and move the radio to the side.
- You also need to disconnect the connector connected to the light alarm button, since four of the six contacts will be connected to it. According to the diagram, you need to figure out which wires are connected where. The circuit itself should come with the computer. When disconnecting the wires from the connector, a problem may arise, since the contacts themselves are secured using plastic chips. You need to press the latch itself a little; to do this, you will need to insert a thin flat-blade screwdriver all the way from the side of the wires and turn it left and right. Then, using a thicker screwdriver, on the other hand you will need to press on the end of the wire, this will lead to the fact that it can be removed, albeit with difficulty.
- Then take the new wiring from the BC and connect it to the required plug on the block instead of the removed one. Then, along the second end of the wire coming from the main cable, you need to connect the one that was removed from the connector. It is recommended to rewind all chips with electrical tape to avoid possible rattling.
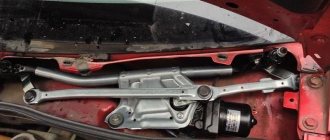
- Once you have connected all four cables to this connector, you need to start tapping into the pink wire located on the rear block of the control panel. The block itself is located in a rather inaccessible place, so if you need to gain access to it, you will have to dismantle the mounting block with fuses and pull it.
- Having done this, you will be able to see a large plug behind the block, usually it is painted gray. There are several wires connected to this plug; you will need the pink one, since it is responsible for the volume of gasoline in the car’s fuel tank. You can simply peel off the insulation from the cable with a utility knife and tape the wiring from the device to it, and then wrap the connection with electrical tape. When performing this task, it is not necessary to disconnect the connector; the main thing in this case is not to mix up the wires.
- All you have to do is connect one more plug to the diagnostic connector located under a special plastic cover just below the cigarette lighter. This is where we will place the computer itself, since this place is the best option. You need to connect a black wire from the device connector to the block, and follow the connection diagram.
- When the steps are completed, the entire winding will need to be pulled directly under the center console and placed securely so that it does not dangle or fray. To do this, you can unscrew the fastening bolts and dismantle the ashtray, and the bundle itself with the wiring can be threaded down. Then remove the right floor tunnel cover and thread the computer connector to the diagnostic socket. After that, all you have to do is connect the battery back and check how the BC itself works.
Operation of injection cars
It is imperative to comply with the requirements that will facilitate the operation of the car. In order for the on-board computer “State” of the VAZ-2110 to produce errors as little as possible, and to increase comfort, be sure to adhere to the following recommendations:
- Carry out soundproofing - this will get rid of unnecessary noise. For example, the fuel pump is quite loud. And it can be inconvenient.
- Be sure to treat all body elements with anti-corrosion compounds.
- The vehicle should only be refueled with recommended brands of fuel. If you fill with low-octane gasoline, the engine will not work properly.
- Timely maintenance will solve any problems regarding the operation of the motor.
What is an on-board computer and why is it needed?
Gone are the days when the phrase “automotive electronics” only caused a chuckle and a condescending correction: “not electronics, but electrics.” Even the simplest cars today are equipped with controllers that monitor many parameters. But many of these controllers (especially in budget versions) are in no hurry to share the information they receive with the driver. Is the air flow sensor broken? Is the catalyst clogged? Broken spark plug? The controller “knows” what happened, but in all these cases, it signals a malfunction with the same “check engine” indicator. Go, dear driver, to a service station and pay money for diagnostics.
An on-board computer is just the device that can extract all its secrets from the controller. And its capabilities are not limited to fault diagnosis alone. He can:
1. Display trip parameters on the screen (average consumption per 100 km, instantaneous fuel consumption, maximum mileage remaining in the tank, volume of fuel in the tank, distance traveled, driving time and much more). Often this information is also displayed by the car’s standard computer, but even in this case, the on-board computer will not be superfluous, since it is capable of not only displaying, but also analyzing the trip parameters. This allows:
— provide information about the quality of fuel;
— save fuel by informing the driver about uneconomical driving modes;
— predict fuel consumption for a trip, arrival time and report deviations from the schedule;
— separate the parameters of a trip in traffic jams from the parameters of a trip on the highway;
— report upcoming maintenance.
2. Display the status of vehicle components on the screen:
— temperature of the engine, automatic transmission, intake and exhaust manifolds, turbine catalyst, exhaust gases, etc.;
— engine speed, engine load, current and maximum torque;
— condition of fuel, particulate and oil filters;
3. Monitor the operation of vehicle components and notify the driver of a malfunction immediately when it occurs. The on-board computer is capable of detecting faults that the controller itself has not yet noticed (“check engine” is off):
— a drop in on-board network voltage, which may indicate an imminent generator breakdown;
— drop in fuel pressure: the fuel filter is clogged or there are problems with the fuel pump;
— drop in boost pressure: wear of the turbocharger;
- and much more.
4. Control the controller:
— change of injection modes: economy/sport
— change of gas/gasoline modes for cars with installed gas equipment
— forced activation of the engine cooling fan
Perhaps an on-board computer is not an essential device. But it can pay for itself quite quickly only due to fuel savings, and due to a timely identified problem and prevented breakdown, the savings can exceed the cost of the BC by several times. Moreover, the price of on-board computers largely depends on their capabilities, and by weeding out the functions you don’t need, you can choose a model at a very affordable price.
About replacing the device and the list of required tools
Which computer should I install? There are models of trip computers on sale that are specially adapted for the LADA Kalina electronic control system and have more advanced functionality. Manufacturers include instructions with the controller, which are an indispensable assistant during installation.
To quickly and efficiently install (replace) a new device in the LADA Kalina panel, you will need to acquire the following set of traditional tools:
- keys
- pliers;
- screwdrivers;
- soldering iron
The instructions provide detailed information regarding the functionality of the new device and techniques for its correct installation. A detailed diagram of all electrical connections is also provided. We recommend that you carefully follow the manual while performing the entire list of installation procedures. After installation, the owner of a LADA Kalina car receives more detailed information about the state of important systems that are included in the overall electronic complex of the car. The instructions also describe in detail how to use the device.
How does one calculate fuel consumption?
Many drivers are interested in the work of the BC in the car and the accuracy of the data provided to it. With working systems, the device shows fairly accurate data.
Fuel consumption is calculated based on the interval between opening and closing the injectors. These are microseconds. When you press the gas, the interval increases and more fuel is supplied. The computer takes into account the throughput of the injectors, which is precisely known
The condition of the fuel pump and filter is also important. Based on these data, the BC shows the average and current consumption at a given speed
Knowing the volume of fuel in the gas tank and its consumption, the computer can easily determine the remaining trip distance. Many other parameters (oil, pressure) are calculated using a similar principle. The data may not match if one of the systems is faulty. For example, the injectors are clogged or the settings are wrong. Even the use of non-standard rubber can significantly affect the result.
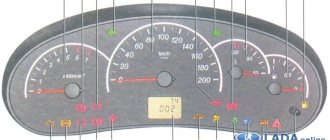
Self-diagnosis of the Kalina/Priora instrument cluster
- With the ignition off, press the “Reset” button (reset daily mileage). While holding the button, turn on the ignition.
- The instrument panel will go into self-diagnosis mode, all segment positions will light up on the display, all indicators will light up, and the arrows will travel the full path.
- Using the control button on the right steering column switch, we switch between modes (self-diagnosis, firmware version, error codes).
- To reset errors, you need to be in error mode and press and hold the “Reset” button for more than 3s.
- The diagnostic mode exits automatically after inactivity for 20-30 seconds.
Decoding error codes in the dashboard:
- 2-increased voltage of the on-board network;
- 3-fuel level sensor error (if a break in the sensor circuit is detected within 20s);
- 4-error of the coolant temperature sensor (if an open circuit of the sensor is detected within 20s);
- 5-outside temperature sensor error (if there are no sensor readings within 20s, indication on the LCD is “-C”);
- 6-engine overheating (the criterion for triggering the acoustic alarm has been met);
- 7-emergency oil pressure (the criterion for triggering the acoustic alarm is met);
- 8-defect of the brake system (the criterion for triggering the acoustic alarm is met);
- The 9-battery is discharged (the criterion for triggering the acoustic alarm is met);
- E-determination of an error in a data packet stored in EEPROM.
How to reset errors on Kalina? You can reset the errors yourself using the on-board computer, or contact a service station with special diagnostic equipment.
Let us remind you that you can find detailed photo reports in the Lada Kalina repair category.
An on-board computer is a device that helps the driver when operating a vehicle. Today we will talk about the domestic device State Kalina X5 M. The computer is designed specifically for this VAZ model, which makes it easy to connect and use.
Description of the instrument panel: part 1 Tools for work
If any indicators on the device do not light up, the reason may be burnt out light bulbs, insufficient contact between the light bulb socket and the printed circuit board, oxidation of contacts, broken wires, or a malfunction of the indicator sensor. Button 2 when you press the top arrow of the key - turns on the mode for selecting functions of the on-board computer in a ring forward, setting the minutes in the time setting mode.
| Kalina's watch is located in the instrument cluster, as is the case with many other cars. To set the clock, many people try to intuitively turn the button on the front panel of the instrument cluster, which is not correct. Do you know how to set the time on Kalina 1st and 2nd generation? |
How to reset a car's on-board computer
Sometimes it is necessary to erase data about past errors and update the work of the bookmaker. “Brain reset” returns the computer to normal operation. This is not difficult to do. You need to remove the negative terminal from the battery and wait 3-5 minutes. Then reconnect the battery. Next, the “zeroed” BC must collect working information about the condition of the car. It is also recommended to travel in different driving styles. This way the bookmaker will work more correctly.
An on-board computer is a useful and necessary thing in a modern car. It helps the driver choose the optimal driving style and warns about breakdowns and errors. This will not only save time and money on possible repairs, but will also increase the safety of the driver and passengers.
Connecting a voltmeter to the on-board network
A digital voltmeter in a car must meet two main requirements:
- show the voltage on the battery as accurately as possible;
- turn off when the engine is not running so as not to discharge the battery while parked.
Accurate data on the voltage on the battery can be taken directly from its terminals. To do this, you need to connect the wire from the positive terminal to the installation location of the voltmeter. To prevent conductor resistance from causing a voltage drop across the device, the wire cross-section must be at least 0.5 mm.
The wire must have strong, good insulation so that a short circuit does not occur over time.
It is important that this way of connecting the wire bypasses the standard fuse box, so care should be taken to protect the circuit from overload. For safety, install a fuse between the battery and the wire going to the voltmeter
Otherwise, the wiring may even catch fire in the event of a short circuit.
On-board computer functions
A modern car is “stuffed” with various electronics, systems and sensors. It is difficult for the driver to keep track of everything on his own. This is precisely the main role of the on-board computer (OB) - to control the operation of the main systems in the car and promptly provide the necessary information to the driver. Typically, the results are displayed on the monitor.
A standard on-board computer is usually installed on the dashboard or on the front console. In budget versions, this is a small, monochrome screen; in more expensive versions, a color LCD display is used.
The on-board computer can be controlled either through its own unit, or it can be integrated with the infotainment system.
The bookmaker's capabilities largely depend on the model. The computer can present the following data:
- current fuel consumption, as well as average consumption and range in kilometers;
- travel time, total and current mileage;
- control of movement modes and settings, if such a function is provided by the manufacturer;
- specified travel route (navigator);
- malfunctions of various vehicle systems.
In the event of any malfunction, a simple standard controller usually displays a “check engine” signal and issues an error code. The error code can be found in the instruction manual or contact a service center for diagnostics. In any case, you should not ignore such messages from the bookmaker.
In more expensive versions, the bookmaker's capabilities are much wider. It can remember the driver's individual parameters. For example, seat position, driving style. The BC also issues recommendations on the optimal driving style on a certain section of the route to save fuel.
Types, prices
On-board devices can be divided into two large groups:
- Universal. These models can be installed on any car model. Most often they are mounted as an alternative to an interior mirror. Sometimes universal type BCs are mounted on the windshield;
- Individual. Such on-board computers are focused either on one car model or on a group of similar ones. For example, VAZ 2108, 2109, 2110 - the group is determined by the old instrument panel. These are more functional and efficient devices that use an electronic control unit and are mounted in the dashboard.
You can also distinguish injection and carburetor types. The first option has gained great popularity among motorists, so there are significantly more models on the market. As for the VAZ 2110, this car requires computers for the old type of torpedo. The most popular device manufacturers are State and Gamma. Depending on the price, the State offers a different set of features. There is even a color version of BC State. Gamma devices have a higher price, but they have less choice, since the model range is limited to functional modern devices.
Their prices are as follows:
- The cheapest State computer will cost the owner of a VAZ 2110 1200-1300 rubles; for 2500 rubles you can already purchase a more serious version with a color display and a large set of functions. The latest model of the universal device, State, costs about 5 thousand rubles.
- As for Gamma, the cheapest on-board computer here costs 3,200 rubles. The most expensive is 7,000 thousand.
In addition to these companies, there are Prestige, Orion, Multitronics and others on the market. It’s hard to say who is better and who is worse, since the functions are almost the same everywhere.
Source of the article: https://prometey96.ru/ustrojstvo/bortovoj-kompyuter-kalina-1.html