Replacing the outer CV joint: how to do it?
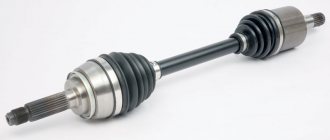
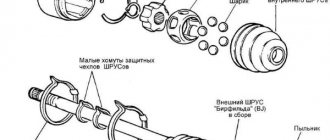
The control system of vehicles with front-wheel drive provides for the presence of special angular velocity joints. It is needed to transmit torque to the axles and change the wheel alignment angles. Structurally, this part (in common parlance it is called a grenade due to its similarity with a real weapon) is assembled together with a clip, a separator, balls, a drive shaft, and a stopper. CV joints are subject to constant alternating loads, which over time lead to damage to individual parts - this must be taken into account when operating the car.
If the replacement of the external element is carried out in a timely manner and operation is ensured in compliance with the manufacturer’s recommendations, the hinges will operate for at least 100 thousand km. It is necessary to periodically monitor the condition of the boot, since extreme loads, dust and dirt lead to rapid wear of the component.
Adaptations
Professionals do not use any specialized equipment when replacing CV joints. However, if you lack the skills, a device for pulling a “grenade” from the shaft can help, at least psychologically. They can be of different designs; the common thing is a clamp fixed to the drive shaft and a screw puller that pulls the hinge from it.
Sometimes the existing shank of the outer race with a standard hub nut screwed onto it is used as the working thread of this puller. The device is as trustworthy as it is inconvenient in practical work.
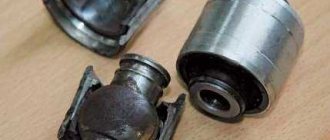
The bottom line is that the grenade is held on the shaft by a spring retaining ring, which is recessed into the groove of the splined part under pressure from the inner race. The angle of attack of the cage chamfer on the ring greatly depends on the deformation of the ring, the presence of lubricant and rust, and the chamfer configuration.
It often happens that the ring does not sink in, but rather jams, and the greater the force, the stronger its resistance. In this case, a sharp blow works much more effectively than even significant pressure developed by the puller thread.
And the entire procedure for installing a device in a limited space takes a lot of time. But sometimes it actually works, simultaneously preventing the transfer of loads to the adjacent hinge.
9.1.5. CV joints
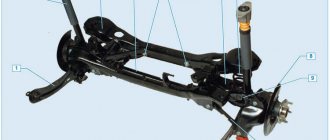
Axle shaft (4 cylinder models)
| 1. Inner CV joint outer diameter for cars with a 4-cylinder engine: 100mm 2. Axle shaft There are axle shafts of different lengths depending on the type of gearbox 3. Install the retaining ring in the annular groove on the axle shaft (not visible when the joint is installed) 4. Remove the outer CV joint only complete installation: install the hinge on the axle shaft using a mallet so that you can install the retaining ring 5. Thrust washer 6. Convex washer 7. Hose clamp 8. Check the cover for cracks and signs of wear 9. Clamp 10. Check the cover with cover for cracks and signs of wear, remove using a mandrel; before installing on the CV joint, cover the front surface with D3 glue 11. There are 2 types of convex washer: 1. with internal splines 2. with external splines; when replacing, install a washer of the same type 12. Oil seal replacement: remove protective film and stick it on the hinge 13. Retaining ring |
Warning
Axle shaft lubrication on 4-cylinder vehicles: Lubricate the inner and outer CV joints with 90 grams of G-6 grease each.
Axle shaft (5-cylinder models)
| 1. There are 2 types of convex washer: 1. with internal splines 2. with external splines, when replacing, install a washer of the same type 2. Install the retaining ring in the annular groove on the axle shaft (not visible when the hinge is installed) 3. Remove the outer CV joint only in the entire installation : install the hinge on the axle shaft using a mallet so that you can install the retaining ring 4. Thrust washer 5. Convex washer 6. Hose clamp 7. Check the cover for cracks and signs of wear 8. Clamp 9. Axle shaft 10. Check the cover with cover for cracks and signs of wear, remove using a mandrel before installing on the CV joint, cover the front surface with D3 glue 11. Inner CV joint outer diameter: for cars with a 4-cylinder engine: 100 mm for cars with a 5-cylinder engine: 108 mm Quattro: 100 mm 12. Oil seal replacement: remove the protective film and stick it on the hinge 13. Retaining ring |
Warning
Lubrication of the axle shaft on cars with a 5-cylinder engine: lubricate the inner CV joint with 120 grams of G6 grease and the outer CV joint with 90 grams.
Modified axle CV joint
| 1. An axle shaft with an internal CV joint is sold as a spare part, complete with a boot and grease; when replacing the boot, lubricate with 250 grams of grease G 000 604 2. Always replace the stainless steel clamp 3. Check the boot for cracks and wear; to replace it, remove the CV joint to install it a little lubricate the collar on the axle shaft and carefully put on the cover using a plastic wedge 4. Always replace the stainless steel clamp | 5. Check the cover for cracks and signs of wear; to install, remove the outer CV joint 6. Always replace the stainless steel clamp 7. Always replace the clamping ring; install it in the annular groove on the constant velocity joint 8. Replace the entire outer CV joint; lubricate with 90 grams of grease G 000 602 : 50 grams for the boot, 40 grams for the CV joint, lubricate when replacing the boot installation: install the hinge on the axle shaft using a mallet so that the retaining ring fits into the annular groove |
Useful article: 8.4.8. Differential Convex and thrust washers, installation position
| 1. Retaining ring 2. Thrust washer 3. Convex washer |
Removal and installation of CV joint
| EXECUTION ORDER |
| 7) install the convex washer, mark its position; axle shafts with modified constant velocity joints are installed on vehicles with a 4-speed automatic transmission 097 and a 130 hp engine. |
| tighten the clamps |
| 9) remove the outer CV joint: clamp the axle shaft in a vice, move the boot |
| 10) install the CV joint boot on the axle shaft: remove the locking ring (indicated by the arrow) screw in the M16 bolt of tool 3207 until the CV joint is removed from the axle shaft |
Replacement of outer CV joint AUDI A6 C5
Let's try to figure out in this article how to independently change the constant velocity joint (CV joint) along with the boot of an Audi A6 C5. The main signs that tell us about a breakdown are: the so-called “crunch”. This sound is caused by balls rolling along the grooves, because they have a very large output. You can hear this sound effect at any time, but more often you will hear it when turning, or when you suddenly pick up speed or when faced with any obstacles. To gain experience in recognizing a CV joint failure, car owners should already familiarize themselves with other situations that cause failure.
It is important to seal the constant velocity joints with a rubber boot, because the boot protects the joints from unnecessary parts getting in because CV joints often break if dirt and dust get there through the holes that appear. Such symptoms include the appearance of small jerks while pressing the gas pedal of the car, or a change in the dynamics of movement; play of the shaft may also occur, passing between the existing joints of equal angular velocities, moving the latter in different planes.
What do we need when changing hinges? Be sure to prepare for work:
1) a small screwdriver; 2) hexagon size 14; 3) hammer; 4) ratchet keys; 5) head 17 and head 18; 6) spanners sizes 17 and 18 7) wd-40 lubricant
Before starting work, keep in mind that it is more convenient to remove the boot on the left, since you won’t need to remove the levers, but if you touch the CV boot on the right, then you won’t be able to do without removing the levers. The exhaust pipe is located here.
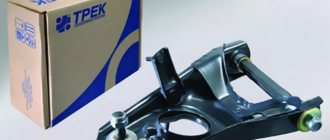
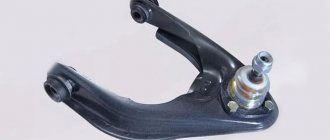
This is what a prepared new boot looks like.
Then we install the machine on the inspection hole, unscrew the bolt connecting the hexagon and the pipe. We release the wheel. Unscrew the bolt all the way.
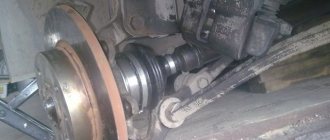
Next, release the upper arms from the steering knuckle, in order to remove the CV joint, it happens like here, it turns out to be rusty, so we resort to heating, but you can then unscrew the lower arms, as shown here.
Now we take a spanner to remove the nut and release the levers from the steering knuckle.
After this, move the steering wheel all the way to the left and take out the hinges, there will be enough space for you, don’t worry.
So, then we take the hub bolt and screw it into the CV joint so that it comes off the shaft, perhaps a hammer will help us here. Next, you need to remove the remaining parts of the boot and clean our shaft from dirt, grease, and dust.
Next, we screw the hub bolt into the CV joint so that it comes off the shaft, helping with a hammer.
We prepare the purchased CV joint for installation. To do this, take the lubricant that comes with it and hammer it into the hinge, but to prevent it from coming out on the other side, be sure to immediately secure it with a bolt.
Lubricant must be applied to each ball starting from the top to the very bottom, adding to the center; if any residue remains, you can put it in the boot.
After changing the CV joint, we proceed to the reverse of our actions: we install back the boot, the plastic ring, the removed support washer and the locking ring, so that the lock is at the top, on the shaft.
We install the CV joint itself on the shaft, hammering it with small blows with a hammer. The boot itself must be pressed with the clamps that come with the hinges.
We tighten the hub with a bolt and proceed to installing the first lever.
To secure the other lever, you need to put the steering wheel straight and secure the lever with a bolt.
We put the wheel in place and tighten it with the bolt. All is ready!
Personal experience: Audi 80 B3 vs Audi 80 B4
04.22.2009 by Uncle Edik in FAQ
My personal comparison based on the operation of an Audi 80 V3 1.8 carburetor and an Audi 80 V4 2.0 injector:
advantages of B4: the trunk has become normal (and a station wagon has also appeared), the appearance is more impressive, if desired, it is easier to find a packaged version, after 94. The door upholstery has become better (there is no fabric right up to the glass, which likes to get greasy in this place), the presence of wheel arch liners on all wheels, the standard suspension may be a little softer than in the B3, but not significantly.
disadvantages of B4: the weight and, accordingly, fuel consumption increased (less than 10 liters in the city, no matter how it works, I couldn’t even get less than 11-11.5 on the Avant with climate control).
advantages of B3: easier with all the consequences (my consumption even in winter did not exceed 9 liters, people with mono-injection, if desired, fit into 8 liters (exactly approx. Audi 80 | Replacing the thermostat | Audi 80. Uncle Edik)), the body seemed all right to me a little stronger than in B4.
cons of B3: well, a very small trunk, the vast majority of copies are in poor configuration, and of course, age….
It felt like my B3 1.8 carburetor accelerated to hundreds at least as well as the B4 Avant 2.0 injector, but in the B3 the gears were much longer, which is a big plus for me (at 100 km/h about 2200 rpm, and in the B4 at the same speed it turned out to be 3000 rpm), but at speeds higher the B4 gains more confidence (apparently the influence of mass is less affected, and power is more significant).
IMHO, if you already have a normal B3 that suits you, then changing it to B4 doesn’t make much sense. Replacing the thermostat on Audi 80 b3. In fact, Audi tuning provides wide scope for the implementation of any ideas. And if you look for a machine from scratch, then even a B4 is very difficult to find a normal one, but with a B3 it’s generally a one in a million chance.
When to replace
There is a set of typical symptoms that appear when hinges wear or break, which are simultaneously used during diagnosis and determination of a specific unit to be replaced:
- an external inspection revealed catastrophic damage to the cover with signs of old age; instead of lubricant, a mixture of wet dirt and rust has been working inside the hinge for a long time, there is no point in going through such a hinge, it needs to be changed;
- when turning under traction, a characteristic crunch or ringing blows are heard, which, after lifting the car, are clearly localized in the drives;
- when the car rolls, the sound is heard from the inside of the drive, and when turning the minimum radius, the outer hinge manifests itself;
- extreme case - the drive is completely cut off, the balls are destroyed, the car cannot even move, instead a grinding noise is heard under the bottom.
Replacing a single hinge is advisable if you are sure that all the others have not lasted long and are in good condition. Otherwise, it makes sense to listen to the manufacturer's instructions and replace the drive assembly.
The fact is that in addition to the CV joint there are two splined connections to the shaft, over time they work together and play appears. Such a drive will click or rattle even with new parts, and in advanced cases, vibrations or complete destruction of the remnants of the spline connection may appear. This will also damage the parts you just replaced.
Technology for replacing the outer CV joint and boot
First of all, we will have to acquire spare parts. Since I decided to change the entire grenade assembly, I ordered a new CV joint from Exist, it’s a pity that it was not of the best quality and this was evident from the contents of the package.
Next, we had to buy another jack, because in addition to lifting the car, we would also have to jack the lower arms in order to remove the CV joint from the hub without unscrewing the arms.
I bought a hydraulic bottle jack for lifting loads up to 3 tons.
Now we get to work replacing the purchased parts with new ones.
With a car standing on the ground (in my case it is an Audi A6 C5 sedan from 1997), we tear off the hub bolt, but do not unscrew it.
Then we remove the wheel nuts, jack up the car, remove the wheel and unscrew the hub bolt.
Now the most difficult thing is to remove the axle (shaft) with CV joint from the hub. Almost all mechanics, self-taught and professionals at large service stations unscrew the lower or upper arms for this.
But I didn’t want to do extra work at all, especially since all the levers are not so easy to remove, so I get the axle as follows.
It is necessary to turn the wheels in the direction opposite to the CV joint being replaced, since I changed the left CV joint, then I turned the wheels to the right.
Next, we place another jack, which we bought earlier, under the lower arms and raise them to a height parallel to the ground.
In this case, the distance from the hub to the gearbox will be as large as possible and when turning the CV joint we will be able to remove the latter from the hub.
We move the CV joint to the side and this space is quite enough to carry out all the work to replace it or replace only the boot (depending on what someone needs to do).
At the next stage, remove the clamps so that the boot does not hold the CV joint. And using the hub bolt, we remove the CV joint of the shaft axle, since it is held in place by a retaining ring.
To do this, screw the hub bolt back until the CV joint is squeezed out from the shaft axis.
If you are only changing the boot, then make sure that no dirt gets into the old CV joint; as a preventive measure, I would recommend washing it altogether and filling it with new lubricant.
Next, remove all the washers and retaining ring from the axle and do not forget about the old boot. We remember how everything stood so that we can install new parts in exactly the same way.
We clean the shaft from dirt and old grease, and then put a new boot with clamps, two washers and a lock ring on it.
We take a new outer CV joint and fill it with grease, so that it does not leak out from the back side, we screw in the hub bolt.
The kit usually comes with a tube of lubricant, most of which we fill into the part being replaced, and the rest onto the shaft axis under the boot.
We put the CV joint on the axle and in order for the part to fit into the retaining ring, we lightly hit the hub bolt through a wooden block.
We drive the CV joint all the way until it rests against the metal ring. Control this whole thing through the boot.
At the last stage, you need to tighten the boot clamps so that dirt does not get inside the joint from outside. I used household wire cutters for this.
Now, in the same way as we removed, put the CV joint back into the hub and, with the car standing on its wheels, tighten the hub nut.
After all the above, be sure to take a test ride. The result should pleasantly surprise you, since the crunching and knocking noise when turning the steering wheel should disappear.
After the first ten kilometers, it doesn’t hurt to check the boot for twisting, squeezing out grease and ruptures.
More details about how to change the outer CV joint of an Audi A6 C5 were described in the video; ask all questions under the video.
That's all I wanted to tell you today, as you can see, there is nothing difficult in removing and replacing the CV joint and boot yourself and without the help of others.
Replacement methods
There are two methods for replacing the external CV joint on an Audi A6 C5 with your own hands - with disconnecting the suspension arms from the steering knuckle and without this operation.
With detachable levers
We will consider replacing hinges with preliminary disconnection of the levers using the example of the left outer CV joint.
The operation is performed like this:
- We park the car on a level surface, engage the handbrake and engage first gear at the gearbox. Additionally, you can put wheel chocks under the rear wheels;
- We remove the cap and using a 27 socket with a wrench, we tear off the bolt securing the drive to the hub, and also loosen the wheel fasteners;
- We tear off 5 disk bolts;
- Use a jack to lift the front of the car on the left side and remove the wheel;
- Completely unscrew the drive mounting bolt;
- Turn the steering wheel to the left all the way;
- We clean the steering knuckle mounting bolt from the upper suspension arms, unscrew it (you will need two 16mm wrenches) and knock it out;
- Carefully remove the tips of the levers from the fist, causing the latter to move to the side;
- Having “bent” the hinge all the way, we remove it from the hub. Do not forget to turn the steering wheel to the right (when replacing the left CV joint);
- We remove (cut) the clamps. We pull the boot together or simply cut it off;
- We align the CV joint end cap relative to the shaft (so that they are located on the same axis);
- We pull the joint off the shaft. To do this, install the mounting bolt back and tighten it with a wrench until it stops. Then we turn on the gear to lock the CV joint and further screw in the bolt until the unit “comes off” from the retaining ring located on the shaft;
- Remove the retaining ring, bushing and thrust ring;
- We thoroughly wash the shaft and wipe it with a rag;
- We put a clamp on the drive shaft;
- We do the same with the new boot;
- Next, we put the first washer on the shaft (with its bottom towards the engine);
- Install the second plastic washer;
- We install the retaining ring last;
- We put lubricant in the hinge. There are new CV joints for the Audi A6 C5 already filled with grease, which is very convenient;
- We also put lubricant in the boot;
- We put the new CV joint on the shaft splines, and then seat it all the way, using a hammer and a wooden adapter (we seat it carefully so that dust does not get into the lubricant). Next, take the old bolt, screw it into the hub and use a hammer to push the CV joint onto the shaft. You can check whether the hinge is completely seated by looking at the plastic bushing - it should be almost completely “hidden” inside the unit;
- We put the boot on the outer ring. To do this, you will have to use a screwdriver and remove the car from the gear. We fix the rubber element with clamps, clamping them with pliers;
- Then we do everything in reverse order. We install the drive in the hub and attach the mounting bolt;
- We reconnect the steering knuckle to the suspension arms and secure everything with fasteners;
- We put the wheel in place, lower the car from the jack;
- Tighten the drive and wheel fasteners.
At this point, the replacement of the external CV joint on the Audi A6 C5 is considered complete.
In some cases, it is not always possible to unscrew the fastening of the knuckle to the upper arms. If these bolts have not been loosened for a long time, then over time they “stick” and are difficult to unscrew. An alternative option in this situation is to unscrew the lower arms from the knuckle.
In fact, to replace the outer CV joint on an Audi A6 C5, it makes no difference which levers to disconnect the steering knuckle from - upper or lower, in both cases the hub will move to the side, which will allow you to remove the drive limit switch.
Internal CV joint of an Audi 80
Many motorists today, after discovering any breakdown in their car, instead of going to a service center, prefer to fix the problem themselves. Be it even a complete replacement of a worn-out part.
However, in most cases, only owners of used cars decide to carry out repairs themselves. After all, in the salon, even the simplest repairs threaten serious financial losses. And if the driver has certain skills, any part can be completely changed independently, for example, if it is an internal CV joint on an Audi 80.
For what reason can an internal CV joint fail and how to recognize a breakdown?
The steel alloy from which the CV joint for this Audi model is made is capable of withstanding enormous loads for a long time. This is high quality carbon steel. And therefore, from the first minutes of vehicle movement, the internal joints bear a high responsibility.
Despite all the strength of the part, over time it still fails. This is usually due to common factors such as:
- heavy, prolonged loads due to aggressive driving;
- climatic conditions;
- poor-quality road surface, which is especially important in Russia;
- accidents.
But there are two main enemies of the internal CV joint of the Audi 80 B3: sand and dirt. Because of this, the lubricant deteriorates and scratches form on the parts. Over time, the boot begins to tear. And it’s good if the car owner noticed a malfunction at the stage of a torn boot, because then the entire CV joint will fail.
Attention! It is important not to leave replacing the internal grenade until later. After all, it is she, along with other particularly important components, that is responsible for safe movement.
A failed grenade is very easy to recognize. While driving, a faulty part causes unpleasant, loud, sharp crunching noises. The crunch is created by gaps and scratches. It is heard from one side or the other, depending on which CV joint on the Audi 80 is broken. This sound indicates serious problems with the car and the need for immediate inspection.
The procedure for replacing the inner CV joint in stages
There is a certain algorithm of actions in order to replace the front or rear internal CV joint of an Audi 80. All actions must be performed in strict sequence. First, let's list them briefly.
- The car must be placed above the inspection hole or jacked up. For greater safety, if a jack is used, you need to build an additional support from bars.
- Raise the handbrake and install special anti-roll bars.
- Unscrew the hinge bolt and loosen the nuts.
- If the car was standing above the inspection hole, you need to lift it and put supports in order to remove the wheel that has the faulty part.
- Remove the drive.
- Completely unscrew the previously loosened CV joint bolt.
- Turn the wheels to the right and remove the outer CV joint with boot.
- Unscrew the CV joint bolt and remove the inner grenade with retaining rings.
- The internal CV joint of the Audi 80 b4 is being replaced.
- All parts are reinstalled in the reverse order.
All the nuances of the step-by-step replacement procedure
Before installing the Audi 80 on a jack, you must remove the hub bolt. When the car is on a jack, it is almost impossible to rip it off because the bolt can become stuck. If the hub bolt is very difficult to remove, it can be treated with a special tool. Then you need to use a 16mm socket to unscrew the nut.
Attention! It is important to remember that the bolt will not simply be removed and will have to be squeezed out, for example, with a crowbar. Better to have new bolts. Then you can simply knock out the first one and then install another one
Then you can simply knock out the first one and then install another one.
To remove the hinge, you need to screw a bolt into it and hit it with all your might with a hammer until the Audi 80 CV joint is free.
To remove the boot, unscrew the clamp and remove the locking ring with pliers. The new boot and clamp must also be treated with lubricant.
THIS IS INTERESTING: Knock in the engine on a cold Volkswagen Polo sedan
New parts need to be very well lubricated.
Before replacing the internal CV joint on an Audi 80 B3, it is important to purchase new components in advance, these are the CV joint itself, boots, retaining rings, lubricant
Replacing the outer CV joint of an AUDI A6 C5 with your own hands with and without disconnecting the arms
Jack up, unscrew and remove the wheel.
Unscrew the hub bolt all the way. To remove the CV joint you need to either release the upper arms from the steering knuckle, but in my case it was so rusty that it can only be released by heating or by releasing the two lower CV joints, which was done.
Use a spanner wrench or sockets to tighten the nuts and knock the levers out of the steering knuckle.
Photo report on replacing the outer CV joint A6 C5
I puzzled over what this could be for a long time, and after a trip to one of the specialists, the verdict was made that the left outer CV joint was crunching. After studying many forums, I decided that changing the left CV joint would be a piece of cake, since you don’t need to remove any levers, and you can completely forget about the hammer. What do you think, so it is, on the Audi A6 the external CV joint, the audi a6 c5 CV joint, the boot changes very audi a6 c5 CV joint and below I will show the entire procedure and the front of the upcoming work.
Technology for replacing the outer CV joint and boot First of all, we will have to acquire spare parts. Since I decided to change the entire grenade assembly, I ordered a new CV joint from Exist, it’s a pity that the Audi A6 C5 CV joint was not of better quality and according to the contents of the package it was.
Next, we had to buy another jack, because in addition to lifting the car, we would also have to jack the lower arms in order to remove the CV joint from the hub without unscrewing the arms.
I bought a hydraulic bottle jack for lifting loads up to 3 tons. Now we get to work replacing the purchased parts with new ones. With a car standing on the ground, in my case it is an Audi A6 C5 sedan, we tear off the hub bolt, but do not unscrew it.
Then we remove the wheel nuts, jack up the car, remove the wheel and unscrew the hub bolt. Now the most difficult thing is to remove the axle shaft with CV joint from the hub.
Almost all mechanics, self-taught and professionals at large service stations unscrew the lower or upper arms for this. Next, take the old bolt, screw it into the hub and use a hammer to push the CV joint onto the shaft.
To do this, you will have to use a screwdriver and remove the car from the gear.
We fix the rubber element with clamps, clamping them with pliers; Then we do everything in reverse order.
We install the drive in the hub and attach the mounting bolt; We reconnect the Audi A6 C5 CV joint to the suspension arms and fix everything with fasteners; We put the wheel in place, lower the car from the jack; Tighten the drive and wheel fasteners.
In some cases, it is not always possible to unscrew the fastening of the knuckle to the upper arms. An alternative option in this situation is to unscrew the lower arms from the knuckle. In fact, to replace the outer CV joint on an Audi A6 C5, it makes no difference whether the audi a6 c5 CV joint comes from the upper or lower ones; in both cases, the hub will move to the side, which will allow the drive limit switch to be removed.
Without unscrewing the levers The second method does not require disconnecting the suspension elements, but to carry it out you will need an additional jack, and only a hydraulic one, of the bottle type. The technology for replacing the second method is as follows: The essence of the method is that when the hub is jacked up, the suspension itself will move it a little to the side, this will allow the audi a6 c5 CV joint to be replaced.
Causes and signs of CV joint failure
One of the most common causes of premature failure is a torn boot, which protects the hinge from the penetration of dirt, dust and moisture. If the damaged boot is not replaced in a timely manner, the CV joint will fail much faster. Of course, replacing the internal CV joint of an Audi A6 C5 will cost the car owner much more than simply replacing the boot. To avoid such negative consequences, technical center specialists recommend periodically diagnosing the vehicle.
Experienced car owners can immediately identify the breakdown of this unit. The main symptom is the appearance of a characteristic “crunch”. Such a sound can only come from balls that move along the grooves, since they have significant wear. “Crunching” can occur at any moment, but most often it occurs when overcoming obstacles, sharp acceleration, or turning.
To make sure that the hinge is faulty, the car owner can also pay attention to the following signs:
- the play of the shaft, which is located between the CV joints, can be felt when trying to move it in different planes;
- slight jerking when the vehicle's driving dynamics change, or when the vehicle is just starting to move.
The process of replacing the CV joint of the Audi A6 C5 in those
Repair work is carried out in a pit, or you can use a special lift.
The operating procedure is as follows:
- First of all, the hub bolt is broken off using a hexagon.
- The car is placed on a jack, after which the wheel is unscrewed and removed.
- The hub bolt is unscrewed.
- The CV joint is pulled out, and this can be done in two ways: releasing the upper arms from the steering knuckle or releasing the two lower arms. The first method is preferable.
- To release the levers, the nuts are unscrewed using a spanner, after which the levers are knocked out of the steering knuckle. To remove the hinge, first of all, you need to turn the steering wheel left/right all the way (depending on the side being repaired), and then pull out the part directly.
- The torn boot is removed and thrown away. The shaft is cleaned of old grease and dirt. If the condition of the hinge is unsatisfactory, it is replaced with a new one.
- The new hinge is filled with lubricant, which usually comes with the part. Moreover, it is necessary to screw in a bolt from the opposite edge so that the lubricant does not escape from there.
- The remaining lubricant is driven into the boot.
- Put on a new boot, support washer, plastic ring, retaining ring.
- The hinge is put on and with the help of light movements it is pressed onto the shaft. To secure the boot, use the clamps that come with the kit.
- The hub is inserted into place, the bolt is tightened, and a straight lever is mounted.
- To insert the second lever, you must first align the steering wheel. Once the lever is installed, it is secured with a bolt.
- The wheel is installed in its place and the hub bolt is tightened.
To ensure that the repair was carried out successfully, a test drive is necessary. When turning the steering wheel, the knocking and crunching should disappear, and the driving process itself should become more comfortable.
It is worth noting that if damage or wear to the boot was detected in a timely manner and there were no signs of hinge failure, it is not necessary to replace the part. In this case, it is quite enough to disassemble and clean the unit of old lubricant, and then use new, clean lubricant.
Advantages of those
The technical center is staffed exclusively by qualified specialists who have thoroughly studied all the weak points and features of Audi cars. This allows us to guarantee high results when performing repair work of any complexity.
Our craftsmen use good quality spare parts recommended by the car manufacturer. After all, not only their service life, but also the safety of the driver and passengers of the car depends on the quality of the parts.
Step-by-step instructions for replacing the SHARS on an Audi A6 C5 with your own hands
First of all, we will have to acquire spare parts. Since I decided to change the entire grenade assembly, I ordered a new CV joint from Exist, it’s a pity that it was not of the best quality and this was evident from the contents of the package.
- With a car standing on the ground (in my case it is an Audi A6 C5 sedan from 1997), we tear off the hub bolt, but do not unscrew it.
- Then we remove the wheel nuts, jack up the car, remove the wheel and unscrew the hub bolt.
- Now the most difficult thing is to remove the axle (shaft) with CV joint from the hub. Almost all mechanics, self-taught and professionals at large service stations unscrew the lower or upper arms for this.
- Next, we place another jack, which we bought earlier, under the lower arms and raise them to a height parallel to the ground. In this case, the distance from the hub to the gearbox will be as large as possible and when turning the CV joint we will be able to remove the latter from the hub.
- We move the CV joint to the side and this space is quite enough to carry out all the work to replace it or replace only the boot (depending on what someone needs to do).
- At the next stage, remove the clamps so that the boot does not hold the CV joint. And using the hub bolt, we remove the CV joint of the shaft axle, since it is held in place by a retaining ring.
- To do this, screw the hub bolt back in until the CV joint is squeezed out of the shaft axis.
- If you are only changing the boot, then make sure that no dirt gets into the old CV joint; as a preventive measure, I would recommend washing it altogether and filling it with new lubricant. Next, remove all the washers and retaining ring from the axle and do not forget about the old boot. We remember how everything stood so that we can install new parts in exactly the same way.
- We clean the shaft from dirt and old grease, and then put a new boot with clamps, two washers and a lock ring on it.
- We take a new outer CV joint and fill it with grease, so that it does not leak out from the back side, we screw in the hub bolt. The kit usually comes with a tube of lubricant, most of which we fill into the part being replaced, and the rest onto the shaft axis under the boot.
- We put the CV joint on the axle and in order for the part to fit into the retaining ring, we lightly hit the hub bolt through a wooden block.
- We drive the CV joint all the way until it rests against the metal ring. Control this whole thing through the boot. At the last stage, you need to tighten the boot clamps so that dirt does not get inside the joint from outside. I used household wire cutters for this.
- Now, in the same way as we removed, put the CV joint back into the hub and, with the car standing on its wheels, tighten the hub nut.
Types of CV joints
Based on their location on the drive, hinges are divided into external and internal. The division is not purely geometric; the nature of the operation of these CV joints is very different, which is why they are constructed differently.
If the external one is almost always a six-ball “grenade” of impressive size, then the internal ones are often a three-pin joint of the “tripoid” type with needle bearings.
An example of the operation of an outer CV joint.
How does the internal CV joint work?
But such differences have little effect on the replacement method; the insides of the CV joint will not affect the progress of work. The presence of balls will require greater care; they can easily be lost if handled carelessly.
Procedure for replacing outer CV joint
It is much more convenient to work with the drive (half shaft) when it is removed and secured on a workbench in a vice. But you don’t have to perform unnecessary operations to dismantle and drain the oil from the gearbox by removing the outer grenade directly under the car, working from below or in the wing arch.
Without removing the axle shaft
The complexity of the task lies in the fact that when knocking down the outer CV joint, it is important not to transfer unnecessary forces through the shaft to the inner one. It may sort itself out or pop out of the box
Therefore, you need to act carefully, preferably together with an assistant:
- the bolts or nuts of the wheel fastenings are loosened, as well as the nut that tightens the wheel bearing;
- the machine is jacked up from the desired side and secured on a reliable stand;
- the wheel is removed, the hub nut is unscrewed;
- further actions may differ depending on the car model, but in the most common case of MacPherson type suspension, it is necessary to disconnect the steering knuckle from the ball joint with the lever or braces, for which the ball joint pin is uncoupled or its body is unscrewed from the lever;
- the stand is moved to the side, while the shank of the outer CV joint comes out of the splined connection of the hub;
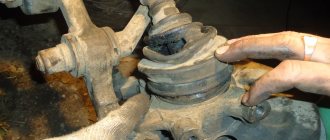
- The clamps and cover are removed from the grenade boot, excess lubricant is removed, which interferes with working with the inner race;
- the most crucial moment is to hold the shaft and apply a sharp blow with a heavy hammer through the spacer to the end of the inner race; if done correctly, the grenade will move along the splines or even separate from the drive;
- The boot, clamps, nut, CV joint assembly and retaining spring ring must be replaced, usually all this is included in the repair kit along with a tube of special lubricant; ordinary multi-purpose lubricant is not suitable here;
- first of all, a new boot is installed on the shaft;
- a new lubricated hinge is put on the shaft and moves with a sharp movement until the locking ring clicks; sometimes you have to apply a light blow to the end of the shank, protecting it from deformation with the old nut;
- The suspension is assembled in the reverse order, the hub nut is tightened according to the repair documentation for the specific machine.
It will be useful to also change the boot of the inner CV joint while the outer one is removed. The resource of the unit fundamentally depends on the condition of the covers.
With axle shaft removed
Removing the drive assembly is useful for greater ease of operation, especially in severe cases of a stuck retaining ring. Usually, this will require draining the oil or part of it from the gearbox, not forgetting to fill it back in, or even better, combine the procedure with an oil change.
The drive in the box is held by a similar retaining spring ring of circular cross-section, which is compressed after a sharp blow to the outer race of the hinge through a spacer.
Sometimes it is possible to press out the drive with a pry bar. Removing the hinges from the shaft is carried out in a vice similar to the procedure already described.
Do not try to pull the axle shaft by the shaft. This will end with self-disassembly of the internal hinge; the thrust ring present there will not withstand it.
Replacing the outer CV joint
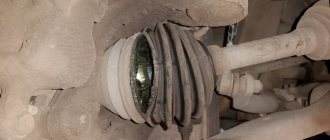
Hi all. It all started when I noticed a wet boot on the right outer CV joint.
Before it was too late (before the CV joint crunched), it was decided to buy a boot and change it over the weekend. But on the left side the boot also had cracks. Ay. Let's buy two. We’ll change the other side in advance too, we won’t wait. This is changing quickly. I changed the CV joints more than once on my dad’s 80. But on mine you don’t even need to turn the levers. I thought about it and ordered 2 sets of anthers from LOBRO 300320.
Still, they were staged in the original. The box contained, of course, GKN.
What is included in the kit can be seen in the photo.
This LOBRO kit contains a 17mm hex hub bolt. I had to buy that too (17mm hex).
Reiki for Audi A6 C5 repair and restoration. Price range
| Name of work, parts | Average prices, rub. |
| Removing and replacing the rack | from 3000 |
| Repair, bulkhead | from 6000 |
| New rack for Audi A6 C5, number: 2GS0319C | from 19000 |
| New rack for Audi A6 C5, number AU215 | from 16000 |
| Used rack for A6 C5 | 4000-7000 |
Removing the steering column of an Audi A6C5 2000 is not difficult. To do this you will need a flat area, hole or overpass. To replace the rail with another one, follow the step-by-step instructions. All work takes on average 1-2 hours, excluding disassembly and repair of parts. If replacing the steering rack does not require the intervention of craftsmen, then its restoration is difficult to perform without turning equipment and precise measuring instruments.
Symptoms of problems and methods for checking the SDC on an Audi A6 C5
The main sign of problems with the operation of the steering wheel steering wheel on the Audi A6 C5 is a crackling sound that appears when the steering wheel is turned to the side . To confirm your guesses:
- Get out of the car and turn the steering wheel all the way. If you hear a crackling sound, then the SDC is really faulty.
- You can also drive onto the overpass and conduct an external inspection of the anthers and the constant-velocity control joint to more accurately identify the malfunction.
I recommend that you read the article: how to change the oil in the variator of an Audi A6 C5 with your own hands
Replacing the CV joint of an Audi A4 B5
| Call us |
Replacing the CV joint of an Audi A4 B5 is a fairly popular service in our car service center. Carrying out these and other works on Audi requires highly qualified mechanics and often the use of special tools.
Why should you have your Audi serviced at our service center?
We strive to be fair and honest and treat clients the way we would like to be treated - with respect and consideration. For most of the work and spare parts we carry out, we provide one of the longest warranties in our city. We do not carry out any additional repairs or increase the estimate without your consent.
You will know in advance what work will be done on the car, how long it will take, and what the final cost of the work and spare parts will be.
- You will be very surprised at the level of service when you visit our car service center for the first time. Our employees do NOT talk down to customers. We speak to you in a simple and understandable language without abstruse technical terms that make your head hurt. After all, if you don’t understand what we’re talking about, then how can you make the right decision that your car needs?
- All our services are certified according to GOST-R, for which there are supporting documents. This means that you can service even a NEW car with us, just bought at the showroom, with the same quality, but at a fair price. At the same time, the car manufacturer's warranty is fully preserved. For more information about this, see the section “Maintenance not at the dealer”
- You've probably found yourself in a situation where a car service center tells you one pick-up time, but in fact it turns out that it will be longer. Or even worse - when you come to the service center to pick up the car at the appointed time, but it is not ready and you have to wait and change your plans. We carefully monitor this in our car service center and with us you will not find yourself in a similar situation.
- We never put pressure on clients to perform unnecessary work. For all questions that arise, we will always give you the necessary advice and tell you what needs to be done urgently and what can be waited.
- We use the latest diagnostic and repair equipment, which allows us to fix problems the first time. We have an extremely low repeat repair rate. This means that you can be sure that if you come to us, you will only leave in a working car.
- We are happy to take you to the repair area if you wish to take a personal look at the detected faults. You will always know which specific master is responsible for your car and even which mechanic performs the work.
We have a large selection of spare parts and consumables, both original and non-original. If the required parts are not in stock, we will deliver them to order in the shortest possible time, without intermediaries. This means that you don’t have to look for anything yourself, your car won’t be hanging on a lift waiting for spare parts, and the repair will take place as quickly and conveniently as possible for you.
Symptoms of device problems
Most often, problems with the steering system arise due to natural wear and tear of parts. Frictional forces arising in mating parts cause wear. Play appears on the shaft, the result is a knocking sound in the steering rack, deterioration in Audi handling, and oil leaks under the hood. To repair the unit, you will have to remove it and inspect it.
There are three elements in which backlash occurs: the worm mechanism; clamping stop; centering sleeve. If there are strong knocks, you need to start repairs immediately, otherwise there is a high probability of a global breakdown of the steering rack and even an accident on the road due to loss of control.
The play of the rack shaft, which appeared due to the weakening of the clamping stop, can sometimes be eliminated by tightening the adjusting screw. Thanks to this, there is a chance to increase the service life of the unit between repairs. To determine when to stop tightening, you need to check the steering play using a play meter. To get rid of a slight knock, it is enough to tighten the adjusting bolt by about 20-30% of the full turn of the nut.
The simplest case that occurs on the Audi A6 C5 is a slight corrosion of the rack shaft. This occurs due to poor elasticity of the seals. Over time (due to temperature changes) they crack, become hard, and the unit becomes leaky. Moisture penetrates inside the slats and the steel parts quickly rust. In this case, the lubricant is washed out and the surfaces wear out.
Sensitivity to pollution
Despite their fairly high reliability, CV joints have a significant drawback - sensitivity to contamination. Even a small amount of dust and dirt that gets inside the hinge leads to accelerated wear of the working surfaces.
And despite the presence of a boot that protects the CV joint, dirt often penetrates into the unit, since the rubber element is easily damaged.
If a crunching noise appears, the hinge on the Audi A6 C5 can be washed, put new lubricant in it and change the boot, but these measures will only help extend the life of the unit.
It will not be possible to restore the hinge more radically, since it is not repairable. Therefore, in the end, a crunchy CV joint will have to be replaced.