It is worth noting that the CV joint (constant velocity joint), better known among car enthusiasts under the common name “grenade,” has a fairly long service life. However, as with any other part or assembly, the resource of this element is limited. It is also important to understand that the condition of the CV joint is also greatly influenced by the individual characteristics of vehicle operation.
At some point, the driver may encounter the fact that when driving, extraneous sounds appear in the area where the grenade is installed. In fact, the CV joint crunches, making a characteristic knock when driving with the wheels turned out, etc. This phenomenon is well known to owners of front-wheel drive VAZ cars, as well as various cars of foreign brands.
In any case, if a grenade crunches on a VAZ 2114, VAZ 2115 or another car, the specified element needs to be changed. Next, we will look at how to replace a VAZ 2114 CV joint in a regular garage, as well as what you should pay attention to during this procedure. At the same time, the information below will also allow you to learn how to change the CV joint of a VAZ 2115 or other cars with a similar design.
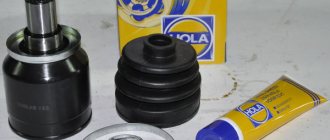
Replacement of CV joint boots on VAZ 2115.
Yesterday late at night I came from the garage, as in that song “Tired, hungry and angry, but very pleased with myself!”
Anthers have been replaced. And it was like this. So for work we need: - CV joint boots - 2 pcs; -Anther clamps - 4 pcs; -Hub nuts - 2 pcs; -CV joint grease - 1 tube; -Head for 30 (I took it with touch control using a crowbar) - 1 piece; -Well, and a bunch of other tools (wrench, tweezers, chisel, hammer, vocabulary of obscenities, etc.) So, let's begin. We remove the cap from the wheel (those who don’t have it have less work), remove the hub nut cap. Unscrew the nut, I used a dowel, take a 30mm socket and loosen the hub nut. Then loosen the wheel bolts.
We jack up the car and remove the wheel, immediately put it under the car (just in case), and unscrew the hub nut.
We unscrew the bolts securing the ball joint to the steering knuckle (I unscrewed it with a balloon)
We press the lever down using a crowbar, hold it in this position with your knee, and at this time we move the steering knuckle and pull the drive out of the hub (after turning the steering wheel to the left). Cutting off the old boot
Well, then it’s time to remove the CV joint from the shaft. I read that it can be removed by lightly tapping the inside. It wasn't like that. I remembered all my swear words, but it didn’t do any good. It was too late to go to the store for a puller, so I took out a welding tool and invented a puller. With his help, the CV joint was removed within five minutes. But I couldn’t do anything with a hammer in two hours.
After that, we take gasoline and thoroughly wash the CV joint, at least to this condition
Well, then we apply grease inside, put the boot on the shaft and put the CV joint in place. To do this, we screw on the old nut and, with a short but sharp blow of a hammer, drive it until the thrust washer. We put the boot on the CV joint and secure it on both sides with clamps. We put the drive in the hub and attach a new nut.
Next, install the wheel, lower the car and tighten the hub nut with the same force as it was unscrewed. And don’t forget to seal it
We repeat the same procedure on the right wheel. That's basically it, the boots have been replaced, the car is running, I now have a puller for CV joints and invaluable experience in removing them. Oh yes, I bought a phone stand yesterday, it didn’t have clamps for my baby, I took it with suction cups
Good luck to everyone, and less breakdowns!
Issue price: 400 rubles
Tags: DIY repair
Comments 54
I did everything as written. The left boot was changed normally. but with the right one the thread was cut off by the nut. I do not know why ?
Perhaps the thread was already loosened, or maybe the nut did not fit the thread, or maybe it was pulled too hard.
bought a new car
andrey19810205
Perhaps the thread was already loosened, or maybe the nut did not fit the thread, or maybe it was pulled too hard.
maybe because it was poorly countered?
andrey19810205
Perhaps the thread was already loosened, or maybe the nut did not fit the thread, or maybe it was pulled too hard.
This means that the bent parts of the nut were not bent properly
well it turns out like this. On the classics I never bothered to bend anything, everything was always fine. here the thread is only half hardened
Tell me... did you have any play in the wheel drive relative to the inner CV joint? i.e. I have a play of 5 cm, if the drive is pushed towards the box and back, pulled out... the inner CV joint stands motionless relative to the box, spins when the drive-shaft rotates (it’s just such a problem, I disassembled the suspension, the car fell off the jacks, they lifted it, and the front lever was unscrewed from the body, they were pushing back and forth to level the car in the garage, the right front strut came off, the drive flew out of the CV joint, the boot did not break, I sorted out the matter, i.e. the CV joint remained in the hub, the hub nut was tightened , and the drive flew out.)
Yes, there is play, it should be, otherwise the drive would be cut off when the suspension was working, and when the steering wheel was turned, it would break.
Damn, I was already thinking about taking everything apart further. broke the car :-((((
andrey19810205
Yes, there is play, it should be, otherwise the drive would be cut off when the suspension was working, and when the steering wheel was turned, it would break.
That's right, you're right! I just found it on the Internet... The grooves in the internal joint housing are straight, which allows the parts to move in the longitudinal direction, “lengthening” or “shortening” the drive (this is necessary to compensate for the mutual movements of the suspension and power unit)... that’s it, now I’m calm
How to replace the outer CV joint boot on VAZ cars
For front-wheel drive cars of the VAZ family, from model 2108 to model 2115, as well as more modern Kalina and Priora cars, maintenance of the drive wheels comes down to periodically checking the condition of the CV joint boots, both external and internal.
Otherwise, the ball-type constant velocity joints with guide grooves used on these machines do not require maintenance.
Purpose and location of the part
A CV joint is a special part that is involved in transmitting torque from the engine to the wheels. The boot is a corrugated tip that protects working units from rapid wear. It does this by sealing the working fluid. The oil, without leaking, continues to provide the necessary conditions under increasing frictional force from the operating mechanism.
The CV joint boot is located in several places, there is an outer and an inner one. One can only be changed by removing the wheel, while the other requires a little more effort. In any case, you can change the CV joint boot in a VAZ-2114 car even without a workshop.
By the way, because of its shape, the hinge is often called a “grenade”, so it is possible to use this definition further.
Reasons for replacing the boot
The service life of CV joints can be reduced very quickly due to damaged boots. Dirt and dust that gets inside the “grenade” act as an abrasive.
And since the hinge elements are heavily loaded and are constantly in contact with each other, the trapped dirt very quickly damages them and the “grenade” fails.
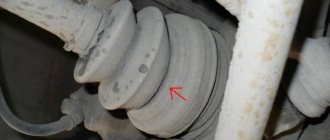
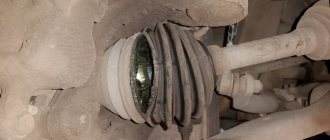
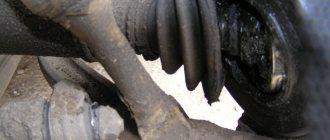
Even if you do not check the condition of the boot, the hinge itself will signal that it is damaged.
For example, as shown in the photo below, the CV joint turned.
When making turns, the CV joint with dirt trapped in it will begin to crack loudly. If the damage is not quickly repaired, the “grenade” will soon simply disintegrate and will have to be completely replaced.
But replacing a CV joint will cost much more than a boot. Therefore, upon discovering damage to the boot, or hearing a cracking sound from the CV joint, it is better to immediately begin troubleshooting the problem.
And such a malfunction is eliminated by replacing the boot, washing the CV joint and adding new lubricant to it.
Next, we will consider the sequence of actions for replacing the external CV joint boot of front-wheel drive VAZs using model 2199 as an example.
Similar work is carried out on the VAZ 2110, 2114 models, so we hope that the owners of these cars will not have any problems after reading the article.
We choose the outer boot because it is damaged much more often than the inner one, since it is located near the wheel hub and the impact on it is more intense, therefore the chance of a crack appearing on it is greater.
When replacement is required
If while driving your car you hear noise coming from the front of the car, be sure to check the condition of the boot. Quite often, replacing the outer CV joint boot of a VAZ 2114 becomes a daily task for service center employees.
To check, just turn the wheels in any direction and look under it. If cracks or complete damage are detected on the boot, the outer CV joint of the VAZ 2114 will definitely need to be replaced.
The presence of damage indicates that dirt has gotten inside the element. Much or little of it is no longer so important. Contamination leads to disruption of the functionality of the device.
In such situations, when the CV joint is damaged, it is strongly not recommended to continue driving under your own power. This is dangerous for you, your car and other road users. Ignoring this recommendation entails even more expensive repairs, since by the time you get to the garage or car service center, you will damage a number of other components and elements of the car.
Preparation
So, damage to the boot on the VAZ 2199 has been identified. You can replace it and wash the CV joint itself in the garage, the main thing is that there is an inspection hole.
Tools you will need:
- Set of wrenches (socket wrenches, open-end wrenches);
- Set of heads and collars;
- Metal brush;
- WD-40;
- Mount;
- Hammer;
- Jack;
- Wheel chocks;
- Wooden coasters.
You will also need a new boot, CV joint grease-4, a container for collecting oil, a container with gasoline for washing the CV joint, and rags.
It is better to do all work together with an assistant.
For convenience, we will describe the process of replacing the external boot on the left side. The replacement work on the right side is identical.
Disassembling the drive and replacing the boot
The car is driven into a pit, chocks are placed under the wheels, and the car itself is left in first gear.
Before completely removing the wheel, loosen all the wheel nuts.
The protective cap of the nut securing the drive to the hub is also removed.
To prevent the nut from unscrewing from the shaft, it is centered around the circumference, which is why it has bends that fit into a groove made in the shaft.
These bends need to be aligned, this is done with a thin screwdriver or a drift and a hammer.
After aligning the bends, using a socket and a powerful wrench, the nut is unscrewed, and the washer located under it is also removed.
Next, the car is jacked up and wooden stands are placed under its sills.
The wheel nuts are unscrewed and the wheel is removed.
Next, work is done under the car.
If there is a crankcase protection, it can be unscrewed. Then the oil from the gearbox is drained through the drain plug into the prepared container.
Next, you need to unscrew the two bolts securing the lower ball joint to the hub.
This will make it possible for the latter to move sideways. At the same time, you can check the condition of the support itself.
The steering wheel must be turned all the way to the left so that the drive is completely shifted in the inner CV joint, ensuring its minimum length.
After this, the hub is removed from the splines of the drive shaft.
The outside of the drive will be removed.
Then you can go in two ways.
Knock down the outer “grenade” without removing the inner CV joint.
To do this, you need to remove the boot clamps, and then cut the boot, and then wipe off the existing grease on the hinge.
Then you need to prevent the drive from moving on the internal hinge.
To do this, take a small vice or a butt wrench, clamp the shaft in them and hold it firmly in your hands.
An assistant, using a soft metal spacer and a hammer, knocks down the CV joint, striking the inner race of the hinge.
With this method, there is no need to drain the oil from the box. But there is a possibility that when striking, the inner race will jump out of the outer inner CV joint.
Also, shooting down a “grenade” in this way is not very convenient, since this work will be done in a limited space.
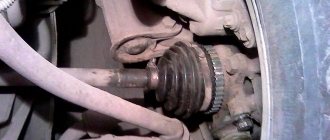
Complete removal of the drive from the vehicle. To do this, a pry bar is driven between the gearbox housing and the internal joint and the shaft entering the gearbox is pulled back and forth.
After this, the drive is completely removed.
The advantage of this method is also the ability to assess the condition and replace the gearbox seal, through which oil often leaks.
In the future we will consider work with the drive completely removed.
What to do if the boot breaks on the road
The situation is not uncommon: you had to change a tire while on the road and you noticed that the boot was torn. It is highly not recommended to leave “everything as it is” and go to the nearest car service: CV joint is not a cheap part at all, especially if it is on an expensive foreign car. Options:
- Place the car on a jack (if it is not already on it), pull out the old contaminated grease through the hole and fill the boot with grease until it stops, and to prevent it from falling out when driving, wrap the problem area with a plastic bag and tighten it along the corrugation with a rope.
- Wrap the torn case with opaque tape or electrical tape. This “alternative” will last for 500 kilometers until the boot is changed.
The drive is removed, what next?
The drive surface is cleaned with a metal brush and rags.
Then the clamps securing the boot are removed, and it is cut or removed using a screwdriver.
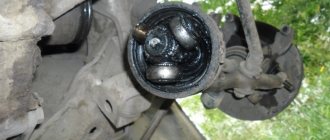
The CV joint is wiped clean of grease and then becomes loose.
To do this, it can be clamped in a vice or held suspended with the outer “grenade” down, and an assistant knocks it down with a drift and hammer.
After this, you need to check the condition of the retaining ring at the end of the shaft and replace it if necessary.
The removed hinge is thoroughly wiped and placed in a container with gasoline for washing.
The new boot is placed on the shaft.
The washed CV joint sits on the shaft splines and is then driven onto the last one.
It needs to be hammered through a wooden spacer.
Don't forget about lubrication.
Before pulling the boot onto the CV joint, CV joint-4 lubricant is placed inside it, as well as inside the hinge. After this, the boot is put on the “grenade” and secured with clamps.
Then all that remains is to put everything back in place.
The drive is driven into the gearbox using a hammer and a wooden spacer.
The hub is put on the splines of the outer CV joint and the nut securing it is tightened.
The lower ball joint is screwed into place. The wheel is installed.
After this, you need to check the tightness of all the bolts and nuts that were unscrewed.
The crankcase protection is screwed on, the car is removed from the stands, and oil is poured into the gearbox.
The same sequence of work applies to the drive of the other side.
Replacing the CV joint boot VAZ 2113, 2114, 2115
Since my inner CV joint boot on the left side was torn, it needed to be changed urgently, I finally found the time for this task.
The inner CV joint is removed along with the shaft and outer CV joint, so I decided to change the boot on it too. I went shopping and purchased the necessary spare parts.
2 boots (inner and outer); 4 clamps; CV joint lubrication
In order: 1) Place the car on a log and remove the wheel.
follow safety measures, do not forget about the handbrake and slippers under the wheels, and also make sure that the car rests firmly on a log, I left a jack for safety
2) Unscrew the plug on the left side of the box and drain the oil; if this is not done, it will flow through the hole where the internal one is inserted. CV joint
3) Next, unscrew the hub nut (an assistant is needed here), ask him to press and hold the brake. It is not recommended to do this at speed!
4) We unscrew the ball from the hub from the bottom (two 17 bolts), unscrew and press out the steering tip, pull the hub off the CV joint splines and move it to the side.
5) Holding the shaft with a sharp movement, pull out the inside. CV joint We remove the torn boot and begin to disassemble the inside. CV joint
6) Use a screwdriver to pry out the retaining ring of the separator (there is no photo, I took it from the internet)
7) Remove the CV joint housing, then use a screwdriver to pick out the balls from the separator.
We continue to pick the retaining ring of the holder and remove it.
9) We wash all parts of old grease. I washed it in gasoline.
10) Once washed, put everything back together in reverse order, liberally lubricating every part
We tighten the boot clamps and the CV joint is ready.
11) The outer CV joint is not removable, so we wipe off all the grease that we can get with a rag, turn it over and fill it with gasoline
12) After letting it settle, drain the gasoline, pour in a new one and hold the CV joint, and turn the shaft in different directions (as when driving), repeat the procedure until the parts shine
13) Fill the CV joint with grease, put on the boot, and put everything back.
The work is not pleasant, you have to tinker, and your hands still smell like gasoline. And don’t forget to pour oil into the box through the dipstick!
Disassembling the gearbox, eliminating the rattling of the gearshift knob and installing the gearbox universal joint from Kalina VAZ 2113, 2114, 2115
Dismantling the VAZ 2113, 2114, 2115 gearbox. Removing the rattling of the VAZ 2114 gearbox handle. Installing the cardan shaft.
The grenade replacement process in detail
To begin with, before starting the replacement procedure itself, you need to decide on the tools. So, what will be needed when replacing the internal grenade: knobs and heads 13-17, as well as 30; keys 17 and 19; jack; lamp; pliers; CV joint lubrication; wheel wrench; and the spare part itself.
Go!
Now that everything is assembled, you can begin the replacement procedure:
- We remove the lower engine protection.
- Drain the oil from the gearbox.
- Using a wheel wrench, remove the wheel.
- Using a 30 mm socket, unscrew the nut securing the outer CV joint.
Unscrew the nut securing the CV joint to the hub
Unscrew the fasteners and remove the ball joint from the fist
We dismantle the CV joint from the hub
Using a crowbar, remove the inner CV joint from the landing mount
Unscrew the boot clamp to free access to the grenade
CV joint lubricant LUXE
Original
2108-2215056 – original catalog number of the internal grenade for the VAZ-2114. The average cost is 2000 rubles. Fitting the fasteners is easy and does not require any modifications.
Analogs
Grenade assembly with boot and clamp made by "HOLA"
In addition to original spare parts, you can find quite a lot of analogues on the automotive market, which are in no way inferior to the original in quality and price. All of them are certified and recommended for installation on this vehicle. So, let's look at what analogues can be installed on the VAZ-2114:
| Manufacturer's name | Catalog number | Average cost in rubles |
| Weber | CVJ 2110-1 | 1500 |
| Master-sport | 400952-ST-SET/5/-MS | 1500 |
| LPR | KLD823 | 1600 |
| SCT | RT 209 | 1800 |
| Fenox | CV16007 | 2100 |
| Fenox | CV16007E7 | 2300 |
| Pilenga | CV-P 2 001 K | 2400 |
| LYNXauto | CI-4602 | 2500 |
| Coram | KCVJ012 | 2500 |
| Hola | CV018 | 2700 |
| Torque | VN-3837 | 2800 |
| Profit | 2810-1028 | 3000 |
| Ruville | 77203S | 3700 |
| Patron | PCV1658 | 4000 |
| Finwhale | FJ-228 | 4000 |
| Mapco | 16081 | 4000 |
How to replace a VAZ-2115 CV joint
It's sad when something goes wrong with your car and it needs repairs. Extra waste of time and money that does not fit into the schedule and budget only causes a feeling of annoyance. Few people will be happy that something has broken down in the car. Even if it was obvious that a breakdown was about to occur, there was no joy from this event. Sometimes you don’t understand: what’s wrong, what’s creating interference and obstacles?
Interruptions in work are a signal for comprehensive diagnostics, but somehow everything is not on the way to the car service, and it would be nice not to forget, but it is forgotten. You have to take a risk, postponing a trip to a car service center until later, although it is known that a car in a faulty condition is dangerous to the life and health of the driver himself and the people around him. Driving carefully is perhaps the most important thing if any problem makes itself felt. Not everyone has the useful skill of self-diagnosis.
Is it allowed to transport people in a trailer in a summer house: answer from traffic rules
In theory, and sometimes even in practice, it is possible to replace the boot without removing the CV joint.
But in most cases, resorting to such methods is not particularly rational or correct. To minimize the consequences of such a makeshift replacement, use special elastic anthers.
And the most correct solution would be to dismantle and replace it in accordance with the operation and repair manual. Objectively, this is the most correct and effective solution to the problem of a torn boot.
There are many life hacks related to car repair and maintenance. But not all of them are universal, useful and safe.
Therefore, think twice before using the life hack discussed in the example of your own car. You assume all risks.
Do you think it is worth changing the anthers in this way? Or is this life hack extremely dubious and ineffective?
Write your opinion in the comments. It will be interesting to read your reviews. At the end there is also a visual video.
CV joint needs to be replaced
VAZ-2115 is a beautiful economy class car. Of course, many people dream of a luxurious and spectacular foreign car. The VAZ-2115 car may lack gloss and shine, but it is characterized by lightness and elegance. Good build is another feature. But not everything is so smooth. Nothing lasts forever, and this means of transportation begins to bother you over time.
A CV joint is a part whose load is high. This is a constant velocity joint, an element that is fragile and strong at the same time.
Sometimes it breaks and needs repairs. But how can you determine that it is he who is causing trouble? Millions of reasons sometimes provoke the same failure. Should a driver take on the job or is it better to go to a service station? In order to make the right decision, you need to carefully weigh the pros and cons.
Oil groups
For domestic VAZ 2115 cars, different groups of transmission oils are suitable, namely:
- GL-4
- GL-5
The first is suitable for gearboxes of front-wheel drive VAZs, and the second is universal and suitable for almost all domestic cars. Some people believe that GL-5 oils are better than GL-4, but this is not true.
These classes are simply different from each other, and none of them are better or worse than the other. For example, in some gearboxes, API GL-5 oils can have a detrimental effect on synchronizers, while API GL-4 is perfect for them. Oils for the VAZ 2115 GL-5 gearbox can be divided into three groups:
- SAE 85W90 - mineral lubricants such as Rexol TM-5-18, Norsi and Lukoil TM-5-18;
- SAE 80W90 - less thick mineral oils, including Wells TM, Spectrol-Forward, Texaco Geartex EP-C and others;
- SAE 75W-90 - synthetics and semi-synthetics: Motulgear, Teboil EP, BP Energear SGX.
Symptoms of a problem
You can determine that a CV joint has broken based on certain signs. Diagnostics in this case does not cause problems. There are characteristic symptoms. If they appear, you need to look at the condition of this particular part. The breakdown is accompanied by:
- crunching under the wheels;
- jerking when changing speed or starting to move.
It is the crunch that is easiest to notice, and it is this sign that you should focus on first when making a diagnosis. But how can you distinguish the sound emanating from the outer element from the sound made by the inner CV joint? You can check the condition of the external one by turning the steering wheel all the way and starting to drive. A crunching sound while driving in a straight line indicates a malfunction of the inner CV joint. You can also check the condition of this part by lifting the car and spinning the wheels idle. The sound that appears is a 100% guarantee. One of the CV joints is faulty.
If crunching or jerking occurs, you should also inspect the mechanism. The boot may have cracked. A visual inspection will allow you to find cracks, chips, deformation and it will become clear what is wrong and what to do.
Signs of failure of the outer grenade (CV joint)
There are two options here:
- signs that your grenade has already broken
- signs that the grenade will soon come out and break .
This is interesting: Generator for Volkswagen Passat B3: technical features
How to understand that a grenade will break soon
Of course, the first sign of a malfunction of the external grenade is a crackling sound . If you hear a crackling noise while driving with the steering wheel turned, it is definitely a CV joint. The greater the angle of rotation of the wheel and the harder you press on the gas, the louder the clicks. Another sign that does not always appear is vibration on the steering wheel at speeds greater than 80 km/h. The vibration is only slightly similar to the vibration from an unbalanced wheel. It usually manifests itself as a slight twitching of the steering wheel.
How to understand that the outer CV joint is broken
If the CV joint breaks, the car will stop moving. In any gear engaged, press the gas, the speed increases, but the car does not move.
How to understand that it is the outer CV joint that has broken, and not the internal one or the clutch in general (the first signs of failure are similar to the signs of a clutch failure)? First of all, start the car and put it in any gear. Next, open the hood and look in turn at each of the shafts going from the box to the wheels (one short, the other long). If any shaft is spinning, it means that the CV joint has broken on this side.
I recommend not just visually looking at the shaft, but touching it with some long, hard object, such as a stick. The main thing is that there is nothing on it that can wrap around the shaft !!! When you touch the shaft with a stick, if it is spinning, you will feel a slight vibration. This is usually done in the dark, because it is difficult to understand whether a cylindrical object is spinning, especially in the dark.
Fix the breakdown without the help of a specialist
In order to determine whether it is worth going to a service station or doing it yourself, it would be good to know how to replace a CV joint on a VAZ-2115. What is better - to overestimate your strength or underestimate? Some people like to repair their cars; in the old fashioned way, they don’t trust this activity to anyone; others consider it a relic of past years. Many people used to understand mechanical engineering. Both adults and children wanted to create a robot. Having bought a car, we traditionally explored it with pleasure.
The CV joint is completely changed. So there’s not much to tinker with: you don’t need to take it apart, examine the device, or look for any element. Buying a CV joint, both external and internal, is not a problem. The boot is also easy to find, but that’s not what we’re talking about now.
The algorithm of actions is as follows:
- Secure the vehicle using the parking brake.
- Place locking bars under the rear wheels.
- Remove the protective cap and unscrew the hub nut.
- Loosen the wheel mounting bolts.
- Now the car should be raised with a jack.
- It is necessary to remove the bolts that secure the ball and steering knuckle.
- The drive must be pulled out of the hub; the steering wheel must first be turned to the left.
- Cut off the old boot and remove the CV joint.
- Put on a new CV joint, carefully treating it with lubricant, which will help extend the life of the part.
- Put all the parts back in the reverse order.
The procedure is not complicated. But physical strength is needed here. You will also need ingenuity - only an auto mechanic, to whom experienced craftsmen and teachers have revealed their secrets, knows how best to do all this. But if you repair a car for your own pleasure, without knowing absolutely anything about the CV joints and the nuts that hold them together, fantasy and imagination will come in handy, as well as confidence, clarity of movements, good emphasis, and reliable fixation of the car.
Damaging adjacent parts and aggravating the situation is difficult and yet real - we must remember the risks and potential threats. There is a possibility of injury. Caution comes in handy when repairing your car yourself, no matter how simple or complex the procedure. When replacing a CV joint, it is better not to rush, prepare for the fact that the process will take several hours, and have time. The replaced CV joint will work properly for a long time if you monitor the road and the condition of the boot.
What to choose?
To replace the inner or outer CV joint on a VAZ 2114, a new element will be required. To be fair, we note that the most suitable and high-quality CV joints for the VAZ 2114 model are produced by the manufacturer, that is, AvtoVAZ.
But here comes the most important disappointment - they are not for sale. The only option is to go to a specialized VAZ official car service center. But from the point of view of financial costs, it is not the most reasonable decision.
In addition, there is now a fairly wide range of analogues on the market.
Judging by the reviews of VAZ 2114 owners, special attention should be paid to CV joints produced by such companies as:
- Hola;
- GKN;
- Kraft.
Photo of GKN CV joint for VAZ 2114
VAZ 2115: replacing the CV joint will cost less if you do it yourself
Replacing CV joints on a VAZ 2115
Replacing the CV joint on a VAZ 2115 is carried out when a strong crunching sound appears when turning at speed; if you find such a sign of a malfunction, you simply need to carry out repairs immediately. The reason for the appearance of crunching (destruction) of a “grenade” (as motorists have long nicknamed CV joints due to some external similarity) is usually the ingress of sand, dust, and dirt through a torn (damaged) boot (aka cover). In the VAZ 2115, replacing the grenade can be prevented by timely changing the boot, but such a malfunction does not reveal itself until the unit completely breaks down and a crunching sound appears.
Consider the device
The stable availability of spare parts for any domestic cars in stores, and their quite affordable price, makes the repair (replacement) of a CV joint not costly, both financially and in terms of time. However:
- You should take into account that replacing a boot in terms of the volume of work performed is no less than replacing a grenade on a VAZ 2115
- That is why in practice, due to the labor intensity, replacing the boot cannot be called easy, in addition, you will need skills in using metalwork tools and following the rules in accordance with safety requirements when starting to perform such work
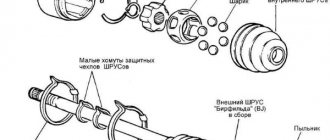
- CV joint, also called a “grenade” for its peculiar shape, its task is to transmit torque from the box to the wheels of the car, the design of the CV joint is not complicated, it consists of the main seven elements, photo below
The main elements of the CV joint and the CV boot (boot)
- However, although its service life is designed for a long time, replacing the VAZ 2115 CV joint is a procedure that has to be performed quite often and this largely depends on the intensity and operating conditions of the machine
- The need for replacement arises when play appears in any connections of the device, or when there is a characteristic crunch and crackling sound when turning the wheels.
- Replacement is usually carried out after checking and confirming the version of the CV joint malfunction, and you need to diagnose it to make sure that the whole problem really lies in it
Advice from experienced motorists
There are some useful tips on this matter that are worth listening to.
- If you hear a characteristic crunch while driving in a straight line, it means the CV joint has failed. If this crunching noise is heard only when turning, then the problem lies in a faulty joint.
- Before installing a new CV joint, treat the grenade landing site with lubricant. This significantly extends its service life.
- To adjust the CV joint and seat it properly, use wooden attachments. If this is not done, the risk of damaging the new element is very high.
- The boot should be installed as tightly and efficiently as possible. If you don't do this, dirt and dust will soon get there. These components will quickly render it unusable, and repair work will have to be carried out again.
- The lock nut on the hub is tightened with a special torque tool. Moreover, tightening is carried out strictly with the parameters specified in the instruction manual for your VAZ 2114 modification.
- During a routine inspection of the technical condition of your car, be sure to pay attention to the condition of the clamps and rubber elements to ensure their integrity. Such seemingly insignificant components can lead to serious consequences and significant financial costs.
- The purchase of spare parts, including CV joints, should be made only from trusted sellers, certified distributors. If you buy a bad, low-quality part, just trying to save money, you will have to pay even more to eliminate the consequences that the use of such elements led to.
The CV joint is an important component of any car, and replacing it even on your own is not particularly difficult.
Source
Diagnostics
Before we start replacing the CV joint with our own hands, we usually carry out simple diagnostics by first checking for play in the shaft of our drive, and all we need are our hands, as well as an understanding of what play is. There are several ways to check:
- Method one - grab your drive shaft with your hand and swing it, when you feel a lot of free play or play - this means you need to replace the CV joint
- Method two - we go to the inspection hole and turn the steering wheel to the right as much as possible or to the left (as necessary), then we carefully look at the condition of the “grenade”, if there are cracks or visible breaks on its boot, traces of grease protruding, this means that the boot needs to be replaced, otherwise the entire CV joint will soon need to be replaced
- We buy a new “grenade”, the price is affordable
Let's start replacing
Before starting any replacement work, we will need to prepare everything, not forgetting what the safety instructions say:
- You need to secure the car, to do this, engage fourth gear and tighten the handbrake
- Then you need to install wheel chocks (shoes) under the rear wheels; if you do not have them, use wooden blocks of a similar shape
- We remove the protective cap from the wheel disk, then unscrew the hub nut, for this it is better to use an extension in the form of a tube or a pry bar to make it easier to unscrew
- After moving the hub nut from a dead center, we proceed to unscrew the bolts that secure the wheel
- Using a jack, we hang up the wheel on which we are going to change the CV joint.
We tear off the hub nut, then the wheel bolts and you can hang the wheel on a jack
- Raise the car, place wooden blocks and remove the wheel
- Then we unscrew the two bolts that secure our lower ball joint for the steering knuckle
Unscrew the bolts securing the lower ball joint
- Now turn the steering wheel as much as possible in the direction opposite to the CV joint being replaced
- We need to pull our steering knuckle together with the strut, and then remove the splined end of the CV joint from the hub
- Then remove the inner CV joint connected to the gearbox using a pry bar for this purpose
- We clamp the shaft in a vice, then remove the clamps from the inner, then from the outer hinge
- We turn the anthers inside out, if we find any breaks or cracks, we simply cut them off with a knife so as not to waste time on removal
- Now we knock the CV joint off the shaft; a hammer and a wooden or bronze adapter are suitable for such a procedure
- We assemble the hinge in the reverse order; during the assembly process we recommend replacing the old hub nut, and after tightening it, do not forget to lock its edge to avoid unscrewing
- When installing the inner CV joint, remember the plastic plug, it is installed at the end of the shaft
- And before installing the CV joint, you need to take care of the need to fill the “grenades” with lubricant
- We install the retaining ring (certainly new) on the inner CV joint before installing the assembled mechanism on the car
- And after installing the drive in the box, it must be inserted into the floor of the axial gear until it is completely fixed
- To do this, use light taps with a hammer through a wooden adapter, along the perimeter of the axis of our shaft
That's it, you can wash your hands and be sure that replacing a VAZ 2115 grenade yourself is a completely doable task, it is only important to follow the instructions and then the repair will be successful. All that remains is to avoid surprises and to clarify unclear points, watch the video on this topic.
Tips and notes
The procedure for replacing the outer boot of the left CV joint was described above. There are practically no differences in the replacement process for the left and right sides. The only difference is that the protective cover of the right inner CV joint is not attached to the gearbox using bolts. The hinge itself is mounted on splines and secured with a stopper, so the shaft is removed by tapping a hammer through a drift.
It is important to remember that there are differences in the size of the protective covers themselves - the left one is 2 cm shorter and 1.5 cm larger in diameter. Accordingly, they are not interchangeable.. Despite the fact that on cars before the 2010 restyling the CV joints are non-separable, their design has not fundamentally changed, so the technology for replacing CV joint boots is similar.
Despite the fact that on cars before the 2010 restyling, CV joints were non-separable, their design did not fundamentally change, so the technology for replacing CV joint boots is similar.
If you don't have a CV joint puller
If there is no puller for dismantling the retaining ring of the inner joint race, you must use a hammer and chisel carefully so as not to break it. It is recommended to apply weak blows to the points of the clip located around the circle at an angle of 120° to each other and continue to do this consistently until the clip is completely removed
To avoid losing the rings of the cage, before dismantling it is necessary to wrap it in a piece of rags.
When replacing the outer CV joint boot, it is quite reasonable to replace the inner boot as well. Firstly, by the time the outer protective cover is removed, most of the dismantling work will have already been completed, and, secondly, this will significantly increase the overall service life of the drive. In addition, it is strongly recommended that along with the external boot, you also replace the plastic boot, oil seal and bearing.
Thus, by performing a relatively simple operation to replace the outer CV joint boot, you can prevent the labor-intensive and costly work of replacing the entire CV joint or wheel drive assembly.