Replacing CV joints on a VAZ 2112
Rear-wheel drive cars are being replaced by cars with front-wheel drive. In this regard, the crosspieces are replaced by hinges of equal angular velocities, which are called grenades. This article is instructions for replacing the internal grenade on a VAZ 2112 car and other cars from this family. Here you will find a video describing the process, as well as photos of some of the process steps. So, let's begin:
- Causes of constant velocity joint failure
- Determining the need to replace the internal grenade
- Grenade replacement
- Tool for the job
- Removing the axle shaft (wheel drive)
- Removing and installing a new CV joint
- Installing the drive on the car
Replacing CV joints VAZ 2110, 2111, 2112
The main reason for replacing a VAZ 2110, 2111 or 2112 CV joint is damage to the boot. In this case, dirt, chemicals, dust, moisture, sand get on the grenade (as this part is often called in everyday life), and it quickly loses its functionality. You can tell that the linkage is out of order when there is a characteristic crunching sound when turning when accelerating. In this case, the car must be urgently taken for repairs. Replacing the CV joint on a VAZ 2110 and other models with your own hands is quite affordable. But initially you need to understand that the work requires care and precision. How to fix it will be described below, but first it is advisable to familiarize yourself with the structure of this unit.
How to check the inner CV joint
The breakdown of any car part is associated with a change in its size, physical properties or the appearance of wear on rubbing parts. A CV joint is a hinged joint in which the elements of the mechanism are in close contact and are under constant load. Over time, wear develops in the places where the parts interact and the gap increases, which manifests itself in an increase in the characteristic “crunch” during sharp acceleration or overcoming obstacles.
Unlike the outer CV joint, which is easy to check when driving at maximum angle of rotation, the inner one is rarely in a state of maximum curvature. You can verify whether the unit is in good condition or broken when hanging the wheel. To do this, on the lift, with the engine running, engage first gear so that the wheels rotate slowly. If a crunching sound is heard from the faulty part, and play is felt when the shaft is impacted, then the CV joint is faulty.
Required spare parts
Each car is equipped with two grenades: internal and external. The first joint transmits rotation to the shaft from the gearbox, the second – to the hub from the shaft. Depending on the scope of the repair, you may need:
- internal hinge (article 302315, 2108-2215056);
- external CV joint (article 3107K, 2110-2215012);
- front wheel drive shaft (article 2110-2215070, 21100221507000);
- cover (article 2110-2215068, 21100221506800, 2108-2215068);
- buffer (article 2108-2215073-01);
- hinge clamp (article 2108-2215086);
- internal hinge retaining ring (article 2108-2215104, 21080221510400, 2121-2215084);
- thrust ring (article 2121-2215082);
- clamp (article 2108-2215034Ч, T-00040, 2108-2215036, 2108-2215034-31, 2108-2215034);
- protective ring (article 2108-3103060, 21080310306000).
Tools required for repairs.
To remove and install the VAZ 2110, 2111, 2112 CV joint, you will need the following tools:
- jack;
- keys for 17 and 19;
- pliers
- heads for 13, 14, 15, 16, 17 and 30;
- mount;
- knob;
- wheel wrench;
- lubricant;
- rags.
Do-it-yourself repairs are well justified by saving time and money. Since the price of work on replacing the CV joint of a VAZ 2110 and other models in a car service is: for an external one - 1100 rubles, for an internal one - 1300 rubles. Tariffs are valid as of 02/15/2019. And this is comparable to the cost of the parts themselves.
Order of Operations
If there is no inspection hole or overpass, you need to prepare a place for repairs. Raise the car with a jack, put on the handbrake, provide the work area with good lighting, and support the wheels with clamps.
Replacing the inner CV joint of the VAZ 2110 and other models is carried out in the same way as the outer joint. They are both located on the shaft drive, which you need to get to first:
- On the crankcase protection, two nuts are unscrewed at the front and rear.
- You need to drain the oil from the box - 40 percent of the total volume.
- When replacing the right CV joint on a VAZ 2110, the wheel bolts come off on the right; if the left one is changed, the wheel bolts come off on the left.
- The outer hinge fasteners are completely unscrewed.
- Now you still need to jack up the car and remove the wheel.
At this stage, two hub bolts securing the grenade become accessible; they need to be removed.
- The hub needs to be separated from the rods, this is done with a pry bar.
- The stand is pulled forward and the CV joint pin is removed from the hub.
- The shaft drive is removed and set aside.
Now you need to remove the inner grenade from the box. With the hood open, you need to insert a pry bar between these elements. Then the tool jerks the hinge towards the box. The grenade should move. If this does not happen, the operation is repeated again. If the CV joint moves, then both hinges and the shaft can be removed from the wheel arch area. - You need to remove the covers from the grenades; to do this, use pliers or special pliers to open the small and large clamps.
- The boot must be inspected for integrity. If the cover is damaged, it must be replaced. If the boot is in good condition, you can simply move it away.
Use a hammer to remove the inner hinge. They need to hit the clip hard. The grenade should fly off. The same action must be performed on the other side.The rings are removed from the shaft drive, new ones are installed in their place and the boot is put on.
- The new grenade is also installed using a hammer. It and the boot need to be lubricated.
- The covers are secured to the hinge and shaft with clamps.
- A nut is screwed onto the grenade, then the hinge is driven into the box.
- Further operations are similar to the first, but are performed in reverse order.
On a VAZ, a grenade flies out of the box, reasons, repairs, photos
Repair manual for VAZ 2108, 2109, 2114, 2115 Wires and fuses It is necessary to change the constant velocity joint (CV joint, or popularly a grenade) on a VAZ-2112 when a peculiar knocking (crackling) noise appears in this part. If such repairs are not carried out on time, the grenade may fly out of its place while moving. Then you will have to call a tow truck to transport the car to the service station, since it will no longer be able to drive on its own.
Why are grenades flying?
The grenade flew out and the boot broke
The fact that the grenade is out of order is indicated by a knocking sound in the area of the front wheel when turning, as well as when the clutch pedal is released while the car is standing still. A crash will be heard in the area of the front wheel where the grenade was fired.
In this case, you should check with the speed turned on (the car must be placed on a lift); if the drive spins, but the wheel does not, then the external grenade has failed. If the drive is stationary at switched on speed, then the internal grenade has broken.
The internal grenade just “flies” out of the gearbox. Or rather, it crumbles, one part remains in the gearbox, the other on the wheel drive. Sometimes a situation arises when the retaining ring falls apart, in this case the grenade will also fly out. The breakdown is not associated with incorrectly selected oil in the gearbox.
Grenade replacement
Trialli external grenade - seems to be praised.
When you hear a cracking sound in the grenade, you can fix this breakdown yourself, without resorting to the services of a specialist. To do this, follow simple steps that will be described below.
Process
Don’t forget to check whether the CV joint kit includes a separate boot and clamps. If not, then you will have to buy it all.
Separate boot and clamps
- The car should be raised from the side where the grenade failed. In this case, wheel chocks should be placed under the rear wheels.
- Remove the protective cap from the wheel and unscrew it.
- Remove the hub nut. This may require a strong tool, since the nut may become welded to the axle during operation. You can also use a special wrench for this (weld the head at “30” to the chisel and use a long wrench).
- Unscrew the ball joint (lower) bolts from the steering knuckle.
- Turn the wheel to its extreme position.
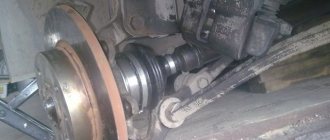
- Pull the steering knuckle together with the strut and pull out the CV joint spline from the hub. We took the CV joint out of the hub
- Using a pry bar, you need to pull out the drive splines from the gearbox. If you need to change two grenades at once, then after removing the drive from one side, you need to fix the box with a technological lock. You can use an old CV joint for this. If this procedure is not done initially, the gears on the differential will shift, and then during assembly it will be impossible to insert the CV joints themselves.
- After removing the drive shaft, it must be clamped in a vice.
- Remove protection from grenades. If the anthers are torn, you can simply cut them off and then install new ones. If they are whole, then you should simply wrap them, being careful not to damage them.
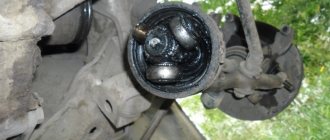
- Using a hammer, knock the CV joints off the drive shaft.
- Next, a new spare part is installed. The CV joint must first be lubricated. You also need to put fresh lubricant in the boot. It is recommended to use MoS2. It will last for the entire service life of the hinge. We check the condition of the separator on the grenade and fill it with lubricant
- The boot is attached to the grenade using clamps. We put on the “fashionable” transparent ACVA boot. Reviews are mostly positive
- If the inner CV joint is being assembled, then do not forget about the plastic plug that is placed on the end of the shaft. The old grenade is on the right, and the new one is on the left, they differ in height
- A retaining ring is also installed on the inner CV joint.
- Then the assembled part is placed in the box drive. It should be seated on the slots to the base. To do this, you can lightly hit it with a hammer, placing a block of wood on it. The inner CV joint is already in the gearbox
- Further assembly is carried out in the reverse order of disassembly.
It is also worth replacing the nut that holds the hub with a new one. It must also be tightened in accordance with the requirements of the car manufacturer.
Stabilizer link failure and grenade flying out
As a result of the stabilizer bar breaking, the wheel went to the side, and grenades flew out with it. The anthers also came to an “end.”
Knowing these points and adhering to the given rules, you can replace CV joints on your own and without resorting to the help of a specialist.
Replacing the outer CV joint of a VAZ 2112. Expert advice
Replacing the outer CV joint on a VAZ 2112
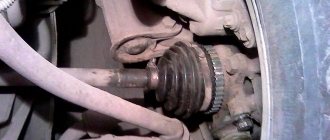
On cars with front-wheel drive, instead of a driveshaft with crosspieces, constant velocity joints (CV joints) with axle shafts are used. Both crosspieces and CV joints tend to fail. This article discusses in detail: replacing the external grenade of a VAZ 2112, visual photos for a better understanding of the process and practical advice from an auto repair specialist.
- Removing the axle shaft
Drive shaft installation
So:
- The shaft is finally fixed in the side gear.
- The drive shaft is installed in the wheel hub.
- Further assembly is carried out reversely to removal.
How to correctly replace the internal grenade on a VAZ 2112 can be clearly seen in the video. Timely replacement of CV joint elements increases the service life of the vehicle in good condition.
Rear-wheel drive cars are being replaced by cars with front-wheel drive. In this regard, the crosspieces are replaced by hinges of equal angular velocities, which are called grenades. This article is instructions for replacing the internal grenade on a VAZ 2112 car and other cars from this family. Here you will find a video describing the process, as well as photos of some of the process steps. So, let's begin:
- Causes of constant velocity joint failure
- Determining the need to replace the internal grenade
- Replacing a grenade Tool for work
- Removing the axle shaft (wheel drive)
- Removing and installing a new CV joint
- Installing the drive on the car
Why does the CV joint fail? Principle and working conditions
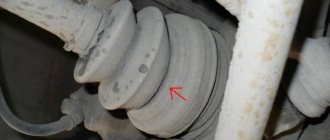
A torn boot is the cause of all troubles with grenades
- A car's wheel is its dirtiest part. The wheel is constantly in contact with the road, and the road is not always asphalt, but often dirt or sand.
- The outer grenade usually wears out much faster than the inner one, since it is closer to the wheel and is more subject to overload when driving on uneven surfaces.
- Anther breakage. One of the reasons for grenade failure is a violation of the integrity of the boot. This usually happens due to a torn boot clamp, a cut of its fastening, or a cut in the boot itself.
- It also happens that the boot loses its rubber properties over time and stretches. Then it does not fit tightly to the axle shaft.
- For all these reasons, dust gets inside the outer CV joint, and even worse, sand and dirt.
- If harmful substances get inside the grenade, the bearing fails - it collapses or jams.
If you notice a torn grenade boot, this means that on a VAZ 2112, replacing the CV joint is simply necessary for its further safe operation.
How to determine if a hinge is faulty? Diagnostics
At any service station, before repairs, they carry out diagnostics of the unit that is going to be repaired. Let's do it ourselves:
- Are there any strange sounds while driving your favorite car? One possibility could be a faulty CV joint.
- Most often, a CV joint in need of repair manifests itself during turns (not necessarily sharp ones). When turning the car, a sound comes from the hood, similar to metal jamming, the sound of metal breaking, metal grinding on metal.
- If such sounds appear even when driving straight, then the CV joint definitely needs to be changed!
Advice! Do not ignore sounds that occur when operating the vehicle. In some cases, this can cost the lives of the driver and passengers.
- After sounds similar to a malfunctioning grenade appear, it is necessary to diagnose the front chassis of the car in a pit or overpass, or, as a last resort, just in the garage.
- To do this, you need to lift the car using a jack. Raise the side from which the sound was heard. Don't forget to put wheel chocks under the rear wheels of the car.
- When the wheel can rotate freely, you should rotate it around its axis and listen for sound. If the sound does not appear, then you should turn the wheel in the direction of the turn at which it occurred.
- When a sound appears, it will become clear that the VAZ 2112 CV joint is faulty and requires replacement as soon as possible.
- If the sound still does not appear, then check the other side (the other wheel) in the same way. By the way, if the sound appears, check it anyway - you may have to change both grenades.
Basic faults
The most common failures of a grenade include: failure due to contamination and due to wear of the part (end of service life or defect).
A faulty grenade can itself reveal its unsatisfactory condition in the form of crunching sounds, crackling sounds when turning wheels, and body vibrations. But in this case, you will have to buy a new part, but you can notice the malfunction much earlier (at the stage of damage to the cover) and prevent serious repairs.
There are several ways to identify a breakdown:
- shake the drive shaft with your hand. If play is detected, the element should be replaced;
- Turn the steering wheel all the way to the left, and then to the right, and at each stage assess the condition of the anthers. If damage (cracks, breaks) is detected, replace them.
The CV joint is protected by anthers from getting dirt into it, which disables the part. But their service life does not last forever; regular inspection of these parts is necessary (as described above) to prevent more serious damage to the grenade.
When operating a car with a faulty joint, also known as CV joint, there is a high probability of it breaking in half. In this case, the vehicle will not be usable. This means repairs will be required and most likely (if this happens on the road) expensive tow truck services.
It is recommended to replace the grenade in a timely manner to avoid unpleasant situations.
Price
An internal CV joint will cost an average of 1,500 rubles, an external CV joint will cost 1,300 rubles. For the anthers they will ask about 150 rubles each. Replacing anthers will cost much less.
Replacing CV joints at a car dealership will cost 1,200 rubles (600 rubles each).
It is recommended to buy a new part using an old one, so the likelihood of an incorrect purchase is minimized. In addition, the purchase of CV joints should be carried out in trusted stores. You should not buy these parts at a disassembly site; it is possible that a breakdown will occur within a few meters.
Replacement
After all the preparations, you can begin the process of replacing grenades with a VAZ 2112.
Removing the axle shaft
- Perhaps this is the most interesting thing in the process of replacing a grenade.
- Place the car on a level platform, inspection hole. Install wheel chocks.
- First, remove the hubcap from the wheel, if you have one installed.
- Now you need the help of a partner. He should take a driving position and press the brake pedal hard.
- In this case, you should take a 30 socket (in some cases 27 or 32) and a large wrench. The head is put on the hub nut, which secures the grenade to the hub (located in the middle of the wheel) and unscrew it with a large wrench.
Unscrew the nut with a large lever!
Advice! It will take quite a lot of effort to complete the last step described. Therefore, the longer the driver you take, the easier it will be to unscrew the nut.
- Then you can unscrew the wheel bolts and remove the wheel.
- Spray the splined surface of the hinge with rust remover. Most often, an additional remedy is needed - you can’t just knock it out.
- When the wheel is removed, it is necessary to free the hub from the ball joint. To do this, take a suitable head and unscrew the two bolts securing the ball joint to the wheel hub.
- When the hub is freed from the ball joint, you can try to remove the splined surface of the grenade from the hub. Remove the entire hub nut and metal washer.
- Now you need to take a copper (bronze) adapter and a hammer, and with their help we knock the splines out of engagement. If necessary, add more WD.
- When the splines are disengaged, move the strut to the side and remove the axle shaft from the hub.
Instructions for replacing the outer CV joint of a VAZ 2112
Advice! During operation, make sure that the internal grenade does not jump out of the gearbox housing - this is an unnecessary loss of oil.
Next, we will consider the most profitable option for replacing a grenade on a VAZ 2112 - replacement without removing the axle shaft from the car.
Grenade replacement
Two methods will be considered:
- Remove the boot from the grenade. To do this, use pliers to cut through the fastening clamp and, using a screwdriver, remove the boot from one side. Turn it out so that it does not interfere with further work.
Removing the drive, boot and CV joint
To replace the outer CV joint, follow the following procedure:
- We place the car on the inspection hole and support it with wheel chocks.
- Using a 30mm socket, loosen the hub nut. If the nut does not break off, then you can extend the key with a pipe.
- Raise the car with a jack in the right place and remove the wheel.
- We unscrew the bolts securing the ball joint of the lower arm to the hub.
- We squeeze out the tie rod end with a puller.
- Unscrew the drive shaft nut completely.
- We pull out the hub by grasping the brake disc and pulling the shock absorber strut towards us.
To change the boot and hinge, you will have to climb into the inspection hole. To remove the CV joint, remove the clamps that hold the boot. Next, we get rid of the old boot, which is easier to do with a knife. Use a rag to remove grease from the hinge. Then you need to knock down the inner race, for which we lightly hit the attachment with a hammer, which must be rested against the end of the hinge. Next, we thoroughly clean the CV joint from dirt, sand, dust and grease.