A constant velocity joint (CV joint) is a unit through which torque is transmitted from the transmission unit to the drive wheels. This device is also popularly called a “grenade”. There are both external CV joints, which directly engage the wheel hub, and an internal CV joint, which is adjacent to the gearbox. Both hinges on one side of the car are connected to each other by a metal pipe, and the entire structure is called an axle shaft. It happens that malfunctions appear, so many drivers are interested in how to change them.
The CV joint device is not particularly complicated. The unit includes a housing, a boot and a bearing, the separator of which is capable of rotating at different angles to the axle shaft, providing the ability to transmit rotation when the wheels are turned through the steering, therefore, using the tips, you can figure out on your own how to change the CV joint.
The video demonstrates the procedure for replacing the CV joint in the Lada Kalina chassis:
For models of domestic origin, including the Lada Kalina, failure of the hinge we are considering is a fairly common case. The most common factor causing the breakdown of this unit is a torn boot. This is due to the fact that dirt and moisture enter the working area of the hinge, eventually washing away the bearing lubricant, which causes wear and loss of functionality. And the outer CV joint needs to be replaced. You can do this procedure yourself.
How to protect the CV joint boot on the Niva Chevrolet cardan, Video, Watch online
Cardan CV joint for VAZ 2123 disassembly and assembly
All joints are inspected to see if the bolts are loose, and what condition the boot is in. The boot can be removed by cutting; this sequence of actions is necessary to install a new element.
The body, separator, and core must be marked relative to each other so that later there are no problems during assembly and operation.
Good luck with the repair work, dear Shnivavody! There are four of them on one side.
As a result, in August, on regular rides, I discovered that the CV joint boot, which is attached to the transfer case, was torn. Moreover, it was not torn by some object from the outside, but simply rubbed itself on a bend: And the replacement process began.
Having removed the clamps and pulled off the boot, I found on the CV joint body in the inlet under the clamp some kind of black film, tightly fitting the groove of the inlet: Its plasticity is similar to frozen electrical tape.
Video instructions: replacing the driveshaft boot on a Chevrolet Niva
Most likely it's factory sealant. Next, to keep the boot out of the way, I had to cut it off to replace it anyway. The photo shows all the component parts: The body, separator, and core must be marked relative to each other so that later there are no problems during assembly and operation. The cover on the back of the CV joint, which everyone was so worried about that it would get crushed on the shank nut, can be removed quite simply: You just need to sharply pull the CV joint itself down so that it is pushed out by the axle.
During assembly, I decided to seal it with sealant.
Next, remove the CV joint itself from the axle. We take either a thick piece of wood or a metal flat attachment, place it on that same incomprehensible washer and knock it down in the same way as a regular outer CV joint on a drive.
If you are careful and do not try to disassemble the CV joint system, you can get by with little damage. I decided to find out what that incomprehensible washer is for. As it turned out, this washer not only acts as a limiter for the joint travel, but also protects it from self-disassembly. At the gearbox, the lever is placed in the neutral position, and the parking brake is in the down position.
Shoes are installed under the wheels for safety. Before removal, it is necessary to make notches on the ends of the flanges, drive axle and transfer case at the joints. This will help return the shaft to its original position without the need for balancing. The nut of the cardan bracket is unscrewed, while supporting the bolt so that it does not rotate.
What's good about Lada Kalina and Lada Granta
Both models have an average ground clearance of 160 mm. This is enough to avoid getting caught in snow tracks in winter, but when parking near the curb you have to be careful: you can get caught in the overhang of the front bumper.
The suspension in both cases is energy-intensive, does not break through on bumps, but also does not allow excessive swaying during maneuvers. Both models handle simply, without any frills, but not in the same way as the “classic” car when cornering.
Spare parts for both cars are cheap and available in auto stores. A generator, for example, costs 4,000 rubles, and a complete set of improved silent blocks and bushings for the entire suspension will cost 3,500 rubles. The simple design of the cars allows repairs to be made at any service center without special unique tools.
The engines of both cars are quite economical. Fuel consumption for the engine is 87 l. With. and manual transmission - about 7 liters in mixed mode. Therefore, if the driver plans to travel frequently, but does not want to overpay for fuel, purchasing any of the AvtoVAZ models will be a practical option.
Car enthusiasts also characterize the automatic robotic gearbox as reliable and easy to maintain.
Both Lada Kalina and Lada Granta have a very warm stove in winter. AvtoVAZ’s many years of experience in producing cars for the Russian climate is telling.
But if you need a car for frequent transportation of goods, then the Kalina station wagon will be a more suitable choice. Its luggage compartment volume is 670 liters versus 520 liters for the Granta.
Replacing the outer and inner CV joints of Lada Kalina: photo, video
CV joint (constant velocity joint - approx.) or popularly just a “grenade”, is designed to transmit torque to the wheels of a car. CV joints can be internal or external, and the devices themselves are quite simple in technical terms and consist of a ball bearing that rotates transversely to its axis.
In the video, replacing CV joints on a Lada Kalina:
Failure of the CV joint on the Lada Kalina is a very common occurrence, and the main reason for its failure is torn anthers. Because, together with dust and water falling under them, the lubricant turns into thick mud, and it is no longer able to fully perform its functions.
Replacing the outer CV joint
In the process of replacing the outer CV joint
The work of replacing an outer or inner CV joint is not very difficult and can be done by any motorist who has at least once repaired a car with his own hands. And in order for the repair to be easier and faster, you need to prepare the following tools:
- Socket heads for “17” and “30”.
- Driver or ratchet.
- Extension for the wrench.
- Jack.
- Wheel chocks.
- Hammer.
- Vise.
Step-by-step disassembly procedure
After you are convinced of the malfunction of one or another CV joint, you can begin to work.
- First of all, we tear off the mounting bolts from the wheel and the hub nut, then we set the wheel chocks under the rear wheels. (To make it easier to tear off the nuts, it is better to use an extension for the wrench - approx.).
- We put the car on a jack and hang the wheel.
- We remove the wheel and, for greater reliability, place it under the car next to the jack.
- Now that this picture appears before you, all that remains is to unscrew the 2 bolts that secure the ball joint to the steering knuckle.
Unscrew the bolts marked with a red marker on both sides. - When unscrewing the ball joint, apply force and use a wrench extension.
- Turn the steering wheel as far as possible to the side and slightly pull the steering knuckle with the stand and remove the outer part of the hub along with the CV joint (For convenience, you can make several gentle blows with a hammer - approx.).
Dismantled CV joint
- The next step is to dismantle the old boot and clamps. You shouldn't use them again; it's better to take a set of new ones.
- Next, you need to remove the CV joint itself.
If you have a special removable device, then use it. If not, then you will have to knock it out of place with a hammer. Without causing strong blows, the CV joint will move out of place - Hit the CV joint with a hammer, rotating it along the axle shaft. After some effort, the CV joint should give way.
If the internal CV joint is supposed to be replaced, then work 1 to 6 should be performed as well, after which, using a pry bar, we remove it from the gearbox and take out the entire assembly.
We take the inner CV joint assembled with the axle shaft to a vice where we clamp it and dismantle it.
- After the “bare” axle shaft appeared before us, the work on removing the CV joint can be considered completed.
Step-by-step assembly procedure
Work on assembling all parts should be carried out in the same order as removal, however, there are some nuances in these works.
- First of all, we put the new boot on the axle shaft; this may cause some difficulties. To make the task easier, the axle shaft can be coated with lubricant.
- Then add lubricant to the CV joint.
New lubricant added to CV joint - And the remains are in the dustbin.
- Now you need to use a hammer and a block to install the grenade on the axle shaft, using gentle blows we mount it in place.
- After it is fixed, we remove the air from the boot and secure it with clamps.
- Next, when everything is installed, all that remains is to put on the steering knuckle, fix the new hub nut and put on the wheel.
Tighten all the nuts and lower the car from the jack.
All work on changing the CV joint, if the work is carried out correctly, will not take more than 1.5-2 hours. You can check the quality of the work performed immediately after the repair. If you start driving with the wheels turned to the side and there is no crackling, squeaking or noise, it means that the repair was carried out correctly and the car can be safely operated further.
Signs of CV joint failure
The first signs of a faulty grenade are crunching sounds in the area of the front wheel on turned out wheels when starting to move. When the fault is severe, noise appears at less significant loads.
The anther begins to “repair”
Selection of CV joints
CV joint in original packaging. Usually inside the package is a pomegranate produced by VIS
There is no consensus among car owners regarding the choice of one or another brand of constant velocity joint, but clear leaders stand out:
- VIS.
- GNK.
Original packaging of GNK CV jointInside the GNK CV joint package - boot, CV joint, clamps
GNK outer CV joint installed
- GLO.
Replacing a “grenade” on a “Kalina” with your own hands: features, device and recommendations
"Lada Kalina" is a front-wheel drive car in which the engine and gearbox are located transversely relative to the body. The drive to the wheels is carried out through the main gear. Torque is transmitted through constant velocity joints (simply CV joints, or “grenade”). There are several of them - internal and external. Despite their reliability, these elements can fail. Well, let's look at how to replace a “grenade” on a Kalina, what tools are needed for this and what are the signs of a malfunction.
Device
In terms of their design, the inner and outer CV joints are very similar.
- Half shaft.
- Clamp and boot.
- Clip.
- Hinge housing.
- Separator.
- Ball.
- Retaining and cone ring.
- Spring washer.
Thanks to this device, the elements are capable of transmitting torque to the wheels at an angle of up to 45 degrees (not only in the horizontal, but also in the vertical plane).
How to determine a breakdown?
The grenade is a ball bearing, the cages of which have transverse grooves. Due to this, the angle between the driven and driven axle shaft changes. Thus, the CV joint not only transmits torque, but also changes the angle between the axle shafts. In view of this, over time, it develops. In places where the parts do not fit tightly, backlash and extraneous noise are formed. In fact, this is accompanied by a characteristic crunch. It occurs due to large wear on the balls that move along the grooves. The crunch can appear both during straight-line movement and when turning. In the latter case, most likely, the external grenade of the Kalina requires replacement. This sign should not be ignored, since the bearing may fall apart at high speed.
Tools
In order for the replacement of the internal “grenade” of the Kalina and the external one to be successful, we should prepare:
- Two socket heads (17 and 30).
- Ratchet and extension.
- Jack.
- Ballonnik.
- Vise.
- Hammer.
- Wooden block.
Let's get to work. Dismantling the CV joint
First of all, put the car on the handbrake (or install anti-rollbacks). Then we remove the wheel bolts and hub nut. The latter may not be supplied, so we use an extension cord. Next, place the car on a jack, lift its front part and remove the wheel. Then we find two bolts that secure the grenade to the steering knuckle.
Now we twist the steering wheel to its extreme position (so that the disc looks out of the wheel arch). Pull back the steering knuckle along with the shock absorber strut. Next, remove the outer part of the hub with the external “grenade”. If it is tight, you can use a hammer. But you need to hit through a wooden block, otherwise the part will be seriously damaged.
Next (if it is an external hinge) remove the old boot and clamp. Now you need to get the “grenade” itself out of the hub. To do this, you can use a puller or hit the CV joint with a hammer. In this case, you need to rotate its axle shafts.
If it is intended to replace the internal “grenade” on the Kalina, all operations are carried out in a similar way. The only thing is that the part is removed from the box using a pry bar, without hitting it with a hammer.
Assembly
When the old element is disassembled, it's time to prepare the new one for installation
Please note that when installing the CV joint, the boot of the Kalina “grenade” is also replaced. It is strictly forbidden to use the old one, even if it is intact
The element has already undergone wear and tear, and the clamps will not provide the same tightening.
How to extend the resource?
Typically, these bearings travel 250-300 thousand kilometers or more. They have a very durable construction. However, there are several factors that can significantly reduce their durability. This is the condition of the anther. It is because of this that water, dust, and sand get inside. As a result, the lubricant turns into a thick abrasive, which has a destructive effect on the bearing. How to prevent this? During operation, you should periodically check the condition of the boot on the CV joint. If it has cracks or tears, it needs to be replaced immediately.
Conclusion
So, we found out how to replace the “grenade” on the Kalina with our own hands. The operation can be completed in 1-2 hours without an assistant. It is recommended to prepare a puller and a torque wrench as special tools. Things will go much easier with them. You also need to choose the right lubricant. It must be resistant to temperature changes and not change its properties for a long time. Among the manufacturers is ShRB-4, as well as imported Liquid Moly and Mobil-1.
Assembly
When the old element is disassembled, it's time to prepare the new one for installation. Please note that when installing the CV joint, the boot of the Kalina “grenade” is also replaced. It is strictly forbidden to use the old one, even if it is intact. The element has already undergone wear and tear, and the clamps will not provide the same tightening.
So, first we put a new boot on the axle shaft. To ensure smooth installation, lubricate the contact points with lubricant. Next, press the grease into the bearing itself. Please note that this requires specialized composition. No amount of lithol or graphite will help. This lubricant is sold in bags of several grams (or in tubes). It’s better not to save money and buy proven compounds. After all, the service life of the new bearing will depend on the lubrication. We add the rest of the composition to the boot and install the “grenade” on the axle shaft. To do this, use a hammer and a wooden block. It is important to apply light blows - the new CV joint will go in without problems.
How then is the “grenade” replaced on the “Kalina”? Then we remove excess air from the boot and tighten the clamp. After this, put on the steering knuckle and fix the hub nut. The tightening torque of the latter is 225-250 Nm. It is better to perform the tightening procedure with a torque wrench. How then is the “grenade” replaced on the “Kalina”? Now all that remains is to tighten all the wheel nuts and lower the car from the jack. At this point, the replacement of the “grenade” on the “Kalina” has been successfully completed.
Installation of spare parts
Replacing the CV joint on a Kalina car is done as follows:
- A protective cover is put on the axle. To make work easier, the axle can be treated with lubricant.
- Lubricant is placed in the hinge.
- Lubricant is added inside the protective cover.
- With gentle blows using a wooden block, the grenade is mounted on the axle shaft.
- When the installation of the CV joint is completed, air is removed from the protective cover and fastening is carried out using clamps.
- The steering knuckle is mounted, the hub nut is fixed, and the wheel is mounted in place.
- All fasteners are securely tightened and the car is removed from the jack.
What are popular “compatriots” hiding?
Both Russian models are in wide demand on the secondary market. In the last month alone, through avtocod.ru, “Kalina” was checked more than 21 thousand times, and “Grant” even more - about 30 thousand times. Moreover, 6 out of 10 reports contained information about twisted mileage.
Here is one such example:
The author of the ad indicated the mileage was 58 thousand km. However, in the report received through Autocode, we see completely different data - more than 112 thousand km. That is, the mileage is underestimated by almost two times. Probably in order to increase the profitability of the car in the secondary market.
In principle, it’s too early to discount such a car. But if the owner hid the mileage, then it is unknown what awaits when checking the technical part of the car.
Let's try to check the Lada Granta.
The situation is the same here. Moreover, the owner did not waste time on trifles and clocked up 75 thousand kilometers:
A twisted mileage is a great opportunity to lower the price tag. But if the car has other problems (theft, leasing, collateral, unpaid fines, etc.), it’s up to you to decide whether it’s worth purchasing the car.
We randomly selected 10 reports from each model from our database to identify the most common problems.
“Kalina 2” has legal problems in three cases: one is in pledge, two are with traffic police restrictions. Another one with an accident and unpaid fines. "Granta" meets traffic police restrictions. There were two such reports. Another car has the status of “recycled”. This could happen after a serious accident, where restoring the car is not economically profitable.
Replacing a CV joint on a Lada Grant
February 23rd, 2016 Admin
In a car with front-wheel drive, it is not the driveshaft with the main gear and axle shafts that is responsible for transmitting torque from the gearbox to the wheels, but special parts - CV joints, they are also constant velocity joints, in common parlance - a “grenade”. They consist of a drive and a CV joint itself; there are 2 of them on each drive. – external (closer to the wheel) and internal (closer to the gearbox). The “Grenade” is very durable, and with constant maintenance the car can withstand 100,000 km. and more. However, it does not last forever, and one day it may fail. In this article we will talk about how to independently diagnose and replace an external CV joint using the example of the popular Russian car Lada Granta.
Causes of grenade malfunctions and its diagnosis
Usually the CV joint does not break right away. You will feel the car accelerate jerkily and hear a knocking sound from somewhere in the front suspension. Over time, symptoms worsen. Diagnostics is very simple: put the car on a jack and swing the CV joint of the suspended wheel. Do you feel any play? It's time to change the part.
There are 4 main reasons why CV joints fail prematurely:
1) The part itself is of low quality or defective;
2) The vehicle is operated off-road;
3) The boot has torn, and dust and abrasive particles have penetrated inside;
4) Aggressive driving style.
If you turn to specialists for help, you will have to fork out money. Replacement service costs an average of 1,500 rubles. for 1 CV joint.
You can save money by doing your own repairs: the cost of a spare part in auto shops starts from 1000 – 1500 rubles. for 1 “grenade”, complete with drive components cost about 3000 – 4000 rubles. There are a lot of manufacturers, but it is better to take the original from AvtoVAZ.
Tools and materials
- new CV joint (the grenade itself, without the drive) and lubricant for it;
- jack, hammer;
- wheel wrench, mounting, pipe of suitable diameter;
- a set of wrenches and sockets, a screwdriver;
- graphite lubricant.
How to identify a malfunction?
CV joint is a design that is a complicated version of the cardan and gear drive. Just like the cardan, the grenade ensures the transmission of torque when the direction of the axes changes. And just like a gear drive, a CV joint engages between the driving and driven elements, only the role of the teeth in this case is played by balls moving in the longitudinal recesses.
Since the balls constantly move along the grooves, metal is produced there over time, which leads to the appearance of extraneous noise. If you ignore the first symptoms of a serious defect and postpone inspection of the grenades until later, one of the units may collapse during the trip.
Installation of spare parts
Replacing the CV joint on a Kalina car is done as follows:
- A protective cover is put on the axle. To make work easier, the axle can be treated with lubricant.
- Lubricant is placed in the hinge.
- Lubricant is added inside the protective cover.
- With gentle blows using a wooden block, the grenade is mounted on the axle shaft.
- When the installation of the CV joint is completed, air is removed from the protective cover and fastening is carried out using clamps.
- The steering knuckle is mounted, the hub nut is fixed, and the wheel is mounted in place.
- All fasteners are securely tightened and the car is removed from the jack.
What we have as a result: differences between Grants and Kalina
Both models together cover all consumer demand for a variety of body styles. The latest, second, generation of Kalina is available in station wagon and hatchback body styles. And the second-generation Granta bodies are now available in sedan, hatchback, liftback and station wagon. Each of them has its own advantages. For example, access to the trunk of a sedan eliminates the flow of cold air in winter, and when loading and unloading things, people in the cabin do not have to freeze. "Kalina 2" is additionally equipped with climate control and other useful options.
Author: Maxim Golenetskikh
What car would you buy? Share your opinion in the comments below the article.
Before considering the main topic of the article - which grenades are better for the VAZ 2114, you should first understand what this part is. A CV joint (otherwise called a grenade because of its characteristic shape) is an element of the front suspension of a car, extending from the hub of each wheel. It has an oblong shape with a thickening at the end. Its main purpose is to transmit torque at maximum rotation angles (reaching 70 degrees).
As for its service life, it can be noted that initially CV joints were created as elements with a very long service life (in some cases equal to the service life of the car itself). But, in practice, damage to the grenade occurs quite often, and the main reason for this is wear or cracks on the CV boot, allowing dust and dirt to get inside, violating the integrity of the structure and causing its damage.
Checking the damage to the grenade is quite simple - you just need to turn the car's wheels as far as possible in any direction and inspect the suspension. If the boots are damaged (that is, have cracks or tears), they should be replaced immediately. And in a situation where a grinding or other extraneous noise emanating from the suspension is heard while driving, conclusions can be drawn about the damage to the grenade and its failure.
In this case, it is categorically not recommended to continue driving - firstly, it is very dangerous and can lead to road accidents, and secondly, driving with a faulty CV joint can lead to the breakdown of a number of other parts and mechanisms, as a result of which the total cost of repairs is significantly will increase.
How to replace the CV joint boot on a Lada Kalina?
We will replace the boot on the removed axle shaft, this will simplify and speed up the work process.
1. Place the car on a flat surface, tighten the handbrake and place wedges or something similar under the rear wheels to prevent the car from rolling.
2. Take the “balloon” and start removing the wheel. Don't rush to jack up the car; remove the bolts while the car is standing on four points. After this, you can jack up one side on which the work will be done. It is dangerous to work on a jack, so be on the safe side and place a block or metal jack under the car.
3. Using a flat-head screwdriver, pry up the protective cap and remove the wheel arch liners (if any).
4. Place a container under the drain hole of the gearbox, unscrew the plug and drain the transmission oil.
5. Next, you need to unscrew the two mounting bolts that secure the ball joint to the steering knuckle.
6. Now you need to unscrew the hub nut. To do this, you need to fix the hub; to do this, just press the brake pedal. If you have no one to help you, use some kind of device that will apply pressure on the brake instead of an assistant.
7. We take out the thrust washer, then turn the wheels to the extreme position (it all depends on which side the replacement is happening from) and squeeze the outer CV joint out of the hub. To prevent the drive shaft from falling, it is better to hang it with a piece of wire.
8. Using a pry bar, press the inner CV joint out of the box with one hand, and hold the drive shaft itself with the other hand.
9. Take the drive shaft and fix it in a vice, then use a screwdriver to remove the old clamps and cut off the old boots (if they are damaged). If the anthers are in order and will be installed back, there is no need to cut them off.
10. Next, using a hammer and a soft metal or wood socket, knock the outer and inner CV joints off the drive shaft.
11. Using a washing liquid (kerosene, gasoline, etc.), rinse the “grenade” and check the condition of its parts. If during the inspection you did not find anything suspicious (violation of symmetry, play, crack development, etc.), you can begin installing new boots on the shaft.
12. We put on the boots carefully so as not to tear them, then we fill the outer CV joint housing with special lubricant, after which we install its drive shaft. Then we fill the hinge until it clicks.
13. Next, using pliers, squeeze the clamp on the boot on one side. Squeeze the boot slightly to release the air, then tighten the boot clamp on the other side.
14. Replace the retaining ring of the inner CV joint and lubricate its splines with graphite grease, then carefully install the hinge into the gearbox housing.
15. We fix the shaft in the side gear; to do this, take a wooden block, place it on the drive shaft and hit the block with a hammer along the axis of the drive shaft.
Further assembly is performed in reverse order.
"Lada Kalina" is a front-wheel drive car in which the engine and gearbox are located transversely relative to the body. The drive to the wheels is carried out through the main gear. Torque is transmitted through constant velocity joints (simply CV joints, or “grenade”). There are several of them - internal and external. Despite their reliability, these elements can fail. Well, let's look at how to replace a “grenade” on a Kalina, what tools are needed for this and what are the signs of a malfunction.
On a note!
Constant velocity joints, which are sold in the store in sets, include grease, a boot and all the necessary clamps in their sets. Pay special attention to this fact so as not to overpay for additional spare parts and accessories.
I had to change more than one CV joint. Of course, I had to tinker with the first one for a couple of hours, since I didn’t really know all the subtleties, but I changed the subsequent ones almost with my eyes closed.
I bought a grenade for viburnum. The assembly includes the grenade itself, a finger guard and clamps. You can change it in an hour without rushing, it can be done faster. But why rush in such a matter?
What is this? Is the seal leaking? He's darling!
Jacked it up and removed the front left wheel:
I drained the oil from the box into a basin:
I hung them on a rope) They shouldn’t be hanging from the brake hoses! :
Unscrewed the ball joint from the hub:
We place a thick beam under the hub so that it does not twitch.
Unscrewed the steering knuckle:
Attention! I also unscrewed the two bolts securing the strut to the hub, because I decided to replace the “leaked” strut at the same time. If the rack does not require replacement, then these bolts:
Under no circumstances should you touch it, as it will disturb the wheel alignment. To maintain the “camber” you need to unscrew 3 nuts:
This will allow us to untie the strut from the body, thereby giving the hub more freedom to move when we pick out the CV joint from the leaking oil seal.
To pick out the CV joint we need a high-tech tool:
We insert the end of the nail puller into the gap between the box and the CV joint:
and begin to furiously uproot the CV joint from the oil seal. It comes out very tight! Therefore, you need to do it fiercely)
There is a retaining ring at the end of the CV joint. It must be alive!
We uproot the old oil seal:
We insert a new oil seal. I stuck it in like this: I leaned the old one against the new one and lightly hit the old one with a hammer.
Afterwards, you need to hammer the CV joint back. It should not be particularly bent relative to the shaft. The straighter you keep the CV joint on the shaft, the better.
I inserted the CV joint, supported the shaft, supported the hub and hit the hub a couple of times with a sledgehammer through a wooden board. The CV joint is in place.
Replacing the outer and inner CV joints of Lada Kalina: photo, video
CV joint (constant velocity joint - approx.) or popularly just a “grenade”, is designed to transmit torque to the wheels of a car. CV joints can be internal or external, and the devices themselves are quite simple in technical terms and consist of a ball bearing that rotates transversely to its axis.
In the video, replacing CV joints on a Lada Kalina:
Failure of the CV joint on the Lada Kalina is a very common occurrence, and the main reason for its failure is torn anthers. Because, together with dust and water falling under them, the lubricant turns into thick mud, and it is no longer able to fully perform its functions.
Replacing the outer CV joint
In the process of replacing the outer CV joint
The work of replacing an outer or inner CV joint is not very difficult and can be done by any motorist who has at least once repaired a car with his own hands. And in order for the repair to be easier and faster, you need to prepare the following tools:
- Socket heads for “17” and “30”.
- Driver or ratchet.
- Extension for the wrench.
- Jack.
- Wheel chocks.
- Hammer.
- Vise.
Step-by-step disassembly procedure
After you are convinced of the malfunction of one or another CV joint, you can begin to work.
- First of all, we tear off the mounting bolts from the wheel and the hub nut, then we set the wheel chocks under the rear wheels. (To make it easier to tear off the nuts, it is better to use an extension for the wrench - approx.).
- We put the car on a jack and hang the wheel.
- We remove the wheel and, for greater reliability, place it under the car next to the jack.
- Now that this picture appears before you, all that remains is to unscrew the 2 bolts that secure the ball joint to the steering knuckle.
Unscrew the bolts marked with a red marker on both sides. - When unscrewing the ball joint, apply force and use a wrench extension.
- Turn the steering wheel as far as possible to the side and slightly pull the steering knuckle with the stand and remove the outer part of the hub along with the CV joint (For convenience, you can make several gentle blows with a hammer - approx.).
Dismantled CV joint - The next step is to dismantle the old boot and clamps. You shouldn't use them again; it's better to take a set of new ones.
- Next, you need to remove the CV joint itself.
If you have a special removable device, then use it. If not, then you will have to knock it out of place with a hammer. Without causing strong blows, the CV joint will move out of place - Hit the CV joint with a hammer, rotating it along the axle shaft. After some effort, the CV joint should give way.
If the internal CV joint is supposed to be replaced, then work 1 to 6 should be performed as well, after which, using a pry bar, we remove it from the gearbox and take out the entire assembly.
We take the inner CV joint assembled with the axle shaft to a vice where we clamp it and dismantle it.
- After the “bare” axle shaft appeared before us, the work on removing the CV joint can be considered completed.
Step-by-step assembly procedure
Work on assembling all parts should be carried out in the same order as removal, however, there are some nuances in these works.
- First of all, we put the new boot on the axle shaft; this may cause some difficulties. To make the task easier, the axle shaft can be coated with lubricant.
- Then add lubricant to the CV joint.
New lubricant added to CV joint - And the remains are in the dustbin.
- Now you need to use a hammer and a block to install the grenade on the axle shaft, using gentle blows we mount it in place.
- After it is fixed, we remove the air from the boot and secure it with clamps.
- Next, when everything is installed, all that remains is to put on the steering knuckle, fix the new hub nut and put on the wheel.
- Tighten all the nuts and lower the car from the jack.
All work on changing the CV joint, if the work is carried out correctly, will not take more than 1.5-2 hours. You can check the quality of the work performed immediately after the repair. If you start driving with the wheels turned to the side and there is no crackling, squeaking or noise, it means that the repair was carried out correctly and the car can be safely operated further.
Signs of CV joint failure
The first signs of a faulty grenade are crunching sounds in the area of the front wheel on turned out wheels when starting to move. When the fault is severe, noise appears at less significant loads.
The anther begins to “repair”
Selection of CV joints
CV joint in original packaging. Usually inside the package is a pomegranate produced by VIS
There is no consensus among car owners regarding the choice of one or another brand of constant velocity joint, but clear leaders stand out:
- VIS.
- GNK. Original packaging of GNK CV joint
Inside the GNK CV joint package - boot, CV joint, clampsGNK outer CV joint installed
- GLO.
carfrance.ru
Which model is more comfortable?
The interiors of both cars are spacious. The legs of the driver and passengers are positioned freely. But Kalina 2 uses high-quality plastic and modern seat materials. The Grants interior is made of low-quality materials that creak and wear out quickly.
The new Kalina seats have an orthopedic structure and are comfortable for people with bad backs and drivers who often have to travel long distances. The Granta seats are made without pronounced lateral support and are not very comfortable.
Leather interior and cruise control are not available in Russian cars in any of the trim levels. But Kalina 2 has climate control in the “luxury” version, as well as a heated windshield, a rain and light sensor. Granta does not have all these options.
Both cars have poor sound insulation. But the ride in Kalina 2 is still quieter.
So, in terms of the quality of interior materials and sound insulation, Kalina 2 outperforms Granta.
Grenade
The Kalina CV joint or “grenade,” as car owners call this unit in driver’s slang, is a mechanism that transmits rotation to the wheels. Structurally, grenades are quite simple, while ensuring rotation of wheels that are not located parallel. The functional unit is securely covered under a ribbed cover containing lubricant inside. After several years of hard work, the rubber boot of the hinge exhausts its service life: its surface becomes covered with tears, allowing lubricant to seep out, and dust and water begin to actively penetrate into the unit from the external environment. If the defect that has arisen is not detected in a timely manner, the Lada Kalina grenade can very quickly fail, since the mechanism does not tolerate moisture, sand and dirt falling on the contacting surfaces. Prevention is always cheaper than treatment, so it will be much cheaper to change the boot than to wait for a breakdown and replace the entire device.
What's wrong with Lada Kalina and Lada Granta
No matter how hard the domestic tried, it didn’t happen. Both cars have their drawbacks, which apply equally to both models.
The quality of the interior trim leaves much to be desired. The plastic creaks and scratches easily. But the updated Kalina 2 received a number of improvements, based on the experience of Grants. There are fewer creaks in the cabin, and the sound insulation is better.
The lack of anti-corrosion treatment of the metal is also not long in coming. Rust appears in places where stones and gravel are chipped if these areas are not touched up.
Separately, in Kalina 1, drivers noted the uncomfortable front seats. Due to the lack of lumbar support, drivers' backs became tired on long trips. This problem has been fixed in the updated second version. And although the design of the suspension and steering of the cars is almost the same, the steering rack of the Kalina 2 often breaks.
Removing the front wheel drives
We carry out the work on an inspection ditch or overpass.
Drain the oil from the gearbox.
Unscrew the front wheel hub bearing nut from the side of the drive being removed.
Unscrew the two bolts securing the ball joint. We hang up the front of the car and remove the wheel.
To remove the right drive, remove the lower cover of the clutch housing. An assistant will be required when removing the right drive.
We move the steering knuckle with the stand to the side and remove the splined shank of the outer hinge housing from the hub.
We lay the drive on a stretcher.
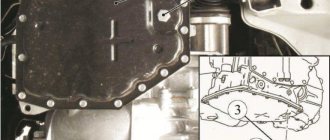
We insert a chisel (preferably not sharpened) into the hole made in the bracket of the rear support of the power unit, so that the wedge of its working part falls on the beveled surface of the internal joint housing.
To do this, you can turn the drive by hand.
From the flywheel side, we place the mounting blade under the housing of the internal drive joint.
Using a hammer, hitting a chisel, and squeezing the inner joint housing away from the gearbox with a mounting blade, we push the shank of the hinge housing out of the spline hole of the drive gear.
Remove the right drive.
When removing both drives, after dismantling the first one, it is necessary to insert a retainer into the hole of the drive gear, for example, a roller made of wood or soft metal, or an old internal CV joint.
Otherwise, the differential drive gears may become misaligned and the drives may not be able to be installed.
When dismantling the left drive, it is convenient to rest the mounting blade through the spacer on the gearbox housing.
Remove the left drive.
Before installing the drive, use a screwdriver to pry up the retaining ring of the shank of the internal joint housing, which secures the drive in the gearbox.
Remove the retaining ring
We install a new ring into the groove of the shank of the internal joint housing.
Reuse of retaining rings is not permitted.
We insert the splined shank of the outer joint housing into the hole in the wheel hub, install the washer and tighten (without tightening) the hub bearing nut.
Then we insert the shank of the internal joint housing through the hole in the drive oil seal and, by turning the shaft, align the splines of the shank with the splines of the drive gear.
Moving the suspension arm downwards, with a sharp movement of the rack with the steering knuckle towards the gearbox, we send the drive to its place.
By pulling the internal hinge housing towards you or prying it with a mounting blade, we make sure that the housing shank is fixed in the drive gear.
We carry out further assembly in reverse order.
Front suspension CV joint design
The Lada Kalina car has front-wheel drive, which receives torque using a gearbox regardless of the angle of rotation. Front suspension drives (left and right) - consist of two working joints of equal angular velocities and a connecting shaft that provides connection between them. The left short shaft is made of a special steel bar, and the right long shaft is made of durable steel pipe. The shank of the inner joint housing is connected via a spline to the differential side gear. Torque is transmitted from the hinge to the drive shaft at the required angles. A feature of the design of the internal CV joint of the Lada Kalina is that, in addition to transmitting torque at several angles, it allows movement along the axis of the hinge body and the drive shaft of the suspension when moving.
With proper operation and timely maintenance of the vehicle, the joints can last up to 100 thousand km. According to statistics, external hinges are prone to failure more often than internal ones, which is primarily due to external factors.
Signs of failure of the outer grenade (CV joint).
There are two options here:
- signs that your grenade has already broken,
- signs that the grenade will soon come out and break.
How to understand that a grenade will soon break.
Of course, the first sign of a malfunction of the external grenade is a crackling sound. If you hear a crackling noise while driving with the steering wheel turned, it is definitely a CV joint. The greater the angle of rotation of the wheel and the harder you press on the gas, the louder the clicks. Another sign that does not always appear is vibration on the steering wheel at speeds above 80 km/h. The vibration is only slightly similar to the vibration from an unbalanced wheel. It usually manifests itself as a slight twitching of the steering wheel.
How to understand that the outer CV joint has broken.
If the CV joint breaks, the car will stop moving. In any gear engaged, press the gas, the speed increases, but the car does not move.
How to understand that it is the outer CV joint that has broken, and not the internal one or the clutch in general (the first signs of failure are similar to the signs of a clutch failure)? First of all, start the car and put it in any gear. Next, open the hood and look in turn at each of the shafts going from the box to the wheels (one short, the other long). If any shaft is spinning, it means that the CV joint has broken on this side.
I recommend not just visually looking at the shaft, but touching it with some long, hard object, such as a stick. The main thing is that there is nothing on it that can wrap around the shaft!!! When you touch the shaft with a stick, if it is spinning, you will feel a slight vibration. This is usually done in the dark, because it is difficult to understand whether a cylindrical object is spinning, especially in the dark.
Who has more choice of engines and gearboxes?
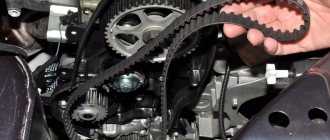
Starting from 2011, the models are almost identical in terms of power units. Both are equipped with 1.6 liter engines with capacities of 87, 98, 106 horsepower. The difference in the number of “horses” under the hood is achieved by modifying the engines and timing belt. But the Granta in the Sport package has a special 16-valve unit with 118 hp. With.
As for gearboxes, the brainchild of AvtoVAZ has two of them - 5 manual transmissions (modernized, cable) and 4 automatic transmissions from Jatco. True, in 2018, Granta also received a robotic 5th gearbox. And a little later, “Kalina 2” also inherited the “robot”.