The presence of debris in gasoline can lead to clogging of fuel system elements and cause unstable operation of the power unit. To prevent such a situation, the design of the Lada Vesta car provides special coarse and fine fuel filters. When using a vehicle, the filters become clogged with debris. Because of this, the throughput of the fuel module decreases, and additional load is placed on the fuel pump. The way out of the situation is to replace or clean consumables. Changing the fuel filter is not particularly difficult with your own hands.
Option I
It was suggested by Alexander, who is known on Drive as MiheyA. The following components are required:
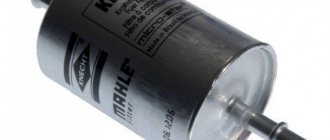
- Bosch brand fuel filter - it can be found under article number 0986450114. Price is about 500 rubles.
- Bicycle camera.
- Mounting the power steering reservoir from model 2110.
- Fuel hoses for model 2170 ramp – length 405 mm. The price is about 600 rubles.
The filter is placed on the bracket, and the mount itself is installed on the studs of the ABS block directly on top of the factory nuts.
https://youtube.com/watch?v=tX2YfVROopE
To better fix the filter, a piece of rubber cut from the camera is glued to the inside of the mount.
In the end, all that remains is to connect the fuel hoses.
In addition, another piece of rubber must be attached to the fuel hose with clamps to eliminate the possibility of chafing.
VAZ engine
Method No. 1 (author iLyaBLagoy):
- We bought a fuel filter and hose.
- We connect the mass to the body and to the filter housing.
- The filter housing was placed above the fuel pump and covered with double-sided tape.
- The standard filter in the electric fuel pump module was removed.
It was required: Bosch filter 0986450114 (496 RUR), fuel hoses to the ramp 2170 (405mm), power steering reservoir bracket 2110, bicycle tube.
The filter was installed on a bracket that is attached to the studs of the ABS block over the standard nuts. A strip of rubber from a bicycle inner tube was glued to the inside of the bracket to securely secure the filter to its lower part. Next we connect the fuel pipes:
The filter also acts as a pulsation damper (see information letter No. 25-18).
Recommendations for selection
Purchase consumables mainly at official points of sale. Do not use the services of unverified suppliers who sell products at reduced prices.
New filter
Check the tightness of the packaging, the presence of holograms, barcodes, dates and batch numbers. If you have any doubts about the quality and origin, do not purchase.
Conclusion
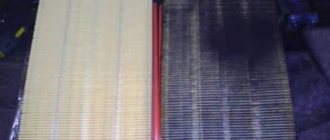
A clean air filter means good acceleration dynamics, low fuel consumption, and stable engine operation. Car owners often violate the replacement intervals for the cleaning element, thereby reducing the efficiency of the equipment.
Any car enthusiast without experience or skills in servicing a technical device can cope with replacing the air element. However, be extremely careful, as incorrect installation will lead to depressurization and the intake of untreated air from the outside. If you are experiencing difficulties or do not have free time, contact the specialists in the workshop for additional help and advice.
Pros and cons of HR16DE
The engine in question has been familiar to Russian consumers for several years. Based on the results of many test drives carried out on cars equipped with this engine, in real conditions on Russian roads, we can confidently list the advantages and problems of this power unit.
Advantages
- Engine reliability regardless of operating mode.
- Moderate requirements for gasoline consumed (Ai-92 and higher).
- Economical.
- Environmental friendliness (Euro 4, Euro 5).
- Engine response (confident operation at low speeds without downshifting).
- Possibility of tuning, from easy by flashing the internal combustion engine software to deep with the replacement of injectors and installation of a turbine.
Disadvantages of HR16DE
- Lack of hydraulic compensators (the need to periodically adjust the valves by replacing pushers, the price of which is not encouraging).
- Relatively high cost of timing chains and oil pump.
- Modular design of the fuel pump in the gas tank (complete with filter, pressure and level sensors) - failure of one component can result in replacement of the entire unit.
Why is it needed?
There is a coarse filter that comes first from the gas tank. After all, first the lid where the fuel tank is located is opened, a gun is inserted there, the magic button is pressed and the fuel flows. Yes, it takes a lot of your money along the way, but what can you do? The location of the tank can be on the left or right, but this does not play a special role. Coarse cleaning, which is a mesh that traps large particles of debris.
This is followed by a fine filter. This is exactly what we will talk about. This element is called a fuel filter. With its help, small particles are retained. But even they can penetrate your diesel engine or gasoline injector.
Dust, dirt, debris, rust elements. All this can penetrate the system, causing a clogged pipe, tube, valve, fuel hose, or fuel pump components. Nothing good will come of this if timely replacement is not made.
To understand how to replace the filter, which element to choose and how to choose an analogue for the device you are going to change, you need to have at least a basic understanding of such an important component of the car.
I suggest starting with varieties.
Kinds
Modern fuel filters installed on Ford Focus, Nissan Almera, Hyundai Solaris, Nexia, Mazda, Opel, BMW e60, Renault Logan and Megane, Kia Rio and many others have at least two degrees of purification.
- First degree. This is a rough cleansing that allows you to get rid of large contaminants. Not to be confused with a regular mesh in the tank, which is not available everywhere.
- Second degree. Fine cleaning. This is the main task that falls on the shoulders of the filter.
And here you probably have the main question - where is the filter device located? I don't know. No, I can answer, but if you tell me specifically what make of your car or what year of manufacture. After all, on the same Chevrolet Niva, different Opel, Toyota, Mazda models, on the Volkswagen Passat B3, as well as on the domestic VAZ 2114, 2112 and 2110, the location may differ.
However, they are always located somewhere between the engine and the gas tank, since the filter's job is to prevent contaminants from entering the engine while the fuel moves from the tank to the engine. What's in the gas tank itself? That's right, a coarse cleaning device. This is an additional filter element so that any unscrupulous gas stations do not spoil your car.
Now let’s talk about the types of filters themselves. What element will be on the car? It depends on the type of engine. There are three of them, as you know. Except for electric motors. Well, there is no need for a fuel filter, as you understand.
Therefore, there are three types of filters:
- carburetor;
- diesel;
- injection.
Location
So you bought yourself a brand new sedan and you think it’s time to change the filter for this engine. Want to choose the best? Well then, take a closer look at Cummins devices. Mann, Hertz. They have proven themselves well, and they cost quite a bit.
You probably know whether your engine is diesel, injection or carburetor
This is important to understand the location of the fine filter, that is, our today's hero
- Carburetor. In these engines, the TF (fuel filter) is placed in front of the carburetor itself, and is often in a transparent housing to control contamination. These are the most basic devices, because the carburetor is the least demanding on the quality of fuel.
- Injector. It uses nozzles and therefore requires high-quality filtration. And the fuel is supplied under high pressure. Therefore, the filters are enclosed in durable metal housings. The TF has to be regularly maintained, cleaned and monitored for its condition. They are placed mainly under the bottom of the car to make it easier to dismantle and replace.
- Diesel. A diesel engine also needs high-quality purified fuel, since the system is quite sensitive. Diesel fuel has a higher moisture content than gasoline. The TF is designed to filter debris and remove accumulated moisture. A separator is provided for this purpose. The location is quite simple - between the engine and the pump that pumps fuel.
Any fuel system must include a TF. They are replaced assembled, that is, there is no point in removing the filter elements themselves (usually special paper), leaving plastic or metal. Be sure to look at the number and article number of the filter that is installed on your machine, and check the operating manual from the factory. This is the only source of truthful information regarding the maintenance of your particular vehicle in this configuration and with this type of engine.
Cleaning
Handy cleaning agent
The procedure is not complicated, but try to do everything carefully and step by step.
Visually examine the condition of the item. If there are traces or signs of leakage, it is better to immediately replace the elements, since cleaning will definitely not have a long-term effect.
If the injector can be saved by stripping, remove the O-rings located on the body and nozzle.
Place them in acetone for a while. As an analogue, you can use regular gasoline. But do not forget that these are highly flammable mixtures, so there should not be any sources of even the slightest spark nearby.
Be sure to keep a fire extinguisher near you. May you be the most careful and consistent person, accidents have never been canceled.
Keeping the injectors in acetone or gasoline will allow you to better clean all accumulated contaminants.
While the units are soaking, pay attention to the valve cover and ramp. It is advisable to clean them, as they act as sources of contamination.
The ramp is blown out with a conventional vacuum cleaner.
Now we take out the nozzles and start working directly with them.
Coke often forms on the nozzles, resembling resin in appearance and consistency. Be sure to get rid of these deposits.
The surface around the nozzle is cleaned with gentle movements of a pin or needle.
At this point, external cleaning can be considered complete.
Now the most difficult process is the internal “cleaning” of the elements. For this procedure, arm yourself with a tube, a syringe and a can of a substance intended for cleaning carburetors
It doesn’t matter that you have an injection car produced by our glorious automobile company AvtoVAZ. It’s not difficult to purchase such a product, and it’s cheap.
The product must be applied under pressure using a tube, simulating an injection. For each injector, perform several such manipulations.
This will allow them to cleanse themselves and break through from within. As a result, the devices will be able to spray fuel liquid more evenly than before cleaning.
Be sure to give them some time to dry.
You should also replace the old O-rings with new ones. It is strongly not recommended to use the old ones, even if you clean them. Replace the seals every time you clean the injectors.
To delay the next cleaning as much as possible, and also to ensure long-term and efficient operation of the cleaned injectors, it is recommended to replace the mesh on the fuel pump, as well as the fuel filter.
VAZ 2114 drivers motivate the use of cheap gas stations by the need to save money. But if this is not stopped, clogged injectors will be only a small part of the problems your car will face due to poor fuel. And all the money saved on gasoline, plus the same amount, will be spent on repairs. Here is the price of cheap gas stations.
A nozzle (or injector) is an important part of the injection system, which is designed for dosed injection of fuel, atomizing it in the combustion chamber and forming a fuel-air mixture.
The injectors are installed on gasoline and diesel engines. Most domestic cars run on gasoline engines, for this reason we will look at how an electromagnetic injector works (there are also electrohydraulic and piezoelectric ones) and the removal of VAZ 2114 2110 injectors, since they are the ones used on these types of engines.
Dismantling and disassembling the fuel pump module Lada Vesta
The work is unpleasant because of what will happen inside the cabin, since the pump assembly can only be obtained in this way. A similar solution can be observed on other new AvtoVAZ models, for example, on the Lada Priora; dismantling the fuel module is similar there. Of course, the solution is somewhat strange, and many will find it impractical, but this arrangement of the fuel pump can be seen in most modern foreign cars.
- The first step is to provide access to the location of the fuel module. To do this, we dismantle the rear sofa cushion. This is done as follows: the front part is pulled out from the latches, and the rear part is removed from the hooks.
- Next, you need to remove the cover (just turn it) and clean the workplace from dust and sand. We take a vacuum cleaner and vacuum up dust and sand so that nothing gets into the fuel tank during dismantling.
The next step is mandatory! You need to relieve the pressure in the fuel system so that when you disconnect the fuel lines from the pump, you do not flood the entire cabin with gasoline.
This is very important, so I do not advise you to neglect this point. There are two ways to relieve pressure in the fuel line.
- First: remove the fuel pump fuse, then start the engine and wait until it stalls.
- Second: Turn off the power to the fuel pump, then start the engine, etc.
Decide for yourself which option suits you best...
- Now that the pressure has been released and everything is ready to begin dismantling, it is necessary to take care of fire safety. Make sure there are no open sources of fire near you, remove anything that could lead to a fire. Remember that gasoline vapors ignite very quickly even from a small spark. I also recommend removing the negative terminal from the battery, “just in case,” as they say.
- Disconnect the fuel hoses. We press the latches and move them aside.
- Using a wooden adapter and a hammer, remove the retaining ring by striking counterclockwise. Sometimes you can remove it without any problems, but in most cases everyone complains that it is difficult to remove.
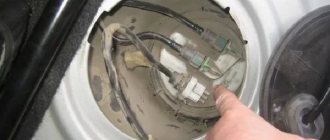
Next you can get the fuel pump module assembly
We remove it carefully, do not forget about the float, which complicates the entire extraction process.
Disassembling the fuel pump module (cleaning, replacing, etc.)
- We do disassembly. To do this, disconnect the lower part of the module along with the coarse fuel filter. Depending on the degree of contamination, the mesh should either be washed (solvent or Carb) or replaced.
- We also disconnect the fuel pressure regulator wire
- Following this, we take out the spring filter along with the fuel pressure regulator.
- We disconnect the intake hose, hold the clamps and take out the fine filter along with the fuel pump. Almost everyone has problems with the hose, since when trying to remove it, it is often damaged. Putting this hose on is also a problem; to do this you will have to heat it with a hairdryer, but under no circumstances with an open fire!!! I recommend buying a spare hose just in case.
- Now you can remove the pump from the filter housing, do not forget to turn off the power to the pump.
Further work depends on the reason for disassembly. If you need to replace the Vesta fine filter, we do it without any problems. As it turns out, it is possible! Replacing the Lada Vesta fuel pump is also possible, both with and without filters. But I would strongly recommend that when replacing the pump, you also immediately change the fine filter. As for the mesh, in most cases it is enough to simply wash it.
That's all I have, thanks for your attention. Write in the comments whether you succeeded and what difficulties you encountered during your work. Bye everyone, take care of yourselves!
Bye everyone, take care of yourselves!
Vesta and elastic bands from Solaris
Starting to study the systematic breakdowns that owners of the model experienced from time to time, it almost immediately became clear that a miracle had not happened - Vesta has plenty of weak points. First of all, I would like to talk about rubber products that wear out, tear, scratch and disturb the silence so actively that I had to devote an entire section to this topic.
Briefly about the quality of tires for a completely new car
It is recommended to replace standard windshield wiper blades with something more kosher immediately after purchasing a new car, otherwise in rainy weather you will have to look at the road through arched stripes. Little things, of course, especially when you consider that normal rubber bands can be bought for 150 rubles apiece, but, as you may have guessed, this is just the beginning. Vesta owners are also concerned about the side window seals, which, as they lower and raise, become covered with a scattering of “eternal” scratches, and in order to prevent this from happening so intensely, the friction points have to be often cleaned of dust and dirt and, for reliability, lubricated with everyone’s favorite “magpie” ( WD-40). We have already seen something similar in a used Kia Ceed JD.
And, of course, sounds. Even though this is far from the only source of noise for the Lada Vesta, it is still the stabilizer bushings that begin to creak earlier than anything else, since this happens in the very first stages of the semi-domestic beauty’s life. It is useless to lubricate and replace with the original. The best thing you can do is to break allegiance to AvtoVAZ and install the rubber bands of the main competitors, with whom Vesta so bloodthirsty “fought” on advertising posters - the brothers Hyundai Solaris and Kia Rio. Someone is adding parts from the Kia Soul and this also works in the battle for silence.
Sometimes you have to change bushings every 30,000 km, or finally fit rubber bands from a competitor called Solaris
Sometimes you have to replace the rear silent blocks of the front control arms with something imported, the rubber of which is accustomed not to crack and tear, but to immediately peel off from the holder. Moreover, the instability of quality has led to the fact that for some people this happens after only 50 thousand kilometers, while others drive a solid 100 thousand without replacement.
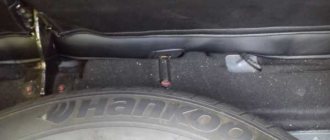
Tubes from the vacuum brake booster and systems for changing the length of the intake manifold also end up in landfills near garages. In the first case, a “hissing” from under the hood will help you understand what happened; in the second case, floating speed and poor starting.
This hose has already given in, disrupting the operation of the engine.
Finishing the topic of the total unsuitability of the rubber used in the Lada Vesta, one cannot ignore the exhaust gas removal system, that is, the muffler, which after the first year of operation “slides” down a couple of centimeters, bringing to motorists nostalgic feelings for the times when the pipe was hung on an air filter . At the same time, the old element ideally replaced sagging rubber bands forever, but Vesta, alas, does not have round filters and you will either have to reliably “collective farm” in another way, or just patriotically install the original every year
In this case, special attention should be paid to the condition of the intermediate corrugation, which has become one of the leaders in replacement during early car runs:
Torn corrugation
When to change the fuel filter on Vesta
According to the manufacturer, the service life of the fine gasket is equal to the service life of the fuel pump. The fuel pump has a resource of 180 thousand kilometers. Photos on the Internet show dirty filter elements with more modest mileage figures.
On forums, car owners say that they change the fuel filter on their Vesta every 30-40 thousand km. The frequency of replacement is directly affected by the purity of the fuel used. When refueling at a suspicious gas station, the filter elements may become clogged within the first kilometers of driving.
Signs that replacement is needed
You can understand that the filtration device is clogged by some characteristic features of the machine’s behavior. These include:
- fuel pump noise;
- increased fuel consumption;
- reduction in engine power;
- car jerks when driving;
- floating idle speed;
- Difficulty starting the engine.
When the “Check Engine” light comes on and subsequent computer diagnostics, a clogged fuel filter displays error P0171.
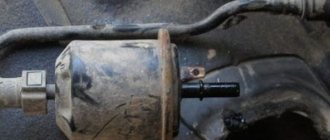
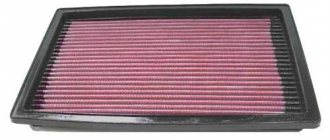
Photo of the fuel filter on the Vesta. Photo source: https://www.drive2.ru/l/527598181760894565
These signs may also indicate other problems. But if the filter device was changed a long time ago, then you can start eliminating the problems by replacing it.
Where can I buy
Purchasing an electric fuel pump, which is used in the latest Lada models, is not so easy. Its official manufacturer, the Japanese company AISIN, annually supplies this part to the market in insufficient quantities.
The easiest way is to contact official distributors. At the same time, there is no guarantee of the success of such an appeal.
The first of them is used as a standard part of two popular car models - Hyundai Solaris and Kia Rio. And the second is for Kia Picanto, Hyundai Sonata or Elantra. All these models are Korean. This is due to the fact that the fuel system of Korean cars is also of Japanese origin.
- Fuel filter. — Toyota Camry Club Russia
- Timing belt Lada Vesta original analogues
- How to replace the fuel filter in a Toyota Camry v40
- Replacing the Renault Duster fuel filter Photo instructions on how to change the fuel filter on a Duster
Analogues of the Lada Vesta filter
If the entire unit needs to be replaced, then the Lada Vesta owner has no chance to save money. However, individual elements of the system can be replaced with cheaper analogues. For example, you can install a gasoline pump from the Japanese company AISIN, which will cost about 3,000 rubles. Installation of an electric fuel pump from a Kia Rio car, the price for which is 4,000 rubles.
How much such work is worth at a reduced price - the car owner must judge for himself. It is believed that while there are no official analogues, it is better to replace the fuel module in a trusted service center and with an original one. Perhaps in the future this procedure will be simplified, or the part itself will become cheaper.
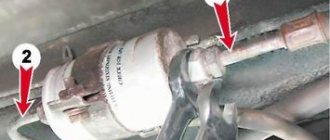
Based on the experience of some drivers, I decided to install an additional fuel filter in front of the fuel rail. The previous post talks about this in more detail. Comments, as always, are mixed. Some are for, some are against. So, I will describe my own feelings.
The mileage with this improvement has already amounted to more than 400 km. Exclusively around the city, in the heat, rain, traffic jams. That is, in the conditions where I work most of the time. What can I say. The car has become more torquey at the bottom. Smoother acceleration, without jerking. More dynamic. The second one starts off more confidently. Gasoline consumption has decreased, which I did not expect at all. Switching from first to second became a little shorter and smoother. And now the downsides. Small twitches at start-up and when moving off did not go away. Which I would really like. And that’s what basically started it all. The switching time from second to third has also increased. I don't particularly like this.
Conclusion, would I bother with installation and spend 577 rubles, knowing the end result specifically on my car? Yes I would. In general, the behavior has improved. Today and tomorrow they will deliver the remote air intake and the sports intake. A valve for the crankcase exhaust system has also been ordered and is on its way. I think with these modifications I will still get the desired result.
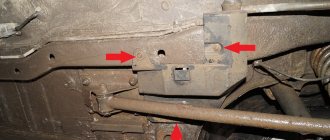
On Lada Vesta and XRAY, the coarse and fine fuel filters are located in the electric fuel pump module, which makes replacement or cleaning problematic. Some owners of these models decide to install a remote fuel filter, as is done on traditional LADA cars. Let's look into this modification...
Filter replacement interval
The design of this unit on the Lada Vesta itself is not bad, it is quite reliable, but the quality of modern gasoline in our country is questionable, so these consumables often become clogged, which leads to increased operation of the gas pump and, as a result, a reduction in its operating time. It is recommended to replace the filter after 180-200 thousand kilometers.
At the same time, official dealers change the entire assembly at once, so the cost of such a procedure on average is about 8,000 thousand rubles. If you want to save some money, you can purchase an analogue of the module, or replace only its individual parts yourself.
Removing a faulty device
First, remove the air filter along with the filter element.
Then disconnect the choke link
It is located on the right side of the carburetor, in the direction of travel of the car.
There we also remove the return spring of the gas pedal drive.
Use a screwdriver to pry up the spring clamp on the gas drive sector and remove it.
Then we remove the throttle cable from the drive sector.
We disconnect all the wiring connectors from the carburetor, having previously marked their connection points so as not to confuse them during assembly.
Loosen the clamps and remove the fuel hoses.
Unscrew the screw and remove the heating block of chamber 1.
We remove the crankcase ventilation hose, and then the vacuum tube going to the breaker - the ignition distributor.
Unscrew the 4 fastening nuts and carefully remove the carburetor. To top it off, cover the outlet hole with a clean rag to prevent dirt from getting into it.
To top it off, cover the outlet hole with a clean rag to prevent dirt from getting into it.
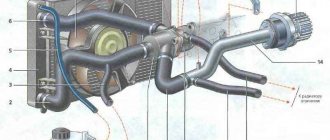
Fuel supply system design
The fuel supply system of the Lada Vesta car consists of 5 parts:
- Gas tank with filling pipe. The gasoline tank is made of compressed plastic and is attached to the bottom of the car with two metal clamps. The filler neck is located on the right side of the Vesta. The plug has 2 valve mechanisms. One ensures the release of excess pressure created in the tank due to thermal expansion. The other serves to intake air, which fills the container when the liquid level in the gas tank decreases.
- Fuel module. Provides pumping of gasoline into the fuel rail. Consists of a fuel pump, bypass valve, gasoline level sensor and filter device.
- Injectors. Located on the ramp. Fuel is injected into the internal combustion chamber.
- Adsorber. The main component of the vapor recovery system. Located on the right side of the car, near the front fender. Equipped with a purge valve.
- Pipelines. Serve to transport fuel and gases between components of the fuel supply system.
Unlike the design of the unit installed on previous AvtoVAZ models, the Vesta fuel filter is not portable. According to the manufacturer, the cleaner's lifespan is sufficient for the entire life of the vehicle. Sometimes cases of low-quality gasoline are poured in, which forces owners to replace the mesh in the Vesta filter.
Rate the article!
↑ How the module is disassembled
As noted above, the procedure for disassembling the electric fuel module of a Lada Vesta or Xray depends on what exactly is planned to be changed. There are both specific features in case of replacing one or another element, and a general procedure, regardless of what exactly needs to be repaired.
In the case when the fuel level indicator sensor is changed, you need to:
- First, remove the wire end from the pressure regulator terminal.
- While simultaneously pressing the latches, remove the wire block from the cover.
- Using a flat-head screwdriver, release the retainer that holds the block.
- After the block is completely disconnected, you can remove the sensor itself. To do this, you need to press two special clamps from the grooves.
A slightly different disassembly procedure is provided if you plan to replace the pressure regulator:
- As in the previous case, you need to start by removing the wire tip.
- After this, helping yourself with a flat screwdriver, you need to remove the special spring-shaped retainer.
- Only after this can the regulator itself be removed from the module cover.
As can be seen from the two cases considered, the most important role when disassembling the elements of the fuel module is played by the correct disconnection of wires and clamps.
Dismantling procedure
The procedure for dismantling the fuel module and fuel pump is the same for both Lada models that we are considering - Vesta and Xray.
You need to start by removing the rear seat in order to free up access to the module. After this, carefully disconnect the wires that connect the pump and the cover. If you replace one of the elements on the cover, you only need to disconnect the cable that is routed to it.
DETAILS: Replacing the Nissan Tiida air filter - Articles
If the goal is to replace the filter, for which you need to get the pump, turn everything off.
Only after all electrical wires have been disconnected should the pump be removed when necessary.
Dismantling and disassembling the fuel pump module Lada Vesta
The work is unpleasant because of what will happen inside the cabin, since the pump assembly can only be obtained in this way. A similar solution can be observed on other new AvtoVAZ models, for example, on the Lada Priora; dismantling the fuel module is similar there. Of course, the solution is somewhat strange, and many will find it impractical, but this arrangement of the fuel pump can be seen in most modern foreign cars.
- The first step is to provide access to the location of the fuel module. To do this, we dismantle the rear sofa cushion. This is done as follows: the front part is pulled out from the latches, and the rear part is removed from the hooks.
- Next, you need to remove the cover (just turn it) and clean the workplace from dust and sand. We take a vacuum cleaner and vacuum up dust and sand so that nothing gets into the fuel tank during dismantling.
The next step is mandatory! You need to relieve the pressure in the fuel system so that when you disconnect the fuel lines from the pump, you do not flood the entire cabin with gasoline.
This is very important, so I do not advise you to neglect this point. There are two ways to relieve pressure in the fuel line
- First: remove the fuel pump fuse, then start the engine and wait until it stalls.
- Second: Turn off the power to the fuel pump, then start the engine, etc.
Decide for yourself which option suits you best.
- Now that the pressure has been released and everything is ready to begin dismantling, it is necessary to take care of fire safety. Make sure there are no open sources of fire near you, remove anything that could lead to a fire. Remember that gasoline vapors ignite very quickly even from a small spark. I also recommend removing the negative terminal from the battery, “just in case,” as they say.
- Disconnect the fuel hoses. We press the latches and move them aside.
- Using a wooden adapter and a hammer, remove the retaining ring by striking counterclockwise. Sometimes you can remove it without any problems, but in most cases everyone complains that it is difficult to remove.
Next you can get the fuel pump module assembly
We remove it carefully, do not forget about the float, which complicates the entire extraction process
Disassembling the fuel pump module (cleaning, replacing, etc.)
- We do disassembly. To do this, disconnect the lower part of the module along with the coarse fuel filter. Depending on the degree of contamination, the mesh should either be washed (solvent or Carb) or replaced.
- We also disconnect the fuel pressure regulator wire
- Following this, we take out the spring filter along with the fuel pressure regulator.
- We disconnect the intake hose, hold the clamps and take out the fine filter along with the fuel pump. Almost everyone has problems with the hose, since when trying to remove it, it is often damaged. Putting this hose on is also a problem; to do this you will have to heat it with a hairdryer, but under no circumstances with an open fire. I recommend buying a spare hose just in case.
- Now you can remove the pump from the filter housing, do not forget to turn off the power to the pump.
Further work depends on the reason for disassembly. If you need to replace the Vesta fine filter, we do it without any problems. As it turns out, it is possible! Replacing the Lada Vesta fuel pump is also possible, both with and without filters. But I would strongly recommend that when replacing the pump, you also immediately change the fine filter. As for the mesh, in most cases it is enough to simply wash it.
That's all I have, thanks for your attention. Write in the comments whether you succeeded and what difficulties you encountered during work
The Lada Vesta car is equipped with a combined fuel filter, which includes elements for coarse (mesh) and fine purification of gasoline where the filter is a paper element - it is located in the fuel module. The replacement itself is not frequent, but it must be done. Unlike most models, here the fuel filters are located in close proximity to the electric fuel pump, also known as the fuel pump, which significantly complicates the independent replacement of the fuel filter on the Lada Vesta. Nevertheless, the car periodically needs such replacement, so let’s deal with the fuel system in advance. Read the article to the end and you will understand this topic: you will know where the fuel block is located on the Lada Vesta, what filter can be changed in it, and are there any analogues of this part!
Ford Focus Fan
Cabin filter Ford Focus 2: price and choice
Original cabin filter for Ford Focus 2 carbon. Thanks to the impregnation of the fibrous coating of the filter with carbon granules, the Focus 2 filter not only cleans the air of dust and other small debris, but also catalyzes burning vapors that come both from the engine of the car itself and from all harmful vapors entering the cabin. This filter is still included in the rating of the best air purification filters according to the most modern European standards and is installed on the Ford Focus 3 without changes. Well, except that they added two foam seals along the edges for tightness. The degree of air purification is from 85 to 95%. Price - from 480 (analogues) to 1200 rubles (original). More expensive than an air filter.
Before purchasing, check the Ford Focus 2 filter for mechanical damage. A normal original Ford Focus filter will cost from 750 rubles and above, do not skimp on your health.
Replacing the cabin filter on a Ford Focus 2
The cost of replacement at a car service is approximately 700 rubles.
When Ford engineers are stupid, they do it in such a way that even AvtoVAZ takes a break. During the design of the filter placement structure, they decided that even the “stupidness” could be worse than Russian engineers and made changing the cabin filter of a Ford Focus 2 torture. They shoved it under the dashboard, almost to the radio, and blocked the path to it with the gas and brake pedals. And they succeeded in this deceit. They probably just assembled the entire panel, installed the filter and put it on the car. How to change it is not their problem. Yes, replacing the air filter is much easier...
Gas pedal and filter cover removal tool:
- Small ratchet
- Grille extensions
- socket heads for 10 and 8
- Flexible extension or driveshaft for ratchet
A set of keys for any auto work
Replacing the cabin filter of a Ford Focus 3 is much easier, thank you that at least they thought of making the replacement easier on the next Focus model...
In general, the filter is located somewhere to the right and above the gas pedal. And in order to make the replacement, you either need to be no more than 30 cm tall, or have a very flexible boneless body and the super ability to turn the torso and head separately, at least 180 degrees. Even replacing the cabin filter in a Ford Focus 1 is easier. But on the new model, when Focus 2 came out, they decided to make this process more difficult. We take out the rug to get less dirty...
Ford Focus 2 has an electronic gas pedal; disconnect the plug from it by pressing the latch while simultaneously pulling the connector up.
And now, it’s time to take advantage of your bulging, long, illuminated eyes, which, according to the designers of Ford Focus 2, you also have. This is needed to unscrew the 3 pedal nuts, one at the bottom, two at the top. After all, both hands will be busy and you won’t be able to illuminate accurately. The designers of Focus 2 have all the listed abilities, since they thought that all other people could do the same.
In general, you see the studs on which the pedal is held - 2 on top, 1 on the bottom. And here is the electronic gas pedal of Ford Focus 2.
Then, we remove the cover and find a dirty, black with dust, dirty filter of the Ford Focus 2 air conditioner. It’s easy to find, but getting it out is a problem...
The Ford brakes also made the brake pedal a serious obstacle. The half-removed filter at the top rests against the pedal connection, clings with the back side to the gas pedal studs, folds almost in half and is thus removed.
The Ford Focus 3 cabin filter is the same, but has two seals at the ends of the filter for greater tightness
The Ford Focus 1 cabin filter is longer, it does not fit two...
The poor guy's condition, of course, was catastrophic... Be careful when installing a new filter. You, of course, will have to bend it “to death”, but do not overdo it and do not tear it on the studs of the gas pedal.
Front brake pads Ford Focus 2: selection, price, replacement+video
Replacing antifreeze Ford Focus 2, Video
Cleaning the Ford Focus air conditioner evaporator
Self-disassembly and repair of the Lada Vesta fuel module
The fuel module on the Lada Vesta must be replaced as an assembly, even if only one of the components has failed. This is the official position of AvtoVAZ, although repair of the unit in a specialized service is allowed. However, the experience of car owners has shown that everything is not so simple and some of the components of the entire module can be replaced independently by first disassembling the Lada Vesta fuel module.
Dismantling
To work you will need tools:
- Hammer;
- Screwdriver;
- Head for 10.
First of all, you need to remove the rear sofa cushion, throwing it forward, and then remove the soundproofing sheet from the floor.
Then you need to remove the fuel pump cover - you first need to pry it off from the side and then disengage it.
The next step is to disconnect the plug from the electric fuel pump itself.
Then you need to relieve the pressure directly in the fuel system. To do this, the engine starts, after which it must run at XO until it stalls. When this happens, you need to remove the key from the ignition switch and remove the “-” terminal from the battery.
After releasing the pressure, the tube is disconnected from the fuel pump - to do this, the spring fastenings of the tube tip are compressed, and then you need to pull along the axis of the fitting. In the case where the fastening is located directly under the tip, it is recommended to use a hook.
Next, the ring is removed and turned counterclockwise. Sometimes there are situations when the ring is overtightened and it is difficult to move it. In this case, you need to either arm yourself with pliers and remove the part with them, or move it by placing a stop and hitting it with a hammer.
When this is done, the fuel module is tilted and removed from the fuel pump (the main thing is not to break the fuel level indicator lever). This completes the independent dismantling of the Lada Vesta fuel module.
Replacing the fuel level sensor Lada Vesta
First of all, remove the tip from the output of the fuel pressure regulator.
Next, the plug with the wires is disconnected from the cover (which requires releasing the latches).
Then, using a screwdriver, the block mount is detached.
This makes it possible to disconnect the plug and the fuel pump.
In the end, all that remains is to unscrew a couple of fasteners and remove the fuel level sensor.
Replacing the fuel pressure regulator Lada Vesta
To replace the element, you need to disconnect the tip of the wire from the output of the regulator itself.
Next, the fuel pressure clamp (spring) is dismantled, for which it is pryed off with a screwdriver.
Finally, the fuel pressure regulator is removed from the Lada Vesta fuel module cover.
Assembly is carried out in the reverse order, but the O-ring must be lubricated with oil before installation.
Removing the coarse filter
To remove the Lada Vesta coarse fuel filter, made in the form of a fine mesh, the fuel level sensor is first removed.
First of all, using a screwdriver, disconnect the drain tube from the intake chamber.
Then the guide covers should be removed from the intake chamber, but first you need to mark the guide with the spring.
Next, by disengaging 3 latches, the fuel pump housing, which comes complete with a coarse filter, is removed from the intake chamber.
The filter element itself is held in place by a spring (retaining spring). You need to pry it up and remove the mesh.
Replacing the fuel pump yourself
To replace the Lada Vesta fuel pump with your own hands, you will need a technical hair dryer. If this is not available, you can use regular hot water.
First you need to release the fastener and remove the fuel pump from the holder.
Next, using a hairdryer or water, the tube is heated and then removed.
Assembly is carried out in reverse order.
As you can see, it is quite possible to disassemble the Lada Vesta fuel module yourself and replace some of its components.
Signs of part wear
A sign of a clogged filter element is a pressure drop in the rail to 3.5-4 atmospheres, accompanied by problems starting the engine and increased fuel consumption. When idling, there are dips until the engine stops.
A clogged filter puts increased load on the electric pump, which begins to make a hum. If the described defects appear, it is necessary to remove the fuel cassette and check the condition of the filter and pump, since damage to the pump has similar symptoms.
Messages 17
1 Topic by Axel 2016-01-06 09:26:46
- Axel
- Participant
- Inactive
- Posts: 973
- Thank you: 139
Topic: Fuel filter
As far as I understand, it is not possible to change it separately; it is combined with the fuel pump. It will be a bit expensive.
2 Reply from Fan 2016-01-06 15:36:41
- Fan
- Moderator
- Inactive
- From: Smolensk region
- Posts: 1,017
- Thank you: 204
Re: Fuel filter
And why this nonsense stuffing without photos and links? This is not how topics are created on normal forums.
- Abrams
- Participant
- Inactive
- Posts: 598
- Thank you: 120
Re: Fuel filter
Are the pump and filter from Renault?
4 Reply from Fan 2016-01-06 17:31:40
- Fan
- Moderator
- Inactive
- From: Smolensk region
- Posts: 1,017
- Thank you: 204
Re: Fuel filter
I don’t know why the fuel pump is there, but on Vesta now, like in many foreign cars, a fine filter is built into the fuel pump, but it is REPLACEABLE. The procedure for replacing it will now become somewhat more difficult; you will have to remove the fuel pump from the tank, but this will not have to be done every 10 thousand. According to the regulations, it seems 100 thousand, but here people usually change more often. On Grant I changed it to 40, cut it later, examined it - everything was clean.
- Fan
- Moderator
- Inactive
- From: Smolensk region
- Posts: 1,017
- Thank you: 204
Re: Fuel filter
- Axel
- Participant
- Inactive
- Posts: 973
- Thank you: 139