How to tighten the parking brake cable of a VAZ 2109
The hand brake, also called the parking brake, must block the rear wheels. This function is carried out due to the VAZ 2109 handbrake cable, which has the ability to stretch over time. In order to restore the functionality of the cable, it is necessary to adjust and tighten it; in some cases, it is necessary to replace the handbrake cable. This publication will tell you how to tighten the parking brake cable of a VAZ 2109.
There is a need to check and adjust the handbrake of the VAZ 2109, having driven more than 30,000 km. The handbrake of the VAZ 2109 should hold the car on a slope of 25%. In this case, the movement of the handbrake lever should be within the range of several clicks. If the car is a VAZ 2109 after 1995, then this figure is from 2 to 4 clicks. If the car is of earlier years of production, then to hold it you need 4 to 5 clicks of moving the VAZ 2109 hand brake lever.
More than 4 clicks of the VAZ 2109 handbrake will not keep the car on a slope, and less than 2 will partially block the wheels in motion.
You can check the operation of the VAZ 2109 hand brake on a level surface.
To do this, lift the handbrake lever 2-3 clicks. You also need to lift one rear wheel using a jack. Now you can check the operation of the VAZ 2109 handbrake. If the raised wheel turns easily, then you need to tighten the VAZ 2109 handbrake cable.
Repair work on adjusting the parking brake cable on a VAZ 2109
— In order to tighten the VAZ 2109 parking brake cable, drive the car into a viewing hole, overpass, or use a special lift.
— If your car is a VAZ 2109 manufactured before 1995, then lift the lever 1-2 clicks.
— We will adjust the hand brake of the VAZ 2109 directly in the brake mechanisms. — The equalizer has a lock nut, you need to loosen it.
— Now the adjusting nut of the equalizer must be tightened. This must be done until the moment when you feel the tension in the VAZ 2109 handbrake cable. If it is impossible to tighten the VAZ 2109 handbrake cable, it must be replaced.
— As you remember, the full stroke of the lever is from 2 to 4 clicks. Check the working condition of the lever.
— Once the check is completed, the equalizer locknut can be tightened. Do it all the way.
— Now check the movement of the wheels. Lower the handbrake lever all the way down. Turn the wheels in a circle. The rotation should be uniform, without jerking.
club2108.ru
Rules for adjustment and replacement
Adjusting or replacing the VAZ-2109 handbrake cable, as a rule, is necessary only after the domestic car has accumulated another 30 thousand km. The car owner will have to think about how to tighten this structural element even when the hand brake cannot hold the vehicle on a slope that has a slope of about 25%. If the unit functions quite clearly, the car owner should hear several clicks when moving it. Almost all vehicles that left the Volga Concern after 1995 should “click” 2–4 times. Machines with a long life cycle can count around 4-5 clicks.
If the car starts to “click” more than four times, then the hand-operated parking brake will not be able to hold the car on a significant slope. In turn, just two clicks will only partially block the wheels while moving.
Before taking action, a person who is thinking about how to tighten the handbrake on a VAZ-2109 should check its functionality on a more or less flat surface.
Replacing the handbrake for Lada 2109 (VAZ 2109)
The handbrake helps keep the car in one place during long periods of parking. It is also required for emergency braking.
Using the handbrake for drifting, which is popular among young drivers, is strongly discouraged.
View from the salon
Design
The handbrake (RT) system on VAZ 2109 cars is quite simple. It includes two main nodes:
- Braking devices for rear wheels;
- Mechanical drive.
The drive, in turn, consists of:
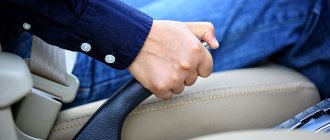
- Handbrake lever located in the cabin on the right hand of the driver;
- Front and rear drive cables.
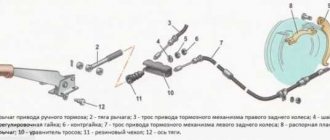
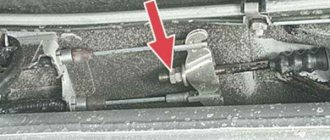
The ends of the rear cable are connected to the levers of the manual brake shoes. In the section where the front cable is brought to the rear area we are dealing with the following elements:
- Equalizer;
- Adjusting nut;
- Tension spring and locknut. They connect the front cable to the car body bracket.
By releasing the lever, the spring releases the tension on the cables and the equalizer returns to its original position. This is where adjustment is required.
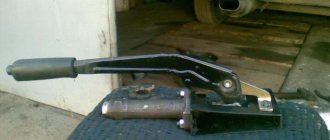
Dismantled RT handle
Adjustment or replacement
In some situations, you can get by with simply adjusting the cables, but sometimes they have to be changed completely.
Before making a final decision, we advise you to check the current condition of the PT and determine whether you just need adjustment, or whether you will have to change the cable.
Checking status
Normal PT adjustment ensures that the vehicle is held on a slope. This corresponds to 3-8 clicks of the handle on newer nines or 5-7 clicks on a VAZ 2109 produced before 1995.
To carry out the test, follow a few simple steps:
- Find a slope that has about 25 degrees;
- Turn the handbrake to the required position;
- If the car starts to roll, the handbrake does not hold, adjustment is required;
- If there is no such slope nearby, the check is carried out in a garage;
- Place the car on a flat surface, raise the handbrake handle all the way;
- Approach from behind and try to push the car with maximum force;
- If the car begins to move, the RT requires adjustment;
- Check the operation of the handbrake at 2 clicks on newer versions of the VAZ 2109 and not reaching 5 clicks on versions before 1995. If the handbrake is working at full strength, the cable will be tightened. It will also need to be adjusted.
Operating a car with a tightened PT cable is also dangerous, as this leads to overheating and wear of the rear brake pads.
Bottom view
Adjustment
To adjust the PT cable you will need a pit, overpass or lift. Next we proceed according to the following algorithm.
- Raise the handbrake handle 2-3 clicks from the passenger compartment.
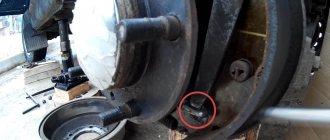
- Get under the car and loosen the locking nut of the parking brake cable equalizer. Before doing this, it is better to treat the nut with a wire brush to remove all dirt.
- Then act according to the circumstances. If the cable is overtightened, it must be loosened by appropriate manipulation of the nut. If the cable holds too weakly, the nut must be tightened more tightly.
- If tensioning the cable does not produce any result, then the element is already at the limit of its capabilities. Therefore, the only solution to this situation is replacement.
- When adjusting the degree of tension, be sure to evaluate the adjustment of the cable along the PT lever. As you remember, normally it is 3-8 clicks for more recent versions of the VAZ 2109, or 5-7 clicks for nines that were produced before 1995.
- Check the freedom of rotation of the rear wheels. If you overtighten the cable, the wheels will spin with difficulty and not as freely as they should.
- After making the adjustment, tighten the locking nut back and check the operation of the handbrake again by driving up a slope or pushing the machine with the PT on.
Adjustment process
Replacement
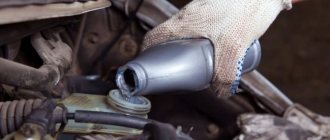
In some cases, heavy movement of the cable in the sheath is due to lack of lubrication. To eliminate this defect, fill the shell with transmission or engine oil. Pour until grease flows out of the opposite end of the cable casing. Remember to move the cable while adding lubricant.
Cable replacement procedure
But lubrication is more of a temporary measure. If signs of cable wear are detected, it is better to replace it with a new one. This is done as follows.
- Loosen the tension on the PT cable locking nut.
- Unscrew the equalizer adjusting nut, which will loosen the handbrake drive cables.
- Raise the rear of your VAZ 2109 using a jack, then remove the brake drum and brake pad.
- Unscrew the drive cable end from the drive arm.
- Disconnect the fastening nut, and then remove the PT cable holder on the rear suspension beam of the vehicle.
- Remove the shell bushing from the hole in the brake shield.
- Pass the end of the PT cable through the hole in the brake shield.
- Remove the PT cable from all holders on the body of your car.
- Disconnect the end of the PT cable from the equalizer.
- Push the cable end out of the bracket to remove the cable.
- Install a new, tested cable, proceeding in the reverse order.
- Do not forget to adjust the cable tension and the performance of the restored RT at the final stage of assembling the unit.
Less work - longer operation?
Many drivers believe that rare use of the handbrake ensures maximum performance of this unit. In fact, such an attempt to preserve the RT resource gives a completely opposite effect.
The less often you use the handbrake on your car, the less movement the cable makes in its sheath. This leads to loss of efficiency and performance of the cable. Loss of mobility leads to the appearance of breaks when the handbrake is rarely applied. As a result, at the most inopportune moment the car does not stand still as it should.
To prevent problems with the RT, periodically inspect the condition of the unit, and also do not forget to squeeze the parking brake handle when necessary and required by traffic rules.
Replacing the parking brake cable on a VAZ 2109 car must be done if the sheath or the cable itself is damaged, or when it is stretched, which does not allow proper adjustment of the handbrake. The cable is also removed to lubricate it, which is recommended to be done once a year immediately before operating the car in winter, so that it freezes less in severe frosts.
We carry out repair work on an inspection pit or overpass. Prepare a standard set of tools and you can get started.
- Having driven the car into a pit, the first thing we do is clean the surface of the leveling bar and its fastening nuts from dirt.
- Next, loosen the locknut and unscrew it completely from the rod, loosen and unscrew the adjusting nut.
- Now we need to hang the rear of the car. Loosen the wheel bolts. Then we lift the car with a jack and put supports under the body and lower it. We do the same on the other side. We remove both wheels.
- Next we need to remove the brake drums by unscrewing the locking pins and knocking them off the shoes using a hammer and a wooden spacer.
- Remove the rear brake pad, to the lever of which the parking brake tip is attached. Then remove the cable end from the shoe drive lever.
- Now unscrew the bolt securing the cable sheath to the rear suspension beam.
- From the back of the brake flaps, we pull out the sealing bushings of the cable sheath, and then pull the cable itself out of the holes. And so on each side.
- And at the final stage, we remove the shell from the holders on the body, after which we remove the ends of the cable from the equalizer.
This completes the removal process. Next, based on the purpose of repair, the cable is either replaced with a new one or lubricated. For lubrication, it is necessary to pour oil into the shell using an oil can, and then develop it.
There is also an opinion among drivers that if you use the handbrake less often, it will last longer. Quite the opposite. The less often you use it, the faster it will fail, since the lack of lubrication, plus sticking of the cable to the inner surface of the sheath due to the accumulation of dust, makes it difficult to move over time, which increases the subsequent load when using it.
At this point, the repair work to replace the parking brake cable on the VAZ 2109 has been completed. Perform installation in reverse order.
Task: strengthen the handbrake of the VAZ 2108
the sole is welded to the handbrake, screwed into the regular place through the holes
hand brake lever from Toyota Nadia on VAZ 2108
clamp - high DIN nut M8, a hole is drilled in it on the side d = 3mm (cable diameter) and we tighten a cone bolt from below, for an internal hexagon 4, clamp M6, made using the same technology
handbrake drive - made of 3 casings 2110, a housing and thrust bushings are used, connecting bushings are made on a lathe - the length of the bushing is 30 mm., on both sides, holes d = 11 mm are made to meet each other (according to the diameter of the casing) on 13mm deep, 3.5mm through hole in the center. A stainless steel cable, d=3mm, is threaded into the housings and the ends of this cable are clamped with DIN M8 nuts, 2 pcs each.
handbrake in the VAZ 2108 interior
2 connecting sleeves on each side, one, placed on a straight line (at a bend it is not advisable - the cable will fray and jam
parking brake, self-propelled drive.
Result: work to strengthen the hand brake of the VAZ 2108 has been completed.
https://www.drive2.ru/l/4258841/
Sources
avtozam.ru
Design
The handbrake (RT) system on VAZ 2109 cars is quite simple. It includes two main nodes:
The drive, in turn, consists of:
- Handbrake lever located in the cabin on the right hand of the driver;
- Front and rear drive cables.
The ends of the rear cable are connected to the levers of the manual brake shoes. In the section where the front cable is brought to the rear area we are dealing with the following elements:
- Equalizer;
- Adjusting nut;
- Tension spring and locknut. They connect the front cable to the car body bracket.
By releasing the lever, the spring releases the tension on the cables and the equalizer returns to its original position. This is where adjustment is required.
Dismantled RT handle
VAZ 21099 - adjusting the parking brake
A correctly adjusted handbrake on a VAZ 21099 and other models operates at 2-6 clicks for cars manufactured after 95 and at 4-6 clicks for cars produced before 95. As a rule, before proceeding with the adjustment, it is necessary to check the quality of operation of the parking brake; to do this, we drive the car onto a slope, this could be the exit of an overpass, and put it on the handbrake; if the car rolls down, it is necessary to carry out adjustment; the same adjustment is performed if the handbrake is activated earlier the recommended number of clicks, as this can lead to wheel braking and premature wear of the pads.
To carry out repair work, prepare a standard set of tools and perform the following sequence of actions:
- To make adjustments easier, we drive the car onto an inspection hole or overpass.
- Next, use a metal brush to clean the surface of the equalizer and adjusting nuts from dirt.
- We set the lever to the position corresponding to the wheel locking, that is, 2-6 or 4-6 clicks.
- Then use two wrenches to unscrew the lock nut, while holding the adjusting nut from turning.
- We hang the rear of the car so that the two wheels rotate freely without touching the floor surface.
- By rotating the adjusting nut, we catch the initial moment of wheel locking and tighten the cable a little more.
- We tighten the lock nut, holding the adjusting nut from turning, and check the travel of the handbrake handle inside the car. Also check the rotation of the wheels; if they cannot be moved at this position of the handle, then the adjustment can be considered complete.
At this point, the repair work to adjust the parking brake on the VAZ 21099 car has been completed. Check the quality of the work done and, if necessary, adjust the tension of the cables.
zubilovaz.ru
Doesn't hold the handbrake? We'll fix it in an hour!
This article applies not only to nines, but also to all front-wheel drive cars produced to this day at the VAZ plant!
Therefore, I urge you to share this post with all drivers of Nines, Tens, Prior, Kalin, etc. In one flight magazine I read an article where a person talks about being in an accident due to brake failure. Moreover, according to him, the speed was low, but the accident could not be avoided due to the impossibility of stopping the car in principle. To my question: “why didn’t you use the handbrake to brake?”, I received the answer: “that’s not how it works.” Judging by my friends and entries in logbooks, it seems to me that half of the front-wheel drive cars of domestic production have the same problem with the parking brake, and one gets the impression that this is normal, but it is not! According to traffic regulations, it is prohibited to operate vehicles if the parking brake system does not ensure that the vehicle is stationary when fully loaded on a 16-degree slope. It should also ensure that the vehicle remains stationary when equipped on a slope of 23 degrees. If your parking system does not meet these requirements, then you are breaking the rules. In fact, solving a problem with the parking brake is not difficult, moreover, it will not take as much time and effort as it seems. I propose to verify this in my article. To solve this problem, you and I will need at least a minimum set of tools, namely: - a key for removing the wheel at “19”; — a key set to “13” (preferably two keys, or even better an extended wheel wrench with a ratchet); — key to “7”; - jack; - ruler (minimum 21 cm); - pliers.
Is the entire instrument ready? Then we go to the overpass or pit. For clarity of the whole process, I created a three-dimensional model of the parking system on the computer, which we will use to understand. For a simpler understanding of the material, the model has been simplified in places. A general view of the parking system is shown in the figures below:
How to pull the handbrake on a VAZ-2109
Handbrake VAZ 2109
Traffic regulations do not allow operating a vehicle with an insufficiently adjusted handbrake. Technically, it is more correct to call this mechanism a parking brake.
It ensures vehicle immobility both during long periods of standing at traffic lights and when parking the vehicle.
The service life of the parking brake device is not inferior to the service brake. As a rule, wear of the brake pads does not affect the strength of the car on a slope. Each handbrake has a brake pad wear compensation device.
But in the design of the parking brake system there is one more part, the drive cable, which has the ability to stretch. Therefore, when once again the tightened lever of the parking system does not ensure the car does not move, it means that it is time to go under the car.
It should be borne in mind that all of the above features are only suitable for the mechanical hand brake that the VAZ-2109 is equipped with.
Procedure for carrying out operations
The regulations for carrying out maintenance operations require monitoring and tensioning the drive cable every 30 thousand kilometers. Of course, this interval can be slightly adjusted, taking into account the characteristics of the vehicle’s operation.
But if the owner still adheres to the factory recommendations, then the procedure for carrying out the work is as follows:
- pre-tighten the drive handle two clicks;
- on the central extension, under the bottom, unscrew the locknut, providing access to the adjustment mechanism;
- the adjustment nut is rotated “tightening”, visually checking the condition of each cable of the left and right wheel;
- You can more accurately understand the sufficient degree of tension by tightening the handbrake lever five clicks. It will not be possible to turn a freely suspended rear wheel manually. The serviceability of the handbrake can be more accurately diagnosed only on a special stand.
If the adjustment is completed, you can fix the tension level by tightening the locknut. Keep in mind that a situation where the adjustment sector is not enough to tension the cable may well occur.
Then it will be necessary to install a new handbrake cable. And this procedure will be more expensive, both financially and in time. However, such a malfunction occurs extremely rarely.
www.vsepoedem.com
Differences between vehicles of other VAZ models
VAZ Classic cars (models 2101 to 2107) were equipped with a traditional hydraulic drive. In this system, the force required to operate the mechanisms installed on the wheels is created using the GTZ when the driver presses the pedal. The increased pressure from the master cylinder is transmitted through the lines to the wheel cylinders, which move (in disc brakes) or spread apart (in drum brakes) the pads.
The wheels of VAZ-2101 – 2107 vehicles are equipped with two types of brake mechanisms:
- modern disc wheels - on the front wheels;
- classic drum ones - on the rear wheels.
Both of these mechanisms are frictional, based on the friction force between moving and stationary parts. The difference between disk and drum mechanisms lies in the position and form of interaction of these parts.
The VAZ 2114 and 2115 use a working vehicle of the VAZ 2110 family with diagonal separation of contours, which ensures high active safety of the vehicle. One hydraulic drive circuit ensures the operation of the right front and left rear mechanisms, the other - the left front and right rear.
If one of the circuits of the working vehicle fails, the second circuit is used, ensuring that VAZ 2110, 2111, 2112 vehicles are stopped with sufficient efficiency. The hydraulic drive includes a hydraulic drive (indicated in the figure as number 6) and a dual-circuit regulator (number 9) of the rear brake pressure. The parking vehicle is driven by the brake mechanisms of the rear wheels.
- Front wheel mechanism.
- Pipeline of the “left front-right rear” circuit.
- Main cylinder.
- Pipeline of the “right front-left rear” circuit.
- Master cylinder reservoir.
- VU - vacuum amplifier.
- Rear wheel mechanism.
- Elastic pressure regulator drive lever.
- RD - pressure regulator.
- Pressure regulator drive lever.
- Pedal.
- A - flexible hose of the front brake.
- B — flexible rear brake hose.
How to check and tighten the handbrake on a VAZ 21099, 2109, 2108
Over time, the handbrake weakens and no longer securely locks the car's wheels. Therefore, it needs to be tightened periodically - approximately every 25-30 thousand kilometers.
To tighten the handbrake cable, you will need an open-end wrench set to “13”.
Step-by-step instructions for checking and tensioning the handbrake on a VAZ 2108, 2109, 21099:
- Drive into the pit.
- Raise the handbrake handle until it clicks two or three times.
- Go down into the hole and tighten the locking nut.
- Tighten the nut that tightens the handbrake cable.
- Check how reliably the handbrake works. To do this, just raise it 5 clicks.
- If you are satisfied with everything, screw back the locknut securing the cable tensioner nut.
The most correct option for tightening the handbrake is when the driver, in order to put the car on the handbrake, needs to lift the handle three clicks. You can focus on this indicator directly during stretching. In this case, one person sits in the cabin and checks the number of clicks, while the other is in the pit and gradually tightens the cable.
Video instructions for checking and tightening the handbrake on VAZ cars:
Rate this article: Share with friends!
pol-z.ru
Less work - longer operation?
Many drivers believe that rare use of the handbrake ensures maximum performance of this unit. In fact, such an attempt to preserve the RT resource gives a completely opposite effect.
The less often you use the handbrake on your car, the less movement the cable makes in its sheath. This leads to loss of efficiency and performance of the cable. Loss of mobility leads to the appearance of breaks when the handbrake is rarely applied. As a result, at the most inopportune moment the car does not stand still as it should.
To prevent problems with the RT, periodically inspect the condition of the unit, and also do not forget to squeeze the parking brake handle when necessary and required by traffic rules.
Source
Why the VAZ 2109 handbrake does not work, how to restore it
The parking handbrake is designed to prevent the vehicle from moving during parking; it is useful when the brakes fail and you need to brake urgently; it is necessary for repair work (changing wheels, jacking up and other work).
Basically, the handbrake stops working if the handbrake cable flies off the parking brake lever, due to weak tension on the handbrake cable, a break in the handbrake cable, or wear on the brake pads. The handbrake does not work. For the handbrake to fail, it is enough to drive just one trip with the handbrake pulled. The design in the handbrake drum allows part of the shoes to be pressed one-quarter of the way to the braking surface. Thus, when moving, some of the pads quickly wear out and do not reach the drum. This reason can be eliminated by adjusting the handbrake cable. After driving with the handbrake pulled, the cable needs to be tightened approximately 4 times. Then the pads wear out and in order to restore the operation of the handbrake, the pads need to be replaced.
The reason for the failure of the handbrake may be jamming of the cable due to mechanical damage, rust, moisture and dirt. In this case, you can repair the handbrake if you lubricate and develop the cable itself. This action does not help for long, so it is still advisable to replace the cable.
A handbrake malfunction may include a broken, stuck, or jammed ratchet or ratchet lever.
How to restore the handbrake on a VAZ 2109. Repair begins with adjusting the cable. The correct setting is considered to be such that the brake lever is activated after 4 clicks before the wheels lock.
If the tightening does not produce results and it is no longer possible to tighten the cable, remove the rear wheels to make sure that there is free movement on both sides, you need to inspect the places of the cable to the brake shield and to the body, then check the condition of the pads and remove the rear brake drums. At this stage, repairs and diagnostics of the VAZ 2109 are considered complete.
If the handbrake cable is very stretched, it makes sense to place a 2 cm thick bushing under the adjusting pin, thereby extending the service life of the handbrake. After replacing the cable or pads, re-adjustment is carried out after one and a half thousand kilometers. It is necessary to adjust the parking brake when the number of clicks when applied is more than five.
How to replace the handbrake cable It is not difficult to replace the cable, you just need to take a closer look at how it is attached and it is easy to replace it. If the handbrake cable flies off the parking brake lever It happens that the cable is excellent, the brake pads are good, but the cable flies off the handbrake lever. A very simple way to prevent the cable from falling off. When you have put the cable in place, you need to seal it with American sealants. The sealant holds it well on the lever and comes off easily when replacing the pads. After covering it with sealant, you need to give it time to dry, about an hour.
Is it necessary to remove the muffler in order to tighten the handbrake on a VAZ 2109? You don’t need to remove the muffler, you should pull it out slightly, tighten the handbrake with a spanner, although you can’t turn it much, but it’s faster and easier than removing the muffler.
It’s enough to simply tighten the disk, but to do this you will have to crawl under the car, jack up one side of the car, and to prevent the car from falling off the jack, you need to place a brick under the jacked wheel or place a stump near the jack. If there is a hole in the garage, then you do not need to lie under the car. The cable needs to be tightened with a nut, to do this, find this nut and place, climb under the car, see a long pin with a nut, the cable is attached to it, and see the ends of the handbrake cable. This nut must be tightened until the handbrake moves above 4 clicks. If you tighten the nut and the handbrake holds on the fourth click, then this is great. But this does not always happen. It often happens that you seem to have tightened the nut all the way, but the handbrake still doesn’t hold, so change the brake pads.01/22/2014, 00:57 | Romanov Victor
motor.chernykh.net
Sequence of repair work
So, car owners who do not know how to pull the handbrake on a VAZ-2109 should position their vehicle above the inspection hole, drive it onto an overpass, or, in the absence of all of the above, resort to using a special lift.
If the car was produced before 1995, the handbrake will have to be lifted by the driver by only one or only two clicks. It should be noted that the adjustment of the mechanism will be carried out directly in the braking device.
The adjusting nut should be tightened until the car owner feels that the cable is tight
The adjustment should begin with an equalizer equipped with a lock nut. It is this element of the mechanism that will have to be unscrewed first.
The next step is to tighten the adjusting nut. The manipulation should be continued until the car owner himself feels the level of tension in the drive cable. It should be taken into account that it will not be possible to tighten the cable endlessly; someday there will come a time when it will need to be replaced.
Due to the fact that the full operating stroke of the parking brake cannot exceed 4 clicks, you should adjust it step by step and check the working condition of the device.
In the end, when the checking actions bring a positive result, you will need to fully tighten the lock nut of the equalizer and make sure that the wheels are functioning properly. After this, it is important not to forget about releasing the lever (it must be set to the lower position). Then you should spin the wheels so that they make several full revolutions. At the moment of rotation, you should make sure that everything happens as evenly as possible, without unnecessary jerks.
Handbrake problems
VAZ 2109 handbrake adjustment
Usually the main malfunction manifests itself in the fact that the handbrake no longer holds the car, so it becomes necessary to adjust it (see Adjusting the handbrake yourself). This problem often occurs in the case of domestic cars. Another malfunction lies in the parking device; for example, the parking brake warning light may not light up or stay on continuously.
Adjusting or tightening the hand brake
VAZ 2109 handbrake and its cable
As noted earlier, the mechanical drive of this device is connected to the same brake pads of the rear wheels, which begin to function due to the main, hydraulic brakes of the car. For this reason, faults occurring directly in the drum will not be affected. In the worst case, there would be problems with the main brakes.
Tools
If the handbrake does not work, it can be adjusted. To do this you will need to acquire the following tools:
- wrench size 13;
- pliers;
- you can’t do without an inspection hole or overpass.
Replacement at a car service
Why shouldn't you contact a car service? The answer is simple - not economically, and not always of high quality. It seems that the procedure is not complicated, but the cost of the work is daunting. In addition, at most service stations they try to slip in their own cable, which is also not cheap. The average price in a store will be 200 rubles, while the service can rip off 500 just for a part. The cost of the handbrake cable varies depending on the manufacturer.
By making the replacement yourself, you will know exactly how well the work was done. Replacing the handbrake cable of a VAZ 2114 is a responsible matter. If you do everything according to the instructions, then there should be no problems. The main thing is not to forget about safety precautions.