Home » Domestic auto industry
Reading time: 11 minutes. Updated 08/04/2019
Replacing the crankshaft pulley oil seal (negative result), as well as changing the oil and adding antifreeze
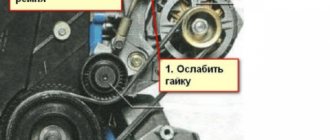
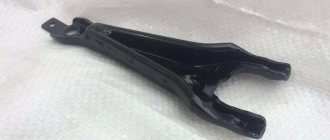
The cold has arrived on you too! I open the hood and there is oil all over the front cover of the engine. After looking at the whole thing a little, it turned out that oil was flying from under the crankshaft pulley. I did a little searching on the Internet about what and how, bought what I needed and went ahead with a friend to change the oil seal. We removed the hood to make it easier and started. In principle, everything went well, there were only minor problems with the pulley nut, in order to break it you had to put on a 38 key and rest it against the stabilizer and with short turns of the key, break it off with the starter, but there was one catch, a 38 key that I bought in the store “Samara” for 850 local money turned out to be made of such shitty metal that at the first pull of the starter it simply bent, I thought that was ALL! At this point the repair was completed, but then the father brought out a normal peasant wrench for 36-38 made of durable alloy, put it on, a friend turned it with the starter, the nut was easily unscrewed. photo of keys:
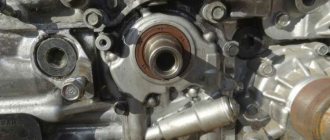
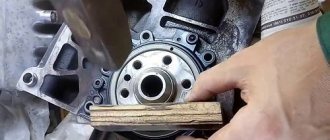
We replaced the oil seal, having previously lubricated it on the outside with sealant, cleaned the pulley and the seat for the oil seal and rinsed it with gasoline. We attached the pulley, tightened the nut, changed the oil in the engine, with an oil filter, by the way, like many people I probably don’t have a special one. a wrench for unscrewing the oil filter, some people twist it with a belt, but I hammer a screwdriver into it and unscrew it. It's not the same for everybody :-). Even after replacing the thermostat (I changed it in the fall), the car practically does not reach operating temperature, and now it’s generally so cold, well, just on the sly, we covered the radiator with cardboard and removed the fan from the pump pulley, now it’s better, the car warms up noticeably faster, and Even when the thermostat opens, the engine does not cool as much as before. Also, in the process, opening the radiator cap, a lot of air came out (I think it’s because of the heater radiator, which leaks a little, I already bought a new one, I’ll change it soon), lifting the front part of the car, they filled in antifreeze, about a liter o_O came in, I was shocked, after This made the stove heat better. While they were pouring antifreeze, we saw for the first time an unusual spiral inside, I personally, without attaching any importance to it, pulled it out. Here is a photo:
The crankshaft oil seals (cuffs) act as plugs that lie at the ends of the shaft to prevent oil from leaking out and dust from entering the engine. Signs of wear on the crankshaft seals, both front and rear, are splashing and oil leaks. The standard service life of oil seals is no more than 150 thousand km.
When is it necessary to replace the crankshaft oil seal?
- if an oil leak occurs in the pulley area, or at the junction of the engine and gearbox;
- when the oil seals are “squeezed out”, that is, they are displaced outward from their places, which indicates increased oil pressure;
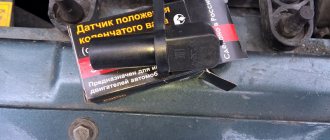
On the injection model there is a crankshaft position sensor; it measures and synchronizes its rotation frequency with the fuel supply. If the sensor has limited the engine speed, then the reason is also a faulty oil seal. The sensor is placed on the oil pump cover.
What reasons lead to premature wear of oil seals?
- poor material, counterfeit parts;
- increasing engine speed, using low-quality fuel, incorrect ignition timing;
- engine overheating;
- long-term operation on old oil and a dirty filter.
During winter operation of the car, the breather can become clogged with snow, and the increased gas pressure can “squeeze out” the seals.
The front seal changes much faster than the rear. To replace the rear one you need to spend much more time.
Regardless of which oil seal (or both, as recommended by the experts) will be changed, the following is required:
- put the car in the pit.
- de-energize the battery;
- engage first gear to lock the crankshaft;
- securely secure the vehicle with the parking brake.
Replacing the rear oil seal
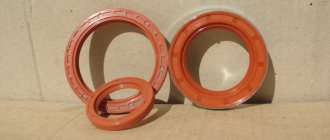
Now we are changing the rear crankshaft oil seal (cuff) on the VAZ 2107. This will require more time, patience and strength, since to access it you need to disconnect the gearbox. All preparatory work is carried out to the same extent, but the car is in neutral gear. Since you need to hang the rear wheels, you need to do this in a pit, and not on an overpass. The external size of this oil seal is 90 mm, and the internal size is 70.
First you need to disconnect the cardan from the gearbox:
A car's engine can become oily for various reasons, but mainly oiling occurs precisely when the oil seals are deformed, which need to be replaced from time to time with new ones.
Note! To replace the front crankshaft oil seal, you will need to take with you: Wrenches, as well as a special “36” wrench, which is designed for unscrewing the crankshaft . You will also need a couple of screwdrivers, it would be advisable to also stock up on a mounting blade, mandrel, hammer and bit!
Summary:
Where is the front crankshaft oil seal located? The oil seal is located in a special hole allocated for it in the camshaft drive . In order to at least visually understand where the oil seal camshaft drive cover is circled in red , and the blue arrow indicates the crankshaft pulley immediately behind which the oil seal .
When should you replace the front crankshaft oil seal? As mentioned above, the oil seal must be replaced if various types of deformation are detected on its surface, due to which engine oil will immediately begin to flow out of the car engine seal
We all know that when the engine is running, the car’s crankshaft rotates, so when the engine is running, due to a deformed oil seal, oil can come out of the engine in a splashing stream, which is why usually the entire front part of the engine will always be oily.
Question? Why are you changing the crankshaft seal ? (Write your answer in the comments)
Video “Replacing the crankshaft pulley on a VAZ classic”
This video talks about oil leakage due to wear on the crankshaft pulley.
The front oil seal of the VAZ 2101-2107 engine is used to prevent engine oil leaks in the place where the accessory drive pulley is attached to the end of the crank. Although the sealing lip is made of high-quality fluorine rubber, over time its working edge wears out and lubricant leaks into the gap. Today we will share a method for replacing the front crankshaft oil seal of a VAZ “classic”. Even a novice driver can cope with the job, because to do this you don’t even have to remove the camshaft drive cover from the engine.
How to replace the front crankshaft oil seal on a VAZ 2101-VAZ 2107?
Note! At the moment there are two ways to replace the front oil seal , one of them is fast and the other is slow but more careful, which one you choose is up to you! (The slow method is described in the article. And the fast method is described in the video clip which is located at the very end of the article)
Removal: 1) At the beginning of the operation, remove the camshaft from the vehicle engine. (How to remove the cover, see the article: “ Replacing the chain tensioner shoe,” in paragraphs “1-8”)
Note! the oil seal before and have experience in replacing it, then the camshaft drive does not need to be removed from the car engine, but the oil seal can be replaced immediately on the installed cover.
But there is one “But” here! If we take into account that there will be little space for replacing the oil seal, then there is a possibility that the oil seal will be pressed into the drive cover with a distortion, which may require repeated replacement of the oil seal, but only with the cover removed!
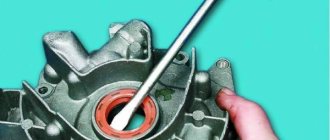
the oil seal using a hammer and punch .
Note! to remove the oil seal only from the inside of the cover, otherwise removing the oil seal will be problematic!
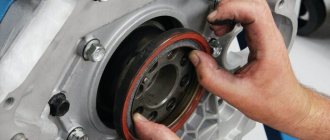
Installation: 1) First, lubricate the new crankshaft oil seal , and then install it on the outside of the cover in its place. When installing the oil seal, be sure to orient its working edge towards the centering protrusions, which are indicated by the letter “A”.
Note! So that you understand what the working edge of the oil seal is, look just below the photo and you will understand that the working edge differs only in the presence of a spring!
2) Next, using a mandrel of a suitable diameter and a hammer, press in the oil seal until it stops.
3) Now pick up the previously removed camshaft and look at its condition; if it is severely compressed or deformed, then replace the old gasket with a new one.
Note! To ensure that leaks through the camshaft , it is recommended to apply a thin layer of silicone sealant to it on both sides.
And for the convenience of installing the cover, it is recommended to glue the gasket to the cover itself with glue so that it does not fly off during installation!
4) Next, install the cover together with the gasket installed on it in its place, and then tighten all the bolts and nuts that secure this cover.
5) Then, using a special mandrel, center the drive cover so that it is level with the crankshaft .
Note! If you don’t have a special mandrel, then use the previously removed crankshaft to center the cover, but how to do this, you ask? To do this, install the crankshaft , and then tighten the nut securing it!
6) Now lightly tighten all the bolts and all the nuts securing the camshaft .
7) And then finally crosswise tighten all the bolts and nuts that secure the cover.
 Finally, tighten all the bolts that secure the oil pan to the engine.
Note! After the entire operation has been completed, install all remaining parts in the reverse order of removal!
Additional video: Don’t know how to replace the front crankshaft oil seal ? Then, in this case, check out the video, which describes in detail the instructions for replacing it.
Signs of a leaking crankshaft oil seal
The main sign by which ordinary VAZ 2114 owners and illiterate servicemen “sentence” oil seals is an oil leak. Indeed, an oily sump and block on the timing side are a sign of a front oil seal leak, and leaks in the flywheel area are a sign of a rear seal leak. But there are two “buts”.
Signs of oil leakage through the front oil seal
Firstly, oil leaks can be caused by other reasons, and, secondly, leaking oil seals can be a consequence of a more serious malfunction.
Common causes of oil leaks around the seals include:
- Oil pressure sensor or oil filter bracket: Oil may drip from them onto the drive and scatter around.
- Leaking from the oil channel plug under the cylinder head casing.
- Leaking from the camshaft seal.
- A special feature of the VAZ 2114 with an 8-valve engine: the hole of the first manifold stud on the front side of the engine passes through the oil channel. When replacing the gasket on the inlet, this pin must be lubricated with sealant, otherwise a leak will occur.
Often problems with seals are symptoms of other problems. If the leak appears again soon after replacement, it may be due to poor quality consumables, or may be the result of the following problems:
- The breather is clogged (important for VAZ 2114 engines with high mileage - more than 200 thousand kilometers), and the oil seal is squeezed out by crankcase gases. When replacing, it would be useful to remove the valve cover and clean the filter mesh.
- The rings are stuck. Another reason for oil squeezing out through the oil seal. In this case, additional signs will be uneven compression and oil leaks from the dipstick.
- If there is play in the camshaft, the oil seal can be squeezed out by the shaft itself when the clutch is pressed. One of the saddest cases: the solution is engine capital.
Another reason for a leak from the oil seal may be the filling of low-viscosity oil. Follow the manufacturer's recommendations for oils for the VAZ 2114.
In any case, along with replacing the seals, it is better to check the condition of the components that may be associated with their leakage.
In what cases should the pulley be removed?
Most often, it is necessary to dismantle the crankshaft pulley when changing oil seals. The role of the O-rings is to prevent oil from the crankcase from reaching engine components. Over time, the seals wear out, crack, and as a result, oil leaks appear. To fix this, you need to change the seals. During this procedure, you have to remove the crankshaft pulley.
Also, the need to dismantle the crankshaft disk arises when replacing the timing belt on a VAZ 2107 injector. It is changed according to the regulations specified in the operating instructions for the VAZ 2107 injector, as it wears out after a visual inspection or if it breaks. During a technical inspection, the pulley must be inspected to identify any defects. If chips or scratches are found, the part should be replaced.
Damaged part with broken part
The procedure for removing the product itself is not difficult, but some problems arise.
Firstly, with access. The pulley we are interested in is located in the lower part of the engine compartment behind the generator. It is difficult to get to because other engine components are in the way. Before removing the pulley, you need to remove the alternator and power steering belt.
Secondly, the crankshaft pulley mounting nut is very difficult to unscrew. When it is put in place, it is screwed with great effort. This is necessary so that it does not unscrew accidentally while the car is moving, as this can lead to expensive repairs. While the engine is running, the nut is tightened even more. In addition, the process is aggravated by high operating temperatures, at which oil coking and metal corrosion occur under the influence of the external environment.
Why does the oil seal wear out prematurely?
- use of counterfeit spare parts;
- pouring low quality gasoline into the vehicle, constantly running the engine at high speeds;
- motor overheating;
- dirty filter and untimely oil change in the car.
The front oil seal is the easiest to change. The rear one needs to spend much more time.
To replace the oil seal you need to perform a number of simple manipulations:
- The vehicle is driven into a pit;
- The battery is de-energized;
- We start the first gear to fix the crankshaft;
- Fixing the vehicle
Removal instructions
With the clutch disengaged, the crankshaft can be easily turned with a wrench.
To carry out the removal procedure, it is necessary to secure the shaft from turning.
There are special devices that are bolted to the pulley into the technological holes, preventing the shaft from turning. If there is no such device, then you need to install supports under the wheels and place the car on the fourth. You can also secure the crankshaft flywheel by inserting a long screwdriver or pry bar between its teeth.
Where is?
The oil seals are located in small holes on the camshaft drive covers. Being at the ends of the shafts, they perform two roles, the first is to prevent oil from leaking out and the second is to protect the components from dust and dirt entering the system. The camshaft cover is circled in red in the photo. The blue arrow shows where the crankshaft pulley is located, behind which the cuff is located.
Reasons for failure
DIY crankshaft oil seal replacement: 3 instructions for replacing front and rear oil seals
Why does the oil seal start leaking? The reason for this is damage to the sealant material. The oil seal is a reinforced rubber ring. Over time, due to high loads and temperature changes, rubber loses its elasticity, hardens and cracks. As a result, the working fluid leaks out and gets onto other elements, complicating their functioning. There are a number of other indirect reasons, for example:
- poor quality fuel or oil;
- filter contamination (untimely replacement);
- driving with an overheated engine.
In addition, in winter, excess snow can clog the breather, which will lead to an increase in gas pressure, which can dislodge the seal from its place.
The meaning of the primary and secondary shaft oil seals
The vehicle's transmission helps transmit the required torque to the vehicle's wheels in accordance with the vehicle's speed.
In this article we will look at what a gearbox secondary shaft is, and also touch upon such important parts as the bearing, secondary shaft oil seal and their replacement. The gearbox consists of many parts that are connected to each other, allowing them to interact and ensure reliable transmission of torque. Initially, the torque is transmitted from the clutch disc to the gearbox input shaft.
The primary shaft has a short length and a common fastening device with the secondary shaft. However, there is no rigid mechanical connection between these two parts, and they rotate independently of each other.
The third element of the transmission is the intermediate shaft, which is located under the primary and secondary shafts.
The output shaft plays a concluding role in the gearbox. It transmits the converted torque to the shank, and then it goes to the driveshaft of the car. Thus, the secondary shaft provides connection between the gearbox and the chassis of the car, and the level of its operation determines whether the car will move or not.
The bearing of the secondary shaft ensures free rotation of its end in the place where the shaft already leaves the gearbox. From the inside, the bearing is filled with a lubricant, which facilitates the rotation of the part.
The gearbox secondary shaft oil seal is installed in the same place. The oil seal is a rubber O-ring that fits onto the shaft and fills the gaps between the shaft and the transmission housing. The oil seal is designed to prevent oil leakage and ensures the tightness of the system.
Over time, both the seal and the bearing are subject to natural wear. Parts of the bearing are destroyed and begin to loosen the shaft. Gradually, the friction between the parts increases, and the bearing begins to disrupt the shape of the shaft. The balancing of the shaft becomes unbalanced over time and it begins to vibrate.
The very first to suffer is the oil seal, which will lose its shape and will no longer be able to hold oil in the gearbox. The oil gradually disappears and the lubrication of gearbox parts is disrupted. In addition, the oil seal may fail due to wear, which occurs in any case.
The fact is that a rubber product has a certain service life, which is determined by mileage and the oil seal begins to crack and also lose its sealing properties.
Bearing failure is quite difficult to determine. To do this, you need to have good hearing and know your car perfectly. When driving in gears, a hum and vibration may appear from the gearbox; when the clutch is depressed or the gear is disengaged, the hum disappears, but this sound should not be confused with the sound of a faulty clutch release bearing or gearbox input shaft.
The direct and main purpose of these small parts is to reliably seal the metal parts and connections of the gearbox housing and other parts of the vehicle system to prevent transmission oil from leaking. Oil seals are made of durable polyurethane alloy using special compounds, since they are constantly in an aggressive environment.
The manufacturer does not provide a specific guarantee for these parts; accordingly, it does not limit their service life; planned replacement is not required at certain mileages. However, in most cases, under normal operating conditions, the service life of the parts is sufficient for runs of up to 200 thousand kilometers. When used in harsh natural conditions, reliability decreases accordingly, and with it the service life of up to 100 thousand kilometers.
Warning! At the same time, the problem of the “floating” quality of parts from AvtoVAZ does not disappear; there are well-known cases in practice when oil seals failed without “traveling” even 30 thousand kilometers.
These parts are located at the junction of the transmission with the clutch in the case of the primary shaft, and the secondary one is located directly inside at the junction of the flange and the gearbox housing. Sealing of pipes and hoses, as well as metal parts, is achieved by tightly connecting two parts directly to the seals, which is a circle with several layers of polyurethane material.
It is precisely because of the unsatisfactory condition of these small parts that transmission fluid often leaks outside the box. Therefore, responsible owners, when the first signs of malfunction appear, replace the part with a new one. Due to their simple design and the absence of any moving parts, these units cannot be repaired; they are simply replaced with new ones.