Replacing the front crankshaft oil seal
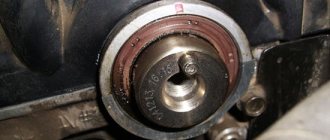
We replace the front crankshaft oil seal when traces of engine oil leakage appear on the wall of the engine crankcase pan, under the generator drive pulley.
Remove the timing belt (see “Checking the condition and replacing the timing belt”). After removing the timing belt, the crankshaft and camshafts must not be rotated to avoid disruption of the engine valve timing and sticking of the timing valves into the pistons. On both sides, we insert the blades of slotted screwdrivers between the oil pump cover and the rear end of the crankshaft timing pulley.
Carefully, so as not to damage the toothed pulley, pry it evenly with screwdrivers...
...and remove the pulley from the crankshaft toe.
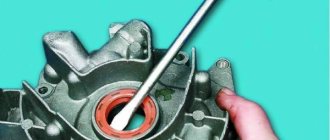
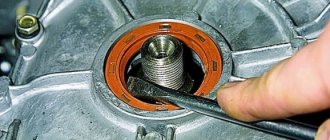
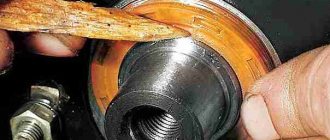
...remove it from the oil pump cover. In contrast to the front crankshaft oil seal of the previous generation VAZ-2108, -21114 engines, to increase the service life...
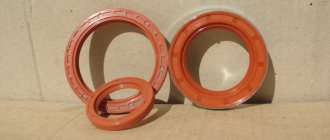
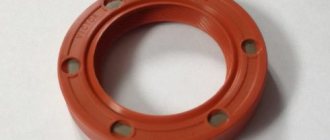
...the manufacturer installs an imported oil seal (with dimensions 28×42×6 mm), made of less elastic material and without a bracelet spring. In the absence of a new imported oil seal, you can install the front oil seal (with dimensions 28×42×7 mm) of the crankshaft of the previous generation VAZ-2108, -21114 engines. Before installing the new oil seal, apply a thin layer of engine oil to its working edge...
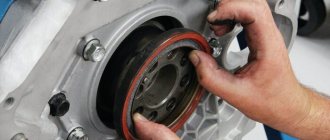
...and press in the oil seal using a tool head or a piece of pipe of a suitable size. We perform assembly in reverse order. In this case, it is imperative to replace the timing belt.
Source
STAGE 1
We drive the car into the inspection hole and lift the front right wheel with a jack. We remove the wheel and, opening the hood, let the engine cool. It is desirable that the engine temperature is approximately 60 degrees Celsius. Before getting to the Kalina timing belt, you need to remove the generator belt and its drive pulley on the crankshaft.
The generator drive device is shown in the photo below:
FIGURE 4 Installing the generator belt for 8 valve Kalina
As can be seen from the photo, the generator belt is tensioned using a roller. To remove the poly V-belt, you need to loosen the tension on this roller. To do this, you first need to loosen the rod locknut with a wrench (19). We loosen the lock nut and use a wrench ( we tighten the rod itself until the belt loosens and it becomes possible to remove it. Now it’s time to get to the generator drive pulley on the crankshaft. To do this, you need to go down into the pit and remove the engine “boot” protection on the right side. Also you need to remove the flywheel protection, which is secured with three bolts (10) from the bottom of the engine, on the gearbox housing. We remove the protection and, by inserting a flat-head screwdriver between the teeth of the ring gear and the gearbox housing, we will lock the flywheel. This is necessary so that when the bolt is unscrewed, the crankshaft does not turn. Bolt ( the key 17) is tightened very tightly, so to unscrew it, you will need to apply some force. To do this, it is better to use a socket with the same size and a pipe as a lever. After tearing off the bolt, unscrew and remove the generator drive pulley.
STAGE 2
At the second stage, we begin to directly remove the timing belt of the Lada Kalina 8 valves...
We leave the pit and remove the upper plastic engine protection. It is attached to the engine with four clips; you just need to carefully pull it off from each clip in turn. Next, remove the timing belt protective cover of the Lada Kalina. To do this, you need to unscrew the three mounting bolts with a wrench (10). One of them is located in front of the casing, and the other two are on the side. Having unscrewed the bolts, we removed the casing, and the entire gas distribution mechanism drive opened in front of us (see photo).
FIG.5 Timing drive Kalina 8 Cl
Now the crucial moment has come! It is necessary to install the entire Kalina timing belt drive strictly according to the marks. To do this, you need to take a socket head (19), preferably with an extension, and screw back the bolt that we unscrewed when removing the generator drive pulley.
Using this bolt, turn the crankshaft clockwise until the marks on the crankshaft and camshaft gears match. The locations of these marks are indicated in the illustrations above.
It is better to turn it by the crankshaft, but it is not advisable to do this with the camshaft. This must be done because the Kalina timing mechanism is driven precisely by the crankshaft, and not by the camshaft.
Next, you need to use a wrench (17) to loosen the bolt securing the tension roller and loosen the tension of the timing belt. Remove the belt and tension roller to check the condition. Usually, when replacing the Kalina timing belt, the roller is also changed, since most often the bearing on it has, albeit a small, play. And this is unacceptable. Checking the condition of the pump. You need to tug on the pulley without removing it, and if there is play, it is better to replace it immediately.
The pump may work for a while, but then it will still fail, and to replace it, you have to open the entire drive again and replace it. And it also happens that it jams and because of this the belt breaks. Then you have to open this entire system again and repeat all the work again. It is advisable to check the condition of the crankshaft and camshaft seals. To do this, you need to remove the corresponding gears and the rear cover of the gas distribution mechanism.
After checking the condition of the seals, we will replace them if necessary, which will save you from unnecessary work in the future.
STAGE 3
So! We removed the timing belt, checked the condition of the pump and seals, and, if necessary, replaced them with new ones. Next, we can begin assembling the Kalina timing belt drive.
Replacing the front crankshaft oil seal of the Lada Granta engine (VAZ 11183, 21116)
We replace the front crankshaft oil seal when traces of engine oil leakage appear on the wall of the engine crankcase pan, under the generator drive pulley.
Remove the timing belt (see “Checking the condition and replacing the timing belt”).
After removing the timing belt, the crankshaft and camshafts must not be rotated to avoid disruption of the engine valve timing and sticking of the timing valves into the pistons. On both sides, we insert the blades of slotted screwdrivers between the oil pump cover and the rear end of the crankshaft timing pulley.
Carefully, so as not to damage the toothed pulley, pry it evenly with screwdrivers...
...and remove the pulley from the crankshaft toe.
...remove it from the oil pump cover. Unlike the front crankshaft oil seal of the previous generation VAZ-2108, -21114 engines to increase the service life...
...the manufacturer installs an imported oil seal (with dimensions 28×42×6 mm), made of less elastic material and without a bracelet spring. In the absence of a new imported oil seal, you can install the front oil seal (with dimensions 28×42×7 mm) of the crankshaft of the previous generation VAZ-2108, -21114 engines. Before installing the new oil seal, apply a thin layer of engine oil to its working edge...
...and press in the oil seal using a tool head or a piece of pipe of a suitable size. We perform assembly in reverse order. In this case, it is imperative to replace the timing belt.
Video on the topic “Lada Granta. Replacing the front engine crankshaft oil seal"
replacing the crankshaft oil seal on a VAZ 8kl Oil leaking from under the front crankshaft oil seal on a VAZ 2114, how to change the oil seal!
Lada Kalina. Replacement of oil seals, timing belt, crankshaft. Source
Replacing the inner CV joint with your own hands
» alt=»»> The procedure for replacing a “grenade” is the same for the entire front-wheel drive VAZ line, starting with 2108 and ending with VAZ-2115, “Kalina”, “Priora”, “Grant”. Before removing the inner CV joint, the oil is drained from the gearbox. Then proceed according to the following algorithm:
- Unlock and unscrew the hub nut. To make the work easier, a piece of pipe about 1 meter long should be put on the key.
- The desired side of the car is hung on a jack or lift.
- Remove the wheel.
- Remove the washer located under the hub nut installation site.
- Disconnect the steering tip.
- The CV joint is removed from the hub.
- Using a pry bar, remove the drive and internal joint from the gearbox.
How to change the “grenade” with the drive removed? To do this, clamp the shaft in a vice, loosen the clamps and remove the boot. After this, the hinge is knocked off the splines with hammer blows.
The new CV joint should be hammered by applying light blows to its end with a hammer. For this it is better to use a wooden mallet. The “grenade” is first filled with a special lubricant.
Before installing a new constant velocity joint, it is necessary to clean its seat from old grease and install a new boot. Assembly is carried out in reverse order.
The repair is considered complete after successful sea trials. In this case, there should be no extraneous sounds from the drive side in all modes of vehicle movement.
Replacing the front crankshaft oil seal Lada Granta
Tools (for 8 valve engines):
- 5 mm hex key
- Screw jack
- Wheel key
- Medium flat screwdriver - 2 pcs.
- Driver for socket attachment
- 10mm wrench attachment
- 17mm wrench attachment
- 15 mm straight box spanner
- 8mm curved box spanner
- Large hammer
- Tool head (for pressing the oil seal)
- Special wrench for tension roller or circlip pliers
Tools (for 16 valve engines):
- Open-end wrench 10 mm
- Open-end wrench 13 mm
- Open-end wrench 19 mm
- 15 mm straight box spanner
- 17mm curved box spanner
- Screw jack
- Wheel key
- Large flat screwdriver
- Medium flat screwdriver
- Medium Phillips screwdriver
- 5 mm hex key
- Ratchet wrench
- 8 mm head
- Large hammer
- Tool head (for pressing the oil seal)
- Special wrench for turning the tension roller (or circlip remover)
Parts and consumables:
- Front crankshaft oil seal
- Timing belt
- Shoe - 2 pcs.
- White spirit degreaser
- Engine oil
- Rags
Replace the front crankshaft oil seal when traces of engine oil leakage appear on the wall of the engine crankcase pan, under the generator drive pulley.
1. Disconnect the wire from the negative terminal of the battery.
2. Set the piston of the 1st cylinder to the TDC position of the compression stroke, as written here (for 8-valve engines) or here (for the VAZ-21126 engine).
3. Remove the timing belt (for 8-valve engines or for 16-valve engines).
After removing the timing belt, the crankshaft and camshafts must not be rotated to avoid disruption of the engine valve timing and sticking of the timing valves into the pistons.
4. On both sides, insert the blades of the slotted screwdrivers between the oil pump cover and the rear end of the crankshaft timing pulley and carefully pry it evenly so as not to damage the timing pulley.
5. Remove the pulley from the crankshaft toe.
6. Using a screwdriver, pry up the oil seal and remove it from the oil pump cover.
Replacing a pump on an 8-valve Kalina
On a Kalina with an 8-valve engine, replacing the pump is not so difficult. But if a novice car enthusiast needs to do the work, he often has various questions. For example, what part to choose, what tool will be needed during work, what to do and in what order.
Which pump to choose for Kalina
When the time to replace the pump approaches or the part fails, many Kalina car owners are faced with the problem of choosing a pump. It’s clear that car owners want it to work for as long as possible. In order not to make a mistake, you need to consult with experts and read the reviews of other drivers. However, preference should be given to factory-made products.
When purchasing, pay special attention to the packaging: it must be of high quality, uncreased, with a gasket inserted inside, a warranty card, and a specified service life of the part. A high-quality product is packaged in a box with a holographic sticker. A TZA pump is installed, which has a fairly long service life.
You need to approach the choice of pump with all responsibility and not purchase a part from an unknown manufacturer.
The most preferred manufacturers of water pumps include:
- Gates.
- Luzar.
- TZA.
- HEPU.
It is quite difficult to answer unequivocally which manufacturer’s pump is better. Each detail has its own pros and cons. Which option to choose depends only on the owner. Pumps from VAZ-2108–09 and 21114 are also suitable for the 8-valve Kalina.
Video: review of water pumps for VAZ
Where is the pump located on Kalina?
On the Lada-Kalina car, the pump is driven by the timing belt and is part of the gas distribution mechanism. To carry out repair work, you need to look for the pump on the right side of the power unit. Without removing the timing belt, only the device pulley can be seen.
The water pump on the Lada Kalina is located on the right side of the engine
What tools will you need?
To replace the pump, you need a standard set of tools (wrenches, sockets), as well as a 6-point hexagon. It is necessary to select a suitable container and rags for draining the antifreeze in order to minimize engine contamination. Even though a new gasket is used when installing the part, for reliability it is recommended to use a sealant with high thermal conductivity.
To replace the pump you will need a standard set of tools that every car owner should have at their disposal: keys, sockets, screwdrivers
Preparatory activities
Preparing to remove the pump comes down to the following steps:
- It is necessary to remove the engine protective splash guard. It is secured with 10mm turnkey bolts.
- Remove the positive terminal from the battery, as well as the high-voltage wires from the ignition coil. The coil, so as not to interfere with free access to the antifreeze drain, is removed and put aside. To do this, use a 5 mm hex key to unscrew the coil bracket fasteners.
- Drain the coolant from the cylinder block into a prepared container by unscrewing the drain plug with a key to “13”, and also unscrew the expansion tank cap.
- If the antifreeze needs to be drained from the radiator, then move the container under the drain hole and unscrew the plug.
How much coolant to drain and add when replacing the pump
Before replacing the pump, you will need to drain some coolant. As a rule, only part of the antifreeze is drained from the cylinder block; there is no need to touch the radiator. If there is leakage from the pipes, replace them too. In cases where the antifreeze and water pump were replaced a long time ago, it is recommended to completely drain all the antifreeze from the system to replace it with a new fluid.
If the coolant has been changed recently, it is enough to remove the hoses from the expansion tank and wait until the liquid drains. After repair work, coolant is filled to the required level. It is recommended to replace the coolant every 60 thousand kilometers. The total volume of antifreeze in the Lada-Kalina cooling system is 7.84 liters.
To drain antifreeze from the cylinder block, unscrew the plug with a 13 key, placing a suitable container under the engine
Pump replacement procedure
After the plastic engine protection is removed, you need to align the marks on the camshaft gear and the crankshaft flywheel. Otherwise, during the repair process, the valve timing may be disrupted, which will lead to additional problems. To align the marks, lift the front wheel with a jack and turn on fourth speed. By rotating the wheel, the crankshaft of the engine is turned. Before this procedure, you must remember to remove the plug that covers the marks on the flywheel. It is located on the side of the checkpoint. The mark on the flywheel must be aligned with the groove on the housing, and the camshaft mark must be positioned opposite the slot at the top.
Video: installing timing marks on an 8-valve engine
The further process consists of the following steps:
- Using the key “17”, release the tension roller and remove the timing belt from the camshaft gear. If the engine is 16-valve, then it has two gears.
- Using the same key, unscrew the camshaft gear mounting bolt, for which the part is wedged through the holes.
To remove the protective plate, it is necessary to dismantle the camshaft gear using a 17 mm wrench.
To remove the pump, you will need to remove the camshaft gear and protective plate.
The pump is secured with three hexagon bolts, after unscrewing which the pump can be removed
Before installing a new pump, clean the seat from the remnants of the old gasket.
If the product comes with a cork gasket, then there is no need for additional lubrication. In the case of a cardboard gasket, it is better to use a sealant. The new pump is installed in place in the same position as the old one, securing the part with bolts. All that remains is to put all the dismantled elements in place and tighten the belt. It would be a good idea to check that the labels match. Then you can install the cover.
Video: how to replace the water pump on Kalina
First, remove the protection, drain the antifreeze, and for convenience you can remove the right front wheel.
- Loosen the locknut of the generator belt tensioning mechanism. Using a 10-mm socket, unscrew the tensioning mechanism pin and remove the drive belt, checking for wear, cracks and traces of oil. We check the tension roller when rotating; it should not make any extraneous noise. To replace the generator belt on Kalina, you will have to remove the engine mount, first dismantling the protection and jacking up the power unit.
- Remove the upper protective cover of the timing belt by unscrewing the four bolts (hexagon 5).
Set the top dead center
- We turn the crankshaft by the pulley mounting bolt clockwise until the mark on the camshaft pulley and the timing belt guard coincide.
Be sure to rotate the crankshaft clockwise, otherwise increased force will be applied to the timing parts.
Important! Never remove the crankshaft bolt with the starter.
- Next, use the same 5mm hexagon to unscrew the bolts securing the lower timing belt cover and remove it.
- Remove the protective washer.
- The marks on the crankshaft timing belt should be aligned with the oil pump housing.
Crankshaft mark.
- Praise be to the designers of AvtoVAZ, finally rollers with a tension indicator appeared on the Lada Kalina 2 engines, now you don’t need to pull it on by eye and check the tension by twisting the belt, not even thirty years have passed since the invention of such a design. We unscrew the tension roller bolt and dismantle the latter; we also remove the old timing belt. The photo shows that the belt has stretched out because the tension marks have diverged; when checking the condition of the timing belt, if you see this, you will just need to tighten it.
Replacing the pump
- To replace the pump, we need to remove the camshaft pulley, and also unscrew a few bolts of the inner casing and remove it. If signs of wear are found on the camshaft pulley, it is better to replace it.
- Three bolts out and the pump replaced (hexagon 5). The green arrow indicates the hole for the tension roller bolt.
Pump mount.
- Having replaced the water pump, we proceed to the next stage.
Crankshaft oil seal leaking: causes of wear, breakdown
Symptoms of the problem: oil leak in the engine compartment, increased oil consumption. You can often see grease flowing onto the ground under a stationary machine. Of course, constantly topping it up does not solve the problem - you need to change the seals themselves.
There are several reasons why a leak forms:
- improper installation of gaskets, resulting in the formation of cracks on their working surfaces;
- oil flows when the engine overheats frequently, with high pressure in the crankcase (in winter, when ice plugs form);
- natural, physical wear and tear of the material;
- mechanical damage, resulting in leakage;
- low-quality material (typical for domestic products).
High-quality crankshaft seals are made of fluorine rubber FPM or silicone. Regular nitrile butadiene rubber quickly burns out, falls apart and leaks.
Features of oil seals
Some crankshaft gaskets have inclined grooves to allow oil to escape. They need to be placed correctly, according to the arrow on the ring body. It indicates in which direction the shaft rotates.
If it is not possible to select imported products, you have to use domestic ones.
They choose red-brown ones - they are made of fluorine rubber and are of the highest quality; such a crankshaft oil seal leaks less often.
This is interesting: Transmissions switch off spontaneously Lada Granta
Replacing the front crankshaft oil seal
The front crankshaft seal is located on the engine cover or oil pump housing. Most often it is he who leaks. There are motors whose cover is integral with the oil pump.
On foreign car engines, the crankshaft gasket is covered by timing and generator pulleys. They need to be removed. Old Zhiguli engines are simpler; the timing chain is located inside the crankcase; only the generator pulley and belt need to be removed.
To eliminate oil leaks and replace the seal on engines with a timing belt with a gear drive, it is necessary to remove the gear wheels (pulleys): generator, belt. The belt itself is also removed.
Before this, they are set according to the marks corresponding to the location of the first cylinder at TDC (top dead center) in a compressed state. The marks - pulley and crankcase - must match. On other units, the mark on the camshaft wheel should be placed opposite the block connector and the engine head. This adjustment is necessary for the valve timing cycles to work correctly. It is enough to align only the camshaft roller according to the mark.
Next, you need to loosen the tension wheel and remove the belt. Then the gear is removed from the front section of the crankshaft. Use a special puller or two screwdrivers. In units with a chain, only the generator pulley needs to be removed.
After this, remove the old ring through which the oil flows using a special device. If it is not there, then you can dismantle the oil seal cover (or oil pump) on the engine block. This is where the seal is located. It is easier to remove it from the dismantled cover.
To remove the wheel drive belt, you may also need a jack, in which case the front right wheel is removed. The front cover on the motor is secured with 4-6 bolts. After unscrewing, you need to carefully peel it off and change the gasket located there. Place the cover with the seal on a flat surface, and, using a screwdriver, remove the seal.
Replacement is in progress. A new crankshaft oil seal, lubricated with sealant, is pressed into place using a mandrel. It can be played by a piece of pipe, a tool socket head 1-2 mm smaller than the circumference of the gasket, a “27” head (nozzle) or an old oil seal will work well. After this, you need to lubricate the edge of the seal and install the cover. The oil seal is carefully placed with a cover onto the lubricated crankshaft and tightened with bolts.
The leak is eliminated, everything returns to its place: the timing pulley with teeth (both marks must match), the timing belt is installed using a tension roller.
A useful video about replacing the front oil seal can be viewed here:
Replacing oil seals (valve seals) — Lada Kalina Blog
Replacing oil seals (valve seals)
In one of the previous articles about the reasons for increased oil consumption in the engine, I wrote about valve stem seals, or as they are also called, valve seals. They are designed to prevent oil from the cylinder head from entering the combustion chamber through the valve guides. They can either wear out or, on the contrary, harden, which leads to dire consequences. Oil begins to penetrate into the combustion chamber and will burn along with gasoline.
If the situation is neglected, then signs of worn caps can be seen by turning out the spark plugs. Those cylinders into which oil flows will be filled with spark plugs and this will be immediately visible. Below I will give an example that I performed on a nine, but the principle of this repair is completely similar to the Kalina 1.6 8-valve, since the design is the same. You will first need to complete the following steps:
- Remove valve cover
- Remove the timing belt and remove the camshaft sprocket, first unscrewing the bolt securing it, and then removing the key
- Unscrew and remove the camshaft
- Remove the valve tappets along with the adjusting washers (be sure to fold them in the same order to put them back in the same way)
As a result, we get approximately the following picture:
Now everything is ready to get started, and here we will need the following tools:
- Tweezers or long-nose pliers
- Magnetic handle
- Flat screwdriver
- Tin rod or long rope (I'll explain later)
- Candle key
- Valve desiccant
- Oil seal puller: figure eight suitable for Kalina
I would like to draw your attention to the fact that the desiccant in my photo is not shown in its entirety; it also includes a special rail to make this process much faster and easier. Below you will see everything in action. We install the rack so that the holes are at the rear of the engine. It fits onto the camshaft mounting studs. Everything is clearly shown in the photo:
Now we insert the desiccant lever itself into the first hole on the left, so that ultimately it can be used to press on the valve spring. This is what it all looks like in practice:
So, first of all, we unscrew the spark plugs and set the piston of the first cylinder to top dead center (TDC), after which we insert a slightly curved tin rod (or another soft metal) into the spark plug hole. We need it to get between the piston and the valve.
Then you need to take the following precautions to avoid damaging the cylinder head surface during work. We will need a plastic bottle. Cut a small piece out of it so that it can be rolled into a tube. The height of the resulting cylinder should be approximately equal to the depth of the valve well:
When you press the lever down, it is necessary that the same rod that was inserted into the hole gets exactly between the piston and the valve, otherwise you won’t be able to desiccate anything. If nothing works out with this approach, there is another method - I used it when repairing an Audi 100. I inserted a rope into the spark plug hole. It is important that it is moderately flexible and not quite thin - something like a thick shoe lace. You will have to push a lot so that it fills the entire combustion chamber.
When the valve rests, then under the action of the lever, the spring is compressed, thereby giving us the opportunity to get to the crackers:
Replacing the rear crankshaft oil seal
If an oil leak has formed through the rear crankshaft seal, then an inspection hole is needed, since it will be necessary to dismantle the drive elements or driveshaft on rear-wheel drive vehicles. Sometimes a leak in the crankshaft rear oil seal can be eliminated by placing the car on jacks or supports - this is unsafe and is strictly not recommended. You will also have to remove the heavy gearbox. After dismantling it, we also remove the clutch disc. Next comes the flywheel with casing.
Boot replacement and repair
The boot can be changed without removing the grenade if you have special equipment. His work is demonstrated on video. » alt=»»> If you do not have such a device, to remove and replace it, you must perform the above-described procedure for removing the drive and dismantling the hinge. The procedure is necessary if there is even minor through damage on the boot.
Temporary repairs to the CV joint boot can be made without removing it from the vehicle. To do this, you need to thoroughly clean and degrease the damage, then seal it with a piece of rubber and cyanoacrylate-based glue (superglue).
An alternative repair method is to seal the holes with silicone caulk. It should be remembered that it takes a day to completely polymerize.
Types and location of oil seals on the crankshaft
Oil seals are used in various elements of the car, including the crankshaft. They ensure that the lubricating fluid does not leave the engine. The element is made in the shape of a ring with an elastic inner edge and also has a rigid outer ring. A spring is used to strengthen the inner edge. It prevents oil from escaping. The devices installed in any car can be of two types:
- Rear oil seal. It is characterized by high wear resistance, which is reflected in service life equivalent to the period of use of the vehicle. It has bulky dimensions.
- Front oil seal. The device is slightly smaller in size and is also more prone to wear. The module is located in the oil pump cover. To gain access to it, you need to disconnect the timing belt element. The oil seal itself is located under the lower crankshaft pulley.
Is it possible to drive with worn oil seals?
Further operation of the vehicle is not recommended for several reasons. Firstly, engine oil consumption increases due to its leakage through rubber products. Secondly, the power unit becomes contaminated with adhering dirt and dust.
But, the most compelling reason to refuse to drive a car with leaking oil seals is the fact that loss of oil can lead to serious damage to the internal combustion engine, which can be eliminated by carrying out a major overhaul of the engine.
Another common problem is transmission malfunction. However, drivers encounter this kind of trouble most often in the event of a malfunction of the rear oil seal. Failures of electrical equipment mechanisms and all kinds of sensors are less common.
Inspection to identify oil leaks
If there is a suspicion that the presented device is operating incorrectly, the driver will first need to determine which oil seal is leaking. If a flaw is observed in the rear of the engine, you need to conduct a visual inspection of the pan and gearbox unit. In order to determine whether there is a leak of working fluid, you need to drop a little water onto the pan and observe: if transformer oil is leaking, it will spread over the surface, motor oil will stick to a single drop.
Sequence of actions on a VAZ-2114 with 8 valves
- The car is installed on the inspection hole. Wheel chocks are installed under the rear wheels. The right front wheel is jacked up and removed using a socket wrench. The engine protection is also removed.
- The hood of the car is opened and the timing belt cover is removed. Now you have access to the crankshaft and camshaft pulleys and to the belt itself.
The timing cover is removed, the crankshaft and camshaft pulleys are visible
Before further operations, 1 engine cylinder is set to top dead center. To do this, the camshaft and crankshaft rotate until the marks on their pulleys align with the marks on the timing case cover.
Aligning the pulley to the marks for bringing 1 cylinder to TDC
- Now the timing belt is removed. To avoid damage, the belt is first loosened. To do this, use a 10mm key to remove the right fender liner of the car. Access to the generator belt and its pulley is available. The belt and pulley are removed. After this, the timing belt tension roller is loosened and the belt is removed.
- Next, the crankshaft pulley is removed, after which the plug on the engine drain hole is unscrewed, and the engine oil is drained into a previously placed container.
After this, the engine sump is removed, which is secured with 16 bolts. The pan has been removed from the engine and the oil has been drained. - After this, the oil receiver is removed. It is carefully inspected for blockages and contamination. If any are detected, the oil receiver is purged with compressed air.
- Now the oil pump is removed.
To do this, unscrew 6 bolts that secure it to the block. The bolts on the oil pump are unscrewed, it can be removed - As a rule, the old gasket under the oil pump is also worn out by the time the oil seal is replaced. So the pieces of the old gasket are carefully scraped off with a screwdriver and thrown away.
- After removing the oil pump, access to the crankshaft oil seal opens. It is removed from the socket with your fingers. If it is not possible to remove the old oil seal manually, a pair of flat-head screwdrivers are used to pull it out, which is used to pry it off from opposite edges.
- The oil seal socket is thoroughly wiped with a rag.
After this, a new oil seal is installed there. As a rule, he does not sit down right away. Therefore, to completely seat it, a 32mm socket is used as a mandrel. It is installed on the oil seal, after which several precise blows are applied to it with a hammer. The crankshaft oil seal is installed in its original place - After this, all components are reassembled, and new engine oil is poured into the engine.
Video: expert advice on replacement on the 14th model
Causes of leaks
The most common causes of oil seal leaks are the following factors.
- Achieving a car mileage of 100 thousand kilometers. In such situations, under the influence of the vibration effect of the crankshaft, the inner part of the oil seal wears out. As a result, it no longer fits tightly to the box and will contribute to the flow of working fluid.
- Drying of the oil seal, which is associated with the use of low-quality oil. This often occurs if the working fluid is kept at low temperatures for a long time.
- Poor quality of the part or its incorrect installation, which should also not be excluded as the cause of the breakdown.
- Malfunctions in the engine itself. The most common failure in this case is an increase in crankcase gas pressure, which leads to displacement of the oil seal.
- The oil filter is leaking, as a result of which the problem is unlikely to be solved only by replacing the oil seal.
Signs of cap failure
Due to the fact that the main working element subject to wear is rubber, over time the material loses its elasticity and begins to leak oil. Reasons that have a negative impact on the product:
- aggressive working conditions;
- low-quality materials;
- natural development of the product resource;
- damage to the element as a result of its incorrect installation or removal.
Indeed, low-quality or outdated materials used in the manufacture of caps significantly reduce their service life. If we talk about natural wear and tear, then its average interval is 20,000 kilometers of a car. As a result of the constant work of the part, the elastic, rubber material hardens over time and begins to wear out and wear out. Damage to the product during poor-quality repair work is a fairly common problem. The fact is that to remove the oil seals, a special puller is required. Some car enthusiasts, when disassembling the engine, pry off the caps using two flat-head screwdrivers, which leads to damage to the valve guides.
Leave a comment:
Click to cancel reply.
Replacing the front crankshaft oil seal
Replacing any part or assembly of a vehicle always takes place in two stages: removing the old worn-out module and installing a new one. Crankshaft seals will be no exception. Such a repair cannot be done without a hammer and a screwdriver, but before you start work, you need to stock up on the necessary tools to perform the following procedures: removing the gas distribution mechanism drive, removing the cylinder head cover. The replacement process for the front oil seal itself consists of three steps.
STEP 1. First, remove the timing belt from all pulleys. After this, using two flat-head screwdrivers, lift the gear-type pulley, which must be removed from the crankshaft toe.
STEP 2. Using a screwdriver, remove the worn element from the cover, after which it is lubricated with engine oil. A new oil seal requires the same treatment with working fluid.
STEP 3. The repairman must press the new oil seal into the desired location using a pipe of a certain diameter or a mandrel. This field is repeated in reverse order, everything that was specified in the first step.
How it works?
The oil seal consists of a rigid (outer) surface that is mounted in a hole. Often the kit includes a metal ring that is hermetically connected to the rubber seal. It fits tightly into the landing niche.
The inner part is softer, it seems to envelop the rotating shaft. The oil seal leaks from the inside of the circle. Manufacturers are constantly looking for compromise:
- hard material is more durable, but does not fit tightly around a rotating object;
- soft, elastic rubber provides excellent sealing, but wears out quickly.
Replacing the rear crankshaft oil seal
Replacement of the crankshaft rear oil seal is carried out in an inspection pit or using a lift. The work involves removing the gearbox. During this procedure, all adjacent nodes should be additionally inspected. This is due to the fact that removing the gearbox is a rather complex and time-consuming process. Due to the high wear resistance of the rear oil seal, it is extremely rare to resort to such actions.
Replacing the oil seal for rear wheel drive vehicles
STEP 1. First of all, the cardan transmission is removed, followed by disconnecting the starter and clutch slave cylinder (removed entirely along with the hose).
STEP 2. The speedometer cable and reverse gear wire are disconnected. After this, you need to release the gearbox slide in the vehicle interior.
STEP 3. Remove the bolts connecting the gearbox and engine. After this, the cross member (rear mount) of the gearbox is removed.
After removing the clutch basket and disc, flywheel and shield, unimpeded access to the oil seal will be provided. The crankshaft oil seal is replaced using a self-tapping screw, which is placed on the edge and gradually screwed into it. First, you need to hit the tool a little so that it goes into the metal more easily. The most successful would be to use a device used during apartment renovations to secure the profile.
After several turns of tightening, the worn out oil seal is pulled out using pliers. In some cases, several screws can be used to achieve greater effect.
Replacing the oil seal for front-wheel drive vehicles
Initially, the left front wheel is removed. Before doing this, you need to loosen the axle nut, which will eventually be completely unscrewed. This will allow the strut to be moved from the axle shaft. Sometimes you have to remove the steering pin in the fastening.
Along with replacing the oil seal, it is necessary to inspect the bearing in the crankshaft, which includes the input shaft of the gearbox: when it sticks and makes noise when turning, you need to install a new one.
After completing the replacement of the oil seal, all procedures must be carried out exactly the opposite.
How to unscrew the crankshaft pulley bolt - solving the problem
The pulleys of front-wheel drive cars are usually secured with a bolt. In such vehicles, the pulley is oriented perpendicular to the axis of the machine, which, of course, complicates repair work (it is very difficult to get to the fastening). In order to unscrew the bolt as quickly and easily as possible, it is advisable to prepare in advance:
- set of auto tools;
- the so-called “stump” (or “tragus”);
- car jack;
- head (socket) with a lever and extension (the head must be selected according to the size of the bolt).
The process with these devices is as follows:
- remove the wheel (of course, before doing this you need to lift the front right part of the car with a jack);
- we install the vehicle on the “stump”;
- remove the engine shield, which protects it from dirt, the air filter (they are located on the top side of the hood) and the generator belt;
- open the plug on the clutch block so that you can fix the crankshaft, and wedge the flywheel teeth using a pry bar;
- We put the head on the bolt and begin to unscrew it (if it does not give in, we slowly increase the length of the lever).
Sequence of actions on a VAZ-2114 with 8 valves
- The car is installed on the inspection hole. Wheel chocks are installed under the rear wheels. The right front wheel is jacked up and removed using a socket wrench. The engine protection is also removed.
- The hood of the car is opened and the timing belt cover is removed. Now you have access to the crankshaft and camshaft pulleys and to the belt itself.
The timing cover is removed, the crankshaft and camshaft pulleys are visible
Aligning the pulley to the marks for bringing 1 cylinder to TDC
The pan has been removed from the engine and the oil has been drained.
The bolts on the oil pump are unscrewed, it can be removed
The crankshaft oil seal is installed in its original place
