Why do you need to replace the VAZ cylinder block plugs?
Motorists often have to deal with a problem when liquid leaks from the cooling system. The cause may be deteriorated plugs in the car engine cylinder block. Usually this is the appearance of holes from rust. Fixing the problem is not particularly difficult - just remove them and replace them with new ones.
Installation of plugs in the VAZ cylinder block
Antifreeze or antifreeze flows through the plug: replacing the plug in the engine block with your own hands
Let's start with the fact that the problem of coolant leaking through plugs is most common on older domestic cars. However, this malfunction does not bypass various foreign cars. To restore tightness to the cooling system if antifreeze or antifreeze flows through a plug in the block, the specified plug must be replaced. Let's look at such a replacement using the example of a VAZ car.
So, the plug (cup plug of the engine block) is installed in six places. The five larger plugs are 40mm in diameter, and the slightly smaller one is 25mm in diameter. The plugs must be changed in a certain sequence.
Eliminating oil leaks in the cylinder block of a VAZ car
Most often, “old” VAZ cars have problems with coolant leakage from the engine cylinder block. To fix the problem, it is best to buy new plugs and replace them. The set of cup plugs for the engine block includes five large diameter plugs measuring forty millimeters and one small diameter twenty-five millimeters. Replacing the plugs in the cylinder block of a VAZ is carried out in a certain sequence.
Tools and materials for work
The negative terminal is unscrewed and removed from the battery. Coolant is drained from the cylinder block and radiator. The possibility of access is determined in order to replace the plug of the VAZ cylinder block. If this is difficult, remove the block head.
How to find stubs
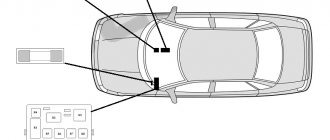
Two cup-shaped plugs are located in the engine block, under the manifold mounting points.
The plugs are located in various places in the cylinder block and cylinder head.
They cover the holes formed during the casting of these parts.
The plug is a weak point that, if overheated or frozen, can be damaged by the pressure of expanded coolant. If there were no plugs, the engine housing would crack at such moments.
Types of Stubs
The dome-shaped plugs are inserted all the way into the collar. Cup-shaped plugs are recessed inside so that the rim extends slightly beyond the recess.
In most cases, the plugs are located: on the side surface of the block, under the manifold; inside the clutch housing or above it, in close proximity to the transverse partition; at the top of the cylinder head, under the overhead camshaft.
Sometimes the plugs fly out completely, causing a sudden loss of coolant. In addition, liquid may leak little by little through the rusted edges. Small leaks leave marks on the block. Examine the block to find them.
Some plugs are hidden from the naked eye. Use a mirror to look into hard-to-reach places, such as behind a block. Remember that plugs come in different sizes, so measure the holes you need before purchasing.
It is possible that to gain access to the plugs you will have to remove the carburetor.
In some cases, in order to change the plugs on the bulkhead side, it is necessary to remove the entire engine. It is better to entrust this procedure to specialists.
Do not try to make a hole in the partition. This is a load-bearing structure, and if the hole is not repaired, the vehicle's warranty may be void. A simple rivet is unlikely to satisfy the insurance company.
Disconnect the battery and drain the cylinder block. If you plan to reuse the fluid, collect it in a clean container (see How to Flush an Engine Radiator).
Before pouring, strain the liquid through a thin cloth. Check the concentration of the solution (see section Checking and adding antifreeze).
There are two types of plugs - cup-shaped and dome-shaped. The installation methods for such plugs are different.
How to install the ignition
- There are marks on the flywheel and the scale of the crankcase hatch, which are used to set the top dead center. The rubber plug installed on the crankcase hatch is removed. As it rotates, the crankshaft rotates until the marks on the flywheel coincide with the middle mark on the hatch body. In this case, the pistons of the fourth and first cylinders are in the top dead center position.
- Wires are connected to the carburetor, ignition distributor, spark plugs and other sensors.
- An air filter is installed.
- The cooling system is filled with antifreeze or water.
- The negative wire is connected to the battery.
- The operation of the car engine is checked.
Let's sum it up
It is well known that overheating is one of the most common reasons why an internal combustion engine can be seriously damaged or fail completely. At the same time, repair and restoration of an overheated internal combustion engine turn out to be very costly operations in practice; sometimes it is necessary to replace the engine with a contract engine, etc.
At the same time, the efficiency of the cooling system directly depends on the quality and condition of the coolant, its level, as well as the cleanliness of the channels of this system themselves. In order to avoid problems with corrosion, get rid of the formation of scale and deposits, and also eliminate the risk that the liquid in the cooling system will freeze in winter, you need to use special coolants. Otherwise, the thermostat may quickly begin to work incorrectly, the pump impeller will be damaged, etc.
You also need to remember that any antifreeze has a limited service life (maximum 4 years), and mixing different types of coolant with each other is also prohibited. Even before replacing antifreeze or antifreeze, the engine cooling system must be flushed using special or household products for flushing the engine cooling system.
Why does engine oil get into antifreeze: the main causes of this malfunction. What will happen to the engine if oil is found in antifreeze or antifreeze?
Reasons why coolant starts to leak. How to find the location of an antifreeze or antifreeze leak yourself. Useful tips and tricks.
Why do antifreeze or antifreeze enter the engine cylinders and what to do in such a situation. How to determine the presence of antifreeze in the cylinders yourself, repair methods.
Replacing the coolant working fluid of the engine cooling system. Features of the draining procedure. Removing antifreeze residues from the cylinder block.
How to unscrew a broken pin or broken bolt from an engine block and other components. Methods for unscrewing a broken bolt, useful tips.
Causes of oil leaks in the oil filter area: oil flows from under the filter, through the housing, in the area of the fitting, etc. Available diagnostic and repair methods.
Cylinder head plug
The cylinder head plug is designed to prevent fluid from leaking out of the corresponding technological unit. It is not directly involved in the functioning of the internal combustion engine.
Sometimes drivers notice that this plug is leaking. Leaks are usually caused by corrosion. Fixing the problem is quite simple by changing the part.
How to replace the plug
Use the correct size holder to install the cup plug.
Lubricate the plug and hole with sealant.
Insert the dome plug with the dome facing out. Make sure it is not skewed. Tap the center of the plug with a striker to expand it. The plug must fit firmly into the hole.
Use the striker to install the domed plug.
To install the cup plug, find a holder that fits snugly into the cup. Place the plug at right angles to the hole and then hit the holder with a soft hammer.
Replacement procedure
First of all, you need to make the area in which the stub is located accessible. To do this, follow these steps (in this order):
- Disconnecting the exhaust pipes of the muffler from the exhaust manifold.
- Removing the bracket on which the pump pipe for supplying coolant is fixed.
- Disconnecting the hoses that provide ventilation to the unit from the carburetor and cylinder head cover. Closing the carburetor with a special cover.
- Removing the air filter.
- Disconnecting the wires from the carburetor, ignition distribution sensor, spark plugs.
- Removing the sensor that distributes the ignition.
- Disconnecting hoses from the fuel pump, outlet pipe, vacuum brake booster.
- Disconnecting the air and throttle valve drive cables.
- Removing the toothed belt protective cover.
- Removing the pulley with key.
- Removing the cylinder head.
Direct replacement of the plug includes the following:
- Rotating the plug into the cylinder head using a chisel and hammer.
- Pry the plug with pliers and remove it. If the part is very rusty and does not turn, you need to make a hole, screw a knob into it and pull out the plug.
- Cleaning the edges of the cylinder head hole from corrosion using sandpaper. Lubricating the edges of the new part with a sealing agent.
- Pressing the part into the cylinder head hole using a mandrel and a hammer.
Preparing for replacement - removing the cylinder head
As you guessed from the title, the first stage of repair will be removing the cylinder head. This is not very difficult to do. Detailed instructions for removal/installation are in the article about cylinder head repair. In this article I will give only a brief description of the process for those who know how to do it and you just need to remind them of the procedure. But it won’t hurt anyone to refresh their memory, so I still advise you to read the article about head repair. First, drain the coolant. How to do this correctly is written in the article about replacing antifreeze. Next, remove the air filter, its housing, all wires and hoses. Then unscrew the valve cover, align the marks, loosen the tensioner, unscrew the sprocket and remove it. After this, unscrew the camshaft nuts and pull them out. Next, remove the rockers (it is important not to confuse and put everything in its place during assembly). Don’t forget to unscrew the “pants” of the exhaust system, the pipes to the stove and everything that prevents you from removing the head. Next, unscrew the hex bolts and remove the cylinder head, clean it from dirt and carbon deposits. Now the fun begins.
What to do after replacement
So, the plug has been replaced and is no longer leaking, all that remains is to return the cylinder head to its place. To do this, follow these steps:
- Cleaning the cylinder head from contaminants and formations using diesel or kerosene.
- Removing remaining coolant from threaded holes.
- Cleaning the cylinder head mating surfaces from the old gasket, degreasing them with a solvent.
- Installation of the head on the BC.
- Head fixation. The fastening bolts are immersed with threads in motor oil. When the lubricant drains (about half an hour), the head is fixed.
- Putting the belt on the crankshaft pulley.
- Tension the belt counterclockwise.
- Installation of the belt drive protective cover (the mounting bolts are not tightened). Turn the crankshaft 2 turns (the belt should be tight even when the crankshaft is stopped). Checking the alignment of the mounting marks on the camshaft pulley and the cylinder head cover. Tightening the bolts securing the tension pulley bracket.
- Installation of drive cables for carburetor flaps.
- Connecting the removed hoses.
- Installation of the ignition distribution sensor.
Now you need to set the ignition timing. To do this, do the following:
- Connecting wires to the carburetor, ignition distribution sensor.
- Installing an air filter.
- Filling the cooling complex with antifreeze/water.
- Connecting the negative cable to the battery.
- Checking the functioning of the internal combustion engine.
How to drain coolant (antifreeze) on a VAZ-2110
Replacing the coolant on VAZ injection engines with 8 and 16 valve heads is carried out depending on the condition of the antifreeze. And its condition may depend not only on the mileage, but also on the quality of the fluid and, last but not least, on the condition of the cooling system. Today we will understand the intricacies of replacing antifreeze on a VAZ-2110.
When is it necessary to change the coolant on a VAZ-2110
There are no specific regulations for replacing the cooling system fluid and there are several reasons for this.
Dirty coolant in the expansion tank.
The type of coolant greatly affects its service life and this must be taken into account.
- For example, inexpensive liquids based on ethylene glycol can last up to one and a half to two years without loss of properties.
- More modern antifreezes of class G12, G12+, G13 can easily last up to 4 years.
However, the replacement period may be dictated by the condition of the fluid:
- oily spots on the surface of the liquid;
- complete loss of color;
- foreign particles in the expansion tank;
- foaming and frequent boiling of antifreeze;
- loss of density due to frequent addition of distilled water.
These signs will indicate that it is time to change the antifreeze.
Inspecting the reservoir and the condition of the coolant (color, shape, dirt and foreign impurities) should become a habit!
Antifreeze selection basics
For replacement, we select, if possible, the same antifreeze that was originally poured into the engine.
Otherwise, the cooling system must be flushed, since mixing antifreeze of different brands and even different manufacturers can lead to sedimentation, clogging of the cooling system and the antifreeze losing its lubricating, cooling, flushing and antifreeze properties.
We drain the antifreeze ourselves
To drain antifreeze and fill in new fluid, we need a drain container with a volume of at least 7.5-8 liters.
You will also need keys and flushing fluid if the system needs to be cleaned.
To refill the system, 7–7.5 liters of ready-made liquid will be enough. This must be taken into account if we pour the concentrate and dilute it with distilled water. It is advisable to carry out the work with gloves, since antifreeze is toxic. Before replacement, we will conduct a detailed inspection of the system, eliminate fluid leaks, and replace failed pipes and clamps.
Algorithm
We carry out replacements on a cold engine according to the following algorithm:
- We place the car on a level surface; if possible, we place the car so that its front part is slightly higher than the rear.
- Remove the negative terminal from the battery.
- We install the heater valve in the extreme right, hottest position.
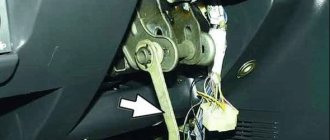
Turn the heater control knob to the right until it stops. - Remove the engine protection, if installed.
Unscrew the screws securing the engine protection. - Disconnect the wires from the ignition module and remove it to provide access to the drain plug on the cylinder block. Unscrew the fastening bolts. We take out the ignition module.
- Remove the plug from the expansion tank.
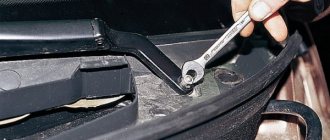
- We place a container under the radiator drain plug, unscrew it and wait until all the liquid flows out.
Unscrew the plug at the bottom of the radiator. - Place a container under the cylinder block plug.
We are waiting for the old fluid to be completely removed. Using a 13 key, unscrew the plug on the front side of the cylinder block. - After draining the antifreeze, wipe the cylinder block and radiator with a rag, replace the block plug and tighten the plug on the radiator.
- Remove the throttle body heating hose.
This will avoid the formation of an air lock in the system. Disconnect the fluid supply hose to the throttle body. - Fill the expansion tank with new antifreeze to the maximum level and screw on the cap.
Fill with antifreeze to the required level. - We put the hose in place on the throttle assembly.
- We put the ignition module in place and screw the negative terminal to the battery.
- We start the engine; as it warms up, the fluid level may drop.
In this case, we will add fresh antifreeze to the required level. Warm up the engine to operating temperature. - We check the system for leaks.
Check the coolant level in the expansion tank.
Conclusion
Thus, you can quickly and independently replace the coolant in the VAZ-2110 engine. Good luck to everyone and clean antifreeze!
Making plugs
It happens that it is not possible to buy a new plug or the cost of the part is more than the cost of making it yourself. In factories, this part is usually made by extruding it from a sheet of metal and cutting off the outline.
If you decide to make the plug yourself, use a round piece of the required size. Make a 5 mm thick disc from it by turning. Adjust it according to the diameter of the seat, coat it with glue and mount it in a hole that is cleaned and degreased. Making a plug yourself is often cheaper than purchasing this part in a store.
Replace the plug when necessary to avoid engine problems. Carefully read the algorithm presented above to understand how the procedure for changing a part is carried out.
Work procedure
In order to free access to the plugs, it is necessary to remove the components that prevent their replacement.
How to make the plug replacement area accessible
- The muffler pipe is disconnected from the exhaust manifold;
- Remove the bracket on which the pump pipe for supplying coolant is attached;
- Hoses are disconnected from the carburetor and the engine block head cover, through which ventilation of the system is ensured. The carburetor must be closed with a special cover.
Disconnecting hoses from the air filter
- The air filter is removed.
- The wires are disconnected from the carburetor, ignition distributor, spark plugs and other sensors.
- The ignition distribution sensor is removed.
Hoses are disconnected:
- from the fuel pump – fuel supply hose;
- from the carburetor - a hose through which fuel is drained;
- from the outlet pipe installed on the engine cooling jacket;
- from the vacuum brake booster.
- The air and throttle valve drive cables of the carburetor are disconnected from the engine.
- Remove the toothed belt protective cover. The nut that secures the tension roller is unscrewed, the roller is removed along with the spacer ring and axle, and then the belt is removed from the camshaft pulley.
Camshaft drive parts. Positions: 8 – protective cover; 6 – tension roller; 2 – belt.
- The bolt is unscrewed and the pulley with the key is removed.
- The bolts are unscrewed and the engine block head is removed.
- Using a chisel or bit in one hand and a hammer in the other, gently tapping the edge of the plug, it rotates in the engine block.
Replacing plugs
Turning the plug with a screwdriver
Then, using pliers, the part is pryed and pulled out of the socket. If the plug is very rusty and there is no way to turn it, then a hole is drilled in it, a knob is screwed into it and the plug is removed.
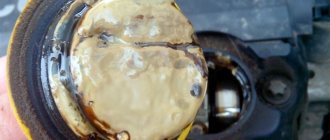
Badly worn plug
If the plug falls inside, you can pull it out using a magnetic pointer. After the part is pulled to the hole, it is pulled out with pliers.
Tip: To replace plugs yourself or to perform other car repair work, your tool kit should include a pointer with a magnet, which can be purchased at an auto store.
Using sandpaper, the edges of the holes on the cylinder block are cleaned of rust. For a better seal, the edges of the new plug can be lubricated with sealant before installation in the socket. The difference between the new and old plug is clearly visible in the photo.
Old and new plugs
- The plug is installed in place.
- Using a mandrel and a hammer, the part is carefully pressed into the hole in the engine cylinder block.
Pressing the plug into the cylinder block
The block head is installed in place.
Installation procedure
- The head is cleaned of dirt and deposits using diesel fuel or kerosene.
- Remaining coolant and oil are removed from the threaded holes.
- The mating surfaces of the block and head are cleaned of the old gasket and degreased with a solvent.
Tip: Be sure to use a new gasket before installing the cylinder head. Do not allow oil to come into contact with the gasket.
- The head is installed on the cylinder block.
- The fastening bolts are dipped with the threaded part into engine oil, let them drain for about 30 minutes and secure the head.
- The belt is being installed.
Work order
- The belt is put on a pulley mounted on the crankshaft.
- It is pulled counterclockwise.
- The protective cover of the belt drive is installed, the fastening bolts are not tightened. The crankshaft rotates smoothly two turns, while the belt must be in constant tension and not weaken when the shaft stops. It is necessary to check the alignment of the installation marks on the camshaft pulley and the cylinder head cover, and also the long mark on the middle cover with the mark on the crankshaft pulley. After they match, the bolts that secure the tension roller bracket are tightened: right, then left.
If the labels do not match, the operations are repeated.
- The cables for driving the air and throttle valves of the carburetor are installed.
- The previously disconnected hoses will be reconnected.
- An ignition distribution sensor is installed.
- The ignition timing is set. If the ignition timing is incorrectly set on a VAZ, engine interruptions occur, more fuel is consumed, and the engine overheats.
How to change the plug on the VAZ 2110 block
To put it simply, engine block plugs are necessary to ensure that when the antifreeze in the engine cooling system freezes, the engine block does not break. There is a fact that the conversion of the coolant in the cooling jacket into ice causes the ice liquid to expand. This causes the device to overload and crack.
In addition, when using a vehicle, a situation often arises when coolant leaks through plugs. It is often possible to discover that the block plugs are rusty, in other words, they are destroyed due to corrosion. Regarding the fact that otherwise the specified elements must be replaced. Next we will look at how to change the forks of the engine block.
The first question is that the problem of antifreeze leakage through plugs is more common on older Russian cars. But this malfunction is not avoided by various foreign cars. To restore the tightness of the cooling system when, if antifreeze, as it is called, antifreeze is leaking through the block within the block, the marked tube must be replaced. This change should be taken into account using the example of a VAZ car.
How to remove the plug
The cup-shaped plug can be pulled out with two pairs of pliers.
Plugs of any type are removed using a thin screwdriver. Use a blade to pierce the center of the plug and pull it out.
Remember that the movement must be uniform. Otherwise, the plug will become skewed and get stuck.
Use a screwdriver to pierce the old plug and pull it out.
In some cases, the edges of the cup-shaped plug stick out quite a bit and can be grabbed with two pairs of pliers. When pulling out the plug, apply equal force on both sides. Do not try to use the screwdriver as a lever and rest it on the block, so as not to damage the groove itself.
Remove any remaining old caulk with a wooden tool.
Replacing VAZ block plugs: how to do it right
- 1 How to eliminate a coolant leak in a VAZ engine 1.1 Materials and tools for work
- 1.2 Preliminary work before replacing plugs on a VAZ car
- 1.3 Replacing plugs on a VAZ car
- 1.4 Installing the cylinder head
- 1.5 Ignition installation
Plugs in the VAZ engine block
The plugs in the cylinder block are integral elements of the unit. If liquid begins to leak from the cooling system, the root cause may be plugs that have become unusable. The appearance of holes is caused by rust that forms during the operation of the car. Replacing plugs on a VAZ engine can often eliminate such problems, and installing new ones yourself does not take as much time as compared to engine repair.
Signs of failure of the cylinder head gasket of a VAZ 2110
There are no specific warranty periods for the use of a cylinder head gasket. Its durability is influenced by such factors as: the degree of operation of the engine, its model, driving style and other reasons. However, there are several symptoms by which you can determine that the gasket has failed:
- at the junction of the block and the head there are leaks of engine oil or coolant ;
- using an oil dipstick, foreign light impurities or foam-like emulsion , which occurs when antifreeze penetrates through the connection with the cylinder head;
- the color of the exhaust changes to bluish-white, which indicates water entering the combustion chamber of the cylinder block;
- presence of oil stains in the coolant reservoir;
- The engine temperature rises due to the breakthrough of hot gases into the cooling system, which immediately heat the coolant.
How to eliminate a coolant leak in a VAZ engine
If a leak occurs in the engine due to bad plugs, they simply need to be replaced with new ones. On earlier production VAZ cars, the set of engine cup plugs includes: one small diameter plug - twenty-five millimeters and five large diameter plugs - forty millimeters. There are instructions on how to replace the VAZ block plug.
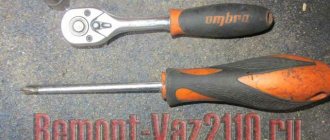
Materials and tools for work
- Set of plugs.
- Hammer.
- Pliers.
- Chisel.
- Screwdriver.
- Sealant.
- Emery cloth.
There are situations when it is not possible to purchase a set of plugs or you urgently need one, but the price in the auto store does not suit you. In this case, the part can be manufactured. In large batches at the factory, plugs are produced by cold extrusion from a sheet of metal, and then cut along the contour. For single production, it is better to take round rolled products of the required diameter. Make a disk five millimeters thick. Carefully adjust it to the diameter of the mounting hole, coat it with glue and install it in place. Before doing this, the hole must be thoroughly cleaned and degreased.
VAZ 2110: replacing the muffler with your own hands - instructions | MasteraVAZa
Exhaust system VAZ 2110
Replacing a muffler for a VAZ 2110 or its parts is not work that needs to be done systematically. It is not necessary to change parts of the exhaust system often, in cases where the muffler begins to make noise, its elements burn out, or in the event of a break in the connecting pipes. You can change any part of the muffler with your own hands. The VAZ 2110 exhaust system consists of a reception pipe (another name for pants), a neutralizer, a resonator (additional muffler), and a main muffler.
How to replace a muffler on a VAZ 2110
We are changing the muffler of the VAZ 2110, the replacement is made in the inspection hole:
- The muffler is connected to the resonator through an o-ring, which is installed in the pipe flare and compressed with a clamp that folds in two halves
- We remove the clamp, then the ring, it is graphite and does not stick to the metal.
Attaching the muffler to the resonator
- Removing the old muffler
- We check the condition of the suspension rubber bands located on the sides of the muffler body. If they have cracks or are stretched, they should be replaced.
VAZ 2110 muffler suspension rubber band
- We install a new muffler, first on the rubber bands, then insert a graphite ring (preferably a new one) between the flares and compress it with a clamp.
So we replaced the muffler on the VAZ 2110, replacing the resonator is the next step.
Replacing the resonator
Resonator VAZ 2110
- The resonator is attached to the muffler using a crimp clamp with an O-ring;
- It is attached to the neutralizer by means of a floating flange (two bolts) and flaring;
- On the opposite side of the neutralizer there is a “fist”;
- It is often problematic to unscrew the knuckle mounting bolts; they are simply cut off with a grinder and replaced with new ones;
- If suddenly you don’t have a tool at hand, we clean the places where the bolts are attached and treat them with a “liquid wrench” (WD-40 or its equivalent);
- Unscrew the bolts and remove the muffler clamp;
- We remove the resonator from the suspension rubber bands, change the rubber bands if necessary;
- Then we hook a new resonator onto rubber bands and attach it to the muffler so that the pipe running from the resonator to the muffler is parallel to the ground;
- When there is wear on the neutralizer fist or there are burrs, grooves or rust on it, it is necessary to lubricate the connection with a special high-temperature sealant;
- Using new bolts and nuts, tighten the flanges of the catalyst and resonator;
- The neutralizer is attached to the resonator by means of a flange connection (two bolts), to the receiving pipe (pants) by means of a spring-loaded connection and a pair of flares, between which there is a graphite or metal-asbestos ring.
Work procedure
In order to free access to the plugs, it is necessary to remove the components that prevent their replacement.
How to make the plug replacement area accessible
- The muffler pipe is disconnected from the exhaust manifold;
- Remove the bracket on which the pump pipe for supplying coolant is attached;
- Hoses are disconnected from the carburetor and the engine block head cover, through which ventilation of the system is ensured. The carburetor must be closed with a special cover.
Disconnecting hoses from the air filter
- The air filter is removed.
- The wires are disconnected from the carburetor, ignition distributor, spark plugs and other sensors.
- The ignition distribution sensor is removed.
Hoses are disconnected:
- from the fuel pump – fuel supply hose;
- from the carburetor - a hose through which fuel is drained;
- from the outlet pipe installed on the engine cooling jacket;
- from the vacuum brake booster.
- The air and throttle valve drive cables of the carburetor are disconnected from the engine.
- Remove the toothed belt protective cover. The nut that secures the tension roller is unscrewed, the roller is removed along with the spacer ring and axle, and then the belt is removed from the camshaft pulley.
Camshaft drive parts. Positions: 8 – protective cover; 6 – tension roller; 2 – belt.
- The bolt is unscrewed and the pulley with the key is removed.
- The bolts are unscrewed and the engine block head is removed.
- Using a chisel or bit in one hand and a hammer in the other, gently tapping the edge of the plug, it rotates in the engine block.
Replacing plugs
Turning the plug with a screwdriver
Then, using pliers, the part is pryed and pulled out of the socket. If the plug is very rusty and there is no way to turn it, then a hole is drilled in it, a knob is screwed into it and the plug is removed.
Badly worn plug
If the plug falls inside, you can pull it out using a magnetic pointer. After the part is pulled to the hole, it is pulled out with pliers.
Old and new plugs
- The plug is installed in place.
- Using a mandrel and a hammer, the part is carefully pressed into the hole in the engine cylinder block.
Pressing the plug into the cylinder block
The block head is installed in place.
Installation procedure
- The head is cleaned of dirt and deposits using diesel fuel or kerosene.
- Remaining coolant and oil are removed from the threaded holes.
- The mating surfaces of the block and head are cleaned of the old gasket and degreased with a solvent.
- The head is installed on the cylinder block.
- The fastening bolts are dipped with the threaded part into engine oil, let them drain for about 30 minutes and secure the head.
- The belt is being installed.
Work order
- The belt is put on a pulley mounted on the crankshaft.
- It is pulled counterclockwise.
- The protective cover of the belt drive is installed, the fastening bolts are not tightened. The crankshaft rotates smoothly two turns, while the belt must be in constant tension and not weaken when the shaft stops. It is necessary to check the alignment of the installation marks on the camshaft pulley and the cylinder head cover, and also the long mark on the middle cover with the mark on the crankshaft pulley. After they match, the bolts that secure the tension roller bracket are tightened: right, then left.
If the labels do not match, the operations are repeated.
- The cables for driving the air and throttle valves of the carburetor are installed.
- The previously disconnected hoses will be reconnected.
- An ignition distribution sensor is installed.
- The ignition timing is set. If the ignition timing is incorrectly set on a VAZ, engine interruptions occur, more fuel is consumed, and the engine overheats.