Using a Phillips screwdriver, unscrew the seven screws securing the engine shield insulation to the frill trim. The fastening screws are located along the entire length of the insulation.
In the corners on the right and left, unscrew the frill under one nut. Ten head nuts.
Lift the cover up and move it to the side.
Lift the coolant expansion tank up and to the side. There is no need to remove the hoses leading to the tank.
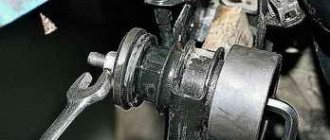
Unscrew the two nuts securing the trapezoid to the crossbar under the windshield.
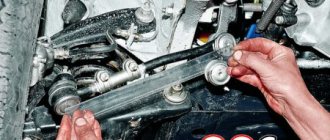
In the depths, unscrew the last bolt securing the trapezoid and remove it along with the motor. Ten head bolt.
If necessary, unscrew the three bolts securing the motor and move it to a new trapezoid.
The process of replacing the trapezium wipers of VAZ 2110, 2111, 2112 is clearly shown in this video:
Replacing the windshield wiper motor and trapezoid
The design of the windshield wiper on the VAZ 2110 is quite reliable and during normal operation the motor and the trapezoid itself can easily move all 300,000 km, which has been proven by the personal experience of many owners. But there are also exceptions to the rules.
It often happens that the splines are bypassed or the trapezoid structure simply breaks down. If you have such problems, the repair procedure will be discussed below.
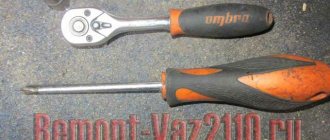
To replace all the wiper parts, we will need the following tool:
- screwdriver flat and Phillips
- ratchet handle
10 mm socket head
To do this job, you first need to do some preparatory steps, namely:
- Remove the windshield trim (jabot)
- Remove the insulation and seal under the hood
- Disconnect one end of the expansion tank rubber and move it to the side
Windshield wiper repair
In practice, repairing wipers on a VAZ 2110 is not at all difficult if you have at least basic experience in working with a car and its electrical components.
Unscrew the fixing nut
First, let's figure out how to remove the wipers on a VAZ 2110. The design provides several fasteners, by unscrewing which you can easily remove the wipers themselves.
But with disassembling the windshield wiper assembly, everything is a little more complicated. It is analyzed as follows.
- Remove the dashboard.
- On the left side, find the relay that is attached to the body. If it is broken, there is no point in repairing it. Just install a new relay.
- Next, check the condition of the fuse that controls the operation of the windshield wiper drive.
- Disassemble the steering column to allow you to examine the state of the switch. If the insulation is damaged or there is other damage, replace the unit.
- Unscrew the electric motor from the body and check it in action. If the damage is not serious, it can be repaired. It's better to immediately replace it along with the relay.
- Check the drive. It is not uncommon for a pulley to break on it, which is why the device has to be replaced with a new one.
- Make sure the trapezoid is in good condition. It may be necessary to replace the windshield wiper trapezium on a VAZ 2110 if, during operation of the car, the lubrication of the device has deteriorated and all kinds of debris and water have gotten in there. If the lubrication does not work properly, the plastic bushings of the hinges wear out, causing play and increasing resistance during operation of the device. The trapezoid itself serves to transmit force from the electric motor to the windshield wiper arms.
What is a windshield wiper trapezoid and what is it for?
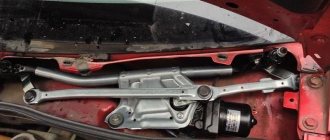
The trapezoids are around here somewhere!
The wiper trapezium is a special unit that converts the engine impulse into forward movements of the windshield wipers.
Simply put, it is she who is responsible for their movement along the windshield or rear window of the car. Since weather conditions are often unpredictable, and the windshield must provide complete visibility, failure of this part must be quickly identified and corrected.
Principle of operation
Most often, plastic bushings wear out in trapezoids.
Although, at first glance, it seems that the movement of the brushes occurs directly, in fact, a trapezoid, which is an electromechanical unit, is responsible for it. It works on the following principle:
- The windshield wiper motor uses the finger, which drives the trapezoid itself.
- Due to the connection of the gearbox and shafts, oscillatory movements occur, causing the brushes to move along the glass, cleaning it.
It often happens that the trapezoid fails. This happens especially often after or during the winter season. Some inexperienced VAZ-2110 owners turn on the “brushes” without bothering to clear the snow from the glass . Often the wipers freeze to the glass, and an attempt to move them ends in breakage. To prevent this from happening, you should always check the brushes before turning them on in winter for freezing .
Replacing wipers
For the first successful replacement, it is recommended to consider the types of windshield wipers. Following detailed instructions, the work is completed within half an hour.
Replacing the windshield wiper motor of a VAZ 2110
First you need to look at the old brushes. You can try to get them out of the levers. Often, special springs are installed that make it possible to bend these levers. Next, you need to determine how the brush is attached to the lever (screws, needles or clamps can be used).
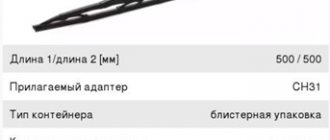
The length of these brushes is measured with a ruler or, for example, tape measure. Required tools for replacement:
Necessary materials to complete the work:
- a set of new brushes;
- special liquid for glass.
The required materials can be purchased in stores specializing in the sale of spare auto parts.
If the car was produced earlier, it is almost impossible to find brushes for it. The only thing that can be done is to change only the rubber part attached to a thin metal base.
It is recommended to replace brushes in the following sequence:
- for normal access to the windshield wiper, the car must be parked;
- windshield wipers must be secured in a position that provides unobstructed access to each blade;
- in some certain brands of cars, the windshield wipers are recessed flush, so you need to read the instructions for replacing them specifically for the VAZ 2110;
- You need to spread an unnecessary blanket on the hood of the car, as well as around the windshield wipers. Such measures will prevent glass from breaking and damage to the coating on the hood;
- The old windshield wiper design is removed from the mount.
- At the end of the rubber brush there is a locking device that can be easily opened with round-nose pliers. The functioning of the locking device is checked several times. You need to compare the rubber brush fixed to the machine with the new brush, they should match. It is removed from the mount and lever. A new brush is inserted, and it must pass through all the points, just like the old design;
- On recent cars, T-shaped mounts for windshield wipers are installed; to remove them, you need to use a small flat-head screwdriver. The purchased unit is installed by pressing the lever itself, as a result a click should be heard;
- Another type of fastening involves the use of screws. In such a situation, the unit with the brush will be secured using one or two screws. The screws are unscrewed with a screwdriver, and the new design is screwed onto the lever. The fastening screws must be tightened tightly, and small washers can be used;
- The new L-shaped design of the fastening levers is noteworthy. This unit is equipped with a rounded latch that has a swivel joint. To install new brushes, no tools are needed; just press the special latch, pull the brush slightly towards you and remove it from the lever. To fix the new structure, you need to press on the latch until it is installed in its place; you should hear a click.
When the manipulations with the first brush are completed, it’s time to start the second, the sequence of actions is the same.
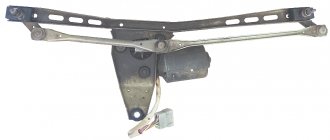
It often becomes necessary, especially on modern modifications of the VAZ 2110, to replace the motor. It is he who is responsible for the normal operation of the windshield wipers.
Replacing the windshield wiper motor on a VAZ 2110
Replacing the windshield wiper motor of a VAZ 2110 can also be done with your own hands. In addition, it may be necessary to replace the windshield wiper mechanism of the VAZ 2110 or replace the wiper arms of the VAZ 2110. Sometimes, simply replacing the windshield wiper drive on the VAZ 2110 leads to normal operation of the blades. A detailed video, of which there is a lot on the Internet, will tell you how to do everything without errors. It is also useful to use photo materials and pictures during the work process, especially if everything is done with your own hands. The detailed instructions for replacing windshield wipers presented above are an opportunity to save a lot of money, because the price for services of this kind in services is high, and the result is not always pleasing to the car owner. You can also find out on our website how to replace washer nozzles.
How to determine that a trapezoid is “kirdyk”
Kirdyk is a slang word meaning an extremely bad situation.
It happens that the retaining ring of the bushing breaks and the rod simply flies out.
The slightest disturbance in the operation of the trapezoid can lead to incorrect operation of the wipers. Usually this part is replaced with a new one, although in some cases you can get by with installing a repair kit. Its cost is significantly lower than the price of the entire part, although repairs will take much more time. Here is a list of the main signs by which you can determine that a part will soon fail:
- Windshield wipers begin to do their immediate job poorly. This occurs due to the weakening of pressure.
- An unusual noise is heard during operation.
- A backlash appears, which can be determined even visually, since the glass will be difficult to clean.
- It happens that the brushes move in one direction easily, but back with difficulty, constantly slowing down.
All these problems lead to the fact that the windshield remains dirty, with streaks and smudges.
Repair kit for VAZ-2110
Most often, plastic parts are destroyed in the trapezoid. In this case, a repair kit can help.
When purchasing a repair kit, pay attention to the part number.
If metal parts are damaged, you will have to replace the entire trapezoid. As a rule, the trapezoid is destroyed as a result of an accident, or due to careless handling of the windshield wiper system.
Replacement procedure
So, you have chosen a gear motor for your VAZ - one of the first three. Let's look at how it is replaced. When performing this work, there is no need to disassemble the entire windshield wiper system. We proceed like this:
- Disconnect the negative terminal from the battery;
- Having noted the position of the brushes on the windshield, unscrew and remove the levers;
- Remove the cover from the fairing;
- Unscrew the nut securing the crank mechanism bracket to the motor axis;
- Unscrew and remove the bracket itself. It is secured to the body with 3 bolts;
- We remove the non-working or poorly functioning motor from the studs;
- Replacing the old one with a new one is done in the reverse way.
Part of the old and new sample
Selecting a new part for a VAZ-2110 is not such a simple matter. Not everyone knows that there are old and new trapezoids.
Therefore, it is better to remove the old part and take it to an auto parts store. They are not only attached differently, but also differ in the connectors through which they are connected to the motor. If you can’t find an old-style trapezoid, and this is exactly what you have, you’ll have to redo the system or look for a used part.
Causes of malfunction
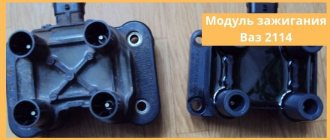
The weak point of this motor is that there are a fairly large number of contacts along the power circuit. This affects both the voltage and the possible causes of malfunctions: the contact on one link of the chain is lost or unstable, and stable operation of the windshield wiper is no longer possible. In this case, it is quite possible that the motor is not at fault. Therefore, before you decide that it needs to be replaced, check the contacts along the entire circuit.
Fuse
Pay attention to the fuse, it may also be faulty; Performance. Next, you should check the switch itself for serviceability; Operating Parameters
Using an ohmmeter, check the resistance in the circuit breaker between the terminals. If it shows “zero”, you need to change the breaker; Correct connection. Without turning on the wiper, measure the resistance between the fourth terminal and ground. It must also be zero. Otherwise, you need to properly restore the grounding; Voltage. Turn the windshield wiper to low speed and check the voltage at terminal five. It is equal to the battery voltage, but the gearmotor does not work? It needs to be changed.
Causes of malfunction of the VAZ 2110 windshield wiper motor
Replacing the trapezium wipers of a VAZ 2110
I don’t think anyone will argue with the fact that good visibility is necessary to drive safely. To do this, it is necessary that the mechanism driving the brushes works, the trapezoid of the wipers is in good working order, but the brushes themselves must be in good condition and appropriate for the time of year.
Bad weather reminds us to regularly replace our windshield wiper blades. Some manufacturers of these extremely important parts recommend changing brushes once a year. The fact is that under the influence of the environment, rubber inserts gradually dry out and lose their elasticity. Hard rubber works like a scraper, leaving streaks and streaks on the glass. Run your finger along the blade of the eraser; if it is worn out and dull, you need to replace the brushes. Don’t skimp on small things and replace dry or worn wipers before the slushy season sets in.
Replenish the washer fluid supply in the washer barrel in a timely manner. To avoid poisoning from toxic pores, buy only proven glass cleaning liquid.
Types of wipers
- Classic.
The design consists of seven metal “rocker arms” arranged pyramidally. The largest arc holds two smaller ones, which, in turn, hold even smaller ones and are attached to a rubber blade. This design allows the downforce of the wiper to be evenly distributed. Slowly going out of fashion, these wipers are falling in price every day, while performing their functionality very well in the warm season. The main enemy of such a wiper is snow. But it is impossible to say that these brushes are worse in functionality than frameless ones. The pressing effect of such a design loses its properties over time. Therefore, it is better to change the brush frame itself after a few years.
The “rocker arm” system for this type of wiper is replaced by a thin metal plate that passes through the entire length of the brush. It is a frame, despite the so-called frameless classification. They tolerate snow better, but this design has a disadvantage - the distribution of downforce here is worse than that of “rocker arms”. In the cold there is a shrinking effect. The advantages of these brushes over the previous ones can be called design. Although the taste and color as they say... .
They repeat the classic summer design, but all its moving parts are hidden under a rubber cover. But these brushes are not very suitable for summer, since the casing causes too much windage. If the speed is above 90 km. at an hour, the brushes begin to move away from the glass. As good as such brushes are in winter precipitation, they are just as bad in summer precipitation.
These brushes are the latest development for today. Metal “rocker arms” here replace three plastic arcs, they also act as a winter cover, thereby allowing these wipers to be called hybrid. Another distinctive feature of these wipers is improved aerodynamics. Headwind increases downforce. Although in such a design there is something to freeze on.
In conclusion, we can say that in winter it is better to use winter wipers, and for summer any wipers except winter ones are suitable. It's up to you to choose. In any case, new wipers, no matter what design, are better than those that do not perform their functions at all.
Step-by-step replacement instructions
Replacing wipers always does not mean a complete replacement, but only a component of it. They always consist of 3 main elements:
- metal holder connected to the lower arm;
- the lower arm extends from the glass;
- the rubber brush itself.
The brush is a consumable item that needs to be changed frequently. Their cost ranges from 300–700 rubles. Original products will cost more. First you need to determine which wipers are best for you.
The assortment is quite rich, models from different brands: frame, frameless, hybrid. All of them, of course, have both positive and negative qualities. Therefore, it is best to follow only the recommendations of the car manufacturer, and not advice on the market. They give precise parameters and even describe specific brands, indicating the exact catalog number.
Some manufacturers that produce these products immediately indicate the applicable model and make of the machine. So that even a person with little knowledge can understand which machine a specific part is applicable to.
If this option does not suit you, then select similar installed ones, if, of course, you are satisfied with their quality of work.
Take measurements before going to the store. Because for most cars they are individual and it is necessary to measure both wipers. If you find it difficult to determine the type yourself, then carefully remove the old brushes. Just remember to place a cloth under the wiper arms so that the glass does not come into contact with the metal.
Trapezium wipers - replacement for VAZ 2110
The trapezium of the wipers transmits the force from the engine to the windshield wiper arms. The best quality of windshield cleaning will be only if all elements of the wipers are in working order. If the trapezoid hinges are clogged with dirt or the lubricant has dried out, the motor energy will not be enough for proper cleaning. Therefore, owners of cars of the tenth family are forced to repair the trapezoid once every 5–10 years in order to avoid deterioration in the performance of the wipers.
These necessary wipers
Replacing a windshield wiper on a VAZ 2110
In the winter months, non-working wipers are not as dangerous as, for example, in the fall. The driver has to make forced stops every 5-10 kilometers to independently clean the icy windshield wiper blades (see Windshield wiper repair - how to do it correctly), which causes a lot of inconvenience. Either way, replacing old wipers is a vital necessity.
Replacing the trapezoid of windshield wipers on a VAZ 2110
Surely everyone knows that wipers are made of rubber, so they wear out after several months of removing snow, raindrops and dirt from the glass. Of course, to replace the brushes, you can go to a car repair shop, where specialists will do everything quickly and efficiently, but why spend money on work if you can do it yourself? This is a simple process that is the same for many cars.
Note! It is recommended to replace windshield wiper blades twice a year. For drivers with extensive experience, such work has long been a habit; the car should always be working.
Replacing windshield wiper blades for VAZ 2110
What affects the condition of the trapezius
The wiper motor and trapezoid are located directly under the glass, so some of the water or washer fluid falls on them. In addition to water, dust, dirt and various small debris get there. All this leads to a change in the properties of the lubricant and deterioration in the performance of the trapezoid. When the lubricant loses its properties, the plastic bushings of the hinges begin to wear out, resulting in backlash and increasing resistance during operation.
How to remove the windshield wiper trapezoid
To remove the trapezoid you will need:
- key to 10;
- thin flat screwdriver;
- crosshead screwdriver.
First of all, you need to remove the wipers. To do this, you need to remove the plastic pads and unscrew the nuts with which they are attached to the trapezoid studs. Then unscrew the screws and side fastenings of the protective casing (jabot) and remove it. If the fasteners do not come out, treat with WD-40. Before removing the casing, make sure to remove all screws, bolts and nuts. If the cover does not come off, look for a fastener that you did not remove. Lifting the frill, disconnect the washer fluid supply tube from the tee, and then move the casing to the side.
Remove the belt that supports the radiator tank and move the tank to the side. Then pull out the partition (sound insulation), which is located behind the tank. Don't forget to remove the washer fluid supply tube from it. Disconnect the electric motor power connectors. After this, unscrew the bolts securing the trapezoid and electric motor. To remove the trapezoid, you must either struggle for a long time, coming up with various options, or place a thin flat-head screwdriver under the far end (relative to the motor) of the lower rod of the trapezoid and pull out the entire structure as if on a slide. You can also turn the left edge of the trapezoid clockwise and pull it out, then remove the engine.
Step-by-step replacement process
- Using a slotted screwdriver, remove the rubber caps and unscrew the two nuts securing the wiper arms. Ten head nuts.
- Remove the wiper arms by pulling them towards you by hand.
- Using a slotted screwdriver, remove the four plastic plugs and remove the four Phillips screws. Screws secure the frill trim under the windshield.
Using a Phillips screwdriver, unscrew the seven screws securing the engine shield insulation to the frill trim. The fastening screws are located along the entire length of the insulation.In the corners on the right and left, unscrew the frill under one nut. Ten head nuts.
Lift the cover up and move it to the side.
Lift the coolant expansion tank up and to the side. There is no need to remove the hoses leading to the tank.
Unscrew the two nuts securing the trapezoid to the crossbar under the windshield.
In the depths, unscrew the last bolt securing the trapezoid and remove it along with the motor. Ten head bolt.
If necessary, unscrew the three bolts securing the motor and move it to a new trapezoid.
The process of replacing the trapezium wipers of VAZ 2110, 2111, 2112 is clearly shown in this video:
Trapezoid repair
During repairs, it is necessary to clean all elements of the trapezoid from dirt and inspect the studs. If wear is detected on their ribs, the trapezoid will have to be replaced. Repairing a trapezoid involves replacing the plastic caps. To do this you will need a repair kit and boiling water. First, disassemble the trapezoid using a pry bar or a heavy-duty flathead screwdriver as leverage. After this, cut off the old plastic caps. If you can’t cut it, use side cutters and bite off the caps piece by piece until you can pull them out of the trapezoid rods. You can also hold the ends of the trapezoid in boiling water, 2 to 3 minutes is enough, then push the caps out of their seats.
Three types of trapezoids were installed on cars of the “tenth” family - VAZ 2110, 2111 and 2112, which differed in minor details. Therefore, there is a possibility that either the trapezoid rods or the caps will have to be adjusted. Remove the cap and inspect it. If there is a fixing protrusion on top of it, check the recess for it on the rod seat. If there is no notch, you will have to either cut off the protrusion on the cap (does not affect the performance and reliability of the trapezoid) or saw through it in the draft. If there is no protrusion on the cap, no adjustment will be necessary.
Clean the rod and seat, then lower the cap into boiling water for 10 - 15 seconds. After this, it will soften and easily fall into place. Do not install a cold cap as this will destroy it. After the cap has cooled completely (20 minutes), the rod is ready for assembly. Before assembly, lubricate the bushings with graphite grease.
Check the serviceability of the electric motor. To do this, disconnect it from the trapezoid (you need to unscrew the fastening nut) and connect it to the car battery. When working, it should make a low buzzing sound. If you don't know how to connect the motor to the battery, then connect it to the power connector. Turn on various operating modes of the electric motor for 10 - 15 minutes. After that, feel it. If the motor gets hot, it needs to be replaced. An electrical technician can try to repair this device, but regular drivers and car enthusiasts need to replace it.
Why the wipers don't work
At some point, the car owner may notice that his wipers are not working. This may manifest itself in their complete stop or creaking operation.
Trapezoid Compatibility
First of all, look for the reason in the electric motor. But remember that mechanical problems also happen.
The most popular mechanical breakdowns of wipers:
- When the cleaners turn on, the sound of the motor is heard, but the brushes do not move or twitch slightly. Most likely, the nut securing the crank to the gearbox axle has lost its grip or has become completely unscrewed.
- Non-synchronous operation of the windshield wipers indicates a problem with the drive. Again, check the locking nut. When tightening the nut, be sure to first place the brushes in the correct position.
As for problems with the electrical component, they manifest themselves as follows:
- The wiper moves very slowly, stops, then starts working again, does not stubbornly go to the lower position. Check the limit switch. By bending the contacts, it is adjusted in this way. If such a measure does not bear fruit, replace the entire VAZ 2110 wiper motor assembly, since the gearbox is built-in;
- You have turned on the intermittent mode, but the brushes work non-stop. Here the problem lies in the relay, which needs to be replaced. If when you turn on the device you do not hear a sound from the rotation of the motor armature, then the relay is 100% to blame. If not, then check for burns and oxidation on the contacts;
- When choosing any mode, you can only hear the clicking of the thermometallic fuse. At the same time, the anchor and brushes remain in place. Check to see if the brushes are frozen because of the frost and that’s why they don’t move. Either fuse F5 has blown, or the armature has burned out;
- The electric motor does not turn on, although the fuses are good. Check the quality of contacts. This often causes a stuck brush or a burnt armature.
Putting the trapeze in place
Usually, installing the trapezoid into place does not cause difficulties. Insert it and secure with bolts. Do not overtighten the motor mounting bolt; the motor may need to be turned slightly to get the trapezoid to operate smoothly. After making sure that the trapezoid is working properly, tighten the electric motor mounting bolt, install and secure the sound insulation, frill (do not forget to connect the washer tube), and the expansion tank. Insert the plastic plugs and install them in place, install the arms with brushes and check the operation of the wipers in all modes.
Sources:
https://autorn.ru/vaz/2110/438-zamena-i-remont-trapecii-dvornikov-vaz-2110-2111-2112.html https://remont-vaz2110.ru/zamena-motora-i-trapecii -stekloochistitelya/ https://carfrance.ru/trapecia-dvornikov-na-vaz-2110/ https://xn—-8sbapc1bfiir0a.xn--p1ai/remont/elektrika/snyatie-privoda.html https://vipwash. ru/lobovoe-steklo/trapeciya-dvornikov-zamena-na-vaz-2110
Rear window wiper
The rear electric motor can also be removed and a new one installed. To do this you need:
- Remove the holder and rear wiper blade;
- Remove the rear door from the upholstery;
- Remove the battery negative terminal wire;
- Disconnect the terminal block from the windshield wiper motor wiring;
- Loosen the nuts securing it to the door (there are 3 of them) and dismantle the motor;
- Install a new electric motor. Replacement is in reverse order.