The clutch plays the role of a link in a car between the transmission and the engine. This element of the internal combustion engine takes on the “impact” and all the loads that arise when transmitting torque from the engine to the gearbox. Therefore, the clutch can be conditionally classified as consumables, since it wears out quite often and requires immediate replacement. It is impossible to influence the wear of the clutch, unless you manage to change gears without its participation, although in this case it will not go unnoticed in relation to other parts of the engine.
Installing a new element
When you have completed the entire range of dismantling work, you can move on to the final stage - installing a new component.
- The first thing to do is check the condition of the new clutch release bearing. For some reason, many car owners forget to make sure that the bearing that replaced the old one is actually in good working order. This is easy to check. Rotate the bearing, pull it in different directions. If there is no jamming during rotation, and there is also no play, then you bought a really serviceable, good release bearing.
- Insert the new part into the coupling. This must be done so that the protruding part of the inner ring is directed towards the coupling.
- After inserting the element, secure it using the holders.
- Before inserting the new release bearing onto the bushing (guide), do not forget to lubricate it with a grease. The layer of lubricant should be thin, do not overdo it.
- Secure the coupling and bearing using a spring lock.
- Place the gearbox and other dismantled elements in their rightful places.
- The entire repair process is completed by adjusting the clutch.
Replacing the release bearing yourself is not very difficult. The main problem is removing the gearbox. All other events cannot be called difficult. However, you will need to be careful, consistent and careful.
Do not ignore the most useful thing that you can need when repairing your favorite VAZ 2110 - the instruction manual. Literally everything a car owner needs to know is described in detail there. With its help, you can even perform complex repairs, the cost of which at a specialized service station would be prohibitive.
Let's move on to withdrawal
To remove clutch discs from a VAZ 2112, perform the following steps:
- We install our car on the inspection pit (or whatever you have instead - an overpass, a lift)
- We remove the gearbox from the car, first disconnect the wires from the battery
- Without this we cannot get to the clutch, let me briefly remind you of the procedure:
- Draining the oil from the gearbox
- Removing the starter
- Disconnect the block with wires from the speed sensor by squeezing the spring clips to do this.
- We unscrew the bolt that secures the bracket holding the ignition module, then the bolts (there are two of them) securing the top of the gearbox to the engine
- Disconnect the wiring block located at the bottom of the car from the reverse sensor
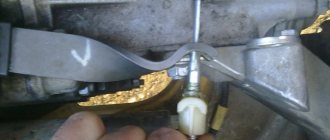
- We unscrew the bolt of the clamp securing the shift rod bracket and pull it off the hinge, sliding it back
- Removing the wheel drives
- Instead of one of them, be sure to insert a plug so that the differential does not fall apart
- The plug should be tied so that it does not accidentally fall out during the process of removing the gearbox.
- It will be enough to pull the right drive out of the box and move it to the side, fasten it to the body with wire so that it does not interfere
- Then unscrew the bottom nut securing the box to the motor (it is located on the motor side)
- You should be careful, because on car models with a gasoline injection system, a bracket supporting the intake pipe is attached under this nut; it must be removed
- You can loosen the top nut of this bracket if you can’t just remove it
- After unscrewing the three bolts, remove the lower cover of the clutch housing
- Then we unscrew the lower left bolt, which also secures the gearbox to the engine, and hang the engine using a board or hoist
- Unscrew the nut of the left engine mount from below
- Then two nuts that secure the rear cushion to the engine
- Unscrew the bolts securing the rear engine mount to the gearbox
- We insert a screwdriver into the gap between the clutch housing and the engine block, and slide the box away from the guide bushings
- It is necessary to hold it
- We move the box as far back as possible so that the rear cover passes over the brace coming from the front suspension (its input shaft comes out of the clutch)
- When the input shaft is not released from the clutch, push the engine to the side
- We lower the front end of the gearbox and pull it out from under the car (you need an assistant here), photo below
We remove and pull out the gearbox from under the car
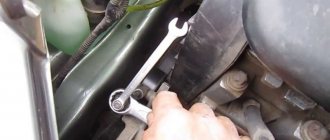
- Use a spanner wrench to unscrew the bolts securing the clutch housing
- To make it more convenient to unscrew them, you can use the “8” head
- The bolts should be unscrewed evenly so as not to deform the casing.
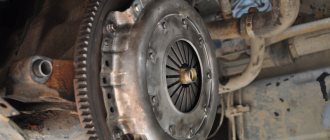
- Then remove the clutch basket
- Visually assess the condition of the slave and master disks
- If any defects are found, they must be replaced
- When installing the clutch, place the driven disk with its protruding side in the direction of the drive disk
- Then insert the centering mandrel
- This is done so that it stands clearly in the center of the flywheel
- Because if it moves, your gearbox will not fit into place (the input shaft will not engage)
The centering sleeve is inserted into the driven disk, then the basket is screwed on
- We insert the mandrel into the crankshaft, then install the drive disc, clutch basket and tighten the bolts evenly in a circle
- After fully tightening, pull out the mandrel
- Then you can install the gearbox (we first recommend lubricating the splines of its input shaft)
Thus, the clutch is replaced. As you can see, there is nothing complicated in such work. A training video will complement our article.
Clutch adjustment
After installing a new or repairing a clutch, it always requires adjustment; our instructions will help you. There is nothing complicated here and, after reading this article, everyone will be able to adjust it independently. So:
- Usually the need to adjust the clutch is determined by the movement of its pedal, when the pedal begins to rest against the mat (covering) - this means that the linings on the driven disk are worn out
- The maximum allowable value for pedal travel is 160mm
- Check the pedal travel in your car, if it is not correct, then you need to urgently adjust the clutch
Let's move on to the adjustment:
- First, determine the distance from the clutch pedal to the mat (covering), to do this, use a regular ruler
- Place the ruler on the floor so that the angle next to the pedal is 90 degrees
- And we measure the distance, if this distance exceeds 160 millimeters, we make adjustments
- To adjust, it is necessary to loosen the lock nut, which is located on the tip of the cable; this tip is located near the clutch fork in the engine compartment
- To set the full clutch stroke of 120 - 160 millimeters, we will need to rotate the nut in a circular motion
- By unscrewing the nut, we reduce the pedal stroke, and by screwing it on, on the contrary, we increase it
- After adjustment, press the pedal all the way at least three times, then check with a ruler from the pedal (its top platform) to the mat
- If the adjustment is incorrect or insufficient, then adjust the pedal stroke with the nut, then secure the nut with a lock nut
- At the last stage, all that remains is to move the fork limit sleeve until it stops, and the adjustment will be completed
Everything is adjustable, good luck with your repair.
Advice from professionals
- Carry out technical inspections of your vehicles regularly. This manipulation will allow us to identify future breakdowns and eliminate malfunctions at an early stage of development.
- Respond promptly to emerging signs. Do not operate a vehicle with worn parts.
- When making repairs, use only new and high-quality spare parts.
- Once again, spend a little and entrust the work to qualified mechanics if you don’t know how to remove the clutch cable of a VAZ 2110.
- To extend the life of the clutch cable, systematically lubricate it with a special substance using a syringe provided for this procedure. This feature will prevent chafing of the element.
Carefully monitor the condition of your car. Timely maintenance will extend the life of the vehicle.
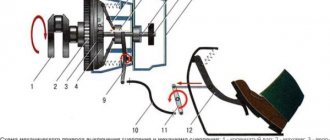
Operating principle of the cable
VAZ models 2112 are equipped with a standard mechanical clutch drive for Volzhsky Automobile Plant products. Its distinctive features:
- structural simplicity;
- cheapness;
- ease of maintenance;
- decent endurance.
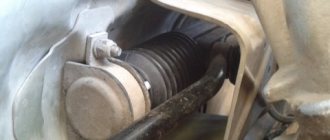
The main element connecting the clutch with the control mechanism is the cable discussed in this article. It is enclosed in a protective shell, which ensures the preservation of the lubricant placed inside and a number of other auxiliary functions.
The pedal is located in the cabin itself, and pressing it moves the clutch fork. The force is transmitted precisely by our cable.
At the end opposite from the foot drive there is an extremely simple adjustment device that allows you to set the pedal stroke length. It consists of two nuts screwed onto the end of the cable. It is not difficult to find - look at the area where the clutch fork is located. The upper nut is responsible for the actual adjustment, and the lower one prevents it from spontaneously unwinding.
The principle of operation of the mechanism is as follows: the person sitting behind the wheel presses the VAZ pedal, which pulls the cable, which, in turn, pulls the fork along with it. The latter moves the release bearing, causing it to press on the basket. As a result, the clutch disengages.
Replacement
If you change the fork on a classic without removing the gearbox, you can still do it, but you won’t be able to do the same on a VAZ-2110. The replacement will take 3 to 4 hours depending on experience.
- Remove the gearbox.
- Remove the pressure bearing.
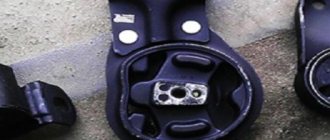
- The next step is to remove the rubber cover by hooking it with a screwdriver. Pull it off the power plug. It also needs to be replaced if it becomes warped, cracked or hard.
- Use pliers to squeeze the locking tabs on one side of the crankcase. Using a screwdriver, pry up the plastic bushing of the fork axle. If there is noticeable damage or signs of wear on the cap, then it also needs to be replaced.
- We unfasten the clutch fork itself: by lifting it, you need to remove its axle from the bushing. First, the axle, then the lever, are removed from the outlets in the crankcase.
- You need to squeeze the ends of the fork spring retainer and remove it. A deformed retainer needs to be replaced.
- We replace the fork that shows signs of wear.
- It is usually recommended to replace the metal bushing as well, especially if it is noticeably worn.
- Before installing a new part, you need to lubricate both the metal and plastic bushings.
- Next, install the shutdown plug. Assembly is carried out in the same order, starting from the end. Carefully secure the plastic sleeve. The protrusion on it should be in the recess on the crankcase. The petals should firmly secure the sleeve, preventing it from falling out.
We change the clutch on a 16 valve VAZ-2112 with our own hands
Car : VAZ-2112. Asks : Anzorin Maxim. The essence of the question : How to replace the clutch on a VAZ-2112 yourself?
Hello! Please tell me how to properly replace the clutch on a VAZ-2112? I want to replace it because it seems to me to be very worn out. Sometimes I press the pedal and then when I release it, it somehow doesn’t grab right away. And the service announced a price of 3,000 rubles.
see also
How to check the clutch
Clutch faults
Which side should I put the clutch disc on?
Extraneous sound when starting VAZ 2110
Clutch release bearing: principle of operation, symptoms of malfunction
- 179 0 137k
Are there signs of clutch wear on your 2110? Hence? You need to purchase a new set and make repairs, or rather replace the clutch on the VAZ Top Ten.
Without a garage with a pit, you can make do with improvised means. To change clutches on a VAZ 2110 you will need : a set of keys, a jack and wooden stumps. And for proper alignment of the clutch disc, you will also need a guide, which is also a simulator of the gearbox input shaft.
Clutch replacement will be needed when the wear of the petals reaches more than 0.8 mm or an increased stroke of the clutch pedal appears - this indicates wear of the drive disk , possibly, spring settlement. The driven disk is mounted on the splines of the gearbox input shaft and is changed in case of runout, uneven wear, scuffing, cracks, and also if the linings from the rivets are 0.2 mm apart.
The driven clutch discs of the VAZ 2110 and VAZ 2112 have the same dimensions (200x140), but slightly different characteristics of the springs - pressure and damper. 2112 discs have a pair of springs (out of six) that are smaller and placed closer to the center; they transmit 12% more torque thanks to a boosted compression spring. The “twelfth” discs can also be distinguished by the hole in the slot of the petals.
Popular problems and their solutions
There are several characteristic faults that occur on the VAZ 2110. Let's try to understand the reasons for their occurrence, and also consider ways to solve the problem.
- The clutch drives. The reasons may be: The pedal has insufficient travel, the tension is too tight. To eliminate this, you need to adjust the drive;
- The driven disk is deformed. Only replacement will help here;
- The driven disc hub sometimes gets stuck. If so, try washing it and lubricating the input shaft splines. If the element or the shaft itself is worn out, then replace them;
- The friction linings are broken and the rivets are loose. The best solution is a complete replacement of the casing, which includes a spring and a disk;
- The pressure plate is warped or warped. Replace the linings, but first make sure that there are no deviations in the end runout of the disk;
- There were problems with the cable. Pull it up. If there is no result, replace with a new one.
- The friction linings on the driven disk often burn or wear out. There is only one solution - replacement;
- Oil has reached the surface. We have already described how to solve the problem above;
Dismantling the gearbox
The most important thing is to remove the gearbox. Therefore, it is best to carry out all work on an inspection hole or overpass - it’s really more convenient. Procedure:
- Remove the left wheel, unscrew the nuts from the ball joint and the tie rod end. You will need to move the box to the side; the drive on the left should come out without any problems.
- Loosen the nut securing the rocker and remove it from the gearbox shaft.
- Remove the starter, having first disconnected the battery and all wires from it.
- Unscrew the fastenings of the pillows holding the box. It is recommended to place a jack or reliable support under the gearbox housing before doing this.
- Disconnect the speedometer cable, disconnect the wires from the reverse sensor, as well as the ground bus.
- Unscrew the three bolts and nut that secure the gearbox housing to the engine block.
- Carefully move the box to the side; the right drive must be removed.
see also
How to check the clutch
Clutch faults
Which side should I put the clutch disc on?
Extraneous sound when starting VAZ 2110
Clutch release bearing: principle of operation, symptoms of malfunction
- 179 0 137k
Are there signs of clutch wear on your 2110? Hence? You need to purchase a new set and make repairs, or rather replace the clutch on the VAZ Top Ten.
Without a garage with a pit, you can make do with improvised means. To change clutches on a VAZ 2110 you will need : a set of keys, a jack and wooden stumps. And for proper alignment of the clutch disc, you will also need a guide, which is also a simulator of the gearbox input shaft.
Clutch replacement will be needed when the wear of the petals reaches more than 0.8 mm or an increased stroke of the clutch pedal appears - this indicates wear of the drive disk , possibly, spring settlement. The driven disk is mounted on the splines of the gearbox input shaft and is changed in case of runout, uneven wear, scuffing, cracks, and also if the linings from the rivets are 0.2 mm apart.
The driven clutch discs of the VAZ 2110 and VAZ 2112 have the same dimensions (200x140), but slightly different characteristics of the springs - pressure and damper. 2112 discs have a pair of springs (out of six) that are smaller and placed closer to the center; they transmit 12% more torque thanks to a boosted compression spring. The “twelfth” discs can also be distinguished by the hole in the slot of the petals.
What to do if the breakdown occurs on the street
If the cable fails on the road, then it is not at all necessary to call a tow truck or look for well-wishers who are ready to tow your car to a garage or car service center.
In principle, it is quite possible to get there on your own without using the clutch at all. This method is best used when there is not too much traffic on the roads, since your driving speed will be low.
Start the engine and put the lever in first gear. Don't forget to turn on the emergency lights. It is important to understand that this option is extremely harmful to the clutch, but if the garage or workshop is not very far away, then nothing bad will happen.
Source: ladaprofi.ru