The correct operation of the generator itself and the entire electrical system of the car depends on the alternator belt. If the belt is worn out or sagging too much, there is a danger that the generator will not produce current and the battery will quickly discharge. Starting a car will be very problematic. The entire electrical system will fail.
Determining whether a belt needs to be changed is quite difficult, but some signs may indicate this:
- when the engine is running, the headlights become weak and dim;
- extraneous noises, whistling when starting the car.;
- After a mileage of 30 - 50 thousand on Kalina, it is worth checking the serviceability of the belt. It may have cracks, broken teeth, cuts, oiling or delamination of rubber, which can lead to belt breakage. In this case, it is better to replace it.
What is it needed for?
As mentioned above, any vehicle is equipped with such an important device as a generator. If it fails, the operation of the vehicle will be impossible. Therefore, special attention should be paid to the performance of all elements of the device, be it a Lada Kalina with a 16- or 8-cl. engine, with or without air conditioning. What is the component size? How is the roller strap adjusted and replaced? How to tighten up? You can find out the answers to these questions in the article.
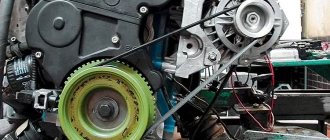
Car Lada Kalina tuning
Before answering questions that interest Lad Kalin owners, you should understand why this component is needed. Not every motorist knows what role he plays in the functioning of the car.
In modern cars, this belt is the only element that allows you to transmit crankshaft rotation to the generator. When the crankshaft transmits rotation to the device pulley, energy appears in the vehicle's electrical network, thanks to which all electrical equipment operates.
We recommend: Hi-Gear sealant for cooling system
Belt and roller selection
Several types of belts are used on Lada Kalina cars.
The type of element depends on the engine model and its equipment:
- The motor version without air conditioning and tensioner has a belt length of 823 mm. Gates (number 6PK823) is standardly used, but such a part is not supplied as spare parts. To replace it, a slightly different strap is used - Gates 6PK823SF.
- The version of the unit with a belt tensioner, but without air conditioning is 882-884 mm. Standard part manufactured by Gates (article 6PK882). In addition to it, straps are often used - Finwhale BP6883, Dayco 6PK888 or the cheapest Balakovo belt BRT882.
- Engine with air conditioning and belt tensioner (motor 11183) - 1018 mm. Standard element manufactured by Gates (number 6PK1018). Alternative options are Dayco 6PK1018 or Continental 6PK1015.
- The 21127 16-valve engine with air conditioning and tensioner uses a 995 mm belt. The Gates part (6PK995) is supplied from the factory, and it is also used as a spare.
Sometimes when replacing a belt it becomes necessary to install a new tensioner. It is the same for all motors, its article number is 2123–1041056.
Belt selection and price
If the generator design has a tensioner, then the belt length is 883 mm. In the vast majority of cases, Kalina has 8 valves. If the generator is like on Grant, the length is 823mm.
When choosing a manufacturer, you should take into account that the official supplier of these belts for AvtoVAZ is GATES, so preference should be given to its products. Belts are also produced by BTR (lots of bad reviews), Continental, Finwhale, and ANDYCAR. It is better to buy Dayco 825 (manufacturer GATES), elastic belts are marked Poly-V, if not, then the belt is rigid. The price of belts is approximately from 500 to 1000 rubles.
Prices for alternator belts vary on average from 300 to 400 rubles, depending on the manufacturer, which is not affordable.
We recommend: How to remove the window regulator on a Priora
Alternator belt 1118 (without air conditioner.) 6PK884 BOSCH (1987947933)
Payment to Sberbank VISA card
The most convenient and profitable payment method for you. Payment can be made through the Sberbank Online system, through a payment terminal (Sberbank ATM), provided that you have a card from this bank. If you are not a client of this bank and you do not have a card, then you can top up your balance at any bank branch through an operator; they will accept cash payment and top up your balance. Commission from 0 to 1%
Payment to Alfa-Bank card
Payment via Tinkoff card
Payment to VTB card
Cash on delivery (payment upon receipt)
Payment for the order will be made at the post office upon receipt of the goods. For cash on delivery services, Russian Post takes an additional commission - approximately 4% of the cost of the order (parcel) upon receipt.
When is it time to change?
On Lada Kalina cars, the manufacturer does not regulate the replacement of this part. However, its failure is a common problem. In particular, we are talking about Lada Kalina cars. This applies to both 16-cl and 8-cl engines.
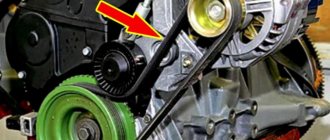
This is what a deformed element of a Kalina generator with an 8-cyl internal combustion engine looks like
Therefore, let’s look at the signs that indicate that the belt may fail in the near future:
- Whistle when moving. As a rule, this whistle appears when the electrical appliances of the vehicle begin to load. For example, if you start the car, and when you press the gas, a loud whistle is heard from the engine compartment, this indicates that the belt is loose. In this case, it must be tightened using a tensioner or replaced.
- Cracks on the strap. If you open the hood, look at the belt and see cracks on it, then you know that it’s time to change the element. Neither tensioning nor adjusting the rollers will help here. The component can be tightened, but this will not be enough for a long time. The only option left is replacement.
- Deformation. As in the previous case, neither tightening the tensioner nor adjusting the rollers will give much effect. You just need to change the element.
- Noise when the engine is running. If the element has already served its service life, this can be understood by the noise that appears when the motor is running. For example, some Lad Kalin car owners report loud knocking and even impacts when the engine is running.
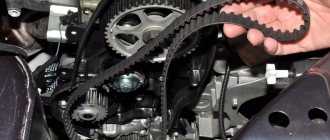
The assembly is disassembled: this is what the strap looks like on the shafts
If the vehicle is equipped with a generator sensor that determines its performance, then it will be easier to identify the malfunction. For example, if you heard a whistle from under the hood, and at this time the indicator on the sensor came on, then you need to pay attention to the strap. This indicates that the belt needs to be tightened, since it may be in a weak state or that its service life has been exhausted.
One way or another, if the slipping and whistling of the strap cannot be eliminated by adjusting the belt or rollers, it needs to be changed.
How to change it yourself?
The complexity of replacing the alternator belt on Kalina does not depend on the number of valves or additional units on the engine.
Replacement on 8 valve engines without tensioner
Replacing the belt on such an engine is the simplest; the only tools you need are a 13 mm wrench and a short flat-blade screwdriver. Since the tension in such a drive scheme is quite strong, when changing it is necessary to use only a Gates 6PK823SF or Dayco 825 six-V belt with the additional marking POLY-V. The remaining straps are too rigid, quickly collapse and damage the bearing on the generator shaft.
Stages of work
To complete the task you need to do the following:
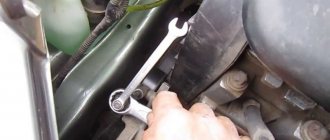
- Unscrew the lower mounting bolt of the generator 2-3 turns.
- Unscrew the nut of the upper fastening, use a screwdriver to push out the bolt and remove it completely.
- Lower the generator down. The eye of the mechanism must pass through the gap between the radiator and the TV body.
- Remove the old belt and replace it with a new one. If the strap does not fit easily onto the pulleys, you can carefully tighten it using a screwdriver.
- Raise the generator up, ensuring the belt is tensioned.
- Insert the upper mounting point bolt and tighten the nut.
- Tighten the lower mounting point bolt.
- Check the operation of the belt.
The repair process on such an engine is clearly shown in the video filmed by the author Ilgiz Magafurov.
Replacement on 8 valve engines with tensioner
Here, the procedure for installing a new alternator belt is very different from that presented above.
Required Tools
To replace the alternator belt yourself, you will need at least the following tools:
- regular or box wrench for 13, 17 and 19 mm nuts;
- a head with a ratchet for 8 mm nuts; if it is not available, an open-end or regular wrench of the same size will do;
- a screwdriver with a thin flat blade;
- thin needle;
- rags;
- white spirit or gasoline, approximately 0.5 liters;
- container and brush for washing;
- CV joint bearing lubricant.
Stages of work
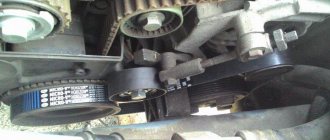
To adjust the degree of belt tension on Kalina engines, a mechanical tensioner is used, in contrast to the timing drive, which uses a hydraulic tensioner. When changing an element, it is recommended to carry out preventive maintenance of the roller by adding fresh lubricant.
To complete the work you need to do the following:
- Loosen the roller bolt. The thread on it is reversed.
- Use a screwdriver to pry up the plastic plug on the roller and carefully remove it.
- Unscrew the fixing nut on the tensioner rod a few turns.
- Loosen the belt tension by rotating the rod nut clockwise. The nut must be unscrewed until the rod begins to move freely in the seat.
- Unscrew the side bolt securing the rod end, located next to the tension roller.
- Remove the tensioner and set it aside.
- Proceed to dismantle the strap. The procedure must begin with the generator pulley, while overcoming the slight resistance of the belt.
- Remove the element from the crankshaft pulley and remove it completely.
- Unscrew the roller bolt and remove it.
- Using a needle, carefully pry up and remove the protective caps on the bearing. Wash the bearing with white spirit or gasoline.
- Refill with fresh grease and install protective rubber caps.
- Assemble all the parts and mount the roller in place. When assembling, you must remember that the bushing is in the bearing on the side of the bracket.
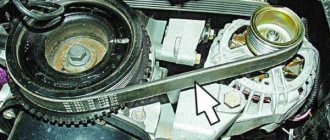
- Change the belt by installing it in the reverse order - from the crankshaft pulley to the generator pulley.
- Install the tensioner and begin tightening the belt by turning the nut counterclockwise. The nut must be tightened until the resistance increases. A well-tensioned strap should be slightly pressed when pressed by hand.
- Tighten the nut securing the tensioner rod.
- Check the operation of the mechanism; if a whistle occurs, tighten the strap.
Replacement cost
The cost of changing a belt on a Lada Kalina car depends on the type of engine, range of units and is:
- for a motor without a tensioner - from 300 rubles;
- engines with a tensioner without air conditioning - from 150 to 350 rubles;
- motors with tensioner and air conditioning - from 220 to 400 rubles;
- for unit 21127 - about 600 rubles.
We recommend: The quietest and softest summer tires
Replacing the roller will require an additional 250 rubles. The total amount required by the car owner to purchase spare parts, in the maximum version, will not exceed 850 rubles.
Replacing the belt and generator roller on an 8-valve Lada Kalina is very easy and simple. A wide range of product choices will not suit every consumer's taste. Moreover, even analogues of original parts are of fairly high quality. Diagnosing faults is easy and can be done by any motorist.
Take off777777777ok
Mounting points for the mudguard and fender liner: 1 — screw with a Torx T-27 key for general fastening of the mudguard and fender liner to the wheel arch; 2 — two Torx T-20 screws for general fastening of the mudguard and fender liner to the wheel arch and fender; 3 - Torx T-20 key screw for fastening the fender liner to the wing; 4 — four self-tapping screws “8” for fastening the fender liner to the wheel arch; 5 - four Torx T-20 screws for fastening the fender liner to the front bumper. Mounting points for the mudguard and fender liner: 1 — screw with a Torx T-27 key for general fastening of the mudguard and fender liner to the wheel arch; 2 — two Torx T-20 screws for general fastening of the mudguard and fender liner to the wheel arch and fender; 3 - Torx T-20 key screw for fastening the fender liner to the wing; 4 — four self-tapping screws “8” for fastening the fender liner to the wheel arch; 5 - four Torx T-20 screws for fastening the fender liner to the front bumper.
We install a height-adjustable stop under the engine oil pan so that it takes on the weight of the engine.