Adjustment methods
Currently, there are three main methods of tensioning the alternator belt in cars:
- Using a special arc-shaped strip. In this case, the generator has two mounting points. One of them is an axis around which it can move within small limits. The other is the nut on the adjustment bar. If you release it, you can move the pulley to the required distance. This method is now considered obsolete. It is mainly used on VAZ classics.
- The generator is moved by rotating the adjusting bolt. This system has become widespread in cars of the tenth family.
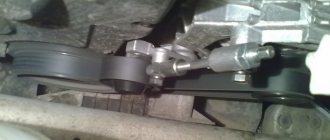
- Using a tensioner. This is a special movable roller that rests on the belt between the generator and crankshaft pulleys. It is equipped with a screw mechanism. By rotating it, you can adjust the pressing force. This is exactly the kind of alternator belt tensioner on the Lada Kalina.
If you need to replace the roller or brushes?
When, during operation of the engine, the owner of a Lada Kalina hears a distinct “rustle” coming from the rotating roller of the tension unit, then a detailed inspection of this element will be required and, if necessary, replaced.
To carry out this repair operation, it is recommended to stock up with ordinary keys and a screwdriver with a flat-tipped tip. All replacement procedures do not cause any difficulties, so we act with confidence.
- First, we resort to loosening the degree of belt tension. To do this, unscrew the stem.
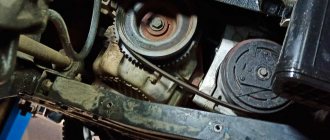
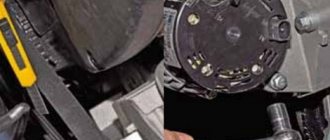
- Using the designated screwdriver, carefully pry up the protective cap of the roller and unscrew the bolt holding the bearing.
- From the worn-out roller we remove the bushing together with the washer (they are necessary for installation in conjunction with a new product).
- The entire assembly is mounted in its proper place and secured with a bolt.
- We tighten the belt and start the engine. We make sure that the new product functions correctly.
One of the factors characterizing weak battery charging is wear on the brushes of the generator set. In order to eliminate this negative aspect, the generator brushes will need to be replaced. To monitor their condition, they will need to be dismantled. Replacing generator brushes is available both on a removed generator set and on one installed on a Lada Kalina car.
In order to achieve safety of work and eliminate the risk of a short circuit in the circuit, before repair work it will be necessary to disconnect the network from the battery (remove the terminals). Now you need to dismantle the protective cover and remove the plug. This can be done conveniently using the previously designated screwdriver.
At the final stage of the process, unscrew the bolts, after which we remove the regulator itself with the brushes present on it. Replacement of generator brushes is complete. Brush wear is assessed by measuring their height. This parameter should not be less than 5 mm. If the brushes are worn out, then replace them and the regulator included.
Advantages of a tensioner
Why weren't designers happy with the previous adjustment methods? Why did they add an extra video? It's not just about convenience. The tensioner significantly increases the service life of the generator. Without a roller, the entire load falls on its bearings. If the belt is tensioned normally, then there is nothing to worry about. In this case, the generator will last many thousands of kilometers. However, very often car owners overtighten the belt, and this is bad.
The load on the bearings increases many times over, so they quickly fail. In itself, this is not so scary and expensive, although repairing a generator is quite labor-intensive. But the car owner does not always recognize the breakdown in time. The bearings gradually “break”, the rotor moves and begins to cling to the stator winding. The result is the need to purchase a new generator. Of course, the Kalina generator belt tensioner pulley can also fail, which happens quite regularly, but that’s only 400 rubles, not twelve thousand.
Forced tuning
Unfortunately, since 2011, designers have abolished the tensioner on Kalina. They were guided primarily by considerations of economy, but they did this without any modification to the generator. In practice, cases of its premature failure immediately became more frequent. Therefore, owners began to install the tensioner on their cars themselves.
It's not very difficult to do this. True, you will have to purchase not only the tensioner itself, but also the generator bracket. The only problem is removing the standard belt. It is very difficult to remove because it is very tight at the factory. You can simply cut it, as you will have to buy a new one. The fact is that the Kalina generator belt without a tensioner has a size of 820 mm, but 880 will be needed.
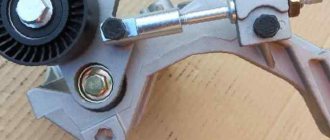
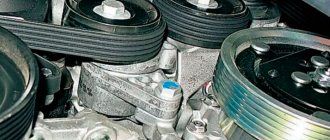
Design
The main element of the tensioner is the pressure roller. It is made of plastic, and a sealed bearing is pressed inside. The roller is mounted on its own bracket, which, with the help of a threaded rod, can move in a vertical plane. This ensures the required moment of pressure on the belt. To prevent the bracket from moving spontaneously when the car is moving due to engine vibration, the pin is tightened on top with a locknut. The entire structure is placed on the generator bracket. There are two holes in it for attaching the Kalina generator belt tensioner.
Checking the tension of the generator belt
If there is a suspicion of a malfunction of the alternator belt, it is necessary to carry out appropriate diagnostics. To carry out diagnostics, you need to acquire a caliper or an ordinary metal ruler.
Diagnostics of the alternator belt is carried out as follows:
- You should press the belt with a certain force (about 3-4 kg);
- Next, use a ruler to measure the degree of bending.
There is also a way to diagnose the alternator belt using a dynamometer. It consists of using a dynamometer to move the belt to the side, which should not bend more than 10-15 mm with a force of approximately 10 kgf.
Most common faults
During operation, the surface of the roller is constantly in contact with the generator belt. In addition, it is in continuous rotation, which places additional demands on the reliability of its bearings. The tensioner bracket is also subject to heavy load. Hence the main problems:
- Bearing wear. It simply runs out of service life or becomes unusable due to dust and dirt getting on it.
- Damage to the work surface. As already mentioned, the roller itself is made of plastic. Despite its high wear resistance, it often cannot withstand loads. This manifests itself in the form of scratches and chips, which quickly render the alternator belt unusable.
- Misalignment. This means that the belt and tensioner are at a certain angle to each other. Alignment can be disrupted in both the horizontal and vertical planes (due to the curvature of the bracket). This always causes rapid wear of the belt and the roller itself.
Often the cause of the malfunction is the driver himself. When trying to make adjustments, he forgets or does not loosen the locknut enough. As a result, the hexagon of the stud breaks off, and the Kalina generator belt tensioner fails.
We change bearings in Lada Kalina
The rectifier units present in the designs of generator sets of the AvtoVAZ model range have received a considerable number of negative reviews during operation. This statement is also true for the Lada Kalina we are considering. These modules can break down even after a mileage of 10 thousand km, which requires repair or replacement of the device. It has also been revealed in practice that the cause of most malfunctions is the generator set bracket. However, bearings can also fail prematurely. It is gratifying that the owners are able to cope with such a problem on their own.
Symptoms of a problem
Damage to the tensioner is usually easy to diagnose. It is often noticeable visually. Running the car for a short time without an alternator belt helps to identify the problem. This often allows the damage to be localized. You should think about replacing the Kalina generator belt tensioner in the following cases:
- Presence of traces of rust and corrosion on the roller axis.
- A characteristic whistle when the engine is running.
- Short service life of the alternator belt.
- Curvature of the roller relative to the belt.
Replacing the tensioner
The device consists of several elements, each of which is removable. Therefore, the need to replace the Lada-Kalina alternator belt tensioner assembly does not arise so often. As a rule, it is associated with mechanical damage to the bracket and stud.
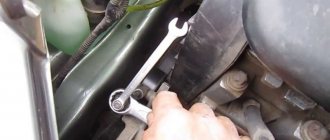
Replacement work must begin with preparing the tool. No special variety is required; keys 8, 13 and 19 are sufficient. Replacement is carried out in the following sequence:
- Use a 19mm wrench to loosen the tensioner locknut.
- Using a 8 key, rotate the pin clockwise. Here you need to be careful and not put in much effort. If rotation is difficult, it is better to loosen the locknut a little more.
- The pin is released until the roller no longer acts on the belt.
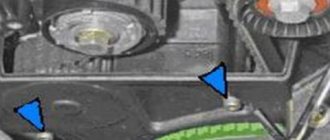
- By unscrewing two 13mm bolts, you can completely remove the tensioner.
Here you need to pay attention to one point. Bushings are inserted into the tensioner mounting holes. When removed, they often fall out and get lost, and they may not be present on the new tensioner. Bushings are necessarily included in the kit, but not everyone knows about their existence, so they don’t check it when purchasing. Installation of the Kalina generator belt tensioner is carried out in the reverse order. The pin is tightened with a force of 0.18 kgf/m.
Timing belt tensioning process
To determine the tension, you must press the timing belt firmly with your hand. It is advisable to use a special tool, which can be purchased at any automotive store. Under the influence of force, the belt should bend no more than 8-10 mm downwards.
Lack of sag indicates excessive tension, which is a deviation and requires adjustment. If the tension is not strong enough, so-called sliding along the pulleys will be observed during operation of the mechanism. This process is dangerous for the operation of the battery, since the latter does not receive the necessary electrical energy, as a result of which it is not recharged at all or partially. As a result, the battery deteriorates and quickly fails.
If, when tensioning the belt, there is an increase in load during operation of the machine with or without air conditioning, then the tension roller and bearings interacting with the generator lose their functionality sooner.
Mark for correct belt tension
If a tension discrepancy is detected, a number of manipulations should be performed to correct the situation. In order to loosen the tension, it is necessary, using a special adjustment pin, to rotate clockwise until the required tension level is obtained. As work progresses, you need to check the tension with a special device. To increase the tension, the adjustment pin should be turned in the opposite direction, also monitoring the changes.
The sixteen-valve viburnum simply pleases with the simplicity of its maintenance.
Old Gates, mileage 40 thousand. Yes, yes, according to the regulations, replacement after 30 thousand.
The belt had been asking for a replacement for a long time; a new one was purchased and was lying in the trunk along with the roller. The belt replacement had to be combined with the radiator replacement. I scrolled through fifty pages on the forums, didn’t remember anything, so I went to change it. I already had a lot of things unscrewed, but, just in case, I’ll list them in detail:
1. Remove the washer reservoir, do not touch the tubes. Need 8.10 heads. 2. We loosen the belt tension. Keys 19, 8. 3. Remove the wheel. 4. Unscrew the front suspension arm extension (one nut 24 and three bolts 17). 5. Remove the engine splash guard. A bunch of self-tapping screws with a head 8 and two bolts 10. 6. Jack up the engine by the mount bracket so as to support it just a little. We place the jack not at the very edge of the bracket, slightly deep into the engine compartment. Otherwise, it will prevent you from pushing the new belt through and removing the old one without cutting it. Look locally. 7. First, unscrew the two nuts and the bolt securing the pillow to the body (on top of the pillow). 8. Lower the engine down a little to remove the load from the two remaining bolts. 9. Then unscrew the two bolts securing the pillow to the bracket (in the center). Need a Torx E14 head. 10. Remove the pillow and change the belt through the gap formed. 11. Pry off the tensioner pulley cover. Unscrew the roller. LEFT THREAD! We change. 12. Putting everything back together.
The pillow hangs on one bolt
When I lowered the engine, the airbag touched the plastic pistons under the mudguard mounting screws (the square ones), and I had to pull them out.
One nut came loose along with the stud. Screwed it back like a bolt.
The new belt is in place, just need to tighten it.
There are again a dozen topics on the forums with hundreds of pages on how to tighten a belt. How I did it:
1. I did not tighten the belt too much. 2. Started the engine, gradually turned on electrical appliances, lights, heater and air conditioning. 3. It whistled - I pulled up a couple more turns. 4. Started the engine, gave it a load, whistled, and pulled it up. 5. After a day of use, the belt stretched a little and whistled. Finally tightened it up.
Tip: Don't buy Torx kits with 3/8" sockets included. It’s hard to find a wrench or adapter for them; a 1/4 + 1/2 inch set is better.
If you suffer for a long time, something will work out. Happy renovations!
The alternator belt is an important element of the life of your car. The correct operation of the generator, the quality of battery charging, as well as the voltage level in the on-board network largely depend on its integrity and correct tension.
When loosened, the belt begins to whistle, which may increase wear on the generator bearings. In addition, improper tension can lead to rapid destruction and further damage to the belt itself.
Such as:
- Cracks, cracks.
- Uneven wear.
- Break.
Therefore, you must know how to adjust the alternator belt on Kalina, what to do and in what sequence.