The service life of the rear brake drum is over 100 - 120 thousand km. Usually the part wears out faster and braking efficiency decreases.
The process of self-replacement is simple, but requires compliance with the algorithm. Let's look at the process of replacing the drum step by step.
How to remove the drum on a Lada Vesta: step-by-step instructions
- We install the machine within the perimeter of the repair area.
- Jack up the left (right) side.
- We remove the wheel.
- Unscrew the two bolts.
- We press out the element together with the bearing.
After carrying out maintenance and troubleshooting, we install the parts in the reverse order.
Troubleshooting the drum
Diagnosis of the brake system is usually carried out during a vehicle technical inspection. Another reason is the appearance of signs of malfunctions.
It is best to check the effectiveness of braking and identify a failed wheel on a special stand. On it, the wheels are spun to a speed of 15-20 km/h, and then braking is applied. The force created by the system is reflected in the instrument readings. Based on these data, as well as the results of the technical inspection, the specialist issues his recommendations.
The decision on the method of repair or replacement of any part is usually made at the defect detection stage, which should not be confused with diagnostics.
The presence of ABS, unfortunately, worsens the initial diagnosis, since the system prevents skidding.
The reduction in braking force on the rear axle is more pronounced in reverse mode. Cyclic jerks during braking most likely indicate the ovality of the inner surface of the drum. These jerks create response pulsations in the pedal.
The handbrake helps confirm this assumption - it only acts on the rear wheels. For example, when you press the pedal, you hear a strange creak, but it is unclear where it is coming from. Then, pressing the handbrake lever button, carefully tighten the latter. If the sound appears again, it means it comes from the rear wheels, if not, it comes from the front wheels.
The most characteristic of the extraneous sounds caused by faulty brakes is the grinding sound of metal. It occurs when the brake pad lining wears out or breaks. In this case, the brake drum wears out intensively. In this case, it is also good to use the handbrake.
Manipulations related to road testing and brake diagnostics should be performed in safe places. If brake fluid leaks and gets on the drum, the latter will become oily and the wheel will hardly brake.
A faulty wheel is also determined by the temperature of the drum. The part heats up due to friction. The wheel bolts become hot. The increased travel of the parking brake lever is due, among other things, to abrasion of the drum, but this is the total result of wear of all components.
Reviews
| № | Positive |
| 1. | Gennady (otzovik.com): mileage 80,000 km, brake circuit is working, replaced the front pads once. |
| 2. | Vladimir (www.zr.ru): the brakes in the Lada Vesta are effective, they work quickly, there are no comments. |
| 3. | Sergey (autobann.su): the car is two years old, no capital investments. I carry out technical inspections in a timely manner and buy original consumables. |
| 4. | Vladimir (lada-vesta.net): there are no special comments on the TD, the quality is good, but when sand gets into the caliper, a metallic creak and grinding sound is heard. The spacer plate and pads are covered in rust. |
| 5. | Dmitry (otzovik.com): review of the car is positive. I've been using Lada Vesta for two years and have no particular complaints. |
| 6. | Semyon (www.zr.ru): I noticed that in the rain the effectiveness of the brakes decreases, the pedal increases free play. |
| 7. | Maxim (autobann.su): before the Lada Vesta there was a Granta, the quality of the latter is not the best. Well done engineers, they finalized the model properly. |
| 8. | Georgy (lada-vesta.net): actual mileage is 74,000 km, the condition of the hub mechanism and steering knuckle is good, production is minimal. TC and TD are worn out by 60%, reserve is at least 15%. |
| 9. | Stepan (otzovik.com): I am pleased with the quality of workmanship and assembly of the car. There were no major breakdowns; minor ones were fixed on my own. |
| 10. | Vladimir (www.zr.ru): comrades recommended installing brake system elements from Renault Megane, they say the quality is better there. Not ready for large-scale spending yet. |
| 11. | Alexander (autobann.su): the car is two years old, standard equipment, no comments, the interior is quiet, the suspension is strong. |
| 12. | Mikhalych (https://forumvesta.ru): I’m proud of my domestic car; in three years of active use it has never let me down. Good brakes are a guarantee of safety on the road. |
| Negative | |
| 13. | Konstantin (www.zr.ru): as soon as it rains, the discs immediately creak, no matter what I did, it didn’t help. The dealer refuses to replace it due to a non-warranty issue. |
| 14. | Vitaly (otzovik.com): after purchasing the Lada Vesta, I immediately replaced the original TCs and TDs with imported ones. The quality of domestic spare parts leaves much to be desired. |
| 15. | Grigory (autobann.su): the rear drums turned out to be defective, replaced under warranty from an official dealer. |
| 16. | Kirill (lada-vesta.net): if possible, replace original disks and drums with imported ones. The service life of Russian ones is short. |
Possible causes of increased wear
Drum wear is inextricably linked with pad wear. Moreover, the dependence can be both direct and inverse.
Reducing the life of drums is facilitated by:
- The quality of the pads and the brake disc itself.
- Technical characteristics of the pads. The lining can be of high quality, but at the same time “soft”. It brakes smoothly, but wears out faster than the “hard” one. But it protects the surface of the drum. A “hard” pad is more aggressive towards the brake drum, so the mileage of the latter is shorter.
- Frequent use of brakes is driving in city conditions, with many traffic lights and crossings.
- Aggressive driving. Constant sharp braking, overheating of mechanisms.
- Off-road driving. The terrain is constantly changing, and every now and then you have to slow down. At the same time, dust and sand do not spare the working surfaces of mating pairs (pads, drums).
- Untimely maintenance, delayed repairs. If you can hear the sound of the steel base of the pad touching the disc, it means the wear has long been beyond the limit. You shouldn’t convince yourself that it’s not scratching too much yet. We urgently need to repair the system while there is a chance to get away with replacing the pads. In winter, when approaching your house, you can drive through a puddle and leave the car overnight. The block will freeze to the drum. When starting, the lining slightly detaches from the block, and after a while it completely falls off. For the reasons described above, the drum wears out intensively.
- A handbrake that gets stuck when tightened can cause increased friction, resulting in wear, overheating, and warping of parts.
Inspection of the body from the Lada Vesta interior
After examining the front panel in the showroom, the car service specialists stated that, judging by the joints and the quality of the materials, it would begin to creak within six months. Experts have noticed that car window seals are not of very high quality; therefore, after some time of using electric windows, scratches from accumulated dust and dirt will appear on the windows.
Replacing headlight bulbs will be convenient. Hands can easily reach the lamps in the engine compartment. But replacing taillight bulbs will be complicated by the fact that it will be necessary to fold back the trunk lining. It is also difficult to find the lamp socket from the taillight. In addition, it is worth noting the presence of plugs in the front fender liners, which make access to the fog lamps easier.
In the table below we show the cost of all repair work on a Lada Vesta car, which was announced by specialists from a private independent car service center.
We replace the pads of a Lada Vesta car in case of maximum permissible wear of their linings - the minimum thickness of the pad, including its base, must be at least 6 mm.
We carry out the work on a flat area, inspection ditch or overpass.
If the fluid level in the hydraulic brake reservoir is at the MAX mark, then before installing new pads, use a syringe or rubber bulb to pump out some of the fluid from the reservoir. This operation must be performed so that when the piston is pressed into the wheel cylinder of the brake mechanism while installing new pads, fluid does not flow out from under the reservoir cap.
Using a metal brush, we clean the spring brackets and pad seats in their guide from dirt and corrosion.
To replace the cover of the upper guide pin, you need to unscrew the bolt of the upper fastening of the bracket to the pin and remove the bracket from the pad guide. Before installing the pin, put a little grease into the hole in the pad guide...
We similarly replace the pads on the other side of the car.
During operation, the surface of the brake disc becomes uneven, as a result of which the contact area of the new, not yet worn-in pads with the disc decreases
Therefore, during the first 100 km of driving after replacing the pads, until the new pads have broken in, be careful, as the car’s braking distance may increase, the pads may get hotter than usual, up to the appearance of light smoke and smell, especially in hot weather.. https: //www.youtube.com/embed/zAOeWh3Efdc. https://www.youtube.com/embed/zAOeWh3Efdc
Sources
- https://autoruk.ru/lada-vesta/tormoza-lada-vesta/remont-perednikh-tormozov-lada-vesta
- https://motormania.ru/auto-pomosh/lada-vesta-stoimost-rabot.html
- https://www.zr.ru/content/articles/852978-lada-vesta-zamenyaem-kolodki-tormoznyx-mexanizmov-perednix-koles/
Selecting a drum for Vesta
Drum brakes are installed on Lada Vesta with an engine capacity of 1.6. But these cars are also equipped with disc brakes. The manufacturer equips Vesta with a 1.8 engine only with disks.
In order not to rack your brains over various modifications of spare parts, it is better to select them by the VIN number of the car. This will eliminate the error. There are different options for rear drum repair kits. Namely:
- With ABS ring, without ring.
- With or without bearing.
At the defect detection stage, you need to make a choice so as not to buy too much and not do double work. The stumbling block is the ABS ring. The system only works with the original. It will not function with analogues that have a different number of teeth. Therefore, if a substitute is used, the ring must be rearranged.
In addition to domestic spare parts, there are also Italian ones. In addition, there is repeatedly information on the Internet that this part is identical to the one of the same name for the Ford Fusion. But there are already a lot of analogues to the Ford version, for every taste and budget.
Impressions from the “Russian girl”
Vesta definitely left a pleasant impression. For the money, this is a well-built, spacious and well-thought-out car with a lot of goodies and good handling.
It costs an average of 563 thousand rubles. No problem, according to statistics from avtocod.ru, every fourth car is sold. Every third person is involved in an accident, every fourth is a lien or a repair bill. Vestas with unpaid fines, traffic police restrictions and after taxis are less common.
If you take it, keep in mind that its shortcomings are common to its entire class. Still, this is not a Golf, and it is unreasonable to demand anything more from it.
Instructions for replacing the brake drum
You can entrust the replacement of the brake drum to a car service center, but you can also do it yourself if you have the necessary skills. In addition to reliable hands, we will need some more tools and devices.
Required tools and supplies
Before starting repair work, you should stock up on:
- Knife, screwdriver, thick screwdriver, chisel, hammer. That's all for removing the hub plug.
- Hex head 30.
- Collar.
- Extension.
- Torque wrench.
- Balloon wrench.
- Jack.
- Three-legged puller 67.7823-9519.
- Cord brush.
- Rags.
- Solvent, rust converter.
- Wheel chocks.
- Retaining ring remover.
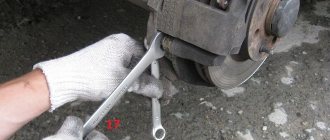
Removing the drum from the hub
In order to remove the brake drum, you must perform the following steps:
- Place the vehicle on a smooth, horizontal surface.
- Secure the machine using stops. It is most effective to install stops under the wheel located diagonally to the raised one (for example, for the raised rear right one, this is the front left one).
- Install the jack.
- Strip the bolts, but do not unscrew them. For now they should press the wheel tightly.
- Hang up the wheel. It is safer to repair the car by placing it on a special rack. Don't settle for a wobbly jack.
- Check the condition of the bearing by spinning the wheel. A faulty bearing may hum. Check wheel play. If a hum is heard or the bearing is loose, it must be replaced.
- Remove the hub nut cap. To do this, you may first need to use a thin screwdriver, or even a knife. Then you should move on to a thicker tool. A chisel sharpened at the optimal angle allows you to quickly knock off a tightly seated cap.
- Unscrew the hub nut after cleaning the axle threads.
- Remove the drum assembly with bearing. If its inner ring is “soured” on the axle, then a puller will be needed.
It is also recommended to flatten the pads. This is done by turning the adjusting toothed nut located on the pad spacer bar. A screwdriver is inserted through the hole in the wheel bolt and the nut is rotated upward. This increases the clearance between the drum and the lining and makes removal easier. If this is not done, then if there is a large wear-out, the pads will cling to the formed shoulder, preventing dismantling.
Brake drum installation
If bearing replacement is required, it is done on a press by installing a mandrel on the outer race. Otherwise the spare part will be damaged. The bearing is secured with a retaining ring using a puller.
Further assembly occurs in the reverse order of removal. Before installation, all mounting surfaces must be cleaned of dirt. It is important not to snag the ABS ring.
The hub bearing nut is tightened using a torque wrench. The tightening torque of the hub nut is 15.8 - 19.2 kg cm (158 - 192 nm).
Wheel nuts are disposable. Their reuse is not permitted.
Even if the rear brake pads have not been changed, the gap still needs to be adjusted after replacing the drum. This vehicle has automatic brake pad adjustment. To configure the mechanism, you need to do the following:
- Depress the brake pedal several times.
- Keeping the pedal depressed, tighten and release the parking brake lever with the button pressed. The auto-tune ratchet inside the wheel will click.
- When the clicking stops, the gaps between the linings and the drum are considered adjusted.
How to carry out defect detection
Professionals consider it necessary to replace or bore the second drum if the first one has been bored or replaced, and also when replacing drums, be sure to change the pads.
Having disassembled the structure, it is necessary to check all its elements, which we do not dwell on in detail in this article. These are pads, cylinder, hand brake, all driving elements of the mechanism (springs, levers, etc.), wheel bearing, ABS ring.
Inspect the drum for local damage, corrosion, wear and measure the internal diameter. You should find the greatest distance between the diametrical points of the rim. The second measurement is taken approximately at right angles to the first. This will give a picture of ellipse. Other deviations from the form are also possible.
Dimensions for defect detection are the inner diameter of the drum
- nominal - 203.2 mm.
- maximum permissible - 204.45 mm.
Large wear may jam the wheel and prevent the handbrake from being adjusted. Drums are susceptible to corrosion, so it would be advisable to consider cleaning, painting, or installing special decorative overlays.
Replacing the rear wheel brake working cylinder
Place the car on a lift and apply the parking brake to the rear wheels.
Remove the rear wheel.
Release the handbrake lever.
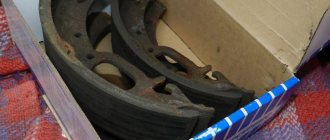
Remove the brake drum.
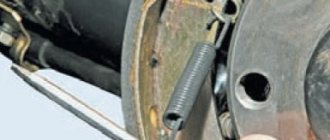
Remove the upper tension spring.
We spread the brake pads.
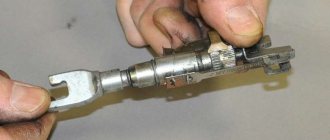
We unscrew the fitting securing the brake pipe 4, Figure 4, to the wheel cylinder 2 of the rear brake and install plugs on the brake pipe and in the hole in the wheel cylinder.
Using a 10mm socket, unscrew bolts 3 securing wheel cylinder 2 to rear brake shield 1 and remove the cylinder.
Installing the slave cylinder
Clean the rear brake elements.
We install the wheel cylinder on the rear brake shield and secure it with bolts. The tightening torque of the bolts is 7 - 11 Nm (0.7 - 1.1 kgf.m).
We remove the plugs from the holes in the wheel cylinder and the brake pipe and screw the brake pipe fitting into the hole in the wheel cylinder. The tightening torque of the fitting is 14 - 20 Nm (1.4 - 2.0 kgf.m).
Install the upper tension spring.
Install the spacer bar.
Check the outer diameter of the brake pads and adjust if necessary.
Install the brake drum as indicated above.
Install the rear wheel.
We bleed the brake system and, if necessary, the hydraulic clutch.
After this, we check the effectiveness of the brakes.
I can’t help but praise Vesta in motion: its handling is just right. Both at 100 kilometers per hour and at 140 it’s pleasant to drive this car. But I would gladly replace the “robot” with its tendency to kick and thoughtfulness with “mechanics” or a hydromechanical “automatic”.
The rear suspension, even on tram rails, gave a kick to the “butt”; on “speed bumps” it worked before the lights out, responding with unpleasant blows. Of course, handling is paramount, but for our roads I would like something with a longer stroke.
What will the masters say about the salon? We spent a long time feeling the panel, and were most interested in the joints and materials. They promised that in six months it would begin to creak. Let's see, it's quiet in the cabin.
The sound of the driver's door window rising and falling made them fear for the future safety of these same glasses: dust and dirt accumulate in the seals, which can cause scratches to quickly appear.
They listened to the movement of the dampers of the climate control unit like doctors listened to the patient’s heartbeat. Yes, the damper sounds are strange. When changing direction, say, from the glass to your feet, a quiet crunching sound is heard.
In general, the interior is, of course, comfortable and so far evokes positive emotions. We can attribute some minor shortcomings to the fact that this is not a C or D-segment car. There is nothing criminal, nothing falls off or unscrews. We just have to look at at least replacing the light bulbs.
Sources
- https://autoruk.ru/lada-vesta/tormoza-lada-vesta/remont-tormoznykh-mekhanizmov-zadnikh-koles-lada-vesta
- https://www.kolesa.ru/lada/jeto-vam-ne-zhiguli-obsluzhivanie-i-remont-lada-vesta-2015-12-25
Don't delay repairs
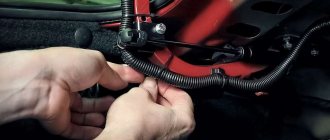
Untimely replacement of components leads to accelerated wear and failure of new components. Thus, a handbrake cable that was not replaced in due time holds the shoe close to the drum.
When the lining wears off, the iron block damages the surface of the drum very quickly. After installing a new spare part, such a drum begins to intensively destroy the lining. A faulty block kills the drum, and vice versa.
But it's not just about wear and tear and increased repair costs. When iron rubs against iron, the braking distance increases, and the uneven distribution of braking forces leads to a deviation from straightness. Driving with faulty brakes is dangerous.
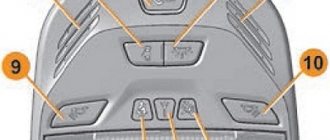
Correction and assistance system for driving a Lada Vesta car
The Lada Vesta car is equipped with all the most necessary systems that contribute to comfortable driving. All of the systems listed below are present in absolutely all trim levels of the car, which makes it a very attractive figure on the car market. ABS or anti-lock braking system
- in case of emergency, and sometimes regular braking, it prevents the car’s wheels from completely blocking, thanks to this system the braking distance of the car is reduced, and during braking it becomes possible to control the car due to the fact that the wheels are not blocked. When this system operates, you will probably hear a characteristic “crackling” sound and a slight beating of the brake pedal.
EBD or brake force distribution
- correctly distributes the braking forces of the front and rear axles of the car, the system is activated when the ABS is not working correctly, and is indicated on the dashboard as a red indicator - “Brake failure”.
BA or Brake Assist
— this function reads how quickly you pressed the brake pedal; from the data received, the system recognizes whether it was normal braking or emergency braking. In the event of emergency braking, the system will increase the pressure in the brake system drive to a certain level and will maintain it as long as the brake pedal is pressed.
HHC or preventing the car from rolling away when starting off on an incline
- When stopping the vehicle on a slope of four percent or more, the HHC system is activated to help the vehicle continue to move forward, so that the HHC operates correctly, press the brake pedal with sufficient force to ensure that the vehicle remains stationary once the gear is engaged, releasing the brake pedal and pressing the accelerator pedal, the system will hold the car in place until it starts moving, but no more than two seconds. The system automatically turns off if the car is on the parking brake or the driver's door of the car is open.
ESC and TC - or stability control and traction control
— these two functions of the Lada Vesta car work in tandem and are activated automatically when the car engine is turned on. ESC is responsible for the reliable stability of the car on the road, the system reads the rotation speed of all wheels and if one or more of them starts to rotate faster, the system slows down their rotation; in more serious situations, the system resets the engine speed, thanks to which it returns controllability of the car. TC performs the same functions as ESC only when the vehicle is moving off, which reduces excessive wheel slip of the vehicle.