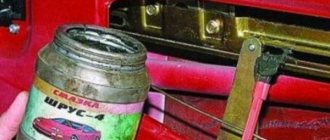
In the places where the speakers are mounted, spacers are placed under the speakers; this gives purity of sound. By the way, the standard radio of the Lada Vesta plays, in my opinion, at a decent level, all because there are spacers there. They must be installed so that: the speakers do not touch the casing, so that there is no rattling, vibration, or constant noise. Automakers provide different options for car audio preparation that make it easier to install music. Lada Vesta does not have speakers and acoustics everywhere. The standard multimedia acoustic system is fully included in the luxury Lada Vesta car; the standard speakers have good sound. The Lada Vesta comfort version includes an audio system + 4 speakers, and does not have tweeters in the mirror triangles. There are speakers in the doors, their size is 16 cm or 6 inches. The Lada Vesta classic (basic version) does not have a radio and speakers; in place of the radio there is a plug - “everything for the people!” The classics only have wires for connecting an audio system, coupled with standard holes for speakers (Acoustic system). To learn more about the topic, read the article to the end!
Where to start modernization
The basic speaker package is sparse and not particularly interesting. This is especially true for sound design. Only the luxury version of the car is equipped with a powerful sound system with a full set of modules.
The basic version does not include a radio and speakers in the rear doors of Vesta.
However, the manufacturer provided the opportunity to install the audio system and speakers yourself. There are standard holes on the dashboard for mounting the speakers. Under the casing there are wires that transmit the signal from the installation site of the speaker system to the speakers. The owner needs to select and purchase components, then install the equipment in the car.
Lada Vesta speaker size
In my configuration 2 shelves instead of music.
All the time after the purchase I drive with headphones (as an antenna) and radio through the phone (through the speaker of the phone).
While MMS did not persist throughout the Russian Federation, did the dilemma become — native speakers or a third-party company?
Let me remind you that they regularly put
in the West: Front doors: BLAUPUNKT (also NISSAN) 28156 BR00A J14265 4ohm 20w 10CW (16 cm) (optional - tweeters in the triangles of mirrors) Rear doors: Faital (?) 281447384R 15w (13 cm) (optional BLAUPUNKT (also NISSAN) 28156 BR00A J14265 (16 cm) through spacers)
Searches for detailed characteristics did not lead to results, and reviews that the dynamics are so-so are enough. Knowing that the quality of cheap China speakers is also so-so (Although now 13 cm of the Hyundai in Kalina pleased me for 3 years with a clear reproduction), I was stopped by the fact that buying dinas from hands is the absence of any guarantees... + 2500 -3000 thousand. (Absolutely crazy people in St. Petersburg on renoshnye speakers) Therefore, I got into the shops.
Wanted features:
– Rated power, W — the nominal is closer to the nominal W from MMC without amplification, e, from 20 W and so. – Sensitivity, dB — before 91/92, ass — don't care. – Type / size – before – 16 cm + tweeters, ass 16 cm wide. – The price is not higher than 5000 rubles for 2 sets.
The following columns came out for inquiries: JVC CS-JS600 (front) and JVC CS-V618 (rear) (3380 rubles for both sets)
Then work began on sawing out and mounting spacers in the door. There is plywood, there is a jigsaw, it seems that even warming played a hand … So we are trying on, sawing, trying on, sawing, drilling, trying on … The back door was pleased with the geometry of the pew under the podium … not even circle on the contour of the stamping!
Hello everyone) today I want to tell you how I installed music in my West) As I wrote earlier, the audio preparation in the West is somewhat different from the audio preparation on other Lada models, since the door has a Nissan (or Renault) connector for connecting their native speakers, which cannot be cut, otherwise all electrics will be void of warranty. I’ll make a reservation right away, after the last entry the guys sent me an adapter in the comments that can be ordered on the Internet, but the problem is that, firstly, it’s a wait, and secondly, it costs from 150 rubles apiece, and a minimum order must be ordered 4 pieces. And this is the least expensive option, there are also more expensive 200))) In general, I’ll return to the connector later, but now about the installation itself:
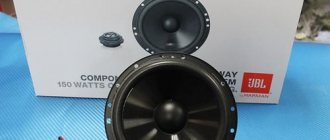
For acoustics itself, I bought a pioneer 180ub head and jbl 602 speakers. Why did I buy this particular one? Yes, because, by and large, I’ve been sick of car audio for a long time, and I don’t really want to invest in this business again)
Let's start with installing the GU, there will be practically no problems with this, we press the plug under the GU with our fingers from above and below, take it out, then we see the ISO connectors, connect them to the GU, everything is connected in addition to the GU antenna, to connect the antenna, you need to find an adapter from the Nissan connector to a regular one, and enjoy the sound... and also find the connector itself in the panel, which is not known where it is located, if it is even present in the classics, although there is an antenna, that means it should be))) but I’m not interested in the radio, I listen flash drives)
and now the most interesting thing))) removing the door trims, you have to remove them, put the speaker through the windows, and fixing it is unlikely to work, and even if it does, you still won’t be able to get to the plug))))
There are instructions for this on YouTube, at this link:
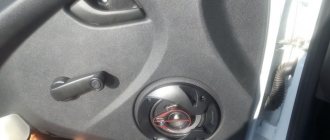
But I didn’t find instructions on the Internet for the right door, so I’ll tell you in more detail about the nuances of removing the trim on it))) Firstly, you don’t need to remove the power window button on it, and there is no secret self-tapping screw in it, just unscrew the handle, this is done as follows : on the bottom side of the handle there are grooves into which you can put a card, and by lifting the cover of the handle, remove it; inside there will be two 10mm key screws that need to be unscrewed, and that’s it, the same as on the left door. Don’t forget to remove the corners for the tweeters, which are installed opposite the rear-view mirrors.
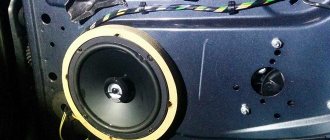
In general, when you remove the casings, you will see the hole for the speaker sealed with Shumka, tearing it off, you will find that the holes for the screws for the speakers correspond to the Renault version. and installation of conventional speakers without spacers is not advisable, BUT! if you want, you can push them in, which is what I did, for this I pasted a vibra around the perimeter of the hole so that it would press the speaker along the perimeter, because the speaker can only be screwed on with 2 self-tapping screws, and even then, the holes even for them are located a bit narrow, but if the speaker lift it above the door, then everything can be screwed in at an angle, and everything will sit quite firmly. Again, I repeat that this option is extremely undesirable, it must be done through spacers, I just personally need the music to play in the background, and no, no listen, that’s why I was lazy and didn’t make them)
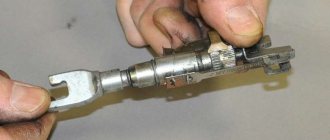
now the very moment that I spoke about at the beginning, this is the same adapter))) in general, wait a month for it to arrive, there was no particular desire, so what I came up with (although 1 person in the comments suggested this idea) I went and bought it at in the store there were 4 thin daddy terminals, as well as terminals for connecting speakers, I soldered the whole thing on the job while I had the opportunity, and put the same terminals that I inserted into the plug on heat shrink, right at the root, so that nothing would short-circuit, after Why else did I additionally wrap the whole thing with electrical tape))
here, by the way, it is very important not to blunt it and not immediately confuse the polarity) By the way, for those who are interested in whether there is wiring for the tweeters, I will say that I did not find it, apparently it is only available with the multimedia package, and you will have to pull it yourself )))
And then we close the upholstery and enjoy the sound))) although no, you won’t be able to enjoy the sound if, before installing the upholstery, you don’t glue the mesh under the speaker))) yes, while you don’t have any music, it stands quite tightly, but all this density ends after 5 minutes of listening to music, and the rattle from it will be such that it won’t seem a little)))
Equipment selection
Car tuning is limited by the driver’s imagination and financial capabilities. Manufacturers of sound mechanisms offer three product options:
- Broadband module. It is a simple design consisting of one column. Accordingly, it reproduces all frequencies at once. The cheapest option.
- Coaxial device. Consists of three speakers located in one unit. The best option in terms of price and quality ratio. The sound is more spacious and harmonious, but there is no stereo.
- Component system. The most expensive and advanced of those available. Each speaker is located separately in its own housing. The first reproduces low frequencies, the second – medium, the third – high. There is a stereo effect and the ability to adjust the sound.
The client's choice depends on several factors. Quality lovers spend more money on expensive subwoofer models. Anyone who is not considered a music lover is limited to a built-in device or the cheapest one on the market.
MMS modes
The multimedia complex involves the use of the following modes:
- "Radio". Allows you to receive and play radio signals, search for radio stations with an automatic memorization function for up to 8 positions. Displays the current radio station on the screen.
- "Audio". Intuitive audio player that plays audio files through 6 speakers. There is an equalizer with the ability to select presets or customize it yourself. Audio files can be played via Bluetooth from an external device, but in this case information about the file being played is not displayed on the screen. Supported formats: MP3 up to 320 kbps, WMA up to 320 kbps, WAV up to 24 bits and FLAC.
- "Video". To view videos, you will need a converter. Video files must meet the following requirements:
- AVI with a frame rate of up to 30 frames per second and a resolution of no more than 720x536;
- MP4 with a resolution of no more than 1920x1080, frame rate up to 30;
- MOV with support for standard codecs;
- MKV with support for standard codecs, frame rate up to 30 and resolution 1920x1080.
- "Photo". For viewing photos, the radio screen in the car is not the best option. But if necessary, you can view images in most formats.
- "Telephone". Used for hands-free phone calls via speakerphone. You first need to synchronize your smartphone with the system and download the phone book.
- "Navigation". Movement according to maps and according to the guidance of the navigation program "CityGID 7". Allows you to install third-party cards. Disadvantages include the lack of image rotation, the inability to download maps online, the lack of construction of alternative routes, it does not show traffic jams over long distances, and there is no satellite view.
Additionally, it is possible to use the “Rear View Camera” mode. When you engage reverse, it is activated automatically with a slight decrease in the radio volume. For the convenience of reverse parking, markings appear on the screen allowing you to see the distance to the obstacle. The green dotted line corresponds to a distance of 4 and a half meters from the rear bumper. The yellow line is one and a half meters, and the red line is 30-40 cm.
You can configure the screen, radio, telephony, rear view camera, video player, audio player, photo viewing mode, navigator. In this regard, multimedia on the Lada Vesta is much more attractive than a conventional radio.
Installation recommendations
To obtain high-quality sound before installation, you should follow several recommendations:
- The choice of equipment is the most important step in tuning. Its operation and workmanship can be checked upon purchase.
- The use of spacers under the speakers will eliminate extraneous noise when the membrane vibrates.
- To obtain high quality, the output power of the speakers must be higher than that of the radio.
- Using a plastic puller will protect the trim elements from deformation during operation.
- The diameter of the speaker space in the front door is 6 inches, in the rear door it is 5.
- Audio equipment components must be from the same manufacturer. This will help avoid inconsistencies.
- Acoustics must have a volume reserve. Vibration and shaking of the car lead to a decrease in sound quality over time.
General principles
The nuances of installing speakers in the rear and front doors may differ, but the general principles are as follows:
- It is better to carry out all work carefully;
- audio preparation is available in all models, even in the absence of standard speakers;
- it is better to select speakers 16 cm for the front doors, 13 cm for the rear;
- It is better not to cut standard connectors, but to purchase adapters;
- to improve sound quality, it is necessary to install sound insulation;
- The speakers are installed on spacers.
Installing acoustics on a Lada Vesta involves purchasing not only speakers, but also a spacer, if one is not available. Some craftsmen cut out a transition frame from plywood. The purchase kit includes:
- spacer,
- rivets for its installation,
- adapter for connecting acoustics.
Changing and installing a radio
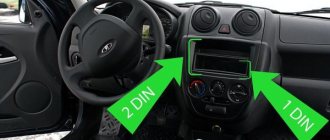
Depending on the model configuration, a standard radio may or may not be installed. The beginning of the manipulations in this case is partially different:
- In the Classic modification, the decorative plug is removed. The procedure is carried out with a plastic card, so the casing is protected from damage. The plastic latches are carefully removed. Inside there are four types of connectors with connected wires: ISO, FAKRA, USB, AUX. The panel is ready for installation of an audio recorder.
- More advanced Grant configurations have a standard soundbar. To install a new product, the old version is removed. To do this, remove the top frame; under the cover is the central part of the radio. The main console latches unhook from the bottom. Next, the air ducts are dismantled and the module is removed, it is attached to the dashboard with screws. On the reverse side, carefully remove the connectors with wires. They are the same as in previous versions of the car.
Installation of the device occurs in the reverse order. The connectors are connected to the appropriate sockets, the pinout of the wires is carried out correctly. The radio is carefully inserted into the remote control and screwed with fasteners. All supply elements are connected, the cover is inserted into place.
Malfunctions of MMC Vesta and methods for their elimination
MMC Lada Vesta is the first of its kind on AvtoVAZ cars. It is still far from ideal - sometimes various malfunctions can occur. For example, the radio cannot boot, hanging on the “LADA” logo. To resolve this issue you need to do the following:
- remove removable media from the USB port;
- disconnect the battery terminals and turn off the power to the on-board network for a few minutes;
- format the USB or SD card in FAT 32 format and create an empty text file explorer.txt in the root directory;
- connect the battery terminals and reboot the system (the desktop should appear).
Removing the trim and installing the audio system
The installation of the speaker system is similar to the placement of the radio, but has features due to the design of the car body. Before installing the speaker in the door on Vesta, the dimensions are calculated in advance.
The trim is removed from the doorway (fasteners and screws are removed), the procedure is performed without the use of sharp tools. Spacers for the speakers are screwed into the open cavity; they are purchased ready-made on the market or cut out of plywood. The depth depends on the thickness of the acoustics; the structure does not protrude from under the casing. After preparation, the speakers are secured to spacers. Standard connectors with wires are connected to the corresponding sockets of the system. If they do not match, then a purchased adapter is used. Do not press or squeeze the wires, as this may lead to a break.
Guarantee
However, before starting work, it is recommended to find out everything regarding warranty service. The fact is that managers at dealership centers threaten to void the warranty if the owner works on the wiring himself. This is exactly the answer that was given to one of the owners of the sedan, Amir Valiullin, who is known on Drive as valiullin-amir.
He was told that independent installation and connection of speakers in Lada Vesta is prohibited, and therefore he needs to contact either a dealership or a certified service station. The price for work at a dealer is about 3,000 rubles, while for a service center it’s about 2,000 rubles.
Correct adjustment and configuration of equipment
For correct operation of the installed system, debugging is carried out using an oscilloscope. Sequencing:
- All sound impulses from the amplifier are turned off.
- The sensitivity controls are set to the minimum value.
- On the main device, music is turned on at a volume level of 90% of the maximum, the tone control is in the middle position.
- A signal is supplied to one input of the amplifier.
- The knob for the corresponding input is turned until the value limit appears on the oscilloscope screen.
- The signal to the first channel is turned off.
The remaining input channels of the equipment are configured in the same way. In the absence of an oscilloscope, adjustments are made by ear. The appearance of sound distortion replaces clipping on the device screen.
Installing speakers in the rear doors, the Lada Vesta will delight the owner with loud and clear sound when driving. In addition, self-installation will save on visiting the workshop.
Lada Vesta Luxe
AvtoVAZ has equipped the top version of the sedan to the maximum:
- Multimedia system with navigation (7” color display with TouchScreen, FM/AM with RDS function, USB, SD card, AUX, Bluetooth, Hands free), 6 speakers;
- Standard speakers in spacers (16 inches);
- Tweeters in mirror triangles (item 281489095r).
Let us remind you that instructions for installing speakers are in a separate article. By the way, it is possible to connect an amplifier or a rear view camera to Vesta’s standard radio.
Hello everyone) today I want to tell you how I installed music in my West) As I wrote earlier, the audio preparation in the West is somewhat different from the audio preparation on other Lada models, since the door has a Nissan (or Renault) connector for connecting their native speakers, which cannot be cut, otherwise all electrics will be void of warranty. I’ll make a reservation right away, after the last entry the guys sent me an adapter in the comments that can be ordered on the Internet, but the problem is that, firstly, it’s a wait, and secondly, it costs from 150 rubles apiece, and a minimum order must be ordered 4 pieces. And this is the least expensive option, there are also more expensive 200))) In general, I’ll return to the connector later, but now about the installation itself:
For acoustics itself, I bought a pioneer 180ub head and jbl 602 speakers. Why did I buy this particular one? Yes, because, by and large, I’ve been sick of car audio for a long time, and I don’t really want to invest in this business again)
Let's start with installing the GU, there will be practically no problems with this, we press the plug under the GU with our fingers from above and below, take it out, then we see the ISO connectors, connect them to the GU, everything is connected in addition to the GU antenna, to connect the antenna, you need to find an adapter from the Nissan connector to a regular one, and enjoy the sound... and also find the connector itself in the panel, which is not known where it is located, if it is even present in the classics, although there is an antenna, that means it should be))) but I’m not interested in the radio, I listen flash drives)
and now the most interesting thing))) removing the door trims, you have to remove them, put the speaker through the windows, and fixing it is unlikely to work, and even if it does, you still won’t be able to get to the plug))))
There are instructions for this on YouTube, at this link:
But I didn’t find instructions on the Internet for the right door, so I’ll tell you in more detail about the nuances of removing the trim on it))) Firstly, you don’t need to remove the power window button on it, and there is no secret self-tapping screw in it, just unscrew the handle, this is done as follows : on the bottom side of the handle there are grooves into which you can put a card, and by lifting the cover of the handle, remove it; inside there will be two 10mm key screws that need to be unscrewed, and that’s it, the same as on the left door. Don’t forget to remove the corners for the tweeters, which are installed opposite the rear-view mirrors.
In general, when you remove the casings, you will see the hole for the speaker sealed with Shumka, tearing it off, you will find that the holes for the screws for the speakers correspond to the Renault version. and installation of conventional speakers without spacers is not advisable, BUT! if you want, you can push them in, which is what I did, for this I pasted a vibra around the perimeter of the hole so that it would press the speaker along the perimeter, because the speaker can only be screwed on with 2 self-tapping screws, and even then, the holes even for them are located a bit narrow, but if the speaker lift it above the door, then everything can be screwed in at an angle, and everything will sit quite firmly. Again, I repeat that this option is extremely undesirable, it must be done through spacers, I just personally need the music to play in the background, and no, no listen, that’s why I was lazy and didn’t make them)
now the very moment that I spoke about at the beginning, this is the same adapter))) in general, wait a month for it to arrive, there was no particular desire, so what I came up with (although 1 person in the comments suggested this idea) I went and bought it at in the store there were 4 thin daddy terminals, as well as terminals for connecting speakers, I soldered the whole thing on the job while I had the opportunity, and put the same terminals that I inserted into the plug on heat shrink, right at the root, so that nothing would short-circuit, after Why else did I additionally wrap the whole thing with electrical tape))
here, by the way, it is very important not to blunt it and not immediately confuse the polarity) By the way, for those who are interested in whether there is wiring for the tweeters, I will say that I did not find it, apparently it is only available with the multimedia package, and you will have to pull it yourself )))
And then we close the upholstery and enjoy the sound))) although no, you won’t be able to enjoy the sound if, before installing the upholstery, you don’t glue the mesh under the speaker))) yes, while you don’t have any music, it stands quite tightly, but all this density ends after 5 minutes of listening to music, and the rattle from it will be such that it won’t seem a little)))
Selection of speaker systems
For high-quality sound of reproduced phonograms, it is recommended to purchase a 2-component system, which has separate high-frequency speakers (tweeters) and low-mid / mid-low frequencies. This way you can create a high-quality sound stage.
That is why it is recommended to place them in front. The role of sound is played by cheaper coaxial speakers, which are installed in the rear of the car. To install tweeters and connect them to the radio, the wires must also be connected.
HF speakers are installed in the triangles of the Lada Vesta mirrors. If you need a budget option, you should buy coaxial speakers. You won't get the frequency diversity effect to get the sound stage, but the musical sound of broadcast programs will be good. No additional system configuration is required.
General provisions
Installing music is not a complicated process, but it is responsible. Before directly installing audio components in the Lada Vesta interior, you will need to understand what composition of elements constitutes audio preparation. Therefore, a logical question arises: what is included in audio training?
The “Classic” modification has all the required minimum, allowing you to seamlessly connect both the head unit and dynamic heads. We are talking about the presence of cable lines, with the help of which the designated components of the audio system are switched.
Note that the corners of the doors near the exterior mirrors in this version of the equipment do not have wiring for connecting tweeters.
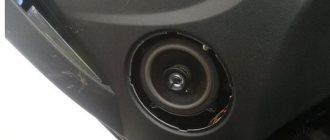
Acoustics
Next, the actual installation of speakers in the doors of the Lada Vesta begins. First, all insulating material is removed from the seats where the speakers will be fixed. The door layout in this case is the same as that of the Renault Logan. Instead of the usual 4 mounting holes for speakers, there are only 3.
If you intend to install acoustics with a diameter of 16 cm or less, then you will not have to cut the steel. Wooden spacers will be sufficient. As for the thickness, it should be such that the installed speakers do not interfere with the assembly of the doors.
Connectivity is not that simple. The fact is that there is already wiring in the doors from the factory, but the plug is non-standard - not from AvtoVAZ, but from Renault-Nissan. You cannot cut it, as this will lead to loss of warranty rights. The only way out is to separately buy and install an adapter like CT55-17 or ZRS-AG-22.
Separate installation of the mesh in the door cards is not required. Therefore, all that remains is to assemble everything in reverse order.
A clear example of installing speakers in the doors of a Lada Vesta is shown in the video.