The standard audio equipment of a Lada Granta liftback car includes: a 2-DIMM radio, two speakers in the front door measuring 13 cm, blocks with wires in the rear door.
Obviously, such an audio system is not complete and of low quality. The stock speakers are too small, weak when using mid and high frequencies. It's enough to listen to the radio. Is it worth changing the standard speakers? The answer is yes.
A short checklist for installing speakers in the front doors of Lada Granta
- Removing the door card.
- Removing standard noise and vibration insulation.
- Removing the stock speaker.
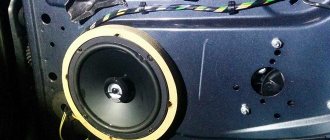
- Installation of speakers (13 cm) Granta liftback. When installing speakers at 16.0 cm, use a metal jigsaw to make a cut in the door contour.
- We connect the blocks with wires.
- We collect the card and replace it in a similar way to the second door.
The sequence of actions is presented very briefly; during installation, many “pitfalls” arise, which are discussed below.
Installing front speakers
Acoustics for Lada Granta
Before moving on to the actual algorithm for installing the front speakers (see How to choose speakers for a car radio on your own), let us remind you that this car has already been equipped with standard seats and there is no need to do anything new. But a serious problem arises when installing two-component acoustics. And yet, modernization will have to be carried out, since the diameter of the standard seats is quite limited, however, as on other car models.
Note. If, for example, we want to install high-quality 16 cm acoustics on a Lada Granta, then another intractable problem will arise. The front windows may not open all the way and will hit the speaker. You will have to make special spacers from plywood or chipboard.
Making podiums
- The first thing to do is to make podiums.
The subtleties of installing speakers on a Granta liftback that everyone should know
- To avoid additional manipulations with cutouts and extensions of standard holes in the doorway, install audio speakers with a diameter of 13.0 cm.
- If you want to improve the sound quality, increase the volume, frequency, install speakers in the front doors at 16.0 cm. Be prepared to widen the hole in the door structure. You can do this at a service center or yourself, armed with a metal jigsaw. From a ring with a radius of 6.5 cm, make 8.0 cm.
- When installing speakers of larger diameter, there is a high probability of glass coming into contact with the back of the speaker. As a result, vibrations are possible when lowering the glass to its lowest position.
Link on topic:
Tuning the rear license plate illumination on the Lada Granta Liftback. Bulb replacement process
General information about music in Grant
In this section, we will consider general non-professional points about music in the Lada Granta.
Installing music
If you have a VAZ 2190 in the basic configuration (or Norma) with audio preparation, then installing music will entail the following steps:
- Removing the radio cover - on the back side there are ISO connectors for power and speaker wires. You will have to run the wires to the rear speakers yourself if you plan to install an acoustic shelf, since from the factory the wires are routed only to the doors;
- Installation of a 1- DIN radio (for 2-DIN you will have to farm, cutting out a jumper in the panel and looking for a suitable frame);
- Finding and connecting the plug of the pre-installed antenna - often the antenna wire on the roof is lost under the ceiling trim and it turns out to be easier to install the antenna separately than to find the factory cable;
- Pulling wires into the trunk to connect an amplifier, subwoofer and speakers installed in an acoustic shelf.
- To install the amplifier, you will also need a separate power cable from the engine compartment directly from the battery terminal through a fuse.
Removing the jumper in the panel cladding is mandatory when installing a 2-DIN GU.
Installation of the acoustic shelf entails removal behind the back of the rear seat. The non-standard shelf ISOFIX fastenings !
If your car does not have audio preparation , you will have to separate the power wires for the radio and the speaker wires in the door.
What kind of acoustics to put in Granta
Common budget music option :
- radio tape recorder within 5000 rubles with the ability to adjust the equalizer;
- 16 cm component speakers with tweeters at the front;
- acoustic shelf with speakers 6*9;
- amplifier with subwoofer in trunk.
Let's look at an example of such a configuration with a price tag in the table (the calculation is for ordinary people, not audiophiles) based on Pioneer devices:
| Example of a Pioneer | Average price tag in rubles | |
| Head unit (radio) | DEH-S101UB | 4000 |
| Front 16cm acoustics | TS-G1733i | 2000 |
| Acoustic shelf | 1500 | |
| 6*9 “pancakes” | TS-R6951S | 2200 |
| Amplifier 2-channel | GM-A3702 | 4300 |
| Passive subwoofer in a box | TS-WX305B | 5200 |
| Subwoofer installation kit | 1500 |
As a result, we get budget sound in the region of 20 thousand. If we consider professional head units, premium-segment speakers, installation of custom podiums and other delights, the price tag can easily jump over a hundred thousand, amounting to a third of the cost of the car itself.
The choice of podium depends on the type of windows, budget and number of speakers.
Podiums in the front doors
We will not describe the technology for making podiums with our own hands. Next is a selection from various resources for ready-made podiums and manuals for self-production.
Please note that most of the podiums in the front right doors interfere with the opening of the glove compartment.
- Here is a link to a store with ready-made options and prices. It's not advertising that's a source of inspiration.
- Here is a photo report on self-production with comments.
- This link is just a photo report without comments.
Professional acoustics
For car audio fans who are ready to invest large sums in Granta, we have chosen a couple of bright videos. Look what you can build on the Lada base and look decent in the area and at local car audio competitions. Enjoy.
Review of prices of audio products manufacturers
| Name / characteristics / article number | Price, rub.) |
| Comprehensive budget solution | |
| Radio tape recorder PIONEER MVH-150UBG | from 1500 – 1700 |
| Speakers Pioneer TS-1339 (13cm) | from 2000 |
| Speaker trim | from 450 – 500 |
| Additional noise/vibration insulation of doors | from 1200 |
| Consumables, bolts, screws for vinyl (wood) spacers | from 100 – 150 |
| Car radios | |
| Pioneer SPX-HUD01 | from 10000 |
| Pioneer DVH-345UB | from 12000 |
| Sony XAV-65 | From 15000 |
| Pioneer SPH-DA230DAB | —/— |
| Pioneer SPH-DA120 | from 12000 |
| Pioneer MVH-X585BT | —/— |
| Pioneer MVH-X580BT | —/— |
| Pioneer MVH-S300BT | —/— |
| Auto acoustics coaxial | |
| Two-way coaxial acoustics URAL AK-M | from 7000 |
| URAL AK-74 | —/— |
| Coaxial acoustics URAL AS-C6947 | from 5200 |
| URAL AS-C1647 | —/— |
| URAL AS-C1347 | —/— |
| Four-way acoustics German Maestro AC6511 | from 7500 |
| Focal Performance PC 130 | —/— |
| Dragster DCB 5 | —/—7 |
| Dragster DCA 943 | from 6800 |
| Dragster DC 572.2 | —/— |
| Dragster DC 502.2 | —/— |
| Auto acoustics component | |
| 2-component acoustics Dragster DSB 5 | from 4000 |
| URAL AS-C1627K | —/— |
| URAL AS-C1327k | —/— |
| URAL AK-74.C | —/— |
| URAL AK-47.C | —/— |
| Avatar CBR-6.21L | from 5000 |
| German Maestro MB 4.2 FR | —/— |
| German Maestro 2S 6512 | —/— |
| Dragster DSC 592.2 | —/— |
| Dragster DSA 582 | —/— |
| Dragster DS 532.3 | —/— |
| Alphard Machete MC-6.2A | —/— |
| Amplifiers single / multi-channel | |
| Machete MFC-650.1D | from 10000 |
| Taramps DSP 3000 | —/— |
| Taramps TS2000x4 | —/— |
| Taramps TL500 | —/— |
| Taramps TL1800 | —/— |
| Taramps TL1500 | —/— |
| Taramps DS800x4 | —/— |
| Taramps DS800x2 | —/— |
| Taramps DS440x4 | —/— |
*prices are as of September 20, 2018.
Tightness is the key to high-quality sound
In order to achieve the maximum effect from the installation, almost every stage of the installation of 16-centimeter speakers requires additional sealing. After the installation of the ring is completed, and the use of plastic spacers has led to the formation of gaps between the door and the ring, it is necessary to glue the ring with Visomat 10 on the outside.
The outer side no longer has holes and cracks, and a void has formed between the ring and the door, which can be filled with polyurethane foam. Without waiting for the foam to dry completely, we remove its protrusions, which will certainly interfere with the installation of the column itself.
The main differences between coaxial and component acoustics
- Coaxial: a single design of speakers, where low-frequency and high-frequency are mounted on the same axis. Depending on the type of preinstalled crossover, one, two, or three-way crossovers are distinguished.
- Component: consists of a number of individual different-frequency speakers that are installed throughout the vehicle interior.
Related link:
Overview and functionality of sensors installed on the Lada Granta Liftback
It is better to install coaxial ones on the back row of seats, component ones - in the front. The cost of coaxial speakers is a third cheaper than component ones.
Algorithm of actions
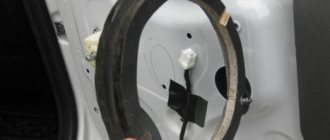
- First you need to remove the door trim (details in this article).
- We take measurements and estimate certain dimensions. The most convenient way is to pre-make a layout from cardboard.
- Based on the layout, we figure it out on the spot and see if the column fits into the door niche. We are trying to understand whether the glove compartment can open with this column, since the column may interfere with it.
- We cut out spacers, if necessary; below we will consider options for columns for which it is not necessary to make spacers.
- We cut out a decorative plug for the column on the door trim.
For convenience, you can first drill holes around the perimeter of the cutWe cut the trim with a utility knife.
- After making the spacers, once again estimate everything in place, fasten the spacer with one bolt to the door body, put the column on the spacer with one bolt, and attach the door trim. If everything is beautiful, then start attaching the elements.
- Screw the spacer to the door body.
Treat the drilling areas, if any, with mastic to prevent rust from occurring in the future. Install and secure the spacer - Screw the column onto the spacer, having previously connected the wires.
It would be a good idea to check the operation of the speakers. It will be a shame if after assembly there is no sound coming from the speakers. Attach the column to the spacer - Place the trim on the door.
We put on the trim - Place a decorative mesh over the column.
Ready! - Test the sound system, try opening the glove compartment.
Sequence of actions when installing rear speakers in a Lada Granta liftback
The speakers will be installed in the factory door openings. The situation with dimensions for openings is atypical. The shape is oval, while the columns are round. It is not known why AvtoVAZ made this decision.
To correctly install speakers in the rear door, do the following:
- remove the door card, handle, control unit;
- select the size of speakers for installation. Size 13 will require less cost and plumbing work compared to size 16.
- Selecting a speaker at “13”: using a utility knife, cut off the edge at the top of the hole for the speaker. The metal body is left unchanged.
- If you select a speaker with “16” or more, use a metal jigsaw to cut off the edge on the metal and plastic casing.
It is important to know!!! Many car owners are wary when they see that the hole in the speakers is not located in the center of the oval structure (preparation). The problem is familiar, but the defect has not yet been fixed.
- We cut out a stand from wood for the base of the speaker, no more than 0.6 cm thick. For these purposes, it is better to choose plywood.
- We insert the speaker into the door, place a wooden spacer, connect the block with wires - the so-called audio preparation.
To the left rear door: blue/white - brown/blue wire. To the rear right: green / black - yellow / green. We complete the assembly by installing the door card. By analogy, we carry out the installation on the left door.
How to install 16 cm speakers with spacers
You can install 16-cm speakers without enlarging the hole, but then, due to the spacer, the speaker will stick out from the door. It is more advisable to carry out a standard cutting. Instructions:
- After the handle and facing panel are removed, the wires are disconnected. Sound insulation is removed. Use a jigsaw to enlarge the standard hole in the door.
- A pre-created podium is attached to the back and securely fixed with self-tapping screws.
- The cable is removed, the electronics are connected, and the structure is assembled in the reverse order.
Before putting the door back together, it is important to check the sound of the speakers. Incorrect operation may be due to incorrect wiring connections. If you hear wheezing or knocking, it means the speaker is not securely fixed.
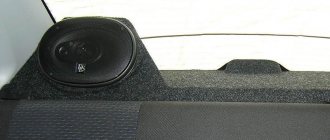
Installing speakers in the rear shelf of Lada Granta liftback
The installation process is somewhat complicated by the need to pre-prepare the shelf, cut holes, and install podiums.
- Open the back door of the Lada Granta Liftback, remove the shelf;
- We apply the speakers one by one, projecting their oval silhouette onto the shelf from the back side;
- We cut out holes with a jigsaw and clean them around the perimeter with sandpaper;
- We buy in advance and cut out the podiums for the speakers ourselves. We apply and assemble the structure.
Related link:
Replacing the front / rear bumper of a Lada Granta liftback with your own hands
The most crucial moment comes - laying the cable. Some masters practice feeding from side doors, which is fundamentally wrong. As the load on the circuit increases, the speakers will begin to sag. It is best to connect to the ISO connector on the back of the tape recorder.
- We dismantle the plastic linings - thresholds between the front and rear rows of seats.
- We lay the wires from the rear speakers and bring them out to the inside of the dashboard.
- We route the ISO connector and connect it to the free sockets.
- We reassemble the pads.
Provided you follow the recommendations and follow the algorithm, the performance of the speakers is guaranteed. During the warranty period, the buyer has the right to present to the seller any demands provided for by law.
Car radio installation
Acoustics in Lada Granta
The car radio for the Lada Granta must be selected in such a way that its connection corresponds to the 1 din connector.
Note. You can also install a car radio with 2 din on the Lada Granta, but then you will have to cut out the partition and adjust the frame in the console to the size, which is very, very labor-intensive.
- We dismantle the plastic pocket that stands in place of the future car radio. We use a flat blade screwdriver. On the back of the pocket we see slots where you will need to insert ISO connectors.
Installation of car radio in Lada Granta
- The metal frame is removed from the radio and installed in the same place where the pocket was removed. We unbend the frame's antennae and securely fix it.
- We connect the connectors to the car radio. Then we insert it into the frame.
We check the operation of the car radio, and if it is functioning normally, then we move on to the next stage of our operation.
Reviews
| № | Positive |
| 1. | Kirill , 33 years old: the standard front speakers are quite enough for me. To add volume to the sound, I installed a couple on the rear shelf. |
| 2. | Vasily , 44 years old: The standard radio on the Lada Granta Liftback is not bad, the sound is good. There are not enough speakers in the back row. I didn’t bother, I set the speakers to “13”. |
| 3. | Vitaly , 33 years old: after purchasing the Lada Granta Liftback, I supplemented the standard audio system with only two rear speakers, that’s enough for me. |
| 4. | Gennady , 41 years old: to increase the volume of sound, he added two speakers to the rear side doors and the rear parcel shelf. The standard radio works, no problems. |
| 5. | Mikhail , 35 years old: I heard a lot of complaints about the standard system, my feedback is positive. Yes, it is not super powerful, but it is enough for the average driver. |
| 6. | Gennady , 29 years old: the standard 2-DIMM radio on the Lada Granta Liftback is quite enough for good sound. Anyone who wants a concert hall should buy it separately. |
| 7. | Vyacheslav , 38 years old: I heard that they install rear speakers on the Grant at “16”, but did not bother. I bought it on “13”, I’m happy, there are no complaints about the sound, it’s not ideal, but it’s enough for me. |
| Negative | |
| 1. | Vasily , 28 years old: I didn’t believe the negative reviews until I bought the Lada Granta Liftback. Weak and terrible. Change the speakers and radio. |
| 2. | Kirill , 33 years old: I took the car with me, it had a standard radio, I replaced it with a new one from Pioneer. It's a completely different matter. |
| 3. | Georgy , 41 years old: when buying Grants, I knew in advance about problems with acoustics. I bought coaxial speakers and a good radio. |
Related link:
Lada Vesta or Lada Granta Liftback? Expert opinion
Conclusion In general, the sound quality of the standard speakers on the Lada Granta liftback is good. Lovers of high quality and cleanliness do not like this, so they strive to replace it with expensive models.
It is necessary to start from the fact that the car is in the budget segment, which means there is no point in demanding the best. If desired, install 16 speakers on the rear side doors to enhance the sound quality.
Crib
Instead of a conclusion, let's summarize:
- You can plug in budget sound into the Grant for an amount of 20,000 rubles or more.
- Podiums in the front doors = impossible to open the glove compartment.
- 16 cm speakers in the front doors - cut the metal of the door or prepare spacers with the factory facing of the speakers.
- The acoustic shelf covers the ISOFIX mounts.
- Audio preparation pulls wires only in the doors.
- Article numbers for ordering speaker covers and mounts are in the “Installing speakers in rear doors” section.
Did you like the article? Write a comment or see what we have about the selection of budget cars for 200 thousand.
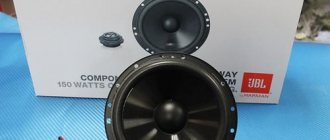
And so, I considered the standard speakers to be a drawback, so I decided to replace them. I decided to replace it with speakers of the same size 13 cm, since to install larger speakers it is necessary to cut the door, and I don’t want to do this, and since even in the long term there is no installation of an amplifier, so installing 16 cm is not logical, because of this I decided to install 13 cm speakers and just get better sound. I purchased the well-known Pioneer TS-1339R speakers for the front doors for 2,000 rubles. The kit comes with long wires, which is useful for those who do not have audio training.
Type - coaxial speaker; Number of speakers included - 2 pcs; The shape of the speakers is round; Number of stripes - 3; Rated power - 40 W; Maximum power - 200 W; Minimum frequency - 40 Hz; Maximum frequency - 30000 Hz; Sensitivity - 91 dB; Impedance - 4 Ohms; Diameter - 13 cm; Planting depth - 55.3 mm.
To install in the front doors, remove the trim; to do this, unscrew the bolts in the indicated places and unscrew the door lock release button, remove the trim that is held on by clips.
Tools:
- Small flat screwdriver
- Medium Phillips screwdriver
- Jigsaw with metal files
- Stationery knife
Parts and consumables:
- Speakers
- Wooden spacers - 2 pcs.
- Fastening pins (if necessary)
- Chalk
Notes:
In addition to the radio, for its normal operation, it will also be necessary to install speakers (acoustics) in the car door.
1. To cut holes in the door trim, remove it from the vehicle.
Note:
The door trim and metal frame of the front doors provide a size for 16 cm speakers.
2. Use a utility knife to cut holes in the front door trim.
3. If you decide to install 16 cm speakers, you may have to modify the door frame, since the speaker basket may not exactly fit into the standard hole in the door iron. Use a jigsaw to cut a hole of the required diameter and try on the speaker.
4. Connect the speaker and install it in place using spacers.
5. Install the speaker grille onto the speaker.
6. Reinstall the front door trim, replacing the damaged trim clips if necessary.
Note:
With the described installation method, the speaker grille does not protrude significantly above the door trim, and therefore will not interfere with the full opening of the glove compartment.
The article is missing:
- Photo of the instrument
- Photos of parts and consumables
The standard audio equipment of a Lada Granta liftback car includes: a 2-DIMM radio, two speakers in the front door measuring 13 cm, blocks with wires in the rear door.
Obviously, such an audio system is not complete and of low quality. The stock speakers are too small, weak when using mid and high frequencies. It's enough to listen to the radio. Is it worth changing the standard speakers? The answer is yes.