Even with a perfectly adjusted high and low beam light beam, you often have to adjust the angle of the headlight reflector. This is primarily due to the loading of the car. If, according to the rules for adjusting the headlights of the VAZ-2110, we start from the load of the driver + front passenger, then in real life, when the cabin is fully loaded, our adjustment will leave no stone unturned. The rear of the car will squat, the front will rise and the light beam will blind oncoming drivers. To quickly adjust the angle of the headlight reflector, a hydraulic corrector is installed in all VAZ-2110s.
How to find a breakdown
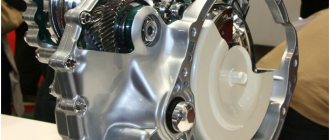
Repair of VAZ 2110 headlight hydraulic corrector
Many people, when headlight adjustment fails, immediately blame the hydraulic corrector for everything and rush to replace it as quickly as possible. But don't rush to conclusions. There may be other causes of the malfunction.
- Pay attention to any leaks of working fluid. If they are not there, check the stroke of the rod.
- To check the stroke of the rod, the actuator cylinders are dismantled. The normal value is between 6.5 and 7.5 millimeters.
- It is impossible to repair the hydraulic type corrector provided by the factory for the VAZ 2110, since the design of the device is not dismountable.
- If malfunctions occur, the entire assembly must be replaced, including cylinders and pipes.
Why do you need to adjust headlights?
While driving, the car cannot avoid hitting various road defects. Because of this, after a certain period of time, the factory settings of the optics are disrupted and require troubleshooting.
It is also necessary that the angle of the headlights be able to be adjusted when any of the following situations occur:
- Mounting fog lights;
- Changing tires or wheels;
- Adding new suspension parts or performing repair work;
- Updating a lamp, headlight or its reflector;
- Damage to the headlight range control;
- Replacing lamp types - from an incandescent lamp to an LED or xenon headlight;
- In the event of an accident, if the front half of the car body is damaged as a result.
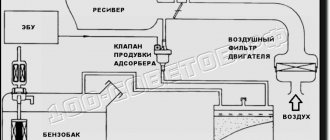
The principle of operation of the VAZ-2110 headlight hydraulic corrector
Its purpose is clear - without leaving the cabin, the driver can change the angle of the light beam relative to the road. The device must work correctly with two headlights at once and have a sufficient range of adjustment - to maximize the angle of the reflector when the rear part of the body is fully loaded, and also reduce the adjustment to zero when the load is minimal.
The principle of operation of the headlight hydrocorrector.
We recommend: When should you change spark plugs - how to determine the timing?
The VAZ-2110 hydraulic corrector, installed as standard, consists of:
- main hydraulic cylinder and switch, both of them are assembled in a single block and installed to the left of the steering wheel on the front panel;
- hydraulic drive system, line - tubes that connect the elements of the system;
- working hydraulic cylinders, actuators that raise or lower the headlight reflector;
- working non-freezing liquid.
Headlight hydraulic corrector assembly.
The low-pressure hydraulic system allows you to change the working pressure and move the rod of the working cylinders within 6–7.5 mm . In theory, this is enough to change the angle of installation of the reflector from minimum to maximum and, accordingly, change the direction of the angle of the light beam.
With a screwdriver under the hood
Headlight levelers are very important and are required for many types of headlights. They are equipped with xenon spotlights and matrix lamps. And forgetfulness of motorists in relation to this device can lead to unpleasant consequences, because correctors are necessary to prevent blinding of drivers of oncoming cars.
The fact is that when the car is unevenly loaded, the body becomes skewed. If you put 400 kg of cargo in the trunk, the stern will sag a few centimeters and the headlights will begin to shine upward. The low beam will be raised, and the light beam will hit the windshield area of oncoming cars. In other words, the headlights will blind drivers. If you go on a night trip with your headlights turned up, then every oncoming car will blink in your face, demanding that you stop blinding. Such signals cannot be ignored.
Question answer
What are daytime running lights and how do they differ from low beam headlights? Before the advent of cheap electronics, headlights were adjusted manually. The position of the lenses was changed under the hood using a screwdriver before each trip. Nowadays, electromechanical correctors are in use, which are controlled from the cabin and can be used at any time.
For example, if three people are sitting in the back seat, and their suitcases are piled in the trunk, then the control wheel must be turned to the second position. The light beam will descend and will not run beyond the horizon. Once people get out of the car and the driver is alone, the weight of the vehicle is reduced, the suspension is raised and the headlights naturally shine downward. That is, they will need to be returned to the zero position. Headlight levelers are very convenient for taxis and car owners who have large families. Daily transportation of family members around the city requires frequent corrections of the light beam.
When is replacement needed?
- If you notice that the adjustment does not work, you need to accurately determine the cause of the breakdown. Most often, depressurization and leakage of working fluid occurs in the system. This can be detected by visual inspection. But if there is no leak, the cause of the malfunction may be in other parts. Perhaps the problem is in the rod itself, the movement of which is hampered due to contamination or deformation. To measure the stroke of the rods, you must first remove the cylinders; the stroke length should be 6-7 mm.
- If the rod stroke is normal, then there is a breakdown in other parts of the hydraulic corrector. In the VAZ 2110 model, this device is non-separable; if one of the components malfunctions, a complete replacement will be required. There are kits on sale at different prices. It is better not to save money and purchase a regulator with high-quality cylinders and tubes.
- Some car enthusiasts recommend trying to repair the hydraulic corrector yourself. You will need to use available materials: threaded bolts, washers and clamps. This will save you money on purchasing a new set, but the service life and reliability of such a design leave much to be desired.
Tip: Most often, when the device breaks down, one or both headlights are lifted up and the flow of light is directed higher than usual. You can notice this when you park your car in front of a garage door or in front of a flat wall.
Stub
Yes, you heard right. Some manufacturers have realized that few people want to go through the hassle of constantly repairing or replacing hydraulic correctors in headlights on VAZs. That's why they came up with plastic plugs instead of working cylinders. It is enough to pull out the old ones and insert the plugs in their place. They have the right size, so they will fit into the seats like “native”.
- Cheap and cheerful. I bought it once and forgot about the problems with the hydraulic corrector
- Ease of installation
- Lost the ability to remotely adjust the headlight angle when the vehicle is fully loaded
Replacing a hydraulic corrector with an electric corrector
From the name it becomes clear that the electric corrector operates using electricity, that is, it requires connection to a battery.
There is no need to spend a long time looking for reasons for such decisions from the owners of the domestic “ten”, since the electric corrector is reliable and highly efficient. Its breakdown occurs much less frequently compared to a hydraulic corrector.
We recommend: Car service in Lyubertsy
Many owners of the model doubt whether it is possible to make such a replacement and use an electric corrector where a hydraulic unit previously functioned. Of course you can. For this purpose, it is possible to use a standard device or a device borrowed from another car.
The procedure itself requires several successive steps.
- Disconnect the negative cable from the battery.
- Remove the hydraulic corrector cylinder from the headlight, as we described in the previous section.
- Be sure to install a new O-ring during the replacement process.
- Once inside your car, remove the control knob for the hydraulic corrector master cylinder. It is held on by a 21 mm nut.
- The positive wiring harness is connected to the 20th socket of the Ш2 block in the mounting block of your car.
- The minus of the electric corrector is mounted on a body stud. There are several of them and they are located under the dashboard.
- The harness of the new regulator can be laid along the previously used tubes of the old hydraulic corrector.
- The harness pads are connected to the actuators.
- Return the negative cable to the battery and check how the new device works.
The cost of an electric corrector today is about 1-1.5 thousand rubles. Depending on the model you choose, you will have a certain number of adjustment positions. There are at least two of them, but the most common ones include 4, 12 and 15 positions.
Electric corrector
On some domestic models, automakers have begun installing electric headlight range control units. This applies to both VAZ and GAZ models and so on. Some of them fit perfectly under the “stock” mounting points. You will only need to do the wiring and connect correctly.
- A slight modification of the electrical correctors is possible. This applies to both the control unit and the operating units installed in the headlights
- You need to have a little electrical knowledge to avoid short circuits and fires.
- Get rid of hydraulic system hemorrhoids forever
- You always receive a working headlight leveler
- If it fails, its repair is much simpler; you can not change the entire system, but only what is broken, that is, in parts
- The service life of an electric corrector is several times higher than that of a hydraulic one.
Here is a video of how the VAZ electric corrector was connected:
Draw your own conclusions. If you are interested in hydrocorrector repair or have questions, write in the comments. I will answer or write a new manul on a topic that interests you.
Source
What determines the choice of the value of the corrector regulator?
The regulator has several positions - from 0 to 3. It is necessary to remember: the more the machine is loaded, the higher the number on the regulator should be. That is, 0 is an empty car (only the driver is sitting in it, the trunk is empty), and 3 is a loaded car (several passengers are sitting in it, the trunk is full). To navigate the controller values, you can refer to the following setting rules:
- position 0 - driver only;
- position 1 - all passenger seats are occupied;
- position 2 - all passenger seats are occupied and the trunk is slightly loaded;
- position 3 - all passenger seats are occupied, the trunk is fully loaded, or a loaded trailer is being towed.
Malfunctions and diagnostics of hydraulic corrector
Despite the simplest design, the hydraulic corrector is considered one of the most unreliable systems in cars of the tenth family. Design flaws, quality of materials and workmanship force us to return to the problem of adjusting headlights almost every year.
In this case, neither the working nor the main cylinders can be repaired and require replacement if they fail.
The signs of a malfunction are clear - the headlights do not respond to the corrector knob and are frozen in one position . The most common problem is depressurization of the hydraulic system. This trouble can be easily calculated by the leakage of liquid from the system, and it is also easy to eliminate. It is enough to seal the joints (on the cylinders) of the hydraulic system and check its operation again.
Another problem is fluid leakage through the cuffs of the working cylinders . No one is going to repair cheap plastic cylinders; they are replaced with new ones. By the way, the price of a new hydraulic corrector for the VAZ-2110 and all cars of the family (article 2110–3718010 and 2110-3718010-10 ) is 450–550 rubles, depending on the manufacturer. The difference between them is the stroke of the working cylinder rod. For tens in a station wagon, a larger load and a larger adjustment angle are provided. Accordingly, a larger stroke of the cylinder rod.
You can check the operation of the headlight hydraulic adjustment system by measuring the working stroke of each of the working cylinder rods:
- 2110–3718010 — working stroke 6–7.5 mm for sedan and hatch;
- 2110-3718010-10 — working stroke 6–8.5 mm for a station wagon.
If the hydraulic cylinders do not work or the working stroke does not correspond to the nominal values, we replace them and install a previously purchased new hydraulic corrector of the appropriate modification.
Selecting and purchasing an installation kit
Minimum installation kit:
- 2 servos;
- Control block;
- switch;
- wiring, connectors of gear motors, control unit.
Nowadays, it is very difficult to find a car that is not equipped with headlight range control from the factory. Therefore, you can assemble all the necessary elements from new or used parts. For many cars, there are unified installation kits on sale (for example, EMKF 11 for VAZ 2110, 2111, 2112).
For installation, you can select parts from another car. The only important parameter is the overhang of the servo rod. Each headlight model has a certain range of adjustment of the reflector angle, so a “non-original” servo drive with a large rod overhang can damage the headlight. In some cases, the extension of the rod can be adjusted by selecting resistors of a certain value, so everything depends on the design features of the control unit.
Unlike a manual corrector, not every car is equipped with a system for automatically adjusting the cut-off line of low beam headlights. By and large, systems are classified according to the type of body position sensor, which allows the autocorrector to automatically change the angle of the headlight unit.
Automatic headlight leveling
Main types of systems:
- using one tilt angle sensor. Similar sensors are used in smartphones to determine the position of the device in space. The sensor is installed on a horizontal surface at the rear of the car. The system is the easiest to install, so it is often included in kits for self-installation of xenon together with a headlight washer. Autocorrectors with an ultrasonic tilt angle sensor, which is installed on a hinged suspension in the rear part of the body, are the best solution among similar systems. If an electric corrector is already installed on your car, then you can implement automatic control by purchasing a kit consisting only of a control unit, a sensor, an adjustment device, the necessary connectors and wires (for example, automatic headlight corrector ALS-1);
- using several ride height sensors based on the Hall effect. The sensor consists of a moving part, in which a permanent magnet is built, and a stationary part - a Hall sensor. One part of the meter is installed on a stationary part of the body, the second is attached to the suspension elements. The change in body position is transmitted to the sensor through the rod. This is exactly the system that cars are equipped with at the factory. If an automatic headlight leveler is installed on your car model in expensive configurations, then most likely there will be ready-made holes in the body for mounting sensors, which greatly simplifies installing the system yourself. If desired, you can install a universal automatic corrector of this type on each car.
Electromechanical system instead of hydraulic corrector
Let's consider installing a standard electromechanical corrector instead of a hydraulic corrector using the example of a VAZ 2110.
- Disconnect the negative terminal of the battery. Remove the headlight hydraulic corrector. The removal procedure is described in detail in the article “Why the headlight range control does not work.”
- Instead of hydraulic corrector actuators, install gearmotors.
- Connect the connectors of the servo drives, lay the wiring along the places where the hydraulic corrector tubes run. The tubes enter the interior through a special seal. After cutting off the tubes, make a hole in it of sufficient diameter for the passage of the wiring harness.
- Instead of the main cylinder of the hydraulic corrector, install an electronic control unit for the electric headlight corrector. Connect the positive wire of the ECU to the pin on which “+” appears after turning on the low beam headlights (in the VAZ 2110 mounting block this is pin 20 of the Ш2 block). The negative terminal can be secured with a bolt terminal to one of the body studs under the instrument panel.
After installing the switch knob, the autocorrector is ready for testing.
Installation of non-standard systems
As an alternative to universal kits, many VAZ owners prefer to assemble an installation kit from parts from GAZ, complaining that in the event of a breakdown it is much easier to find spare parts. But the installation itself has a number of features.
For example, the VAZ 2110 headlight range control gear motor should have a rod reach of 34 mm and a stroke of 2 mm (for the VAZ 2111 the rod reach is 34 mm and stroke of 3.63 mm), whereas the stem reach of the original system based on BUK02-01 for GAZ cars are 38.8 mm, and the stroke is 7 mm. The system can be installed without modifications, but the corrector will only work in a few positions, and the adjustment steps will be too large to correctly adjust the headlights.
EPK 02 servo drives operate in tandem with the BUK02-01 control unit. As is the case with standard systems, power must be supplied to the control unit only after the low beam headlights are turned on.
Please note that control units designed for 3-wire servos are not suitable for controlling 5-wire actuators.
Do-it-yourself modification
For fitting you need:
- briefly apply 12 V to the power contacts of the servo drive so that the rod extends to the maximum position;
- cut off the tip of the rod at the indicated location to grind off the base of the rod;
- adjust the length of the rod to the reach required for your headlight, then glue the tip of the rod back (you can use dichloroethane or solder the two parts with a soldering iron);
- replace resistor R1 with a nominal value of 2.43 kOhm in the voltage divider (a resistor with a nominal value of 4.3 kOhm is suitable for installation on a VAZ 2110). The rod itself is hollow inside, and its extension and retraction is achieved by unscrewing or tightening the thread. Due to the reduction in length, when retracted, the rod will rest against the end of the screw, which can result in burnout of the gearmotor. By increasing the value of the resistor, we reduce the stroke of the rod to the value we need.
An alternative method for adjusting the reach is to select the desired resistor value for the maximum extended state. The value of the resistors is selected experimentally, but for many VAZ models you can easily find ready-made solutions on the Internet. In this case, it is not at all necessary to use SMD components.
How to make automatic headlight leveling with your own hands
If it is almost impossible to make a dynamic auto-corrector with your own hands, then an electromechanical corrector (EMKF) can be made independently. Such a device can replace the hydraulic corrector on all models of domestic cars for which this is provided for by the design of the head optics.
The typical design of an electromechanical corrector consists of gear motors installed on each headlight and a control unit. The corresponding components can be purchased freely. Plus you will need a soldering iron, wires, fasteners, terminals, pads, casing, PVC tube or other insulating material.
It is necessary to select components for the EMKF in such a way that their dimensions correspond to the dimensions of the standard hydraulic corrector installed on your car.